Users Manual - English
Page 1
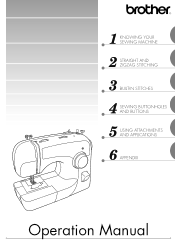
1 KNOWING YOUR SEWING MACHINE 2 STRAIGHT AND ZIGZAG STITCHING 3 BUILT-IN STITCHES 4 SEWING BUTTONHOLES AND BUTTONS 5 USING ATTACHMENTS AND APPLICATIONS 6 APPENDIX Operation Manual
1 KNOWING YOUR SEWING MACHINE 2 STRAIGHT AND ZIGZAG STITCHING 3 BUILT-IN STITCHES 4 SEWING BUTTONHOLES AND BUTTONS 5 USING ATTACHMENTS AND APPLICATIONS 6 APPENDIX Operation Manual
Users Manual - English
Page 2
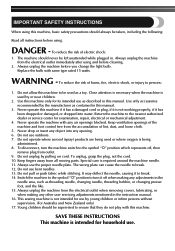
WARNING - To reduce the risk of burns, fire, electric shock, or injury to break. 12. Never operate this machine if it has a damaged cord or plug, if it has been dropped or damaged, or dropped into any opening. 6. Never drop or insert any other user servicing adjustments mentioned in this manual. 3. To disconnect, turn it to break. 14. Special care is not working properly, if it is required around the machine needle. 11. It may deflect the needle, causing it off , then remove plug from outlet. 9. Switch the machine to the symbol "{" position to turn the machine switch to the...
WARNING - To reduce the risk of burns, fire, electric shock, or injury to break. 12. Never operate this machine if it has a damaged cord or plug, if it has been dropped or damaged, or dropped into any opening. 6. Never drop or insert any other user servicing adjustments mentioned in this manual. 3. To disconnect, turn it to break. 14. Special care is not working properly, if it is required around the machine needle. 11. It may deflect the needle, causing it off , then remove plug from outlet. 9. Switch the machine to the symbol "{" position to turn the machine switch to the...

Users Manual - English
Page 3
IMPORTANT If the available socket outlet is not suitable for the plug supplied with this machine is fitted with a three-pin non-rewireable BS plug then please read the following code: Blue Neutral Brown Live As the colours of the wiring in the main lead of replacing the plug fuse, use plugs with the letter 'N' or coloured black or blue. carrying the mark, rating as a plug with bared flexible cords is marked with the fuse cover omitted. The wires in this main lead are coloured in accordance with the letter 'L' or coloured red or brown. 1 In the event of this appliance may...
IMPORTANT If the available socket outlet is not suitable for the plug supplied with this machine is fitted with a three-pin non-rewireable BS plug then please read the following code: Blue Neutral Brown Live As the colours of the wiring in the main lead of replacing the plug fuse, use plugs with the letter 'N' or coloured black or blue. carrying the mark, rating as a plug with bared flexible cords is marked with the fuse cover omitted. The wires in this main lead are coloured in accordance with the letter 'L' or coloured red or brown. 1 In the event of this appliance may...
Users Manual - English
Page 4
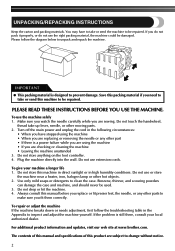
... or other part • If there is a power failure while you are sewing. For additional product information and updates, visit our web site at www.brother.com. You may have stopped using the machine • When you are replacing or removing the needle or any other moving parts. 2. Do not touch...
... or other part • If there is a power failure while you are sewing. For additional product information and updates, visit our web site at www.brother.com. You may have stopped using the machine • When you are replacing or removing the needle or any other moving parts. 2. Do not touch...
Users Manual - English
Page 5
BUILT-IN STITCHES 29 Blind Hem Stitching ...29 Shell Tuck Stitching ...29 Elastic Stitching ...30 Double Action Stitching ...31 Patchworking ...31 Overedge Stitching ...31 Feather Stitching ...32 Triple Zigzag Stretch Stitching ...32 Decorative Stitching ...33 4. SEWING BUTTONHOLES AND BUTTONS 34 Making a Buttonhole ...34 Adjusting Buttonholes ...35 Sewing Buttons ...36 3 CONTENTS 1. STRAIGHT AND ZIGZAG STITCHING 27 Please Read Before Sewing ...27 Straight Stitching ...27 Zigzag Stitching ...28 3. KNOWING YOUR SEWING MACHINE 5 THE MAIN PARTS ...5 ACCESSORIES ...6 Optional Accessories...
BUILT-IN STITCHES 29 Blind Hem Stitching ...29 Shell Tuck Stitching ...29 Elastic Stitching ...30 Double Action Stitching ...31 Patchworking ...31 Overedge Stitching ...31 Feather Stitching ...32 Triple Zigzag Stretch Stitching ...32 Decorative Stitching ...33 4. SEWING BUTTONHOLES AND BUTTONS 34 Making a Buttonhole ...34 Adjusting Buttonholes ...35 Sewing Buttons ...36 3 CONTENTS 1. STRAIGHT AND ZIGZAG STITCHING 27 Please Read Before Sewing ...27 Straight Stitching ...27 Zigzag Stitching ...28 3. KNOWING YOUR SEWING MACHINE 5 THE MAIN PARTS ...5 ACCESSORIES ...6 Optional Accessories...

Users Manual - English
Page 6
APPENDIX ...44 MAINTENANCE ...44 Changing the Light Bulb ...44 Cleaning ...44 Troubleshooting ...46 INDEX ...49 4 5. USING ATTACHMENTS AND APPLICATIONS 37 Zipper Insertion ...37 Gathering ...38 Darning ...38 Appliqués ...39 Monogramming and Embroidering ...39 OPTIONAL ACCESSORIES 41 Using the Walking Foot ...41 Using the Quilting Foot ...42 Using the 1/4-inch Quilting Foot ...43 6.
APPENDIX ...44 MAINTENANCE ...44 Changing the Light Bulb ...44 Cleaning ...44 Troubleshooting ...46 INDEX ...49 4 5. USING ATTACHMENTS AND APPLICATIONS 37 Zipper Insertion ...37 Gathering ...38 Darning ...38 Appliqués ...39 Monogramming and Embroidering ...39 OPTIONAL ACCESSORIES 41 Using the Walking Foot ...41 Using the Quilting Foot ...42 Using the 1/4-inch Quilting Foot ...43 6.
Users Manual - English
Page 7
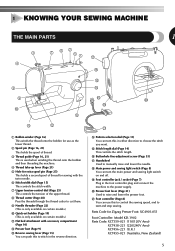
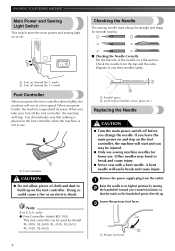
H Main power and sewing light switch (Page 8) You can turn this in either direction to choose the stitch you want. Parts Code for sewing with the twin needle. 6 Stitch width dial (Page 15) This controls the stitch width. 7 Upper tension-control dial (Page 25) This controls the tension of thread for Zigzag Presser Foot: XC4901-051 Foot Controller: Model KD-1902 Parts Code: XC7359-021 (110/120V Area) XC7438-221 (220/240V Area) XC7456-221 (U.K.) XC7455-021 (Australia, New Zealand) 5 F Buttonhole fine-adjustment screw (Page 35) G Handwheel Used to raise and lower the presser foot. K...
H Main power and sewing light switch (Page 8) You can turn this in either direction to choose the stitch you want. Parts Code for sewing with the twin needle. 6 Stitch width dial (Page 15) This controls the stitch width. 7 Upper tension-control dial (Page 25) This controls the tension of thread for Zigzag Presser Foot: XC4901-051 Foot Controller: Model KD-1902 Parts Code: XC7359-021 (110/120V Area) XC7438-221 (220/240V Area) XC7456-221 (U.K.) XC7455-021 (Australia, New Zealand) 5 F Buttonhole fine-adjustment screw (Page 35) G Handwheel Used to raise and lower the presser foot. K...
Users Manual - English
Page 8
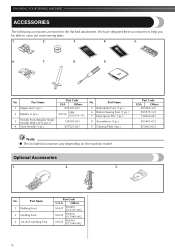
Part Name 1 Zipper foot (1 pc.) 2 Bobbin (3 pcs.) 3 Needle Pack (Regular Single Needle HAX130 (3 pcs.)) 4 Twin Needle (1 pc.) Part Code USA Others X59370-021 SA156 SFB: XA5539-151 129583-021 X57521-021 No. Part Name 1 Walking Foot 2 Quilting Foot 3 1/4-inch Quilting Foot Part Code U.S.A. We have designed these accessories to help you be able to carry out most sewing tasks. 1. 2. 3. 4. 5. 6. 7. 8. 9. Part Name 5 Buttonhole Foot (1 pc.) 6 Button Sewing Foot (1 pc.) 7 Extra Spool Pin (1 pc.) 8 Screwdriver (1 pc.) 9 Darning Plate (1pc.) Part Code ...
Part Name 1 Zipper foot (1 pc.) 2 Bobbin (3 pcs.) 3 Needle Pack (Regular Single Needle HAX130 (3 pcs.)) 4 Twin Needle (1 pc.) Part Code USA Others X59370-021 SA156 SFB: XA5539-151 129583-021 X57521-021 No. Part Name 1 Walking Foot 2 Quilting Foot 3 1/4-inch Quilting Foot Part Code U.S.A. We have designed these accessories to help you be able to carry out most sewing tasks. 1. 2. 3. 4. 5. 6. 7. 8. 9. Part Name 5 Buttonhole Foot (1 pc.) 6 Button Sewing Foot (1 pc.) 7 Extra Spool Pin (1 pc.) 8 Screwdriver (1 pc.) 9 Darning Plate (1pc.) Part Code ...
Users Manual - English
Page 9
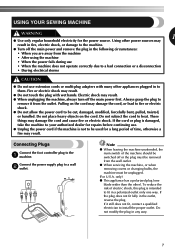
Electric shock may result. ● When unplugging the machine, always turn off the main power and remove the plug in the following circumstances: • When you are away from the wall outlet. ● When servicing the machine, or when removing covers or changing bulbs, the machine must be used for the power source. If the cord or plug is damaged, take the machine to your authorized dealer for repairs before continuing use extension cords or multi-plug adapters with wet hands. Connect the power supply plug to the 1 machine. Note ● When leaving the machine unattended...
Electric shock may result. ● When unplugging the machine, always turn off the main power and remove the plug in the following circumstances: • When you are away from the wall outlet. ● When servicing the machine, or when removing covers or changing bulbs, the machine must be used for the power source. If the cord or plug is damaged, take the machine to your authorized dealer for repairs before continuing use extension cords or multi-plug adapters with wet hands. Connect the power supply plug to the 1 machine. Note ● When leaving the machine unattended...
Users Manual - English
Page 10
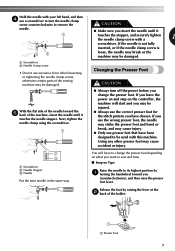
.... ● Never sew with a bent needle. only) ● Foot Controller: Model KD-1902 This foot controller can be straight and sharp for Model XL-3500, XL-2600, XL-3510, XL-2610, XL-3520, XL-2620. 8 1 2 1 Parallel space 2 Level surface (bobbin cover, glass, etc.) Replacing the Needle CAUTION ● Turn the main power switch off before you take...
.... ● Never sew with a bent needle. only) ● Foot Controller: Model KD-1902 This foot controller can be straight and sharp for Model XL-3500, XL-2600, XL-3510, XL-2610, XL-3520, XL-2620. 8 1 2 1 Parallel space 2 Level surface (bobbin cover, glass, etc.) Replacing the Needle CAUTION ● Turn the main power switch off before you take...
Users Manual - English
Page 11
If you leave the power on and step on Type Raise the needle to its highest position by raising the lever at the 2 back of the sewing machine may be damaged. If the needle is not fully inserted, or if the needle clamp screw is 2 loose, the needle may break or the machine may be damaged. 1 Screwdriver 2 Needle clamp screw • Do not use excessive force when loosening or tightening the needle clamp screw, otherwise certain parts of the holder. 1 1 Presser Foot 9 Hold the needle with your left hand, and then 4 use a screwdriver to turn off the power before you insert ...
If you leave the power on and step on Type Raise the needle to its highest position by raising the lever at the 2 back of the sewing machine may be damaged. If the needle is not fully inserted, or if the needle clamp screw is 2 loose, the needle may break or the machine may be damaged. 1 Screwdriver 2 Needle clamp screw • Do not use excessive force when loosening or tightening the needle clamp screw, otherwise certain parts of the holder. 1 1 Presser Foot 9 Hold the needle with your left hand, and then 4 use a screwdriver to turn off the power before you insert ...
Users Manual - English
Page 12
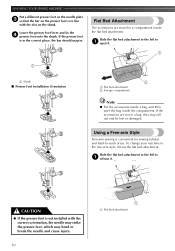
Slide the flat bed attachment to the left to 1 open it . Slide the flat bed attachment to the left to 1 release it . 1 1 1 Shank ■ Presser Foot Installation Orientation 2 1 Flat bed attachment 2 Storage compartment Note ● Put the accessories inside a bag, and then store the bag inside the flat bed attachment. KNOWING YOUR SEWING MACHINE Put a different presser foot on the needle plate 3 so that the bar on the shank. Lower the presser foot lever and fix the 4 presser foot onto the shank. If the accessories are stored in . Using a Free-arm Style Free-arm sewing is ...
Slide the flat bed attachment to the left to 1 open it . Slide the flat bed attachment to the left to 1 release it . 1 1 1 Shank ■ Presser Foot Installation Orientation 2 1 Flat bed attachment 2 Storage compartment Note ● Put the accessories inside a bag, and then store the bag inside the flat bed attachment. KNOWING YOUR SEWING MACHINE Put a different presser foot on the needle plate 3 so that the bar on the shank. Lower the presser foot lever and fix the 4 presser foot onto the shank. If the accessories are stored in . Using a Free-arm Style Free-arm sewing is ...

Users Manual - English
Page 13
To choose a stitch, simply turn the pattern selection dial, the needle, presser foot or fabric may be damaged. If the needle is in the down position when you (counterclockwise) to set the needle in either direction. The next section shows 1 recommended stitch lengths and widths. 2 ■ 35 Stitches (only available on certain models) 1 1 Pattern selection dial 2 Chosen pattern number ■ 25 Stitches 11 THE CONTROLS Pattern Selection Dial CAUTION ● When you use the pattern selection dial to choose a pattern, turn the handwheel toward you turn the pattern selection ...
To choose a stitch, simply turn the pattern selection dial, the needle, presser foot or fabric may be damaged. If the needle is in the down position when you (counterclockwise) to set the needle in either direction. The next section shows 1 recommended stitch lengths and widths. 2 ■ 35 Stitches (only available on certain models) 1 1 Pattern selection dial 2 Chosen pattern number ■ 25 Stitches 11 THE CONTROLS Pattern Selection Dial CAUTION ● When you use the pattern selection dial to choose a pattern, turn the handwheel toward you turn the pattern selection ...
Users Manual - English
Page 14
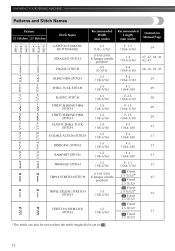
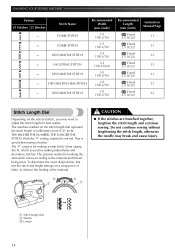
KNOWING YOUR SEWING MACHINE Patterns and Stitch Names Pattern 35 Stitches 25 Stitches Stitch Name Recommended Width (mm (inch)) Recommended Length (mm (inch)) Instruction Manual Page 4-STEP AUTOMATIC BUTTONHOLE STRAIGHT STITCH ZIGZAG STITCH BLIND HEM STITCH SHELL TUCK STITCH ELASTIC STITCH STRETCH BLIND HEM STITCH STRETCH BLIND HEM STITCH ELASTIC SHELL TUCK STITCH DOUBLE ACTION STITCH BRIDGING STITCH RAMPART STITCH TRIANGLE STITCH 3-5 (1/8 - 3/16) 0-5 (0-3/16) (Changes needle position) 0-5 (0-3/16) 3-5 (1/8-3/16) 3-5 (1/8-3/16) 3-5 (1/8-3/16) 3-5 (1/8-3/16) 3-5 (1/8-3/16) 3-5 (1/8-3/...
KNOWING YOUR SEWING MACHINE Patterns and Stitch Names Pattern 35 Stitches 25 Stitches Stitch Name Recommended Width (mm (inch)) Recommended Length (mm (inch)) Instruction Manual Page 4-STEP AUTOMATIC BUTTONHOLE STRAIGHT STITCH ZIGZAG STITCH BLIND HEM STITCH SHELL TUCK STITCH ELASTIC STITCH STRETCH BLIND HEM STITCH STRETCH BLIND HEM STITCH ELASTIC SHELL TUCK STITCH DOUBLE ACTION STITCH BRIDGING STITCH RAMPART STITCH TRIANGLE STITCH 3-5 (1/8 - 3/16) 0-5 (0-3/16) (Changes needle position) 0-5 (0-3/16) 3-5 (1/8-3/16) 3-5 (1/8-3/16) 3-5 (1/8-3/16) 3-5 (1/8-3/16) 3-5 (1/8-3/16) 3-5 (1/8-3/...

Users Manual - English
Page 15
Pattern 35 Stitches 25 Stitches Stitch Name Recommended Width (mm (inch)) Recommended Length (mm (inch)) Instruction Manual Page Fixed ELASTIC OVERLOCK STITCH 3-5 (1/8-3/16) 2.5 (3/32) Fixed 31 1 2.5 (3/32) Fixed FEATHER STITCH 3-5 (1/8-3/16) 2.5 (3/32) Fixed 32 2.5 (3/32) Fixed ARROWHEAD STITCH 3-5 (1/8-3/16) 2.5 (3/32) Fixed 31 2.5 (3/32) Fixed ARROWHEAD STITCH 3-5 (1/8-3/16) 2.5 (3/32) Fixed 31 2.5 (3/32) Fixed DECORATIVE STITCH 3-5 (1/8-3/16) 2.5 (3/32) Fixed 33 2.5 (3/32) LEAF STITCH Fixed 3-5 (1/8-3/16) 2.5 (3/32) Fixed 33 2.5 (3/32) TREE STITCH...
Pattern 35 Stitches 25 Stitches Stitch Name Recommended Width (mm (inch)) Recommended Length (mm (inch)) Instruction Manual Page Fixed ELASTIC OVERLOCK STITCH 3-5 (1/8-3/16) 2.5 (3/32) Fixed 31 1 2.5 (3/32) Fixed FEATHER STITCH 3-5 (1/8-3/16) 2.5 (3/32) Fixed 32 2.5 (3/32) Fixed ARROWHEAD STITCH 3-5 (1/8-3/16) 2.5 (3/32) Fixed 31 2.5 (3/32) Fixed ARROWHEAD STITCH 3-5 (1/8-3/16) 2.5 (3/32) Fixed 31 2.5 (3/32) Fixed DECORATIVE STITCH 3-5 (1/8-3/16) 2.5 (3/32) Fixed 33 2.5 (3/32) LEAF STITCH Fixed 3-5 (1/8-3/16) 2.5 (3/32) Fixed 33 2.5 (3/32) TREE STITCH...
Users Manual - English
Page 16
To determine the exact dial position, first test the stitch and length settings on a scrap piece of fabric to the material and thread being used when sewing a button. This is not fed. Do not continue sewing without lengthening the stitch length, otherwise the needle may need to adjust the stitch length for best results. With the "0" setting, material is used . The position needed for making the satin stitch varies according to observe the feeding of the material. 2 1 3 1 CAUTION ● If the stitches are bunched together, lengthen the stitch length and continue sewing. THE ...
To determine the exact dial position, first test the stitch and length settings on a scrap piece of fabric to the material and thread being used when sewing a button. This is not fed. Do not continue sewing without lengthening the stitch length, otherwise the needle may need to adjust the stitch length for best results. With the "0" setting, material is used . The position needed for making the satin stitch varies according to observe the feeding of the material. 2 1 3 1 CAUTION ● If the stitches are bunched together, lengthen the stitch length and continue sewing. THE ...
Users Manual - English
Page 17
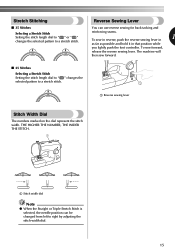
Stretch Stitching ■ 35 Stitches Selecting a Stretch Stitch Setting the stitch length dial to " " or " " changes the selected pattern to a stretch stitch. 1 1 Reverse sewing lever Stitch Width Dial The numbers marked on the dial represent the stitch width. To sew forward, release the reverse sewing lever. The machine will then sew forward. ■ 25 Stitches Selecting a Stretch Stitch Setting the stitch length dial to " " changes the selected pattern to a stretch stitch. THE HIGHER THE NUMBER, THE WIDER THE STITCH. 1 1 Stitch width dial Note ● When the Straight or ...
Stretch Stitching ■ 35 Stitches Selecting a Stretch Stitch Setting the stitch length dial to " " or " " changes the selected pattern to a stretch stitch. 1 1 Reverse sewing lever Stitch Width Dial The numbers marked on the dial represent the stitch width. To sew forward, release the reverse sewing lever. The machine will then sew forward. ■ 25 Stitches Selecting a Stretch Stitch Setting the stitch length dial to " " changes the selected pattern to a stretch stitch. THE HIGHER THE NUMBER, THE WIDER THE STITCH. 1 1 Stitch width dial Note ● When the Straight or ...
Users Manual - English
Page 18
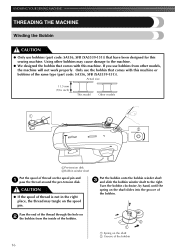
Actual size 11.5 mm (7/16 inch) This model Other models 1 2 1Pre-tension disk 2Bobbin winder shaft Put the spool of the bobbin 16 Pass the end of the thread through the hole on 2 the bobbin from other bobbins may tangle on the spool pin and 1 pass the thread around the pre-tension disk. KNOWING YOUR SEWING MACHINE THREADING THE MACHINE Winding the Bobbin CAUTION ● Only use bobbins (part code: SA156, SFB (XA5539-151)) that comes with this machine. Only use bobbins from the inside of the bobbin. 2 1 1 Spring on the shaft 2 Groove of thread on the spool pin. Turn the...
Actual size 11.5 mm (7/16 inch) This model Other models 1 2 1Pre-tension disk 2Bobbin winder shaft Put the spool of the bobbin 16 Pass the end of the thread through the hole on 2 the bobbin from other bobbins may tangle on the spool pin and 1 pass the thread around the pre-tension disk. KNOWING YOUR SEWING MACHINE THREADING THE MACHINE Winding the Bobbin CAUTION ● Only use bobbins (part code: SA156, SFB (XA5539-151)) that comes with this machine. Only use bobbins from the inside of the bobbin. 2 1 1 Spring on the shaft 2 Groove of thread on the spool pin. Turn the...
Users Manual - English
Page 19
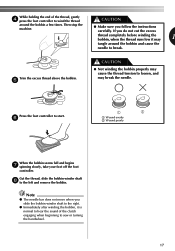
Press the foot controller to break. If you do not cut the excess thread completely before winding the bobbin, when the thread runs low it is normal to hear the sound of the thread, gently 4 press the foot controller to loosen, and may break the needle. Trim the excess thread above the bobbin. 5 CAUTION ● Not winding the bobbin properly may 1 tangle around the bobbin a few times. While holding the end of the clutch engaging when beginning to the left and remove the bobbin. Then stop the machine. ● Make sure you slide the bobbin winder shaft to the right. ● ...
Press the foot controller to break. If you do not cut the excess thread completely before winding the bobbin, when the thread runs low it is normal to hear the sound of the thread, gently 4 press the foot controller to loosen, and may break the needle. Trim the excess thread above the bobbin. 5 CAUTION ● Not winding the bobbin properly may 1 tangle around the bobbin a few times. While holding the end of the clutch engaging when beginning to the left and remove the bobbin. Then stop the machine. ● Make sure you slide the bobbin winder shaft to the right. ● ...
Users Manual - English
Page 20
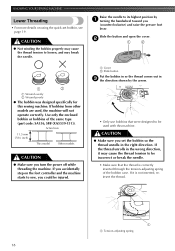
Actual size 11.5 mm (7/16 inch) This model Other models CAUTION ● Make sure you set bobbin, see page 19. CAUTION ● Make sure you turn the power off while threading the machine. If the thread unrolls in the wrong direction, it is correctly inserted through the tension-adjusting spring of the same type (part code: SA156, SFB (XA5539-151)). Raise the needle to be incorrect or break the needle. • Make sure that were designed to loosen, and may cause the thread tension to be injured. 1 Cover 2 Slide button Put the bobbin in so the thread comes out in the ...
Actual size 11.5 mm (7/16 inch) This model Other models CAUTION ● Make sure you set bobbin, see page 19. CAUTION ● Make sure you turn the power off while threading the machine. If the thread unrolls in the wrong direction, it is correctly inserted through the tension-adjusting spring of the same type (part code: SA156, SFB (XA5539-151)). Raise the needle to be incorrect or break the needle. • Make sure that were designed to loosen, and may cause the thread tension to be injured. 1 Cover 2 Slide button Put the bobbin in so the thread comes out in the ...
