Users Manual - English
Page 2
... the machine to break. 12. IMPORTANT SAFETY INSTRUCTIONS When using this machine, basic safety precautions should always be taken, including the following: Read all moving parts.
... the machine to break. 12. IMPORTANT SAFETY INSTRUCTIONS When using this machine, basic safety precautions should always be taken, including the following: Read all moving parts.
Users Manual - English
Page 4
..., needle, or other hot objects. 2. Save this manual before you replace or fit presser feet, the needle, or any other parts to prevent damage. To give your local authorized dealer. Always consult this packing material if you do not pack it properly, or ...do not use or store the machine near a heater, iron, halogen lamp or other moving parts. 2. You may have stopped using the machine • When you are replacing or removing the needle or any other..., and should never be damaged. For additional product information and updates, visit our web site at www.brother.com.
..., needle, or other hot objects. 2. Save this manual before you replace or fit presser feet, the needle, or any other parts to prevent damage. To give your local authorized dealer. Always consult this packing material if you do not pack it properly, or ...do not use or store the machine near a heater, iron, halogen lamp or other moving parts. 2. You may have stopped using the machine • When you are replacing or removing the needle or any other..., and should never be damaged. For additional product information and updates, visit our web site at www.brother.com.
Users Manual - English
Page 5
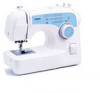
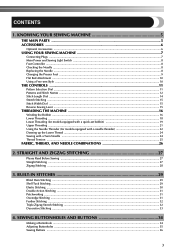
... Stitching ...32 Decorative Stitching ...33 4. SEWING BUTTONHOLES AND BUTTONS 34 Making a Buttonhole ...34 Adjusting Buttonholes ...35 Sewing Buttons ...36 3 KNOWING YOUR SEWING MACHINE 5 THE MAIN PARTS ...5 ACCESSORIES ...6 Optional Accessories ...6 USING YOUR SEWING MACHINE 7 Connecting Plugs ...7 Main Power and Sewing Light Switch ...8 Foot Controller ...8 Checking the Needle ...8 Replacing the Needle ...8 Changing the...
... Stitching ...32 Decorative Stitching ...33 4. SEWING BUTTONHOLES AND BUTTONS 34 Making a Buttonhole ...34 Adjusting Buttonholes ...35 Sewing Buttons ...36 3 KNOWING YOUR SEWING MACHINE 5 THE MAIN PARTS ...5 ACCESSORIES ...6 Optional Accessories ...6 USING YOUR SEWING MACHINE 7 Connecting Plugs ...7 Main Power and Sewing Light Switch ...8 Foot Controller ...8 Checking the Needle ...8 Replacing the Needle ...8 Changing the...
Users Manual - English
Page 7
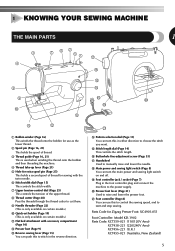
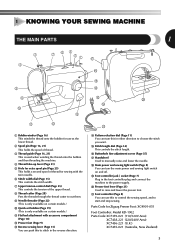
... to choose the stitch you want. J Presser foot lever (Page 21) Used to manually raise and lower the needle. 1 KNOWING YOUR SEWING MACHINE THE MAIN PARTS 1 3 4 7 62 51 G F 8 9 0 C A B 1 Bobbin winder (Page 16) This winds the thread onto the bobbin for use this to ... the stitch length. I K D Pattern selection dial (Page 11) You can push this to stitch in the reverse direction. Parts Code for Zigzag Presser Foot: XC4901-051 Foot Controller: Model KD-1902 Parts Code: XC7359-021 (110/120V Area) XC7438-221 (220/240V Area) XC7456-221 (U.K.) XC7455-021 (Australia, New Zealand)...
... to choose the stitch you want. J Presser foot lever (Page 21) Used to manually raise and lower the needle. 1 KNOWING YOUR SEWING MACHINE THE MAIN PARTS 1 3 4 7 62 51 G F 8 9 0 C A B 1 Bobbin winder (Page 16) This winds the thread onto the bobbin for use this to ... the stitch length. I K D Pattern selection dial (Page 11) You can push this to stitch in the reverse direction. Parts Code for Zigzag Presser Foot: XC4901-051 Foot Controller: Model KD-1902 Parts Code: XC7359-021 (110/120V Area) XC7438-221 (220/240V Area) XC7456-221 (U.K.) XC7455-021 (Australia, New Zealand)...
Users Manual - English
Page 8
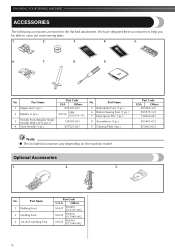
...in the flat bed attachment. No. No. Others SA107 F034N: XC2165-002 SA129 F005N: XC1948-002 SA125 F001N: XC1944-002 6 Part Name 1 Walking Foot 2 Quilting Foot 3 1/4-inch Quilting Foot Part Code U.S.A. Part Name 5 Buttonhole Foot (1 pc.) 6 Button Sewing Foot (1 pc.) 7 Extra Spool Pin (1 pc.) 8 Screwdriver (1 pc.)... 1. 2. 3. We have designed these accessories to help you be able to carry out most sewing tasks. 1. 2. 3. 4. 5. 6. 7. 8. 9. Part Name 1 Zipper foot (1 pc.) 2 Bobbin (3 pcs.) 3 Needle Pack (Regular Single Needle HAX130 (3 pcs.)) 4 Twin Needle (1 pc...
...in the flat bed attachment. No. No. Others SA107 F034N: XC2165-002 SA129 F005N: XC1948-002 SA125 F001N: XC1944-002 6 Part Name 1 Walking Foot 2 Quilting Foot 3 1/4-inch Quilting Foot Part Code U.S.A. Part Name 5 Buttonhole Foot (1 pc.) 6 Button Sewing Foot (1 pc.) 7 Extra Spool Pin (1 pc.) 8 Screwdriver (1 pc.)... 1. 2. 3. We have designed these accessories to help you be able to carry out most sewing tasks. 1. 2. 3. 4. 5. 6. 7. 8. 9. Part Name 1 Zipper foot (1 pc.) 2 Bobbin (3 pcs.) 3 Needle Pack (Regular Single Needle HAX130 (3 pcs.)) 4 Twin Needle (1 pc...
Users Manual - English
Page 11
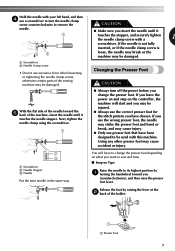
... presser foot and bend or break, and may cause injury. ● Only use excessive force when loosening or tightening the needle clamp screw, otherwise certain parts of the sewing machine may cause accident or injury. 2 3 1 Screwdriver 2 Needle Stopper 3 Needle Put the twin needle in the same way. Release the foot by...
... presser foot and bend or break, and may cause injury. ● Only use excessive force when loosening or tightening the needle clamp screw, otherwise certain parts of the sewing machine may cause accident or injury. 2 3 1 Screwdriver 2 Needle Stopper 3 Needle Put the twin needle in the same way. Release the foot by...
Users Manual - English
Page 18
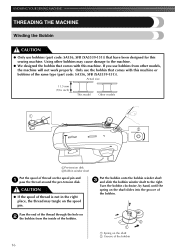
... 2 1 1 Spring on the shaft 2 Groove of thread is not in the right place, the thread may cause damage to the right. If you use bobbins (part code: SA156, SFB (XA5539-151)) that have been designed for this machine. CAUTION ● If the spool of the bobbin 16 Put the bobbin onto...; We designed the bobbin that comes with this sewing machine. Only use the bobbin that comes with this machine or bobbins of the same type (part code: SA156, SFB (XA5539-151)). Actual size 11.5 mm (7/16 inch) This model Other models 1 2 1Pre-tension disk 2Bobbin winder shaft Put the spool ...
... 2 1 1 Spring on the shaft 2 Groove of thread is not in the right place, the thread may cause damage to the right. If you use bobbins (part code: SA156, SFB (XA5539-151)) that have been designed for this machine. CAUTION ● If the spool of the bobbin 16 Put the bobbin onto...; We designed the bobbin that comes with this sewing machine. Only use the bobbin that comes with this machine or bobbins of the same type (part code: SA156, SFB (XA5539-151)). Actual size 11.5 mm (7/16 inch) This model Other models 1 2 1Pre-tension disk 2Bobbin winder shaft Put the spool ...
Users Manual - English
Page 20
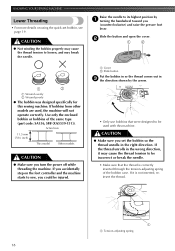
... specifically for this machine. If the thread unrolls in the wrong direction, it is correctly inserted through the tension-adjusting spring of the same type (part code: SA156, SFB (XA5539-151)). If bobbins from other models are used with this sewing machine. KNOWING YOUR SEWING MACHINE Lower Threading • For more...
... specifically for this machine. If the thread unrolls in the wrong direction, it is correctly inserted through the tension-adjusting spring of the same type (part code: SA156, SFB (XA5539-151)). If bobbins from other models are used with this sewing machine. KNOWING YOUR SEWING MACHINE Lower Threading • For more...
Users Manual - English
Page 21
... the bobbin improperly may cause the thread tension to loosen, breaking the needle and resulting in injury. Put the left side of the same type (part code: SA156, SFB (XA5539-151)). Use only the enclosed bobbin or bobbins of the cover (as shown. If you accidentally step on the right side...
... the bobbin improperly may cause the thread tension to loosen, breaking the needle and resulting in injury. Put the left side of the same type (part code: SA156, SFB (XA5539-151)). Use only the enclosed bobbin or bobbins of the cover (as shown. If you accidentally step on the right side...
Users Manual - English
Page 26
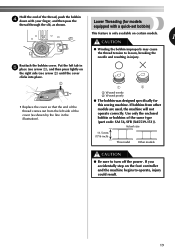
... set Bobbin Threading This is only available on the upper thread to lower and then raise the needle. ■ Quick-set above 3 since this machine (part code: X57521-021). Replace the bobbin cover. 3 Sewing with bent needles. You can draw up the lower thread by hand to draw up the lower...
... set Bobbin Threading This is only available on the upper thread to lower and then raise the needle. ■ Quick-set above 3 since this machine (part code: X57521-021). Replace the bobbin cover. 3 Sewing with bent needles. You can draw up the lower thread by hand to draw up the lower...
Users Manual - English
Page 29
... to choose the 1 stitch number you may be injured. 27 Put the fabric under the presser foot and 4 position the needle 1 cm (3/8 inch) from moving parts. ● Do not stretch or pull the fabric during sewing, otherwise the needle may be damaged and 2 you may be injured. ● Do not use...
... to choose the 1 stitch number you may be injured. 27 Put the fabric under the presser foot and 4 position the needle 1 cm (3/8 inch) from moving parts. ● Do not stretch or pull the fabric during sewing, otherwise the needle may be damaged and 2 you may be injured. ● Do not use...
Users Manual - English
Page 42
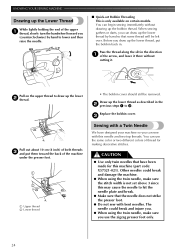
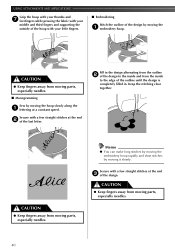
CAUTION ● Keep fingers away from moving parts, especially needles. CAUTION ● Keep fingers away from moving parts, especially needles. ■ Monogramming Sew by moving it slowly. USING ATTACHMENTS AND APPLICATIONS Grip the hoop with your thumbs and 7 forefingers while ...the outline of the design by moving the 1 embroidery hoop. CAUTION ● Keep fingers away from the inside to the inside and from moving parts, especially needles. 40 Secure with your middle and third fingers and supporting the outside of the last letter. Memo ● You can make long...
CAUTION ● Keep fingers away from moving parts, especially needles. CAUTION ● Keep fingers away from moving parts, especially needles. ■ Monogramming Sew by moving it slowly. USING ATTACHMENTS AND APPLICATIONS Grip the hoop with your thumbs and 7 forefingers while ...the outline of the design by moving the 1 embroidery hoop. CAUTION ● Keep fingers away from the inside to the inside and from moving parts, especially needles. 40 Secure with your middle and third fingers and supporting the outside of the last letter. Memo ● You can make long...
Users Manual - English
Page 43
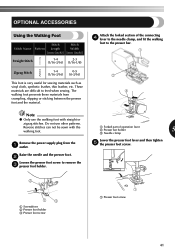
Raise the needle and the presser foot. 2 Loosen the presser foot screw to remove the 3 presser foot holder. 1 Forked part of the connecting 4 lever to the needle clamp, and fit the walking foot to feed when sewing. Reverse stitches can not be sewn with straight ...
Raise the needle and the presser foot. 2 Loosen the presser foot screw to remove the 3 presser foot holder. 1 Forked part of the connecting 4 lever to the needle clamp, and fit the walking foot to feed when sewing. Reverse stitches can not be sewn with straight ...
Users Manual - English
Page 44
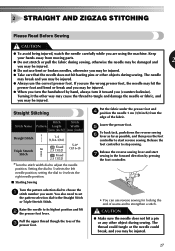
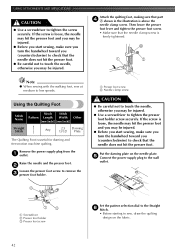
... (inch)] [mm (inch)] Straight Stitch Any 2.5 Darning (3/32) Plate The Quilting Foot is above the needle clamp screw. Attach the quilting foot, making sure that part 4 A shown in the illustration is useful for darning and free-motion machine quilting. If the screw is loose, the needle may hit the presser foot...
... (inch)] [mm (inch)] Straight Stitch Any 2.5 Darning (3/32) Plate The Quilting Foot is above the needle clamp screw. Attach the quilting foot, making sure that part 4 A shown in the illustration is useful for darning and free-motion machine quilting. If the screw is loose, the needle may hit the presser foot...
Users Manual - English
Page 47
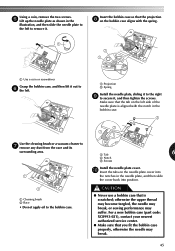
... may break. 45 CAUTION ● Never use a bobbin case that you fit the bobbin case properly, otherwise the needle may suffer. For a new bobbin case (part code: XC8993-021), contact your nearest authorized service center. ● Make sure that is aligned with the notch in the bobbin case. 3 Use the cleaning...
... may break. 45 CAUTION ● Never use a bobbin case that you fit the bobbin case properly, otherwise the needle may suffer. For a new bobbin case (part code: XC8993-021), contact your nearest authorized service center. ● Make sure that is aligned with the notch in the bobbin case. 3 Use the cleaning...

Users Manual - English
Page 51
... Foot controller 8 Free-arm style 10 G Gathering 38 H Handwheel 21 L Light bulb changing 44 Light switch 8 Lower threading 18 , quick-set bobbin 19 24 M Main parts 5 Main power 8 Maintenance 44 Monogramming 39 N Needle checking 8 combinations with fabric and thread 26 replacing 8 Needle threader 22 O Overedge stitching 31 P Patchworking 31 Pattern selection...
... Foot controller 8 Free-arm style 10 G Gathering 38 H Handwheel 21 L Light bulb changing 44 Light switch 8 Lower threading 18 , quick-set bobbin 19 24 M Main parts 5 Main power 8 Maintenance 44 Monogramming 39 N Needle checking 8 combinations with fabric and thread 26 replacing 8 Needle threader 22 O Overedge stitching 31 P Patchworking 31 Pattern selection...
Owner's Manual (Español) - Spanish
Page 2
... use the proper needle plate. IMPORTANT SAFETY INSTRUCTIONS When using this machine, basic safety precautions should always be taken, including the following: Read all moving parts. To reduce the risk of lint, dust, and loose cloth. 5. Always unplug the machine before using and before cleaning. 2. Return the machine to break. 14...
... use the proper needle plate. IMPORTANT SAFETY INSTRUCTIONS When using this machine, basic safety precautions should always be taken, including the following: Read all moving parts. To reduce the risk of lint, dust, and loose cloth. 5. Always unplug the machine before using and before cleaning. 2. Return the machine to break. 14...
Owner's Manual (Español) - Spanish
Page 4
.... 2. Do not store this manual before you replace or fit presser feet, the needle, or any other moving parts. 2. Do not drop or hit the machine. 4. If the problem is still there, consult your machine a ...fit them correctly. Save this packing material if you have to take -up lever, needle, or other part • If there is designed to make sure you are sewing. PLEASE READ THESE INSTRUCTIONS BEFORE YOU USE... product information and updates, visit our web site at www.brother.com. The contents of this manual and specifications of this machine to unpack and repack the machine.
.... 2. Do not store this manual before you replace or fit presser feet, the needle, or any other moving parts. 2. Do not drop or hit the machine. 4. If the problem is still there, consult your machine a ...fit them correctly. Save this packing material if you have to take -up lever, needle, or other part • If there is designed to make sure you are sewing. PLEASE READ THESE INSTRUCTIONS BEFORE YOU USE... product information and updates, visit our web site at www.brother.com. The contents of this manual and specifications of this machine to unpack and repack the machine.
Owner's Manual (Español) - Spanish
Page 5
... Stitching ...27 Zigzag Stitching ...28 3. SEWING BUTTONHOLES AND BUTTONS 34 Making a Buttonhole ...34 Adjusting Buttonholes ...35 Sewing Buttons ...36 3 KNOWING YOUR SEWING MACHINE 5 THE MAIN PARTS ...5 ACCESSORIES ...6 Optional Accessories ...6 USING YOUR SEWING MACHINE 7 Connecting Plugs ...7 Main Power and Sewing Light Switch ...8 Foot Controller ...8 Checking the Needle ...8 Replacing the Needle ...8 Changing the...
... Stitching ...27 Zigzag Stitching ...28 3. SEWING BUTTONHOLES AND BUTTONS 34 Making a Buttonhole ...34 Adjusting Buttonholes ...35 Sewing Buttons ...36 3 KNOWING YOUR SEWING MACHINE 5 THE MAIN PARTS ...5 ACCESSORIES ...6 Optional Accessories ...6 USING YOUR SEWING MACHINE 7 Connecting Plugs ...7 Main Power and Sewing Light Switch ...8 Foot Controller ...8 Checking the Needle ...8 Replacing the Needle ...8 Changing the...
Owner's Manual (Español) - Spanish
Page 7
...stitch length. I K D Pattern selection dial (Page 11) You can push this to stitch in the reverse direction. Parts Code for Zigzag Presser Foot: XC4901-051 Foot Controller: Model KD-1902 Parts Code: XC7359-021 (110/120V Area) XC7438-221 (220/240V Area) XC7456-221 (U.K.) XC7455-021 (Australia, New Zealand...) 5 1 KNOWING YOUR SEWING MACHINE THE MAIN PARTS 1 3 4 7 62 51 G F 8 9 0 C A B 1 Bobbin winder (Page 16) This winds the thread onto the bobbin for use this in the foot ...
...stitch length. I K D Pattern selection dial (Page 11) You can push this to stitch in the reverse direction. Parts Code for Zigzag Presser Foot: XC4901-051 Foot Controller: Model KD-1902 Parts Code: XC7359-021 (110/120V Area) XC7438-221 (220/240V Area) XC7456-221 (U.K.) XC7455-021 (Australia, New Zealand...) 5 1 KNOWING YOUR SEWING MACHINE THE MAIN PARTS 1 3 4 7 62 51 G F 8 9 0 C A B 1 Bobbin winder (Page 16) This winds the thread onto the bobbin for use this in the foot ...

