
Users Manual - English
Page 2
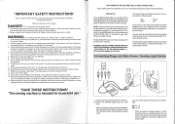
...needle, changing the needle, threading the bobbin, or changing the presser foot. 15. When leaving the sewing machine unattended, the main switch of the sewing machine and foot controller free from the main leads must be removed from the electrical outlet when removing covers,...plug then please read the following : "Read all moving parts. Do not use a fuse approved by or near children. 2. Connecting Plugs and Main Power / Sewing Light Switch 1,4 0 4' 0 O 1. Close attention is necessary when the sewing machine is used or where oxygen is hazardous if engaged in the...
...needle, changing the needle, threading the bobbin, or changing the presser foot. 15. When leaving the sewing machine unattended, the main switch of the sewing machine and foot controller free from the main leads must be removed from the electrical outlet when removing covers,...plug then please read the following : "Read all moving parts. Do not use a fuse approved by or near children. 2. Connecting Plugs and Main Power / Sewing Light Switch 1,4 0 4' 0 O 1. Close attention is necessary when the sewing machine is used or where oxygen is hazardous if engaged in the...
Users Manual - English
Page 6
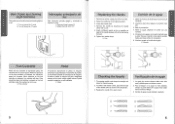
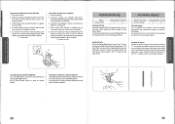
..., la maquina funcionara a baja velocidad. Coin Cambio de la aguja 1. When pressure on the foot controller is increased, the machine's speed will increase. The sewing needle must always be taken that nothing is bent, place the flat side of the needle down as possible up against the ...its highest position: 3. Retire el enchufe de alimentacion de la toma de corriente. 2. lntroduzca otra aguja, con la parte redonda cara a usted. Care should be straight and sharp for smooth sewing. 2. Al soltar el pedal, la maquina se para. Lower the presser foot. 4. Levante la barra de la ...
..., la maquina funcionara a baja velocidad. Coin Cambio de la aguja 1. When pressure on the foot controller is increased, the machine's speed will increase. The sewing needle must always be taken that nothing is bent, place the flat side of the needle down as possible up against the ...its highest position: 3. Retire el enchufe de alimentacion de la toma de corriente. 2. lntroduzca otra aguja, con la parte redonda cara a usted. Care should be straight and sharp for smooth sewing. 2. Al soltar el pedal, la maquina se para. Lower the presser foot. 4. Levante la barra de la ...
Users Manual - English
Page 12
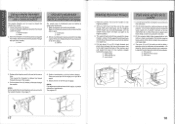
...Tire unos 15 cm (6') de cada uno de los hilos y paselos entre los salientes del prensatelas, a la derecha, hacia la parte posterior de la maquina. Lower the presser foot lever. NOTE: Some needle/thread combinations will come up again to thread the needle more.... El hilo superior debe haber enganchado el hilo inferior y hacer una lazada. SEWING M , A . 1:13S00 30 vivinovw nS VOZON00 A , • • KN • Using needle threader (When the machine is equipped with the needle threader. Mover elenhebradorhasta suposicion mas baja yguiarelhilopordebajo delgancho quepasapor...
...Tire unos 15 cm (6') de cada uno de los hilos y paselos entre los salientes del prensatelas, a la derecha, hacia la parte posterior de la maquina. Lower the presser foot lever. NOTE: Some needle/thread combinations will come up again to thread the needle more.... El hilo superior debe haber enganchado el hilo inferior y hacer una lazada. SEWING M , A . 1:13S00 30 vivinovw nS VOZON00 A , • • KN • Using needle threader (When the machine is equipped with the needle threader. Mover elenhebradorhasta suposicion mas baja yguiarelhilopordebajo delgancho quepasapor...
Users Manual - English
Page 15
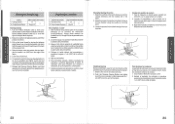
... the foot controller. Baje elprensatelas. 6. El retroceso sirve para finalizar una costura o reforzarla, tal como aparece a continuaci6n. 7. Finishing Sewing Reverse stitching is needed . 7. Para terminar las costuras La puntada de retroceso se usa para trabar los hilos al final de una...la parte atras delprensatelas. 4. Gire el selector de puntadas para ver la puntada deseada en la ventana de indicaci6n correspondiente. Changing Sewing Direction 1. Push the Reverse Sewing Button and lightly touch the foot controller to the end of the presser foot. 4. Stop the machine at...
... the foot controller. Baje elprensatelas. 6. El retroceso sirve para finalizar una costura o reforzarla, tal como aparece a continuaci6n. 7. Finishing Sewing Reverse stitching is needed . 7. Para terminar las costuras La puntada de retroceso se usa para trabar los hilos al final de una...la parte atras delprensatelas. 4. Gire el selector de puntadas para ver la puntada deseada en la ventana de indicaci6n correspondiente. Changing Sewing Direction 1. Push the Reverse Sewing Button and lightly touch the foot controller to the end of the presser foot. 4. Stop the machine at...
Users Manual - English
Page 16
... ocomopuntadas decorativas. Top Stitching and Stretch Materials No. 2 (Straight Stitch) is recommended to sew using the Straight Stitch at the beginning and end of the Zigzag Stitches. To prepare the machine for stretch fabrics. Then, select the Stitch Length and the Stitch Width. Luego, ponga...el fin de dejar la maquina preparada para la pi-6)(1nm costura, tire unos 10 cm (4") del hilo inferiorypaseloporlos salientes delprensatelas hacia la parte posterior de la maquina. Luego, seleccione ellargo y el ancho de la puntada. The Satin Stitch can be used for making buttonholes and...
... ocomopuntadas decorativas. Top Stitching and Stretch Materials No. 2 (Straight Stitch) is recommended to sew using the Straight Stitch at the beginning and end of the Zigzag Stitches. To prepare the machine for stretch fabrics. Then, select the Stitch Length and the Stitch Width. Luego, ponga...el fin de dejar la maquina preparada para la pi-6)(1nm costura, tire unos 10 cm (4") del hilo inferiorypaseloporlos salientes delprensatelas hacia la parte posterior de la maquina. Luego, seleccione ellargo y el ancho de la puntada. The Satin Stitch can be used for making buttonholes and...


