
Users Manual - English
Page 2
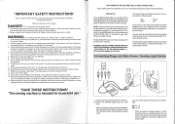
...power and sewlight. 0 Turn on the cord. Do not use plugs with the letter `L.' "SAVE THESE INSTRUCTIONS" "This sewing machine is required around the sewing machine needle. 11. IMPORTANT If the available socket outlet is not suitable for household use a fuse approved by the manufacturer as ... openings. 6. The wire which represents off or the plug must be destroyed as threading the needle, changing the needle, threading the bobbin, or changing the presser foot. 15. plug into the machine. 2. Always unplug this manual. Never drop or insert any object into water. ...
...power and sewlight. 0 Turn on the cord. Do not use plugs with the letter `L.' "SAVE THESE INSTRUCTIONS" "This sewing machine is required around the sewing machine needle. 11. IMPORTANT If the available socket outlet is not suitable for household use a fuse approved by the manufacturer as ... openings. 6. The wire which represents off or the plug must be destroyed as threading the needle, changing the needle, threading the bobbin, or changing the presser foot. 15. plug into the machine. 2. Always unplug this manual. Never drop or insert any object into water. ...
Users Manual - English
Page 12
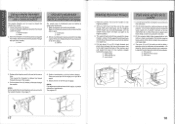
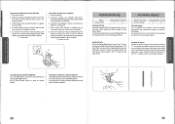
SEWING M , A . 1:13S00 30 vivinovw nS VOZON00 A , • • KN • Using needle threader (When the machine is equipped with the needle threader. Move the threader to its highest position. 3. Pull out about 15 cm (6") of both threads and place them between the toes of the presser foot ...the same time. See page 21. 3. With your left hand, hold the end of thread through the eye of the machine straight behind the presser foot. (D Upper thread C) Lower thread loop ® Lower thread Para sacar el hilo de la canilla 1. Con la mano derecha, gire la ruedecilla hacia...
SEWING M , A . 1:13S00 30 vivinovw nS VOZON00 A , • • KN • Using needle threader (When the machine is equipped with the needle threader. Move the threader to its highest position. 3. Pull out about 15 cm (6") of both threads and place them between the toes of the presser foot ...the same time. See page 21. 3. With your left hand, hold the end of thread through the eye of the machine straight behind the presser foot. (D Upper thread C) Lower thread loop ® Lower thread Para sacar el hilo de la canilla 1. Con la mano derecha, gire la ruedecilla hacia...
Users Manual - English
Page 14
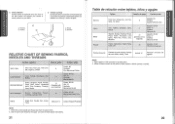
... Correct tension Correct tension is important since too much or too little tension will weaken your seams or cause puckers on your machine) Cotton: 80 Synthetic Fine Mercerized Cotton Cotton: 60-80 Silk: "A" Synthetic Mercerized 50 Cotton: 50-60 Silk: "A"... O O ci) rn mz (4) Reverse (5) Surface C 4 O O (4) Reyes (5) Derecho 5 p airmyrr o pnbuvvyi a FA :=1NFL 1,S AND) Tun SEWING FABRICS NEEDLE SIZES THREAD SIZES VERY THIN Fine Tricot, Fine Lace, Thin Linen, Silk, Organza, Chiffon LIGHTWEIGHT Voile, Taffeta, Synthetics, Silk, Batiste MEDIUM WEIGHT Cotton, Gingham, Poplin, Percale...
... Correct tension Correct tension is important since too much or too little tension will weaken your seams or cause puckers on your machine) Cotton: 80 Synthetic Fine Mercerized Cotton Cotton: 60-80 Silk: "A" Synthetic Mercerized 50 Cotton: 50-60 Silk: "A"... O O ci) rn mz (4) Reverse (5) Surface C 4 O O (4) Reyes (5) Derecho 5 p airmyrr o pnbuvvyi a FA :=1NFL 1,S AND) Tun SEWING FABRICS NEEDLE SIZES THREAD SIZES VERY THIN Fine Tricot, Fine Lace, Thin Linen, Silk, Organza, Chiffon LIGHTWEIGHT Voile, Taffeta, Synthetics, Silk, Batiste MEDIUM WEIGHT Cotton, Gingham, Poplin, Percale...
Users Manual - English
Page 15
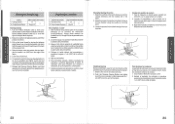
... 3. Baje elprensatelas. 6. Para retroceder, apriete a fondo el pulsador de retroceso y presione ligeramente el pedal. Stop the machine at the end of the presser foot. 4. Finishing Sewing Reverse stitching is used for 1 cm (3/8") from the edge of seams and where reinforcement is needed . 1. Pull up... y posicione la aguja a 1 cm (3/8") de la orilla del tejido. 5. Push the Reverse Sewing Button and lightly touch the foot controller to line up the lower thread by applying pressure to change directions with the needle still in the forward direction by turning the balance...
... 3. Baje elprensatelas. 6. Para retroceder, apriete a fondo el pulsador de retroceso y presione ligeramente el pedal. Stop the machine at the end of the presser foot. 4. Finishing Sewing Reverse stitching is used for 1 cm (3/8") from the edge of seams and where reinforcement is needed . 1. Pull up... y posicione la aguja a 1 cm (3/8") de la orilla del tejido. 5. Push the Reverse Sewing Button and lightly touch the foot controller to line up the lower thread by applying pressure to change directions with the needle still in the forward direction by turning the balance...
Users Manual - English
Page 16
...unos 10 cm (4") del hilo inferiorypaseloporlos salientes delprensatelas hacia la parte posterior de la maquina. It is recommended to sew using the thread cutter located on the back of the presser foot bar. 5. Se recomienda coser conpuntada recta alprincipio y al .... 4. OVZOIZ A Sit103kI SVCIV_LNRd DNIHaLlIS OVZDIZ aNY 1HDIVHIS STRAIGHT AND ZIGZAG STITCHING PUNTADAS RECTAS Y ZIGZAG Removing the Material from the Machine 1. To prepare the machine for stretch fabrics. Cortador de hilos 0 0 0 Zigzag Stitching Pattern 3 (Zigzag Stitch) Stitch Length Stitch Width F-4 0-5 ...
...unos 10 cm (4") del hilo inferiorypaseloporlos salientes delprensatelas hacia la parte posterior de la maquina. It is recommended to sew using the thread cutter located on the back of the presser foot bar. 5. Se recomienda coser conpuntada recta alprincipio y al .... 4. OVZOIZ A Sit103kI SVCIV_LNRd DNIHaLlIS OVZDIZ aNY 1HDIVHIS STRAIGHT AND ZIGZAG STITCHING PUNTADAS RECTAS Y ZIGZAG Removing the Material from the Machine 1. To prepare the machine for stretch fabrics. Cortador de hilos 0 0 0 Zigzag Stitching Pattern 3 (Zigzag Stitch) Stitch Length Stitch Width F-4 0-5 ...

Users Manual - English
Page 26
Cambio de la bombilla 1. A. 3. Replace the sewing light bulb. D. (1) Bulb Loosen ® Tighten 4. C. 5. After oiling, run the machine at each of oil at a fast speed without thread installed for a short time. 4. NOTE: The machine should be oiled once a week if it is available from the outlet.... 2. Reattach the face plate and fasten the screw as shown in fig. Cambie la bombilla talcomo se muestra enla fig. A. 3. Sewing machine oil ...
Cambio de la bombilla 1. A. 3. Replace the sewing light bulb. D. (1) Bulb Loosen ® Tighten 4. C. 5. After oiling, run the machine at each of oil at a fast speed without thread installed for a short time. 4. NOTE: The machine should be oiled once a week if it is available from the outlet.... 2. Reattach the face plate and fasten the screw as shown in fig. Cambie la bombilla talcomo se muestra enla fig. A. 3. Sewing machine oil ...


