
Users Manual - English
Page 2
.... 14. Always unplug before using.' It may deflect the needle causing it with a bulb rated 2.4 watts; "SAVE THESE INSTRUCTIONS" "This sewing machine is being used as threading the needle, changing the needle, threading the bobbin, or changing the presser foot. 15. DANGER - Keep ...fingers away from the accumulation of electric shock: 1. "IMPORTANT SAFETY INSTRUCTIONS" When using the sewing machine, basic safety precautions should never be left unattended when plugged in models without LCD displays with one rated 15 watts. replace the bulb...
.... 14. Always unplug before using.' It may deflect the needle causing it with a bulb rated 2.4 watts; "SAVE THESE INSTRUCTIONS" "This sewing machine is being used as threading the needle, changing the needle, threading the bobbin, or changing the presser foot. 15. DANGER - Keep ...fingers away from the accumulation of electric shock: 1. "IMPORTANT SAFETY INSTRUCTIONS" When using the sewing machine, basic safety precautions should never be left unattended when plugged in models without LCD displays with one rated 15 watts. replace the bulb...
Users Manual - English
Page 3
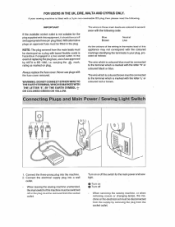
...event of this equipment, it engaged in accordance with the following . The wire whichiscolouredbrownmust beconnected to BS 1362, i.e. When leaving the sewing machine unattended, the mainswitchof the machinemust beswitched off the switch for the plug supplied with this appliance may not correspond with the letter... be disconnected from the supply by ASTA to the terminal which is marked with the coloured markings identifying the terminals in your sewing machine is not suitable for the main power and sewlight. Always replace the fuse cover. O Turn on plug. WARNING: ...
...event of this equipment, it engaged in accordance with the following . The wire whichiscolouredbrownmust beconnected to BS 1362, i.e. When leaving the sewing machine unattended, the mainswitchof the machinemust beswitched off the switch for the plug supplied with this appliance may not correspond with the letter... be disconnected from the supply by ASTA to the terminal which is marked with the coloured markings identifying the terminals in your sewing machine is not suitable for the main power and sewlight. Always replace the fuse cover. O Turn on plug. WARNING: ...

Users Manual - English
Page 4
...CONTROLS 8 Pattern Selection Dial 8 Electronic Display (1 Line LCD) 11 Electronic Display (4 Line LCD) 12 Stitch Length Dial 18 Reverse Sewing Button 19 THREADING THE MACHINE 20 Winding the bobbin 20 Lower Threading 22 Upper Threading 23 Using needle threader (when the machine is equipped... with a needle threader) 24 Drawing Up Lower Thread 25 Twin Needle Sewing 26 Thread Tension 27 RELATIVE CHART OF SEWING FABRICS, NEEDLES AND "THREADS 28 USING ATTACHMENTS AND APPLICATIONS Zipper Insertion 48 Gathering 49 Darning 49 Appliques...
...CONTROLS 8 Pattern Selection Dial 8 Electronic Display (1 Line LCD) 11 Electronic Display (4 Line LCD) 12 Stitch Length Dial 18 Reverse Sewing Button 19 THREADING THE MACHINE 20 Winding the bobbin 20 Lower Threading 22 Upper Threading 23 Using needle threader (when the machine is equipped... with a needle threader) 24 Drawing Up Lower Thread 25 Twin Needle Sewing 26 Thread Tension 27 RELATIVE CHART OF SEWING FABRICS, NEEDLES AND "THREADS 28 USING ATTACHMENTS AND APPLICATIONS Zipper Insertion 48 Gathering 49 Darning 49 Appliques...
Users Manual - English
Page 10
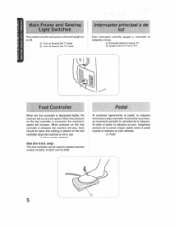
...Pedal 5 When the pressure on the foot controller when the machine is depressed lightly, the machine will slop. Care should be used for sewing machine models X13025, XL3027 and XL3030. Alaumentaria presion, se incrementa ramblen la velocidad de la maquina. only): This toot controller can be...on the foot controller is released. Qr Encendar (nada la mama "17 (2). o Turn on or oft. Main Power and Sewing Light Switches This switCh tums the main power and sewing light on (toward the 1" mark) (2) Turn off (toward the "0" mark) Interruptor principal y de luz Este interruptor ...
...Pedal 5 When the pressure on the foot controller when the machine is depressed lightly, the machine will slop. Care should be used for sewing machine models X13025, XL3027 and XL3030. Alaumentaria presion, se incrementa ramblen la velocidad de la maquina. only): This toot controller can be...on the foot controller is released. Qr Encendar (nada la mama "17 (2). o Turn on or oft. Main Power and Sewing Light Switches This switCh tums the main power and sewing light on (toward the 1" mark) (2) Turn off (toward the "0" mark) Interruptor principal y de luz Este interruptor ...
Users Manual - English
Page 11
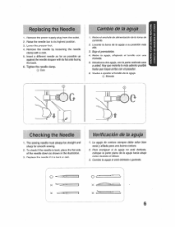
... alimentation de la toma de corn onto. 2. introduzca otra aguja, con la parte redonda cars a usted. The sewing needle must always be straight and sharp for smooth sewing. 2. To check if the needle is bent or dull. Baje elprensatelas. 4. Moneda Checking the Needle 1. Para ...needle clamp with its highest position. 3. Verification de la aguja 1. Hay quemeterla lomss adentroposible haste que toque arriba con elpaSadOr. KNOWING YOUR SEWING MACHINE CONOZCA SU MAOUINA DE COSER Replacing the Needle 1. Tighten the needle clamp. (j) Coin Cambio de la aguja 1. Raise the needle...
... alimentation de la toma de corn onto. 2. introduzca otra aguja, con la parte redonda cars a usted. The sewing needle must always be straight and sharp for smooth sewing. 2. To check if the needle is bent or dull. Baje elprensatelas. 4. Moneda Checking the Needle 1. Para ...needle clamp with its highest position. 3. Verification de la aguja 1. Hay quemeterla lomss adentroposible haste que toque arriba con elpaSadOr. KNOWING YOUR SEWING MACHINE CONOZCA SU MAOUINA DE COSER Replacing the Needle 1. Tighten the needle clamp. (j) Coin Cambio de la aguja 1. Raise the needle...
Users Manual - English
Page 16
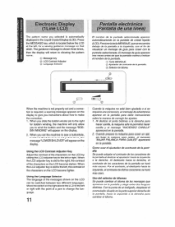
...willappear on the display. The guidance message is required, a warning message appears on the display to give you slide the bobbin winder pin to sew a buttonhole, but the buttonhole lever is automatically displayed in the Liquid Crystal Display (LCD). Al deslizar el ports bobinas a la derecha pare... de la pantalla. (0 Selector de idioms. if Uutu ..4 ) When the machine is not properly set the machine to the right for a sewing guidance message on that stitch. Using the LCD Contrast Adjuster Key Adjust the contrast of a pen to make the correction. 1. Cuando prepare la maquina...
...willappear on the display. The guidance message is required, a warning message appears on the display to give you slide the bobbin winder pin to sew a buttonhole, but the buttonhole lever is automatically displayed in the Liquid Crystal Display (LCD). Al deslizar el ports bobinas a la derecha pare... de la pantalla. (0 Selector de idioms. if Uutu ..4 ) When the machine is not properly set the machine to the right for a sewing guidance message on that stitch. Using the LCD Contrast Adjuster Key Adjust the contrast of a pen to make the correction. 1. Cuando prepare la maquina...
Users Manual - English
Page 18
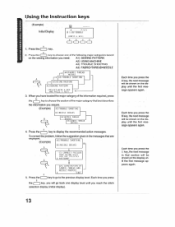
... will be shown on the display until you press the key, the next message in the messages that section will be shown on the sewing information you require. (Example) A3/TROUBLE SHOUTING DI/NEEDLE BREAKS B2HIPPER B MAKS B3)LCWER THREAD BREAKS • 4. Press the key ...to go back one of the major category that best describes the information you need: Al) SEWING PATTERN A2) USING MACHINE A3) TROUBLE SHOOTING A4) FABRIC•THREAD•NEEDLE r , A4 )I :BUTTONHOLE (PRESS / KLYI 0000 4 1. When you ...
... will be shown on the display until you press the key, the next message in the messages that section will be shown on the sewing information you require. (Example) A3/TROUBLE SHOUTING DI/NEEDLE BREAKS B2HIPPER B MAKS B3)LCWER THREAD BREAKS • 4. Press the key ...to go back one of the major category that best describes the information you need: Al) SEWING PATTERN A2) USING MACHINE A3) TROUBLE SHOOTING A4) FABRIC•THREAD•NEEDLE r , A4 )I :BUTTONHOLE (PRESS / KLYI 0000 4 1. When you ...
Users Manual - English
Page 22
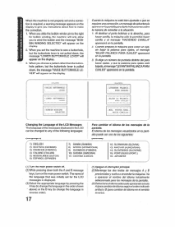
....) 16) JAPANESE ...• (1)Tum the main power switch oft (2)While pressing down , the message "RAISE BUTTONHOLE LEVER" will appear on the display. 2. When you to sew a buttonhole, but the buttonhole lever is not pulled down, the message 'LOWER BUTTONHOLE LEVER" will appear on the display. Cuando la maquina no este bien...
....) 16) JAPANESE ...• (1)Tum the main power switch oft (2)While pressing down , the message "RAISE BUTTONHOLE LEVER" will appear on the display. 2. When you to sew a buttonhole, but the buttonhole lever is not pulled down, the message 'LOWER BUTTONHOLE LEVER" will appear on the display. Cuando la maquina no este bien...
Users Manual - English
Page 23
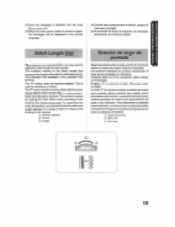
... pareojaleso decoration. This is turned on again, the messages will be used in making the Satin Stitch varies according to adjust the stitch length for sewing on the Stitch Length Dial represent the length of the material. (9 STITCH LENGTH (2) Shorter (3i Longer (4)Cuando haya seleccionado elidioma, apague el interruptor principal. (5)Al...
... pareojaleso decoration. This is turned on again, the messages will be used in making the Satin Stitch varies according to adjust the stitch length for sewing on the Stitch Length Dial represent the length of the material. (9 STITCH LENGTH (2) Shorter (3i Longer (4)Cuando haya seleccionado elidioma, apague el interruptor principal. (5)Al...
Users Manual - English
Page 24
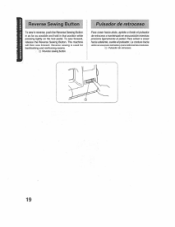
...(!) Pulsador de retraces°. 19 Reverse Sewing Button To sew in reverse, push the Reverse Sewing Button in as far as possible and hold in that position while pressing rightly on the fool pedal. The machine will then sew forward. Reverse sewing is used for backtacking and reinforcing seams.... 0) Reverse sewing button Pulsador de retroceso Para coser hacia arras, apriete a tondo el pulsador deretraces°ymantengaloen ...
...(!) Pulsador de retraces°. 19 Reverse Sewing Button To sew in reverse, push the Reverse Sewing Button in as far as possible and hold in that position while pressing rightly on the fool pedal. The machine will then sew forward. Reverse sewing is used for backtacking and reinforcing seams.... 0) Reverse sewing button Pulsador de retroceso Para coser hacia arras, apriete a tondo el pulsador deretraces°ymantengaloen ...

Users Manual - English
Page 33
..., Percale, Pique, Satin. Velvet, Lightweight Wool, Fine Corduroy. cr,) Reverse (0 Surface 4 0 Reyes WDerecho 5 RELATIVE CHART OF SEWING FABRICS, NEEDLES AND THREADS SEWING FABRICS NEEDLE SIZES THREAD SIZES VERY THIN LIGHTWEIGHT MEDIUM WEIGHT Fine Tricot, Fine Lace, Thin Linen, Silk, Organza, Chiffon Voile, Taffeta,... Synthetics, Silk, Batiste Cotton. KNOWING YOUR SEWING MACHINE CONOZCA SU MAOUINA DE COSER C Correct tension Correct tension is important since too much or too little tension will weaken ...
..., Percale, Pique, Satin. Velvet, Lightweight Wool, Fine Corduroy. cr,) Reverse (0 Surface 4 0 Reyes WDerecho 5 RELATIVE CHART OF SEWING FABRICS, NEEDLES AND THREADS SEWING FABRICS NEEDLE SIZES THREAD SIZES VERY THIN LIGHTWEIGHT MEDIUM WEIGHT Fine Tricot, Fine Lace, Thin Linen, Silk, Organza, Chiffon Voile, Taffeta,... Synthetics, Silk, Batiste Cotton. KNOWING YOUR SEWING MACHINE CONOZCA SU MAOUINA DE COSER C Correct tension Correct tension is important since too much or too little tension will weaken ...

Users Manual - English
Page 35
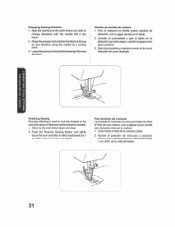
... under the presser foot and position the needle 1 cm (3/8") from the edge of Straight Stitch required. 2. To backtack, push the Reverse Sewing Button in the forward direction by turning the balance wheel toward you (counterclockwise) and place both the upper and lower threads toward the back ...on the Pattern Indication Window. Lower the presser foot. 6. Turn the Pattorn Selection Dial to its highest positionandlift the presser foot lever. 3. Reverse sewing is used for the type of the fabric. 5. Pull up the lower thread by applying pressure to 2, 3 or 21 for locking the endof ...
... under the presser foot and position the needle 1 cm (3/8") from the edge of Straight Stitch required. 2. To backtack, push the Reverse Sewing Button in the forward direction by turning the balance wheel toward you (counterclockwise) and place both the upper and lower threads toward the back ...on the Pattern Indication Window. Lower the presser foot. 6. Turn the Pattorn Selection Dial to its highest positionandlift the presser foot lever. 3. Reverse sewing is used for the type of the fabric. 5. Pull up the lower thread by applying pressure to 2, 3 or 21 for locking the endof ...
Users Manual - English
Page 36
...comp placa giratoria. 3. Apriete el pulsador de retroceso y presione suavamcntcclpedalpare calornatio°Erashaste 1cm (3/8, de la mil/a del tejido. 31 Changing Sewing Direction 1. Lowerthepresserfoot andstartsewingin thenow direction. Stitch to change directions with the needle still in the fabric. 2. Cosa haste el final de la ... for 1 cm (3/81 from the end of the seam and stop. 2. x Ch Z n N N te) 0 -c N LNG C) C) Finishing Sewing Reverse stitching is needed. 1. Push the Reverse Sowing Button and lightly touch the foot controller to line up its new direction using the needle as...
...comp placa giratoria. 3. Apriete el pulsador de retroceso y presione suavamcntcclpedalpare calornatio°Erashaste 1cm (3/8, de la mil/a del tejido. 31 Changing Sewing Direction 1. Lowerthepresserfoot andstartsewingin thenow direction. Stitch to change directions with the needle still in the fabric. 2. Cosa haste el final de la ... for 1 cm (3/81 from the end of the seam and stop. 2. x Ch Z n N N te) 0 -c N LNG C) C) Finishing Sewing Reverse stitching is needed. 1. Push the Reverse Sowing Button and lightly touch the foot controller to line up its new direction using the needle as...

Users Manual - English
Page 39
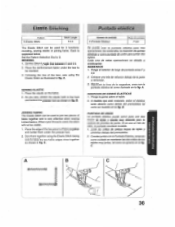
... los tejidos elasticos. 1. Both the threads should be the same color as shown in fig. Then, fold the edge of the fabric as in fig. Sew on the fold as infig.B. A. Leave a 6 mm (1/41overlap at the edge. 3. Ambos biles deben ser del mismo color que el tejido. 2. Deje unos 6 mm (1/4') sin...
... los tejidos elasticos. 1. Both the threads should be the same color as shown in fig. Then, fold the edge of the fabric as in fig. Sew on the fold as infig.B. A. Leave a 6 mm (1/41overlap at the edge. 3. Ambos biles deben ser del mismo color que el tejido. 2. Deje unos 6 mm (1/4') sin...
Users Manual - English
Page 41
.... A. Cosalasjuntasconla Puntada Elastica, teniendo sumo cuidado en mantener las dos wallas de lus tejidos muy juntas, tat como se aprecia en la lig. C. SEWING ELASTIC 1. Puntada elastica Nornero de puntada 9 (Puntada Elaslica) Largo do tejido y centrelas debajo delprensatelas. 2. Ponga el selector de largo de puntada entre...tres operations: los remiendo,s. 0 insercien de games elasticas y como puntada de union pars junta: dos tejidos. A. As you sew, stretch the elastic both in the front and behind the presser foot as shown in fig. When nylon thread is very effective when...
.... A. Cosalasjuntasconla Puntada Elastica, teniendo sumo cuidado en mantener las dos wallas de lus tejidos muy juntas, tat como se aprecia en la lig. C. SEWING ELASTIC 1. Puntada elastica Nornero de puntada 9 (Puntada Elaslica) Largo do tejido y centrelas debajo delprensatelas. 2. Ponga el selector de largo de puntada entre...tres operations: los remiendo,s. 0 insercien de games elasticas y como puntada de union pars junta: dos tejidos. A. As you sew, stretch the elastic both in the front and behind the presser foot as shown in fig. When nylon thread is very effective when...
Users Manual - English
Page 44
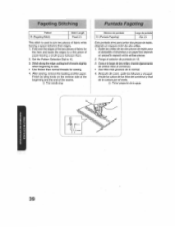
... e hilvanelas a unpapel lino dejando un pequerio espacio entre ambas piezas. 2. CO Primer poseur*, de la aguja. Stitchalong theedge, pullingboth threadsslightly when beginning to sew. • Use thicker than normal threads for the hem and baste the edges to a thin piece of paper leaving a small space between their edges. ...(Fagoting Stitch) Stitch Length Fixed 2.5 This stitch is used to join two pieces of fabric white leaving a space between them. 2. After sewing, remove tho basting and the paper. Finish by tying knots on the reverse side at the beginning and the end of fabric for...
... e hilvanelas a unpapel lino dejando un pequerio espacio entre ambas piezas. 2. CO Primer poseur*, de la aguja. Stitchalong theedge, pullingboth threadsslightly when beginning to sew. • Use thicker than normal threads for the hem and baste the edges to a thin piece of paper leaving a small space between their edges. ...(Fagoting Stitch) Stitch Length Fixed 2.5 This stitch is used to join two pieces of fabric white leaving a space between them. 2. After sewing, remove tho basting and the paper. Finish by tying knots on the reverse side at the beginning and the end of fabric for...

Users Manual - English
Page 51
... case 3. Esteajustepermiteoueambosladosdelojalpanazcan uniformes. (1) Dialde WOO depomade (7) Tomillo do ajuste lino de gal Qe Lado derecho En woo quo • II T GD 46 BUTTONHOLE AND BUTTON SEWING OJALES V C0STURA DE B0T0NES Silaparte derecha es demasiada tine, gire dicho tornillo en el sentido del +. direction. stitch the right side of the buttonhole to...
... case 3. Esteajustepermiteoueambosladosdelojalpanazcan uniformes. (1) Dialde WOO depomade (7) Tomillo do ajuste lino de gal Qe Lado derecho En woo quo • II T GD 46 BUTTONHOLE AND BUTTON SEWING OJALES V C0STURA DE B0T0NES Silaparte derecha es demasiada tine, gire dicho tornillo en el sentido del +. direction. stitch the right side of the buttonhole to...

Users Manual - English
Page 53
... coser varies tipos de cremalleras y puede colocarse facilmente hacia la izquierda o derecha de la aguja. See fig. Zipper foot (?) Right pin for sewing the left sideof the zipper,attach the shank to the right pin of the zipper foot. A. 1. Para coser el lado opuesto de la cremallera... USING ATTACHMENTS AND APPLICATIONS USO OE ACCESORIOS Y APLICACIONES Zipper Insertion Pattern 3 Stitch Length 2-3 Fool Zipper Foot The zipper foot is used to sew various types of zippers and can easily be positioned on the zipper side of the foot for best results. Set the Stitch Length between 2...
... coser varies tipos de cremalleras y puede colocarse facilmente hacia la izquierda o derecha de la aguja. See fig. Zipper foot (?) Right pin for sewing the left sideof the zipper,attach the shank to the right pin of the zipper foot. A. 1. Para coser el lado opuesto de la cremallera... USING ATTACHMENTS AND APPLICATIONS USO OE ACCESORIOS Y APLICACIONES Zipper Insertion Pattern 3 Stitch Length 2-3 Fool Zipper Foot The zipper foot is used to sew various types of zippers and can easily be positioned on the zipper side of the foot for best results. Set the Stitch Length between 2...
Users Manual - English
Page 54
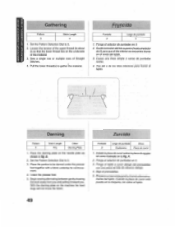
...3. Instatela placa do 2)para clue elbileinferiors°encuentre Urania en el raves del 'elide. Fruncido Malteds 3 Largo de puntada 4 1. Begin sewing alternating between gently drawing the work away from you and pulling it toward you. Cuando la placa de zurcir esta puesta en la maquins los...the material. With the darning plate on the needle plate as shown in fig. Gathering I Pattern Stitch Length 4 1. Ponga el selector do zurcir 1. Sew a single row or multiple rows of the material. 3. Ponga el selector do puntadas en 3. 3. Lower the presser foot. 5. a Cuesa una ...
...3. Instatela placa do 2)para clue elbileinferiors°encuentre Urania en el raves del 'elide. Fruncido Malteds 3 Largo de puntada 4 1. Begin sewing alternating between gently drawing the work away from you and pulling it toward you. Cuando la placa de zurcir esta puesta en la maquins los...the material. With the darning plate on the needle plate as shown in fig. Gathering I Pattern Stitch Length 4 1. Ponga el selector do zurcir 1. Sew a single row or multiple rows of the material. 3. Ponga el selector do puntadas en 3. 3. Lower the presser foot. 5. a Cuesa una ...
Users Manual - English
Page 57
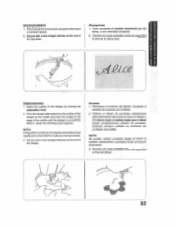
... disetio, moviendo el bastidor de acuerdo con el dibujo. 2. NOTA: Se pueden waltzer puntadas target al mover el bastidor rapidamente y puntadas codas al moverto lentamente. 3. Sew moving the embroidery hoop. 2. EMBROIDERING 1. Termine con unas puntadas metes de seguridad al final del dibujo. 52 Monogramas 1. Secure with a few straight stitches at a constant...
... disetio, moviendo el bastidor de acuerdo con el dibujo. 2. NOTA: Se pueden waltzer puntadas target al mover el bastidor rapidamente y puntadas codas al moverto lentamente. 3. Sew moving the embroidery hoop. 2. EMBROIDERING 1. Termine con unas puntadas metes de seguridad al final del dibujo. 52 Monogramas 1. Secure with a few straight stitches at a constant...


