

Users Manual - English
Page 2
... dropped or damaged, or dropped into any other user service adjustments mentioned in this machine where aerosol (spray) products are being used as threading the needle, changing the needle, threading the bobbin, or changing the presser foot. 15. Do not use ." "SAVE THESE INSTRUCTIONS" "This sewing machine is necessary when the sewing...
... dropped or damaged, or dropped into any other user service adjustments mentioned in this machine where aerosol (spray) products are being used as threading the needle, changing the needle, threading the bobbin, or changing the presser foot. 15. Do not use ." "SAVE THESE INSTRUCTIONS" "This sewing machine is necessary when the sewing...

Users Manual - English
Page 4
... Display (1 Line LCD) 11 Electronic Display (4 Line LCD) 12 Stitch Length Dial 18 Reverse Sewing Button 19 THREADING THE MACHINE 20 Winding the bobbin 20 Lower Threading 22 Upper Threading 23 Using needle threader (when the machine is equipped with a needle threader) 24 Drawing Up Lower... Thread 25 Twin Needle Sewing 26 Thread Tension 27 RELATIVE CHART OF SEWING FABRICS, NEEDLES AND "THREADS 28 USING ATTACHMENTS AND APPLICATIONS Zipper Insertion 48 Gathering 49 Darning 49 Appliques 50...
... Display (1 Line LCD) 11 Electronic Display (4 Line LCD) 12 Stitch Length Dial 18 Reverse Sewing Button 19 THREADING THE MACHINE 20 Winding the bobbin 20 Lower Threading 22 Upper Threading 23 Using needle threader (when the machine is equipped with a needle threader) 24 Drawing Up Lower... Thread 25 Twin Needle Sewing 26 Thread Tension 27 RELATIVE CHART OF SEWING FABRICS, NEEDLES AND "THREADS 28 USING ATTACHMENTS AND APPLICATIONS Zipper Insertion 48 Gathering 49 Darning 49 Appliques 50...
Users Manual - English
Page 18
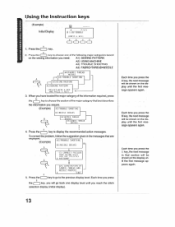
...the (-) key, you will be shown on the sewing information you need: Al) SEWING PATTERN A2) USING MACHINE A3) TROUBLE SHOOTING A4) FABRIC•THREAD•NEEDLE r , A4 )I :BUTTONHOLE (PRESS / KLYI 0000 4 1. Press the f) key. Press the (-) key to choose the section of... the following major categories based on the display until you require. (Example) A3/TROUBLE SHOUTING DI/NEEDLE BREAKS B2HIPPER B MAKS B3)LCWER THREAD BREAKS • 4. t t "END" 5. Each time you press the A key, the next message will go to display the recommended action messages...
...the (-) key, you will be shown on the sewing information you need: Al) SEWING PATTERN A2) USING MACHINE A3) TROUBLE SHOOTING A4) FABRIC•THREAD•NEEDLE r , A4 )I :BUTTONHOLE (PRESS / KLYI 0000 4 1. Press the f) key. Press the (-) key to choose the section of... the following major categories based on the display until you require. (Example) A3/TROUBLE SHOUTING DI/NEEDLE BREAKS B2HIPPER B MAKS B3)LCWER THREAD BREAKS • 4. t t "END" 5. Each time you press the A key, the next message will go to display the recommended action messages...

Users Manual - English
Page 20
ai)sx I TROUFB4I SHOOTINN libI WWIIC PUCKERS IsUlT01•101.11 MIER WILL. HOW UPPER THREAD AND WMIN svmm A2I USINO MACHINE /1.11/Ni LNG MN AT I PPE!) sr rinitzs A4 / FABRIC •IIIREAD• NEIO1LE 041KNIT FARRI C AI PLACE FABRIC. ... FABRIC MOWER BUTECINIIDIZ LEVER AND PRESS LIOIrrue ITMARDS I /ATM/ BUTEN:MOLE POOPIA) A21USING MACHINE B2)REPLACING BOHRI N Al) TROUBLE SIER711NG R21UPPER TIIRPAD BREAKS AA1FABII C • THREAD• ugEr); 02I LIMIT FABRIC 2 }PULL OUT BACK OF FOOT.LET WPM IN PLACE AND CLAMP AVUSIAG MACHINE IN/UPPER...
ai)sx I TROUFB4I SHOOTINN libI WWIIC PUCKERS IsUlT01•101.11 MIER WILL. HOW UPPER THREAD AND WMIN svmm A2I USINO MACHINE /1.11/Ni LNG MN AT I PPE!) sr rinitzs A4 / FABRIC •IIIREAD• NEIO1LE 041KNIT FARRI C AI PLACE FABRIC. ... FABRIC MOWER BUTECINIIDIZ LEVER AND PRESS LIOIrrue ITMARDS I /ATM/ BUTEN:MOLE POOPIA) A21USING MACHINE B2)REPLACING BOHRI N Al) TROUBLE SIER711NG R21UPPER TIIRPAD BREAKS AA1FABII C • THREAD• ugEr); 02I LIMIT FABRIC 2 }PULL OUT BACK OF FOOT.LET WPM IN PLACE AND CLAMP AVUSIAG MACHINE IN/UPPER...
Users Manual - English
Page 23
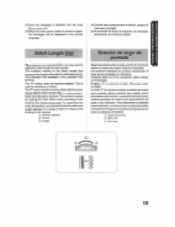
... material. To determine the exact dial position, you may need to adjust the stitch length for sewing on a scrap of fabric to the material and thread being used for best results. Elajuste "O"no alimenta el lejido. Stitch Length Dial Depending on you' selected stitch, you should first test the stitch and...
... material. To determine the exact dial position, you may need to adjust the stitch length for sewing on a scrap of fabric to the material and thread being used for best results. Elajuste "O"no alimenta el lejido. Stitch Length Dial Depending on you' selected stitch, you should first test the stitch and...

Users Manual - English
Page 25
Pass the thread through thehole on the machine. 3. Pase el hilo por la guia. siguiendo la linea do ! Coloque un carrel° de hilo en el eje horizontal ... the horizontal spool pinand firmly hold it witha spoolholder so that the spool of thread will not turn. THREADING THE MACHINE Winding the bobbin 1 . Pass theendof thethread through the thread guide as shown following the dolled line on the bobbin from the inside. (p Clutch release switch () Bobbin winding Enhebrado de la rnthquina Bobinado...
Pass the thread through thehole on the machine. 3. Pase el hilo por la guia. siguiendo la linea do ! Coloque un carrel° de hilo en el eje horizontal ... the horizontal spool pinand firmly hold it witha spoolholder so that the spool of thread will not turn. THREADING THE MACHINE Winding the bobbin 1 . Pass theendof thethread through the thread guide as shown following the dolled line on the bobbin from the inside. (p Clutch release switch () Bobbin winding Enhebrado de la rnthquina Bobinado...
Users Manual - English
Page 26
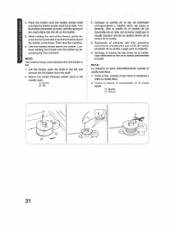
...maquina se pare automat/camerae wand° la candle eSte Ilena. 7. NOTE: The machine stops automatically when thebobbinis full. 7. Trim the excess thread above the bobbin. Slga boblnando el hiro en la canilla presionando el pedal. Sujelando el extremo del bib°, presione suavemente elpedalpare que elhilo...Switch back to theright. Corte el hilo, empuje el eje hacia la izquierda y retire la canilla llena. 8. Vuelva a colocar of the thread, gently depress the foot controller to the left and remove the full bobbin from the shaft. 8. 4. Place the bobbin onto the bobbin ...
...maquina se pare automat/camerae wand° la candle eSte Ilena. 7. NOTE: The machine stops automatically when thebobbinis full. 7. Trim the excess thread above the bobbin. Slga boblnando el hiro en la canilla presionando el pedal. Sujelando el extremo del bib°, presione suavemente elpedalpare que elhilo...Switch back to theright. Corte el hilo, empuje el eje hacia la izquierda y retire la canilla llena. 8. Vuelva a colocar of the thread, gently depress the foot controller to the left and remove the full bobbin from the shaft. 8. 4. Place the bobbin onto the bobbin ...
Users Manual - English
Page 28
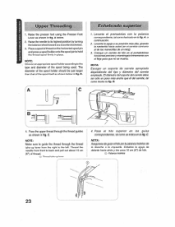
... Escoger un soporte de carrete apropiado dependiendo del tipo y diametro del carrete empleado. NOTE: Make sure to guide the thread through the thread guides as shown in place. Pa se el hilo superior on las guias correspondienies. Raise the presser foot using the Presser... (r) de hilo. (i) Patents wahilos 23 Raise the needle to the left. C. Upper Threading 1. A below in fig. NOTE: Choose anappropriate spoolholder according tothe type and diameter of thread. (1) Thread take•tep lever 4. Eldiametro delsoporte delcarrete debe set solo un poco mas ancho que el...
... Escoger un soporte de carrete apropiado dependiendo del tipo y diametro del carrete empleado. NOTE: Make sure to guide the thread through the thread guides as shown in place. Pa se el hilo superior on las guias correspondienies. Raise the presser foot using the Presser... (r) de hilo. (i) Patents wahilos 23 Raise the needle to the left. C. Upper Threading 1. A below in fig. NOTE: Choose anappropriate spoolholder according tothe type and diameter of thread. (1) Thread take•tep lever 4. Eldiametro delsoporte delcarrete debe set solo un poco mas ancho que el...
Users Manual - English
Page 29
... la maquina esta provista de un en hebrador de aguja) Sepuedeuser&enhebradorpara enhebrarla aguja mas lacilmente. 1. This causes the threader to thread the needle more easily. 1. Moverelenhebradorhasta suposicien alasbale yguiarelhilopordebajo delgancho quepasapor atop do la aguja. (3) Gaucho 7 3. Esto provocarA que el... hilo salga por el ojo de la aguja. 4. Lower thethreader slightlyandpositionthe thread under the hook which passes through the eye of the needle. 4. Softer el enhobrador y elhilo mismo tiempo. Lower the presser loot...
... la maquina esta provista de un en hebrador de aguja) Sepuedeuser&enhebradorpara enhebrarla aguja mas lacilmente. 1. This causes the threader to thread the needle more easily. 1. Moverelenhebradorhasta suposicien alasbale yguiarelhilopordebajo delgancho quepasapor atop do la aguja. (3) Gaucho 7 3. Esto provocarA que el... hilo salga por el ojo de la aguja. 4. Lower thethreader slightlyandpositionthe thread under the hook which passes through the eye of the needle. 4. Softer el enhobrador y elhilo mismo tiempo. Lower the presser loot...

Users Manual - English
Page 30
0 • Z 2. N o b 0 to "C C O tn •
0 • Z 2. N o b 0 to "C C O tn •

Users Manual - English
Page 33
...tensioninsuliciente o demasiado!aerie va a debilitar sus animas o *omit el tejido. Velvet, Lightweight Wool, Fine Corduroy. Select the correct needle and thread size from the above chart. 2. Jersey, Tricot Ball point 14 Cotton Wrapped Polyester NOTE: 1. Suitings, Linen, Muslin 9 11 14 ..., Double Knit. Use the same size thread for the upper and lower threads (spool and bobbin). 28 cr,) Reverse (0 Surface 4 0 Reyes WDerecho 5 RELATIVE CHART OF SEWING FABRICS, NEEDLES AND THREADS SEWING FABRICS NEEDLE SIZES THREAD SIZES VERY THIN LIGHTWEIGHT MEDIUM WEIGHT Fine ...
...tensioninsuliciente o demasiado!aerie va a debilitar sus animas o *omit el tejido. Velvet, Lightweight Wool, Fine Corduroy. Select the correct needle and thread size from the above chart. 2. Jersey, Tricot Ball point 14 Cotton Wrapped Polyester NOTE: 1. Suitings, Linen, Muslin 9 11 14 ..., Double Knit. Use the same size thread for the upper and lower threads (spool and bobbin). 28 cr,) Reverse (0 Surface 4 0 Reyes WDerecho 5 RELATIVE CHART OF SEWING FABRICS, NEEDLES AND THREADS SEWING FABRICS NEEDLE SIZES THREAD SIZES VERY THIN LIGHTWEIGHT MEDIUM WEIGHT Fine ...

Users Manual - English
Page 35
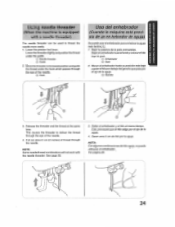
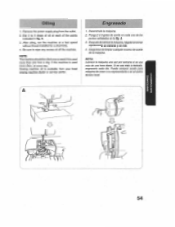
... correspondiente. Coloque el tejido debajo del prensatelas y posicione la aguja a 1 cm (318) de la orilla del tejido. 5. Pull up the lower thread by applying pressure to 2, 3 or 21 for locking the endof seamsandwherereinforcementisneed&d. 7. Lower the presser foot. 6. Levant&la aguja a supastel&mas alta...the Reverse Sewing Button in the forward direction by turning the balance wheel toward you (counterclockwise) and place both the upper and lower threads toward the back of Straight Stitch required. 2. Place the fabric under the presser foot and position the needle 1 cm (3/8") from...
... correspondiente. Coloque el tejido debajo del prensatelas y posicione la aguja a 1 cm (318) de la orilla del tejido. 5. Pull up the lower thread by applying pressure to 2, 3 or 21 for locking the endof seamsandwherereinforcementisneed&d. 7. Lower the presser foot. 6. Levant&la aguja a supastel&mas alta...the Reverse Sewing Button in the forward direction by turning the balance wheel toward you (counterclockwise) and place both the upper and lower threads toward the back of Straight Stitch required. 2. Place the fabric under the presser foot and position the needle 1 cm (3/8") from...
Users Manual - English
Page 36
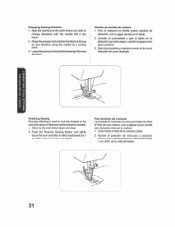
... the needle still in the fabric. 2. x Ch Z n N N te) 0 -c N LNG C) C) Finishing Sewing Reverse stitching is used to the end of the fabric. Stitch to lock the threads at the point where you wish to stitch backwards for 1 cm (3/81 from the end of the seam and stop. 2. Levante el prensatelas y gire el...
... the needle still in the fabric. 2. x Ch Z n N N te) 0 -c N LNG C) C) Finishing Sewing Reverse stitching is used to the end of the fabric. Stitch to lock the threads at the point where you wish to stitch backwards for 1 cm (3/81 from the end of the seam and stop. 2. Levante el prensatelas y gire el...

Users Manual - English
Page 39
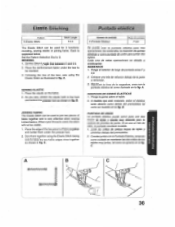
Both the threads should be the same color as in fig. A. Sew on the fold as the fabric. 2. When the fabric is useful for stretch fabrics. Ambos biles ...
Both the threads should be the same color as in fig. A. Sew on the fold as the fabric. 2. When the fabric is useful for stretch fabrics. Ambos biles ...
Users Manual - English
Page 41
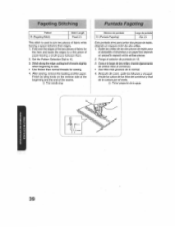
... Length Dial between F and 2.5. 2. As you sew, stretch the elastic both in the front and behind the presser foot as shown in fig. B. When nylon thread is very effective when sewing knitted fabrics. REMIENDOS 1. A. A B 36
... Length Dial between F and 2.5. 2. As you sew, stretch the elastic both in the front and behind the presser foot as shown in fig. B. When nylon thread is very effective when sewing knitted fabrics. REMIENDOS 1. A. A B 36
Users Manual - English
Page 44
... edges. 1. Fold over the edges of the two pieces of fabric for the hem and baste the edges to sew. • Use thicker than normal threads for sewing. 4. Anudelos cabos de loshilos delcomienzoy final de la costura por el roves. CO Primer poseur*, de la aguja.
... edges. 1. Fold over the edges of the two pieces of fabric for the hem and baste the edges to sew. • Use thicker than normal threads for sewing. 4. Anudelos cabos de loshilos delcomienzoy final de la costura por el roves. CO Primer poseur*, de la aguja.
Users Manual - English
Page 54
... 2. With the darning plate on the needle plate as shown in fig. Loosen the tension of he upper thread (to about 2) so that the lower thread lies on the underside of Straight Stitches. 4. Darning Pattern 3 Stitch Length Any Other Darning Plato 1. Zurcido ... Ponga el selector do puntadas en 3. 3. Ernpieceacoserempujandoytirandoaltemativa• mente del tejido. A. 2. Lower the presser foot. 5. Pull the lower thread(s) to be darned under the presser toot together with a fabric underlay for reinforcement. 4. Begin sewing alternating between gently drawing the work away...
... 2. With the darning plate on the needle plate as shown in fig. Loosen the tension of he upper thread (to about 2) so that the lower thread lies on the underside of Straight Stitches. 4. Darning Pattern 3 Stitch Length Any Other Darning Plato 1. Zurcido ... Ponga el selector do puntadas en 3. 3. Ernpieceacoserempujandoytirandoaltemativa• mente del tejido. A. 2. Lower the presser foot. 5. Pull the lower thread(s) to be darned under the presser toot together with a fabric underlay for reinforcement. 4. Begin sewing alternating between gently drawing the work away...
Users Manual - English
Page 56
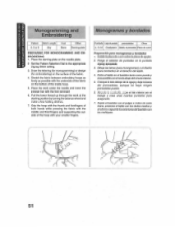
... of the inside hoop. 5. Monogramas y bordados Puntada Lego pnada ptensaretas Oats 4,566 Cualettiera Cabo, snatertsatetas Placa de neck Preparation pare monogramas y bordados 1. Pull the lower thread up through the work under the needle and lower the presser bar with the foot removed. 6. Ponga el selector de puntadas en la punlada 7i...
... of the inside hoop. 5. Monogramas y bordados Puntada Lego pnada ptensaretas Oats 4,566 Cualettiera Cabo, snatertsatetas Placa de neck Preparation pare monogramas y bordados 1. Pull the lower thread up through the work under the needle and lower the presser bar with the foot removed. 6. Ponga el selector de puntadas en la punlada 7i...
Users Manual - English
Page 59
... than one hour a day. Despuesdelubricarlamaculae,litigate funcionar rapidamente un instante y sin hilo. 4. After oiling, run the machine at each of oil at a fast speed without thread installed for a short time. 4. Be sure to 3 drops of the points indicated in fig. Sewing machine oil is used more often, oil every day. lksonchule...
... than one hour a day. Despuesdelubricarlamaculae,litigate funcionar rapidamente un instante y sin hilo. 4. After oiling, run the machine at each of oil at a fast speed without thread installed for a short time. 4. Be sure to 3 drops of the points indicated in fig. Sewing machine oil is used more often, oil every day. lksonchule...
Users Manual - English
Page 60
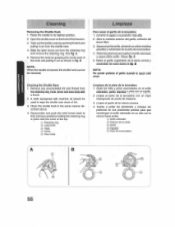
... the latch levers out from the shuttle race. 4. See fig. Remove the hook by grasping the center post of lint. 3. Remove any accumulated lint and thread from the retainingring,hook, driverandrace body with the notch at the top. ()) Retaining ring (2) Latch lever 0; Clean the shuttle hook in place with a brush. 2. Limpie...
... the latch levers out from the shuttle race. 4. See fig. Remove the hook by grasping the center post of lint. 3. Remove any accumulated lint and thread from the retainingring,hook, driverandrace body with the notch at the top. ()) Retaining ring (2) Latch lever 0; Clean the shuttle hook in place with a brush. 2. Limpie...


