
Users Manual - English
Page 2
... or where oxygen is intended for examination, repair, electrical or mechanical adjustment. 4. The sewing machine should always be followed, including the following: "Read all moving parts. WARNING - Use only accessories recommended by the manufacturer as threading the needle, changing the needle, threading the bobbin, or changing the presser foot. 15. To...
... or where oxygen is intended for examination, repair, electrical or mechanical adjustment. 4. The sewing machine should always be followed, including the following: "Read all moving parts. WARNING - Use only accessories recommended by the manufacturer as threading the needle, changing the needle, threading the bobbin, or changing the presser foot. 15. To...

Users Manual - English
Page 4
TABLE OF CONTENTS KNOWING YOUR SEWING MACHINE Principal parts 1 Accessories 3 OPERATING YOUR SEWING MACHINE 4 Connecting Plugs 4 Main Power and Sewing Light Switches ....5 Foot Controller 5 Replacing the Needle 6 Checking the Needle 6 Changing the Presser Foot 7 ...
TABLE OF CONTENTS KNOWING YOUR SEWING MACHINE Principal parts 1 Accessories 3 OPERATING YOUR SEWING MACHINE 4 Connecting Plugs 4 Main Power and Sewing Light Switches ....5 Foot Controller 5 Replacing the Needle 6 Checking the Needle 6 Changing the Presser Foot 7 ...
Users Manual - English
Page 11
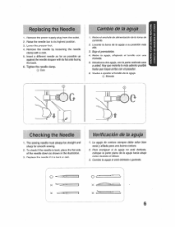
Hay quemeterla lomss adentroposible haste que toque arriba con elpaSadOr. To check if the needle is bent or dull. introduzca otra aguja, con la parte redonda cars a usted. Verification de la aguja 1. Levante la barra de la aguja a su posicidn mss alts. 3. Cambie la aguja si esta doblada o ... 1. Remove the no este doblada. Lower the presser foot. 4. Raise the needle bar to its flat side lacing the back. 6. coloque la parte plans de la aguja hacks abajo como muestra el dibujo. 3. Insert a different needle as far as shown in the illustration. 3. Baje elprensatelas. ...
Hay quemeterla lomss adentroposible haste que toque arriba con elpaSadOr. To check if the needle is bent or dull. introduzca otra aguja, con la parte redonda cars a usted. Verification de la aguja 1. Levante la barra de la aguja a su posicidn mss alts. 3. Cambie la aguja si esta doblada o ... 1. Remove the no este doblada. Lower the presser foot. 4. Raise the needle bar to its flat side lacing the back. 6. coloque la parte plans de la aguja hacks abajo como muestra el dibujo. 3. Insert a different needle as far as shown in the illustration. 3. Baje elprensatelas. ...

Users Manual - English
Page 30
N o b 0 to "C C O tn • 0 • Z 2.
N o b 0 to "C C O tn • 0 • Z 2.

Users Manual - English
Page 35
... puntada deseada en la ventana de indication correspondiente. Segue el hilo inferior girando la ruedecilla hacia usted(enelsentido contrarioaldelasmantillas de unreloj)y tireloshilos superior einteriorhacia la parte apes delprensatelas. 4. Coloque el tejido debajo del prensatelas y posicione la aguja a 1 cm (318) de la orilla del tejido. 5. presionando elpedal. 30 Lower the presser foot...
... puntada deseada en la ventana de indication correspondiente. Segue el hilo inferior girando la ruedecilla hacia usted(enelsentido contrarioaldelasmantillas de unreloj)y tireloshilos superior einteriorhacia la parte apes delprensatelas. 4. Coloque el tejido debajo del prensatelas y posicione la aguja a 1 cm (318) de la orilla del tejido. 5. presionando elpedal. 30 Lower the presser foot...

Users Manual - English
Page 53
... muestra la fig. Baje la palanca delprensatelas y coloque el eje izquierdo o derecho de la pate de cremalleras en la ante. Cuesa a partirde la parte inferior de la cremallera hacia la pane superior, por ambos lades. Para mejores resullados, se debe colocarla aguja del lado de la pate y de to... 4. A. 1. Ajuste el largo de puntada entre 2 y 3. 2. Para coser el lado opuesto de la cremallera, simile la pate a! °prefer el baton situado en su parte posterior, instate la pats en el otro /ado de la cremallera y sign cosiendo, pasando la aguja par fa hondidura del otro lado. Zipper foot (?) Right...
... muestra la fig. Baje la palanca delprensatelas y coloque el eje izquierdo o derecho de la pate de cremalleras en la ante. Cuesa a partirde la parte inferior de la cremallera hacia la pane superior, por ambos lades. Para mejores resullados, se debe colocarla aguja del lado de la pate y de to... 4. A. 1. Ajuste el largo de puntada entre 2 y 3. 2. Para coser el lado opuesto de la cremallera, simile la pate a! °prefer el baton situado en su parte posterior, instate la pats en el otro /ado de la cremallera y sign cosiendo, pasando la aguja par fa hondidura del otro lado. Zipper foot (?) Right...

