

Users Manual - English
Page 2
... pulling on the cord. Always unplug before using and before cleaning . 2. WARNING - The sewing machine should always be followed, including the following: "Read all moving parts. Do not allow this instruction manual. Always unplug the sewing machine from outlet. 9. To reduce the risk of burns, lire, electric shock, or injury to...
... pulling on the cord. Always unplug before using and before cleaning . 2. WARNING - The sewing machine should always be followed, including the following: "Read all moving parts. Do not allow this instruction manual. Always unplug the sewing machine from outlet. 9. To reduce the risk of burns, lire, electric shock, or injury to...

Users Manual - English
Page 4
TABLE OF CONTENTS KNOWING YOUR SEWING MACHINE Principal parts 1 Accessories 3 OPERATING YOUR SEWING MACHINE 4 Connecting Plugs 4 Main Power and Sewing Light Switches ....5 Foot Controller 5 Replacing the Needle 6 Checking the Needle 6 Changing the Presser Foot 7 ...
TABLE OF CONTENTS KNOWING YOUR SEWING MACHINE Principal parts 1 Accessories 3 OPERATING YOUR SEWING MACHINE 4 Connecting Plugs 4 Main Power and Sewing Light Switches ....5 Foot Controller 5 Replacing the Needle 6 Checking the Needle 6 Changing the Presser Foot 7 ...

Users Manual - English
Page 11
introduzca otra aguja, con la parte redonda cars a usted. Replace the needle if it is bent, place the flat side of the needle down as possible up against the needle stopper ... lacing the back. 6. Retire la aguja, aftojando el tomillo con una moneda, 5. Viietua a aprelar el tomillo de la aguja. Moneda Checking the Needle 1. coloque la parte plans de la aguja hacks abajo como muestra el dibujo. 3. Levante la barra de la aguja a su posicidn mss alts. 3. Para averiguar si la aguja...
introduzca otra aguja, con la parte redonda cars a usted. Replace the needle if it is bent, place the flat side of the needle down as possible up against the needle stopper ... lacing the back. 6. Retire la aguja, aftojando el tomillo con una moneda, 5. Viietua a aprelar el tomillo de la aguja. Moneda Checking the Needle 1. coloque la parte plans de la aguja hacks abajo como muestra el dibujo. 3. Levante la barra de la aguja a su posicidn mss alts. 3. Para averiguar si la aguja...

Users Manual - English
Page 30
0 • Z 2. N o b 0 to "C C O tn •
0 • Z 2. N o b 0 to "C C O tn •
Users Manual - English
Page 35
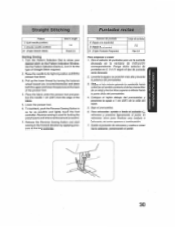
... as possible and lightly touch the foot controller. Segue el hilo inferior girando la ruedecilla hacia usted(enelsentido contrarioaldelasmantillas de unreloj)y tireloshilos superior einteriorhacia la parte apes delprensatelas. 4. Coloque el tejido debajo del prensatelas y posicione la aguja a 1 cm (318) de la orilla del tejido. 5. Baje elpronsatelas. 6. Para retroceder, apriete a tondo elpulsador...
... as possible and lightly touch the foot controller. Segue el hilo inferior girando la ruedecilla hacia usted(enelsentido contrarioaldelasmantillas de unreloj)y tireloshilos superior einteriorhacia la parte apes delprensatelas. 4. Coloque el tejido debajo del prensatelas y posicione la aguja a 1 cm (318) de la orilla del tejido. 5. Baje elpronsatelas. 6. Para retroceder, apriete a tondo elpulsador...
Users Manual - English
Page 53
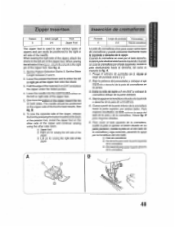
...side notch. 0; A. 1. Para coser el lado opuesto de la cremallera, simile la pate a! °prefer el baton situado en su parte posterior, instate la pats en el otro /ado de la cremallera y sign cosiendo, pasando la aguja par fa hondidura del otro lado. ...portion. 4. Cuando se case la cremallera porelladoizquierdo, instalela pate deslizandola hacia la derecha, tal comp lo muestra la fig. Cuesa a partirde la parte inferior de la cremallera hacia la pane superior, por ambos lades. B para mayores (Mattes. 6. Ponga el selector do la cremeWm. Baja laagujaenlahendidurasituadaalaizquierda...
...side notch. 0; A. 1. Para coser el lado opuesto de la cremallera, simile la pate a! °prefer el baton situado en su parte posterior, instate la pats en el otro /ado de la cremallera y sign cosiendo, pasando la aguja par fa hondidura del otro lado. ...portion. 4. Cuando se case la cremallera porelladoizquierdo, instalela pate deslizandola hacia la derecha, tal comp lo muestra la fig. Cuesa a partirde la parte inferior de la cremallera hacia la pane superior, por ambos lades. B para mayores (Mattes. 6. Ponga el selector do la cremeWm. Baja laagujaenlahendidurasituadaalaizquierda...

