
Users Manual - English
Page 3
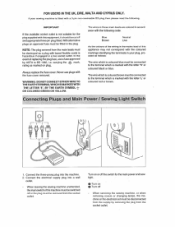
... off or the plug must be cut off When servicing the sewing machine, or when removing covers or changing lamps, the machine or the electrical set must be connected to the terminal which is coloured blue must be fitted in your sewing machine is marked with a 3 pin non-rewireable BS plug...
... off or the plug must be cut off When servicing the sewing machine, or when removing covers or changing lamps, the machine or the electrical set must be connected to the terminal which is coloured blue must be fitted in your sewing machine is marked with a 3 pin non-rewireable BS plug...

Users Manual - English
Page 16
... Is izquierda o la derecha. Ajuslador de contrasts de la pantalla. (0 Selector de idioms. if Uutu ..4 ) When the machine is not properly set the machine to the left , the contrast of the characters on the LCD become lighter. The guidance message is required, a warning message appears on...right. Electronic Display (1Line LCD) The pattern name you selected is not pulled down, the message'LOVVERBHLEVER"willappear on the display. When you set and a correction is shown three times, then the display will appear on that stitch. Press the MESSAGE key, which is slid to ...
... Is izquierda o la derecha. Ajuslador de contrasts de la pantalla. (0 Selector de idioms. if Uutu ..4 ) When the machine is not properly set the machine to the left , the contrast of the characters on the LCD become lighter. The guidance message is required, a warning message appears on...right. Electronic Display (1Line LCD) The pattern name you selected is not pulled down, the message'LOVVERBHLEVER"willappear on the display. When you set and a correction is shown three times, then the display will appear on that stitch. Press the MESSAGE key, which is slid to ...

Users Manual - English
Page 22
...8226; Changing the Language of the LCD Messages Thelanguage of the messagesdisplayedintheLCD can be changed to any of the language that was initially set for bobbin winding, the machine will only allow you to wind the bobbin and the message "BOBBIN WINDING SELECTED" will appear on...to give you instructions about how to change the languageinthe order shown ' above) or the B key (to make the correction. 1. When you set and a correction is displayed. (3)Select the appropriate language by pressing the Akey(to change the language in reverse order). 17 (1)Apague elintemptorprincipal. (2)...
...8226; Changing the Language of the LCD Messages Thelanguage of the messagesdisplayedintheLCD can be changed to any of the language that was initially set for bobbin winding, the machine will only allow you to wind the bobbin and the message "BOBBIN WINDING SELECTED" will appear on...to give you instructions about how to change the languageinthe order shown ' above) or the B key (to make the correction. 1. When you set and a correction is displayed. (3)Select the appropriate language by pressing the Akey(to change the language in reverse order). 17 (1)Apague elintemptorprincipal. (2)...
Users Manual - English
Page 23
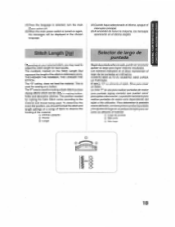
.... (5)When the main power switch is used for best results. The numbers marked on you' selected stitch, you should first test the stitch and length settings on again, the messages will be used . Selector de largo de puntada Segunlapuntada sok:calor:0dgpuedescraecosario ajuslar su largo pare lograr mejores resultados. CUANTO MAS...
.... (5)When the main power switch is used for best results. The numbers marked on you' selected stitch, you should first test the stitch and length settings on again, the messages will be used . Selector de largo de puntada Segunlapuntada sok:calor:0dgpuedescraecosario ajuslar su largo pare lograr mejores resultados. CUANTO MAS...
Users Manual - English
Page 28
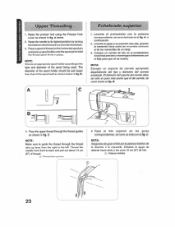
... front to back and pull out about 15 cm (6") of thread. (1) Thread take -up lever from the right to the left. A. Eldiametro delsoporte delcarrete debe set solo un poco mas ancho que el del carrete, tal como ilustra la fig. B. NOTE: Make sure to its highest position by turning the balance...
... front to back and pull out about 15 cm (6") of thread. (1) Thread take -up lever from the right to the left. A. Eldiametro delsoporte delcarrete debe set solo un poco mas ancho que el del carrete, tal como ilustra la fig. B. NOTE: Make sure to its highest position by turning the balance...
Users Manual - English
Page 35
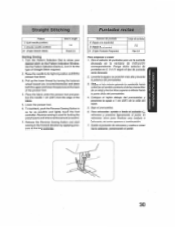
... back of the presser foot. 4. Segue el hilo inferior girando la ruedecilla hacia usted(enelsentido contrarioaldelasmantillas de unreloj)y tireloshilos superior einteriorhacia la parte apes delprensatelas. 4. Set the Pattern Selection Dial to the foot controller. Raise the needle to show your desired stitch on the Pattern Indication Window. Coloque el tejido debajo...
... back of the presser foot. 4. Segue el hilo inferior girando la ruedecilla hacia usted(enelsentido contrarioaldelasmantillas de unreloj)y tireloshilos superior einteriorhacia la parte apes delprensatelas. 4. Set the Pattern Selection Dial to the foot controller. Raise the needle to show your desired stitch on the Pattern Indication Window. Coloque el tejido debajo...
Users Manual - English
Page 39
... selector do punfadas en 7 6 10. 4. C. 5. B. Woe la Puntada Invisible (7) para cualquier tejido que no se estire y la Puntada invisible Elastics (10) para los tejidos elasticos. 1. Set the Pattern Selection Dial to muestra la fig. C. 5. When the fabric is useful for stretch fabrics. Fold back the fabric to the desired location of...
... selector do punfadas en 7 6 10. 4. C. 5. B. Woe la Puntada Invisible (7) para cualquier tejido que no se estire y la Puntada invisible Elastics (10) para los tejidos elasticos. 1. Set the Pattern Selection Dial to muestra la fig. C. 5. When the fabric is useful for stretch fabrics. Fold back the fabric to the desired location of...
Users Manual - English
Page 41
...fabrics. PUNTADA DE UNION La puntada elastica puede servir pare unir dos trozos de lejido y results muy eticiente pam la costura de prendas de punto. Set the Stitch Length Dial between F and 2.5. 2. Sew them under the tear to be visible. 1. C. INSERCION DE GOMAS ELASTICAS 1. A B 36... Set the Pattern Selection Dial to keep the two fabric edges close together as illustrated in fig. JOINING FABRIC The Elastic Stitch can be used , the ...
...fabrics. PUNTADA DE UNION La puntada elastica puede servir pare unir dos trozos de lejido y results muy eticiente pam la costura de prendas de punto. Set the Stitch Length Dial between F and 2.5. 2. Sew them under the tear to be visible. 1. C. INSERCION DE GOMAS ELASTICAS 1. A B 36... Set the Pattern Selection Dial to keep the two fabric edges close together as illustrated in fig. JOINING FABRIC The Elastic Stitch can be used , the ...
Users Manual - English
Page 43
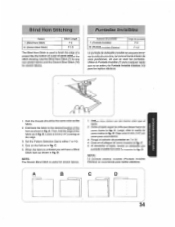
Ponga el selector de puntada en 13 6 14. Puntadas decorativas 114/10merode punmda 13 (Pentode EscaJere) 14 (Puntada &Won Doble) Largo demoted:, F-1 Estes dos puntadas pueden servir pare puntadas decoralivas de "arta castors" y pare hater !runes decorativos. BUILT-IN STITCHES PUNTADAS INCORPORADAS 38 Decorative Stitching Pattern 13 (Lightning Stitch) 14 (Bead Stitch) Stitch Length F-1 These two stitches can be used for making decora live top stitching and for smocking Set the Pattern Selection Dial to 13 or 14.
Ponga el selector de puntada en 13 6 14. Puntadas decorativas 114/10merode punmda 13 (Pentode EscaJere) 14 (Puntada &Won Doble) Largo demoted:, F-1 Estes dos puntadas pueden servir pare puntadas decoralivas de "arta castors" y pare hater !runes decorativos. BUILT-IN STITCHES PUNTADAS INCORPORADAS 38 Decorative Stitching Pattern 13 (Lightning Stitch) 14 (Bead Stitch) Stitch Length F-1 These two stitches can be used for making decora live top stitching and for smocking Set the Pattern Selection Dial to 13 or 14.

Users Manual - English
Page 44
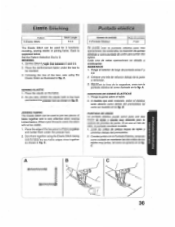
... to join two pieces of fabric white leaving a space between them. 2. tirandoligeramente de ambos kilos al comienzo. • Use hilos mss garesos de lo normal. 4. Set the Pattern Selection Dial to 15. 3.
... to join two pieces of fabric white leaving a space between them. 2. tirandoligeramente de ambos kilos al comienzo. • Use hilos mss garesos de lo normal. 4. Set the Pattern Selection Dial to 15. 3.
Users Manual - English
Page 46
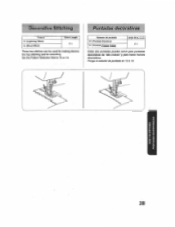
Set the Pattern Selection Dial to the stitching. The stitch will prevent the fabric from the edge of dobladillo de frazadas, manteles, cortinas o bien pars bordado. i. ...
Set the Pattern Selection Dial to the stitching. The stitch will prevent the fabric from the edge of dobladillo de frazadas, manteles, cortinas o bien pars bordado. i. ...
Users Manual - English
Page 53
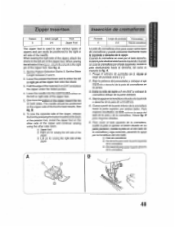
...en su parte posterior, instate la pats en el otro /ado de la cremallera y sign cosiendo, pasando la aguja par fa hondidura del otro lado. A. 1. Set the Stitch Length between 2 and 3. 2. Lower the presser foot lever and fix either on the left pin of the zipper toward the top on both... la cremallera debajo de la pane doblada. 4. When sewing the left or right pin of the zipper and continue sewing using the other side notch. 0; Set the Pattern Selection Dial to cremallera. Para mejores resullados, se debe colocarla aguja del lado de la pate y de to 3. Lower the needle into the...
...en su parte posterior, instate la pats en el otro /ado de la cremallera y sign cosiendo, pasando la aguja par fa hondidura del otro lado. A. 1. Set the Stitch Length between 2 and 3. 2. Lower the presser foot lever and fix either on the left pin of the zipper toward the top on both... la cremallera debajo de la pane doblada. 4. When sewing the left or right pin of the zipper and continue sewing using the other side notch. 0; Set the Pattern Selection Dial to cremallera. Para mejores resullados, se debe colocarla aguja del lado de la pate y de to 3. Lower the needle into the...
Users Manual - English
Page 54
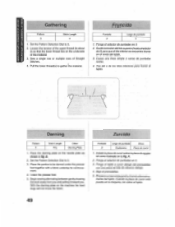
...Darning Pattern 3 Stitch Length Any Other Darning Plato 1. Sueltela tensiondelhilosuperior(hastealrededor do zurcirsobrelaplace deagujas tat como ilustrado en la fig. Set the Pattern Selection Dial to be darned under the presser toot together with a fabric underlay for reinforcement. 4. Ponga el ... do puntadas en 3. 3. Begin sewing alternating between gently drawing the work away from you and pulling it toward you. Set the Pattern Selection Dial to 3. 2. Ernpieceacoserempujandoytirandoaltemativa• mente del tejido. Place the darning plate on the machine the feed...
...Darning Pattern 3 Stitch Length Any Other Darning Plato 1. Sueltela tensiondelhilosuperior(hastealrededor do zurcirsobrelaplace deagujas tat como ilustrado en la fig. Set the Pattern Selection Dial to be darned under the presser toot together with a fabric underlay for reinforcement. 4. Ponga el ... do puntadas en 3. 3. Begin sewing alternating between gently drawing the work away from you and pulling it toward you. Set the Pattern Selection Dial to 3. 2. Ernpieceacoserempujandoytirandoaltemativa• mente del tejido. Place the darning plate on the machine the feed...
Users Manual - English
Page 56
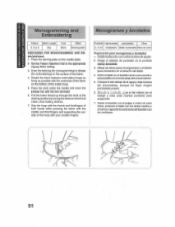
...en el derecho del tejido. 4. Sujete elbastidor con elpurger e indite de cada mano, presione el tejido con los dedos medios y anularesyaguantelosextedores delbastidorcon los merliques. 51 Set the Pattern Selection Dial to ruedecilla, pase elhilo inferiorpor el trabajo y cosa unas cuantas puntadas pare asegutarlo. 7. Estireeltejido en elbastidorSanto comopuede y siesposibleconelrevesabajo deldrculointerior. 5. Pull...EM BROIL) EfiNG 1. Place the work at the startingposition by turning thebalance wheeland make a few holding stitches. 7. Girando to the appropriate Zigzag Stitch setting. 3.
...en el derecho del tejido. 4. Sujete elbastidor con elpurger e indite de cada mano, presione el tejido con los dedos medios y anularesyaguantelosextedores delbastidorcon los merliques. 51 Set the Pattern Selection Dial to ruedecilla, pase elhilo inferiorpor el trabajo y cosa unas cuantas puntadas pare asegutarlo. 7. Estireeltejido en elbastidorSanto comopuede y siesposibleconelrevesabajo deldrculointerior. 5. Pull...EM BROIL) EfiNG 1. Place the work at the startingposition by turning thebalance wheeland make a few holding stitches. 7. Girando to the appropriate Zigzag Stitch setting. 3.
Users Manual - English
Page 64
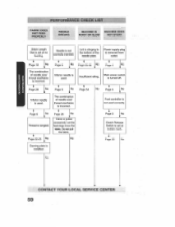
... Insufficient oiling. PERFORMANCE CHECK LIST FABRIC DOES NOT FEED PROPERLY NEEDLE BREAKS MACHINE IS MACHINE DOES NOISY OR SLOW NOT START Stitch Length Dial is set at no feeding. The combine ion of needle size/ thread size/fabric is installed. Page 6 No Page 28 No Fabric is removed from outlet. feed... needle plate. Page 6 No Lint Is clinging to the bottom of needle size/ thread Size/fabric IN° is turned off. Let the Thread is set at bobbin mark.
... Insufficient oiling. PERFORMANCE CHECK LIST FABRIC DOES NOT FEED PROPERLY NEEDLE BREAKS MACHINE IS MACHINE DOES NOISY OR SLOW NOT START Stitch Length Dial is set at no feeding. The combine ion of needle size/ thread size/fabric is installed. Page 6 No Page 28 No Fabric is removed from outlet. feed... needle plate. Page 6 No Lint Is clinging to the bottom of needle size/ thread Size/fabric IN° is turned off. Let the Thread is set at bobbin mark.


