

Users Manual - English
Page 2
... opening. 6. Do not use the proper needle plate. Always unplug the machine from the accumulation of electric shock: 1. SAVE THESE INSTRUCTIONS This machine is not intended for its intended use outdoors. 7. Use only accessories recommended by young children or infirm persons without supervision... for use . It may deflect the needle, causing it off , then remove plug from all instructions before using and before you change the light bulb. IMPORTANT SAFETY INSTRUCTIONS When using this machine, basic safety precautions should always be taken, including the following: Read all ...
... opening. 6. Do not use the proper needle plate. Always unplug the machine from the accumulation of electric shock: 1. SAVE THESE INSTRUCTIONS This machine is not intended for its intended use outdoors. 7. Use only accessories recommended by young children or infirm persons without supervision... for use . It may deflect the needle, causing it off , then remove plug from all instructions before using and before you change the light bulb. IMPORTANT SAFETY INSTRUCTIONS When using this machine, basic safety precautions should always be taken, including the following: Read all ...

Users Manual - English
Page 4
...the diagram below to inspect and adjust the machine yourself. For additional product information and updates, visit our web site at www.brother.com. UNPACKING/REPACKING INSTRUCTIONS Keep the carton and packing materials. If you are replacing or removing the needle or any other hot objects. 2. PLEASE READ ...THESE INSTRUCTIONS BEFORE YOU USE THE MACHINE. The contents of this manual and specifications of this machine to prevent damage. Please follow the ...
...the diagram below to inspect and adjust the machine yourself. For additional product information and updates, visit our web site at www.brother.com. UNPACKING/REPACKING INSTRUCTIONS Keep the carton and packing materials. If you are replacing or removing the needle or any other hot objects. 2. PLEASE READ ...THESE INSTRUCTIONS BEFORE YOU USE THE MACHINE. The contents of this manual and specifications of this machine to prevent damage. Please follow the ...

Users Manual - English
Page 14
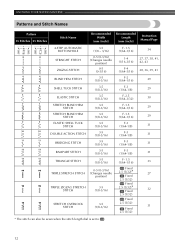
KNOWING YOUR SEWING MACHINE Patterns and Stitch Names Pattern 35 Stitches 25 Stitches Stitch Name Recommended Width (mm (inch)) Recommended Length (mm (inch)) Instruction Manual Page 4-STEP AUTOMATIC BUTTONHOLE STRAIGHT STITCH ZIGZAG STITCH BLIND HEM STITCH SHELL TUCK STITCH ELASTIC STITCH STRETCH BLIND HEM STITCH STRETCH BLIND HEM STITCH ...
KNOWING YOUR SEWING MACHINE Patterns and Stitch Names Pattern 35 Stitches 25 Stitches Stitch Name Recommended Width (mm (inch)) Recommended Length (mm (inch)) Instruction Manual Page 4-STEP AUTOMATIC BUTTONHOLE STRAIGHT STITCH ZIGZAG STITCH BLIND HEM STITCH SHELL TUCK STITCH ELASTIC STITCH STRETCH BLIND HEM STITCH STRETCH BLIND HEM STITCH ...

Users Manual - English
Page 15
Pattern 35 Stitches 25 Stitches Stitch Name Recommended Width (mm (inch)) Recommended Length (mm (inch)) Instruction Manual Page Fixed ELASTIC OVERLOCK STITCH 3-5 (1/8-3/16) 2.5 (3/32) Fixed 31 1 2.5 (3/32) Fixed FEATHER STITCH 3-5 (1/8-3/16) 2.5 (3/32) Fixed 32 2.5 (3/32) Fixed ARROWHEAD STITCH 3-5 (1/8-3/16) 2.5 (3/32) Fixed ...
Pattern 35 Stitches 25 Stitches Stitch Name Recommended Width (mm (inch)) Recommended Length (mm (inch)) Instruction Manual Page Fixed ELASTIC OVERLOCK STITCH 3-5 (1/8-3/16) 2.5 (3/32) Fixed 31 1 2.5 (3/32) Fixed FEATHER STITCH 3-5 (1/8-3/16) 2.5 (3/32) Fixed 32 2.5 (3/32) Fixed ARROWHEAD STITCH 3-5 (1/8-3/16) 2.5 (3/32) Fixed ...

Users Manual - English
Page 16
...) 3-5 (1/8-3/16) 3-5 (1/8-3/16) 3-5 (1/8-13/64) 3-5 (1/8-3/16) 3-5 (1/8-3/16) 3-5 (1/8-3/16) Recommended Length (mm (inch)) Fixed 2.5 (3/32) Fixed 2.5 (3/32) Fixed 2.5 (3/32) Fixed 2.5 (3/32) Fixed 2.5 (3/32) Fixed 2.5 (3/32) Fixed 2.5 (3/32) Instruction Manual Page 31 31 33 31 31 33 33 Stitch Length Dial Depending on the selected stitch, you may break and cause injury. 1 Stitch length...
...) 3-5 (1/8-3/16) 3-5 (1/8-3/16) 3-5 (1/8-13/64) 3-5 (1/8-3/16) 3-5 (1/8-3/16) 3-5 (1/8-3/16) Recommended Length (mm (inch)) Fixed 2.5 (3/32) Fixed 2.5 (3/32) Fixed 2.5 (3/32) Fixed 2.5 (3/32) Fixed 2.5 (3/32) Fixed 2.5 (3/32) Fixed 2.5 (3/32) Instruction Manual Page 31 31 33 31 31 33 33 Stitch Length Dial Depending on the selected stitch, you may break and cause injury. 1 Stitch length...
Users Manual - English
Page 19
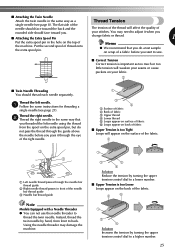
... foot controller. Press the foot controller to sew or turning the handwheel. 17 Note ● The needle bar does not move when you follow the instructions carefully. Then stop the machine. ● Make sure you slide the bobbin winder shaft to the right. ● Immediately after winding the bobbin, it may...
... foot controller. Press the foot controller to sew or turning the handwheel. 17 Note ● The needle bar does not move when you follow the instructions carefully. Then stop the machine. ● Make sure you slide the bobbin winder shaft to the right. ● Immediately after winding the bobbin, it may...
Users Manual - English
Page 27
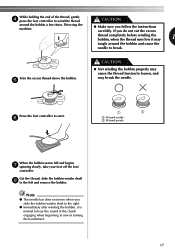
... in the hole on the extra spool pin, but do a test sample on scrap of a fabric before you threaded the left needle. 1 Follow the same instructions for threading a single needle (see page 8). Using the needle threader may need to adjust it through the eye of the right needle. 3 2 1 1 Left needle thread...
... in the hole on the extra spool pin, but do a test sample on scrap of a fabric before you threaded the left needle. 1 Follow the same instructions for threading a single needle (see page 8). Using the needle threader may need to adjust it through the eye of the right needle. 3 2 1 1 Left needle thread...

Users Manual - English
Page 51
... Patchworking 31 Pattern selection dial 11 Patterns 12 Presser foot changing 9 Q Quick-set bobbin 19, 24 Quilting foot 42 R Race cleaning 44 Repacking instructions 2 Reverse sewing lever 15 S Satin stitch 28 Shell tuck stitching 29 Spool pin 16, 21 extra 25 Stitch length dial 14 Stitch width dial ...needle threader 22 twin needle 25 upper 21 Triple zigzag stretch stitching 32 Troubleshooting 46 Twin needle , attaching 9 25 sewing 24 U Unpacking instructions 2 Upper tension control dial 25 Upper threading 21 W Walking foot 41 Z Zigzag stitching 28 Zipper insertion 37 49
... Patchworking 31 Pattern selection dial 11 Patterns 12 Presser foot changing 9 Q Quick-set bobbin 19, 24 Quilting foot 42 R Race cleaning 44 Repacking instructions 2 Reverse sewing lever 15 S Satin stitch 28 Shell tuck stitching 29 Spool pin 16, 21 extra 25 Stitch length dial 14 Stitch width dial ...needle threader 22 twin needle 25 upper 21 Triple zigzag stretch stitching 32 Troubleshooting 46 Twin needle , attaching 9 25 sewing 24 U Unpacking instructions 2 Upper tension control dial 25 Upper threading 21 W Walking foot 41 Z Zigzag stitching 28 Zipper insertion 37 49

Owner's Manual (Español) - Spanish
Page 2
...symbol "{" position to turn the machine switch to ensure that they do not play with same type rated 15 watts. IMPORTANT SAFETY INSTRUCTIONS When using this machine, basic safety precautions should always be used as a toy. This sewing machine is used by pulling on ...blocked. Use only accessories recommended by young children or infirm persons without supervision. (For Australia and New Zealand only) 17. SAVE THESE INSTRUCTIONS This machine is not working properly, if it is intended for examination, repair, electrical or mechanical adjustment. 4. Do not operate where ...
...symbol "{" position to turn the machine switch to ensure that they do not play with same type rated 15 watts. IMPORTANT SAFETY INSTRUCTIONS When using this machine, basic safety precautions should always be used as a toy. This sewing machine is used by pulling on ...blocked. Use only accessories recommended by young children or infirm persons without supervision. (For Australia and New Zealand only) 17. SAVE THESE INSTRUCTIONS This machine is not working properly, if it is intended for examination, repair, electrical or mechanical adjustment. 4. Do not operate where ...

Owner's Manual (Español) - Spanish
Page 4
...store the machine near a heater, iron, halogen lamp or other moving parts. 2. Plug the machine directly into the wall. PLEASE READ THESE INSTRUCTIONS BEFORE YOU USE THE MACHINE. Do not use the machine safely 1. Use only mild soaps or detergents to prevent damage. Do not use the... right packing material, the machine could be repaired. For additional product information and updates, visit our web site at www.brother.com. UNPACKING/REPACKING INSTRUCTIONS Keep the carton and packing materials. To use extension cords. If the problem is designed to clean the case. Do not ...
...store the machine near a heater, iron, halogen lamp or other moving parts. 2. Plug the machine directly into the wall. PLEASE READ THESE INSTRUCTIONS BEFORE YOU USE THE MACHINE. Do not use the machine safely 1. Use only mild soaps or detergents to prevent damage. Do not use the... right packing material, the machine could be repaired. For additional product information and updates, visit our web site at www.brother.com. UNPACKING/REPACKING INSTRUCTIONS Keep the carton and packing materials. To use extension cords. If the problem is designed to clean the case. Do not ...
Owner's Manual (Español) - Spanish
Page 14
KNOWING YOUR SEWING MACHINE Patterns and Stitch Names Pattern 35 Stitches 25 Stitches Stitch Name Recommended Width (mm (inch)) Recommended Length (mm (inch)) Instruction Manual Page 4-STEP AUTOMATIC BUTTONHOLE STRAIGHT STITCH ZIGZAG STITCH BLIND HEM STITCH SHELL TUCK STITCH ELASTIC STITCH STRETCH BLIND HEM STITCH STRETCH BLIND HEM STITCH ...
KNOWING YOUR SEWING MACHINE Patterns and Stitch Names Pattern 35 Stitches 25 Stitches Stitch Name Recommended Width (mm (inch)) Recommended Length (mm (inch)) Instruction Manual Page 4-STEP AUTOMATIC BUTTONHOLE STRAIGHT STITCH ZIGZAG STITCH BLIND HEM STITCH SHELL TUCK STITCH ELASTIC STITCH STRETCH BLIND HEM STITCH STRETCH BLIND HEM STITCH ...

Owner's Manual (Español) - Spanish
Page 15
Pattern 35 Stitches 25 Stitches Stitch Name Recommended Width (mm (inch)) Recommended Length (mm (inch)) Instruction Manual Page Fixed ELASTIC OVERLOCK STITCH 3-5 (1/8-3/16) 2.5 (3/32) Fixed 31 1 2.5 (3/32) Fixed FEATHER STITCH 3-5 (1/8-3/16) 2.5 (3/32) Fixed 32 2.5 (3/32) Fixed ARROWHEAD STITCH 3-5 (1/8-3/16) 2.5 (3/32) Fixed ...
Pattern 35 Stitches 25 Stitches Stitch Name Recommended Width (mm (inch)) Recommended Length (mm (inch)) Instruction Manual Page Fixed ELASTIC OVERLOCK STITCH 3-5 (1/8-3/16) 2.5 (3/32) Fixed 31 1 2.5 (3/32) Fixed FEATHER STITCH 3-5 (1/8-3/16) 2.5 (3/32) Fixed 32 2.5 (3/32) Fixed ARROWHEAD STITCH 3-5 (1/8-3/16) 2.5 (3/32) Fixed ...

Owner's Manual (Español) - Spanish
Page 16
...) 3-5 (1/8-3/16) 3-5 (1/8-3/16) 3-5 (1/8-13/64) 3-5 (1/8-3/16) 3-5 (1/8-3/16) 3-5 (1/8-3/16) Recommended Length (mm (inch)) Fixed 2.5 (3/32) Fixed 2.5 (3/32) Fixed 2.5 (3/32) Fixed 2.5 (3/32) Fixed 2.5 (3/32) Fixed 2.5 (3/32) Fixed 2.5 (3/32) Instruction Manual Page 31 31 33 31 31 33 33 Stitch Length Dial Depending on the selected stitch, you may break and cause injury. 1 Stitch length...
...) 3-5 (1/8-3/16) 3-5 (1/8-3/16) 3-5 (1/8-13/64) 3-5 (1/8-3/16) 3-5 (1/8-3/16) 3-5 (1/8-3/16) Recommended Length (mm (inch)) Fixed 2.5 (3/32) Fixed 2.5 (3/32) Fixed 2.5 (3/32) Fixed 2.5 (3/32) Fixed 2.5 (3/32) Fixed 2.5 (3/32) Fixed 2.5 (3/32) Instruction Manual Page 31 31 33 31 31 33 33 Stitch Length Dial Depending on the selected stitch, you may break and cause injury. 1 Stitch length...

Owner's Manual (Español) - Spanish
Page 19
... thread, slide the bobbin winder shaft 8 to sew or turning the handwheel. 17 Note ● The needle bar does not move when you follow the instructions carefully. Press the foot controller to wind the thread CAUTION around the bobbin and cause the needle to break. Trim the excess thread above the...
... thread, slide the bobbin winder shaft 8 to sew or turning the handwheel. 17 Note ● The needle bar does not move when you follow the instructions carefully. Press the foot controller to wind the thread CAUTION around the bobbin and cause the needle to break. Trim the excess thread above the...

Owner's Manual (Español) - Spanish
Page 27
... toward the back and the rounded side should thread each needle separately. Memo ● We recommend that you threaded the left needle. 1 Follow the same instructions for threading a single needle (see page 8). The flat side of the needle should face toward you. ■ Attaching the Extra Spool Pin The tension of...
... toward the back and the rounded side should thread each needle separately. Memo ● We recommend that you threaded the left needle. 1 Follow the same instructions for threading a single needle (see page 8). The flat side of the needle should face toward you. ■ Attaching the Extra Spool Pin The tension of...

Owner's Manual (Español) - Spanish
Page 51
... Patchworking 31 Pattern selection dial 11 Patterns 12 Presser foot changing 9 Q Quick-set bobbin 19, 24 Quilting foot 42 R Race cleaning 44 Repacking instructions 2 Reverse sewing lever 15 S Satin stitch 28 Shell tuck stitching 29 Spool pin 16, 21 extra 25 Stitch length dial 14 Stitch width dial ...needle threader 22 twin needle 25 upper 21 Triple zigzag stretch stitching 32 Troubleshooting 46 Twin needle , attaching 9 25 sewing 24 U Unpacking instructions 2 Upper tension control dial 25 Upper threading 21 W Walking foot 41 Z Zigzag stitching 28 Zipper insertion 37 49
... Patchworking 31 Pattern selection dial 11 Patterns 12 Presser foot changing 9 Q Quick-set bobbin 19, 24 Quilting foot 42 R Race cleaning 44 Repacking instructions 2 Reverse sewing lever 15 S Satin stitch 28 Shell tuck stitching 29 Spool pin 16, 21 extra 25 Stitch length dial 14 Stitch width dial ...needle threader 22 twin needle 25 upper 21 Triple zigzag stretch stitching 32 Troubleshooting 46 Twin needle , attaching 9 25 sewing 24 U Unpacking instructions 2 Upper tension control dial 25 Upper threading 21 W Walking foot 41 Z Zigzag stitching 28 Zipper insertion 37 49

