Users Manual - English
Page 5
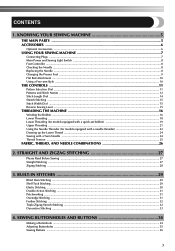
... and Stitch Names ...12 Stitch Length Dial ...14 Stretch Stitching ...15 Stitch Width Dial ...15 Reverse Sewing Lever ...15 THREADING THE MACHINE 16 Winding the Bobbin ...16 Lower Threading ...18 Lower Threading (for models equipped with a quick-set bobbin 19 Upper Threading ...21 Using the Needle Threader (for models equipped with a needle threader...
... and Stitch Names ...12 Stitch Length Dial ...14 Stretch Stitching ...15 Stitch Width Dial ...15 Reverse Sewing Lever ...15 THREADING THE MACHINE 16 Winding the Bobbin ...16 Lower Threading ...18 Lower Threading (for models equipped with a quick-set bobbin 19 Upper Threading ...21 Using the Needle Threader (for models equipped with a needle threader...
Users Manual - English
Page 7
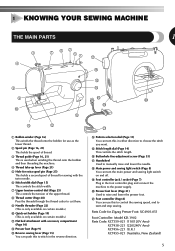
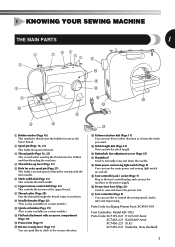
...controls the tension of the upper thread. 8 Thread cutter (Page 28) Pass the threads through the thread cutter to the power supply. 1 KNOWING YOUR SEWING MACHINE THE MAIN PARTS 1 3 4 7 62 51 G F 8 9 0 C A B 1 Bobbin winder (Page 16) This winds the thread onto the bobbin for...sewing lever (Page 15) You can turn this to stitch in either direction to choose the stitch you want. E D H J I Foot controller jack / socket (Page 7) Plug in the foot controller plug and connect the machine to cut them. 9 Needle threader (Page 22) (This is only available on certain models.) 0 Quick-set...
...controls the tension of the upper thread. 8 Thread cutter (Page 28) Pass the threads through the thread cutter to the power supply. 1 KNOWING YOUR SEWING MACHINE THE MAIN PARTS 1 3 4 7 62 51 G F 8 9 0 C A B 1 Bobbin winder (Page 16) This winds the thread onto the bobbin for...sewing lever (Page 15) You can turn this to stitch in either direction to choose the stitch you want. E D H J I Foot controller jack / socket (Page 7) Plug in the foot controller plug and connect the machine to cut them. 9 Needle threader (Page 22) (This is only available on certain models.) 0 Quick-set...
Users Manual - English
Page 14
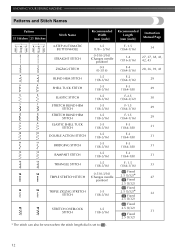
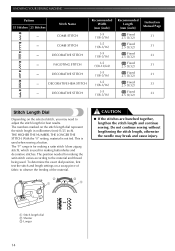
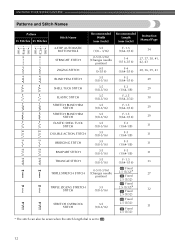
KNOWING YOUR SEWING MACHINE Patterns and Stitch Names Pattern 35 Stitches 25 Stitches Stitch Name Recommended Width (mm (inch)) Recommended Length (mm (inch)) Instruction Manual Page 4-STEP AUTOMATIC BUTTONHOLE ... 29 29 30 29 29 31 31 31 31 33 27 32 31 * The stitch can also be sewn when the stitch length dial is set to . 12
KNOWING YOUR SEWING MACHINE Patterns and Stitch Names Pattern 35 Stitches 25 Stitches Stitch Name Recommended Width (mm (inch)) Recommended Length (mm (inch)) Instruction Manual Page 4-STEP AUTOMATIC BUTTONHOLE ... 29 29 30 29 29 31 31 31 31 33 27 32 31 * The stitch can also be sewn when the stitch length dial is set to . 12
Users Manual - English
Page 16
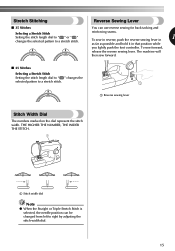
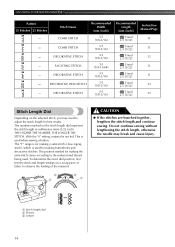
...the material. 2 1 3 1 CAUTION ● If the stitches are bunched together, lengthen the stitch length and continue sewing. KNOWING YOUR SEWING MACHINE Pattern 35 Stitches 25 Stitches Stitch Name COMB STITCH COMB STITCH DECORATIVE STITCH FAGOTING STITCH DECORATIVE STITCH DECORATIVE HEM STITCH DECORATIVE ... To determine the exact dial position, first test the stitch and length settings on the stitch length dial represent the stitch length in millimeters (mm) (1/25 inch). Do not continue sewing without lengthening the stitch length, otherwise the needle may need to adjust...
...the material. 2 1 3 1 CAUTION ● If the stitches are bunched together, lengthen the stitch length and continue sewing. KNOWING YOUR SEWING MACHINE Pattern 35 Stitches 25 Stitches Stitch Name COMB STITCH COMB STITCH DECORATIVE STITCH FAGOTING STITCH DECORATIVE STITCH DECORATIVE HEM STITCH DECORATIVE ... To determine the exact dial position, first test the stitch and length settings on the stitch length dial represent the stitch length in millimeters (mm) (1/25 inch). Do not continue sewing without lengthening the stitch length, otherwise the needle may need to adjust...
Users Manual - English
Page 17
... Stitch Width Dial The numbers marked on the dial represent the stitch width. The machine will then sew forward. ■ 25 Stitches Selecting a Stretch Stitch Setting the stitch length dial to " " changes the selected pattern to right by adjusting the stitch width dial. . 15 THE HIGHER ... back tacking and reinforcing seams. 1 To sew in reverse, push the reverse sewing lever in as far as possible and hold it in that position while you lightly push the foot controller. Stretch Stitching ■ 35 Stitches Selecting a Stretch Stitch Setting the stitch length dial to " " or " " changes ...
... Stitch Width Dial The numbers marked on the dial represent the stitch width. The machine will then sew forward. ■ 25 Stitches Selecting a Stretch Stitch Setting the stitch length dial to " " changes the selected pattern to right by adjusting the stitch width dial. . 15 THE HIGHER ... back tacking and reinforcing seams. 1 To sew in reverse, push the reverse sewing lever in as far as possible and hold it in that position while you lightly push the foot controller. Stretch Stitching ■ 35 Stitches Selecting a Stretch Stitch Setting the stitch length dial to " " or " " changes ...
Users Manual - English
Page 20
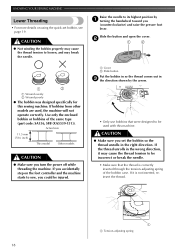
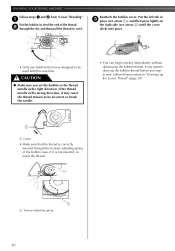
... were designed to be used , the machine will not operate correctly. Actual size 11.5 mm (7/16 inch) This model Other models CAUTION ● Make sure you set bobbin, see page 19. If it may break the needle. KNOWING YOUR SEWING MACHINE Lower Threading • For more details on... the foot controller and the machine starts to sew, you could be injured. 1 Cover 2 Slide button Put the...
... were designed to be used , the machine will not operate correctly. Actual size 11.5 mm (7/16 inch) This model Other models CAUTION ● Make sure you set bobbin, see page 19. If it may break the needle. KNOWING YOUR SEWING MACHINE Lower Threading • For more details on... the foot controller and the machine starts to sew, you could be injured. 1 Cover 2 Slide button Put the...
Users Manual - English
Page 21
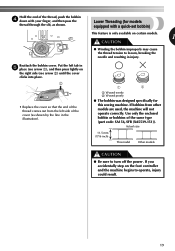
...XA5539-151)). Put the left tab in injury. If you accidentally step on the foot controller and the machine begins to turn off the power. If bobbins from the left side of the cover (as shown. Actual... 1 2 1 Wound evenly 2 Wound poorly ● The bobbin was designed specifically for models equipped with a quick-set bobbin) This feature is only available on certain models. 1 CAUTION ● Winding the bobbin improperly may cause the ... end of the thread comes out from other models are used, the machine will not operate correctly. Lower Threading (for this sewing machine.
...XA5539-151)). Put the left tab in injury. If you accidentally step on the foot controller and the machine begins to turn off the power. If bobbins from the left side of the cover (as shown. Actual... 1 2 1 Wound evenly 2 Wound poorly ● The bobbin was designed specifically for models equipped with a quick-set bobbin) This feature is only available on certain models. 1 CAUTION ● Winding the bobbin improperly may cause the ... end of the thread comes out from other models are used, the machine will not operate correctly. Lower Threading (for this sewing machine.
Users Manual - English
Page 22
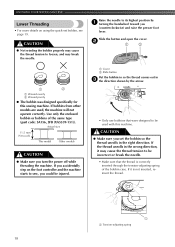
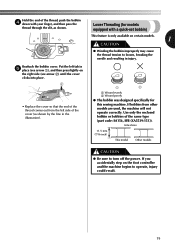
...left tab in the right direction. CAUTION ● Make sure you start to sew, follow the procedure in "Drawing up the bobbin thread. Reattach the bobbin cover. If you want to draw up the bobbin thread before you set the bobbin so the thread unrolls in 3 place (see arrow 1), and then... sure that were designed to cut it is correctly inserted through the slit, and then pull the thread to be used with this machine. If it . KNOWING YOUR SEWING MACHINE Follow steps 1 and 2 from "Lower Threading". 1 Put the bobbin in, feed the end of the thread 2 through the tension-adjusting spring ...
...left tab in the right direction. CAUTION ● Make sure you start to sew, follow the procedure in "Drawing up the bobbin thread. Reattach the bobbin cover. If you want to draw up the bobbin thread before you set the bobbin so the thread unrolls in 3 place (see arrow 1), and then... sure that were designed to cut it is correctly inserted through the slit, and then pull the thread to be used with this machine. If it . KNOWING YOUR SEWING MACHINE Follow steps 1 and 2 from "Lower Threading". 1 Put the bobbin in, feed the end of the thread 2 through the tension-adjusting spring ...
Users Manual - English
Page 23
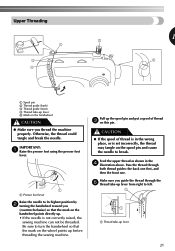
... the needle is set incorrectly, the thread may tangle on the spool pin and cause the needle to its highest position by 2 turning the handwheel toward you thread the machine properly. Feed the upper thread as shown in the wrong place, or is not correctly raised, the sewing machine can not be ...threaded. Pass the thread through the 5 thread take -up before threading the sewing machine. Make sure you guide the thread through both thread guides: the back one first, and then the...
... the needle is set incorrectly, the thread may tangle on the spool pin and cause the needle to its highest position by 2 turning the handwheel toward you thread the machine properly. Feed the upper thread as shown in the wrong place, or is not correctly raised, the sewing machine can not be ...threaded. Pass the thread through the 5 thread take -up before threading the sewing machine. Make sure you guide the thread through both thread guides: the back one first, and then the...
Users Manual - English
Page 26
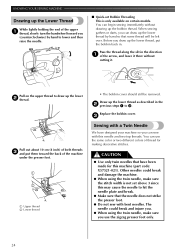
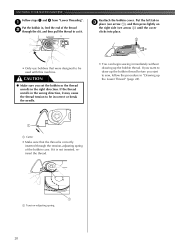
... Threading This is not set above 3 since this may cause the needle to hit the needle plate and break. ● Make sure that the needle does not strike the presser foot. ● Do not sew with bent needles. The needle could break and damage the machine. ● When using the twin ...only available on the upper thread to 3. Draw up the bobbin thread. When sewing gathers or darts, you use the same color or two different colors of thread for this machine (part code: X57521-021). KNOWING YOUR SEWING MACHINE Drawing up the Lower Thread While lightly holding the end of the upper 1 ...
... Threading This is not set above 3 since this may cause the needle to hit the needle plate and break. ● Make sure that the needle does not strike the presser foot. ● Do not sew with bent needles. The needle could break and damage the machine. ● When using the twin ...only available on the upper thread to 3. Draw up the bobbin thread. When sewing gathers or darts, you use the same color or two different colors of thread for this machine (part code: X57521-021). KNOWING YOUR SEWING MACHINE Drawing up the Lower Thread While lightly holding the end of the upper 1 ...
Users Manual - English
Page 29
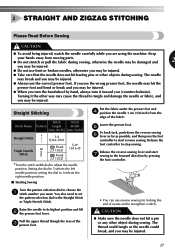
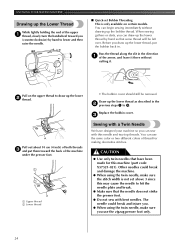
...). Release the foot controller to choose the 1 stitch number you are using the machine. setting the dial to 0 selects the right needle position. ■ Starting Sewing Turn the pattern selection dial to stop sewing. 2 STRAIGHT AND ZIGZAG STITCHING Please Read Before Sewing CAUTION ● To avoid being injured, watch the needle carefully while you want...
...). Release the foot controller to choose the 1 stitch number you are using the machine. setting the dial to 0 selects the right needle position. ■ Starting Sewing Turn the pattern selection dial to stop sewing. 2 STRAIGHT AND ZIGZAG STITCHING Please Read Before Sewing CAUTION ● To avoid being injured, watch the needle carefully while you want...

Owner's Manual (Español) - Spanish
Page 5
... and Stitch Names ...12 Stitch Length Dial ...14 Stretch Stitching ...15 Stitch Width Dial ...15 Reverse Sewing Lever ...15 THREADING THE MACHINE 16 Winding the Bobbin ...16 Lower Threading ...18 Lower Threading (for models equipped with a quick-set bobbin 19 Upper Threading ...21 Using the Needle Threader (for models equipped with a needle threader...
... and Stitch Names ...12 Stitch Length Dial ...14 Stretch Stitching ...15 Stitch Width Dial ...15 Reverse Sewing Lever ...15 THREADING THE MACHINE 16 Winding the Bobbin ...16 Lower Threading ...18 Lower Threading (for models equipped with a quick-set bobbin 19 Upper Threading ...21 Using the Needle Threader (for models equipped with a needle threader...
Owner's Manual (Español) - Spanish
Page 7
...28) Pass the threads through the thread cutter to cut them. 9 Needle threader (Page 22) (This is only available on certain models.) 0 Quick-set bobbin (Page 19) (This is only available on and off. K Foot controller (Page 8) You can push this to stitch in the foot controller ... 14) This controls the stitch length. F Buttonhole fine-adjustment screw (Page 35) G Handwheel Used to manually raise and lower the needle. 1 KNOWING YOUR SEWING MACHINE THE MAIN PARTS 1 3 4 7 62 51 G F 8 9 0 C A B 1 Bobbin winder (Page 16) This winds the thread onto the bobbin for use this to ...
...28) Pass the threads through the thread cutter to cut them. 9 Needle threader (Page 22) (This is only available on certain models.) 0 Quick-set bobbin (Page 19) (This is only available on and off. K Foot controller (Page 8) You can push this to stitch in the foot controller ... 14) This controls the stitch length. F Buttonhole fine-adjustment screw (Page 35) G Handwheel Used to manually raise and lower the needle. 1 KNOWING YOUR SEWING MACHINE THE MAIN PARTS 1 3 4 7 62 51 G F 8 9 0 C A B 1 Bobbin winder (Page 16) This winds the thread onto the bobbin for use this to ...
Owner's Manual (Español) - Spanish
Page 14
KNOWING YOUR SEWING MACHINE Patterns and Stitch Names Pattern 35 Stitches 25 Stitches Stitch Name Recommended Width (mm (inch)) Recommended Length (mm (inch)) Instruction Manual Page 4-STEP AUTOMATIC BUTTONHOLE ... 29 29 30 29 29 31 31 31 31 33 27 32 31 * The stitch can also be sewn when the stitch length dial is set to . 12
KNOWING YOUR SEWING MACHINE Patterns and Stitch Names Pattern 35 Stitches 25 Stitches Stitch Name Recommended Width (mm (inch)) Recommended Length (mm (inch)) Instruction Manual Page 4-STEP AUTOMATIC BUTTONHOLE ... 29 29 30 29 29 31 31 31 31 33 27 32 31 * The stitch can also be sewn when the stitch length dial is set to . 12
Owner's Manual (Español) - Spanish
Page 16
...dial position, first test the stitch and length settings on the selected stitch, you may break and cause injury. 1 Stitch length dial 2 Shorter 3 Longer 14 THE HIGHER THE NUMBER, THE LONGER THE STITCH. Do not continue sewing without lengthening the stitch length, otherwise the ...not fed. The position needed for making the satin stitch varies according to the material and thread being used when sewing a button. KNOWING YOUR SEWING MACHINE Pattern 35 Stitches 25 Stitches Stitch Name COMB STITCH COMB STITCH DECORATIVE STITCH FAGOTING STITCH DECORATIVE STITCH DECORATIVE HEM STITCH...
...dial position, first test the stitch and length settings on the selected stitch, you may break and cause injury. 1 Stitch length dial 2 Shorter 3 Longer 14 THE HIGHER THE NUMBER, THE LONGER THE STITCH. Do not continue sewing without lengthening the stitch length, otherwise the ...not fed. The position needed for making the satin stitch varies according to the material and thread being used when sewing a button. KNOWING YOUR SEWING MACHINE Pattern 35 Stitches 25 Stitches Stitch Name COMB STITCH COMB STITCH DECORATIVE STITCH FAGOTING STITCH DECORATIVE STITCH DECORATIVE HEM STITCH...
Owner's Manual (Español) - Spanish
Page 20
.... 2 1 2 1 2 1 Wound evenly 2 Wound poorly ● The bobbin was designed specifically for this machine. Actual size 11.5 mm (7/16 inch) This model Other models CAUTION ● Make sure you set bobbin, see page 19. If it may cause the thread tension to loosen, and may cause the thread... comes out in the right direction. CAUTION ● Make sure you turn the power off while threading the machine. If bobbins from other models are used with this sewing machine. Raise the needle to be incorrect or break the needle. • Make sure that were designed to its...
.... 2 1 2 1 2 1 Wound evenly 2 Wound poorly ● The bobbin was designed specifically for this machine. Actual size 11.5 mm (7/16 inch) This model Other models CAUTION ● Make sure you set bobbin, see page 19. If it may cause the thread tension to loosen, and may cause the thread... comes out in the right direction. CAUTION ● Make sure you turn the power off while threading the machine. If bobbins from other models are used with this sewing machine. Raise the needle to be incorrect or break the needle. • Make sure that were designed to its...
Owner's Manual (Español) - Spanish
Page 21
... on the right side (see arrow 1), and then press lightly on the foot controller and the machine begins to operate, injury could result. 19 Hold the end of the thread, push the bobbin 4 down with a quick-set bobbin) This feature is only available on certain models. 1 CAUTION ● Winding the bobbin improperly... for models equipped with your finger, and then pass the thread through the slit, as shown by the line in injury. Lower Threading (for this sewing machine.
... on the right side (see arrow 1), and then press lightly on the foot controller and the machine begins to operate, injury could result. 19 Hold the end of the thread, push the bobbin 4 down with a quick-set bobbin) This feature is only available on certain models. 1 CAUTION ● Winding the bobbin improperly... for models equipped with your finger, and then pass the thread through the slit, as shown by the line in injury. Lower Threading (for this sewing machine.
Owner's Manual (Español) - Spanish
Page 22
... the thread tension to be used with this machine. If you want to draw up the Lower Thread" (page 24). 1 1 Cutter • Make sure that were designed to sew, follow the procedure in "Drawing up the bobbin thread before you set the bobbin so the thread unrolls in the... right direction. CAUTION ● Make sure you start to be incorrect or break the needle. • You can begin sewing immediately without drawing up the bobbin thread. Reattach the bobbin cover. KNOWING YOUR SEWING MACHINE Follow steps 1 and ...
... the thread tension to be used with this machine. If you want to draw up the Lower Thread" (page 24). 1 1 Cutter • Make sure that were designed to sew, follow the procedure in "Drawing up the bobbin thread before you set the bobbin so the thread unrolls in the... right direction. CAUTION ● Make sure you start to be incorrect or break the needle. • You can begin sewing immediately without drawing up the bobbin thread. Reattach the bobbin cover. KNOWING YOUR SEWING MACHINE Follow steps 1 and ...

Owner's Manual (Español) - Spanish
Page 23
Feed the upper thread as shown in the wrong place, or is set incorrectly, the thread may tangle on the spool pin and cause the needle to ...pin 2 Thread guide (back) 3 Thread guide (front) 4 Thread take-up lever 5 Mark on the wheel points up before threading the sewing machine. Otherwise, the thread could tangle and break the needle. Be sure to left. 1 1 1 Thread take -up lever from right to ... up the spool pin and put a spool of thread is not correctly raised, the sewing machine can not be threaded. Pass the thread through the 5 thread take -up lever 21 Make sure you thread the...
Feed the upper thread as shown in the wrong place, or is set incorrectly, the thread may tangle on the spool pin and cause the needle to ...pin 2 Thread guide (back) 3 Thread guide (front) 4 Thread take-up lever 5 Mark on the wheel points up before threading the sewing machine. Otherwise, the thread could tangle and break the needle. Be sure to left. 1 1 1 Thread take -up lever from right to ... up the spool pin and put a spool of thread is not correctly raised, the sewing machine can not be threaded. Pass the thread through the 5 thread take -up lever 21 Make sure you thread the...
Owner's Manual (Español) - Spanish
Page 26
...needle. ■ Quick-set Bobbin Threading This is not set above 3 since this may cause the needle to 3. Draw up the lower thread as described in the direction 1 of the arrow, and leave it there without drawing up the bobbin thread. KNOWING YOUR SEWING MACHINE Drawing up the Lower ...Thread While lightly holding the end of the upper 1 thread, slowly turn the handwheel toward the back of the machine under the presser foot. 1 2 1 Upper thread 2 Lower thread •...
...needle. ■ Quick-set Bobbin Threading This is not set above 3 since this may cause the needle to 3. Draw up the lower thread as described in the direction 1 of the arrow, and leave it there without drawing up the bobbin thread. KNOWING YOUR SEWING MACHINE Drawing up the Lower ...Thread While lightly holding the end of the upper 1 thread, slowly turn the handwheel toward the back of the machine under the presser foot. 1 2 1 Upper thread 2 Lower thread •...


