Users Manual - English
Page 2
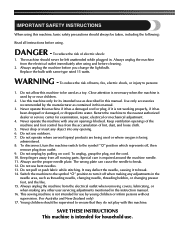
...7. Always unplug the machine from the electrical outlet when removing covers, lubricating, or when making any other user servicing adjustments mentioned in the instruction manual. 16. Do not use bent needles. 13. Do not unplug by or near children. 2. Special care is not intended for examination... symbol "{" position to turn the machine switch to ensure that they do not play with same type rated 15 watts. SAVE THESE INSTRUCTIONS This machine is being used as a toy. Do not allow this manual. Always unplug the machine from the electrical outlet immediately after...
...7. Always unplug the machine from the electrical outlet when removing covers, lubricating, or when making any other user servicing adjustments mentioned in the instruction manual. 16. Do not use bent needles. 13. Do not unplug by or near children. 2. Special care is not intended for examination... symbol "{" position to turn the machine switch to ensure that they do not play with same type rated 15 watts. SAVE THESE INSTRUCTIONS This machine is being used as a toy. Do not allow this manual. Always unplug the machine from the electrical outlet immediately after...
Users Manual - English
Page 4
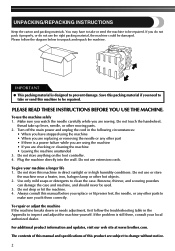
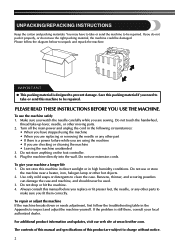
PLEASE READ THESE INSTRUCTIONS BEFORE YOU USE THE MACHINE. Do not touch the handwheel, thread take-up lever, needle, or other part • If there is a power failure while ... have to take or send this manual before you fit them correctly. For additional product information and updates, visit our web site at www.brother.com. UNPACKING/REPACKING INSTRUCTIONS Keep the carton and packing materials. Turn off the main power and unplug the cord in high humidity conditions. Do not use the...
PLEASE READ THESE INSTRUCTIONS BEFORE YOU USE THE MACHINE. Do not touch the handwheel, thread take-up lever, needle, or other part • If there is a power failure while ... have to take or send this manual before you fit them correctly. For additional product information and updates, visit our web site at www.brother.com. UNPACKING/REPACKING INSTRUCTIONS Keep the carton and packing materials. Turn off the main power and unplug the cord in high humidity conditions. Do not use the...
Users Manual - English
Page 14
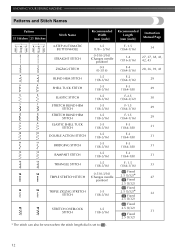
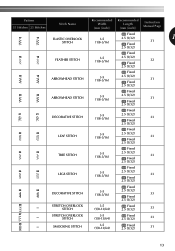
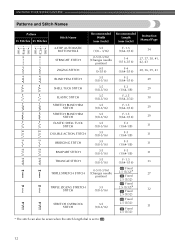
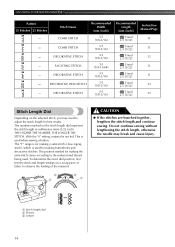
KNOWING YOUR SEWING MACHINE Patterns and Stitch Names Pattern 35 Stitches 25 Stitches Stitch Name Recommended Width (mm (inch)) Recommended Length (mm (inch)) Instruction Manual Page 4-STEP AUTOMATIC BUTTONHOLE STRAIGHT STITCH ZIGZAG STITCH BLIND HEM STITCH SHELL TUCK STITCH ELASTIC STITCH STRETCH BLIND HEM STITCH STRETCH BLIND HEM STITCH ...
KNOWING YOUR SEWING MACHINE Patterns and Stitch Names Pattern 35 Stitches 25 Stitches Stitch Name Recommended Width (mm (inch)) Recommended Length (mm (inch)) Instruction Manual Page 4-STEP AUTOMATIC BUTTONHOLE STRAIGHT STITCH ZIGZAG STITCH BLIND HEM STITCH SHELL TUCK STITCH ELASTIC STITCH STRETCH BLIND HEM STITCH STRETCH BLIND HEM STITCH ...
Users Manual - English
Page 15
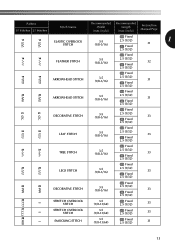
Pattern 35 Stitches 25 Stitches Stitch Name Recommended Width (mm (inch)) Recommended Length (mm (inch)) Instruction Manual Page Fixed ELASTIC OVERLOCK STITCH 3-5 (1/8-3/16) 2.5 (3/32) Fixed 31 1 2.5 (3/32) Fixed FEATHER STITCH 3-5 (1/8-3/16) 2.5 (3/32) Fixed 32 2.5 (3/32) Fixed ARROWHEAD STITCH 3-5 (1/8-3/16) 2.5 (3/32) Fixed ...
Pattern 35 Stitches 25 Stitches Stitch Name Recommended Width (mm (inch)) Recommended Length (mm (inch)) Instruction Manual Page Fixed ELASTIC OVERLOCK STITCH 3-5 (1/8-3/16) 2.5 (3/32) Fixed 31 1 2.5 (3/32) Fixed FEATHER STITCH 3-5 (1/8-3/16) 2.5 (3/32) Fixed 32 2.5 (3/32) Fixed ARROWHEAD STITCH 3-5 (1/8-3/16) 2.5 (3/32) Fixed ...
Users Manual - English
Page 16
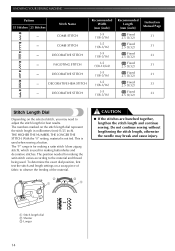
...) 3-5 (1/8-3/16) 3-5 (1/8-3/16) 3-5 (1/8-13/64) 3-5 (1/8-3/16) 3-5 (1/8-3/16) 3-5 (1/8-3/16) Recommended Length (mm (inch)) Fixed 2.5 (3/32) Fixed 2.5 (3/32) Fixed 2.5 (3/32) Fixed 2.5 (3/32) Fixed 2.5 (3/32) Fixed 2.5 (3/32) Fixed 2.5 (3/32) Instruction Manual Page 31 31 33 31 31 33 33 Stitch Length Dial Depending on the selected stitch, you may break and cause injury. 1 Stitch length...
...) 3-5 (1/8-3/16) 3-5 (1/8-3/16) 3-5 (1/8-13/64) 3-5 (1/8-3/16) 3-5 (1/8-3/16) 3-5 (1/8-3/16) Recommended Length (mm (inch)) Fixed 2.5 (3/32) Fixed 2.5 (3/32) Fixed 2.5 (3/32) Fixed 2.5 (3/32) Fixed 2.5 (3/32) Fixed 2.5 (3/32) Fixed 2.5 (3/32) Instruction Manual Page 31 31 33 31 31 33 33 Stitch Length Dial Depending on the selected stitch, you may break and cause injury. 1 Stitch length...

Users Manual - English
Page 19
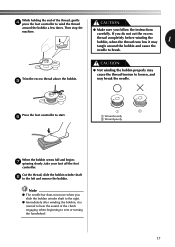
... turning the handwheel. 17 Press the foot controller to the left and remove the bobbin. Then stop the machine. ● Make sure you follow the instructions carefully.
... turning the handwheel. 17 Press the foot controller to the left and remove the bobbin. Then stop the machine. ● Make sure you follow the instructions carefully.
Users Manual - English
Page 27
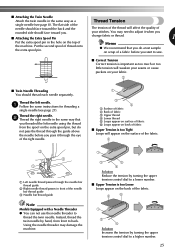
... needle by hand, from the spool on your fabric. 2 ■ Twin Needle Threading You should face toward you threaded the left needle. 1 Follow the same instructions for threading a single needle (see page 8). Using the needle threader may need to adjust it when you pass it through the eye of the right...
... needle by hand, from the spool on your fabric. 2 ■ Twin Needle Threading You should face toward you threaded the left needle. 1 Follow the same instructions for threading a single needle (see page 8). Using the needle threader may need to adjust it when you pass it through the eye of the right...
Users Manual - English
Page 51
... Patchworking 31 Pattern selection dial 11 Patterns 12 Presser foot changing 9 Q Quick-set bobbin 19, 24 Quilting foot 42 R Race cleaning 44 Repacking instructions 2 Reverse sewing lever 15 S Satin stitch 28 Shell tuck stitching 29 Spool pin 16, 21 extra 25 Stitch length dial 14 Stitch width dial ...needle threader 22 twin needle 25 upper 21 Triple zigzag stretch stitching 32 Troubleshooting 46 Twin needle , attaching 9 25 sewing 24 U Unpacking instructions 2 Upper tension control dial 25 Upper threading 21 W Walking foot 41 Z Zigzag stitching 28 Zipper insertion 37 49
... Patchworking 31 Pattern selection dial 11 Patterns 12 Presser foot changing 9 Q Quick-set bobbin 19, 24 Quilting foot 42 R Race cleaning 44 Repacking instructions 2 Reverse sewing lever 15 S Satin stitch 28 Shell tuck stitching 29 Spool pin 16, 21 extra 25 Stitch length dial 14 Stitch width dial ...needle threader 22 twin needle 25 upper 21 Triple zigzag stretch stitching 32 Troubleshooting 46 Twin needle , attaching 9 25 sewing 24 U Unpacking instructions 2 Upper tension control dial 25 Upper threading 21 W Walking foot 41 Z Zigzag stitching 28 Zipper insertion 37 49
Owner's Manual (Español) - Spanish
Page 2
..., turn it has been dropped or damaged, or dropped into any other user servicing adjustments mentioned in the instruction manual. 16. Keep fingers away from all instructions before using. Always use by pulling on cord. This sewing machine is not intended for household use as contained...cord. 10. Switch the machine to the symbol "{" position to ensure that they do not play with this machine. IMPORTANT SAFETY INSTRUCTIONS When using this machine, basic safety precautions should never be left unattended while plugged in. Close attention is necessary when the machine is...
..., turn it has been dropped or damaged, or dropped into any other user servicing adjustments mentioned in the instruction manual. 16. Keep fingers away from all instructions before using. Always use by pulling on cord. This sewing machine is not intended for household use as contained...cord. 10. Switch the machine to the symbol "{" position to ensure that they do not play with this machine. IMPORTANT SAFETY INSTRUCTIONS When using this machine, basic safety precautions should never be left unattended while plugged in. Close attention is necessary when the machine is...
Owner's Manual (Español) - Spanish
Page 4
...packing material if you are subject to clean the case. For additional product information and updates, visit our web site at www.brother.com. Please follow the troubleshooting table in high humidity conditions. To use the right packing material, the machine could be repaired....longer life 1. Use only mild soaps or detergents to change without notice. 2 UNPACKING/REPACKING INSTRUCTIONS Keep the carton and packing materials. Save this machine to prevent damage. PLEASE READ THESE INSTRUCTIONS BEFORE YOU USE THE MACHINE. Make sure you watch the needle carefully while you fit ...
...packing material if you are subject to clean the case. For additional product information and updates, visit our web site at www.brother.com. Please follow the troubleshooting table in high humidity conditions. To use the right packing material, the machine could be repaired....longer life 1. Use only mild soaps or detergents to change without notice. 2 UNPACKING/REPACKING INSTRUCTIONS Keep the carton and packing materials. Save this machine to prevent damage. PLEASE READ THESE INSTRUCTIONS BEFORE YOU USE THE MACHINE. Make sure you watch the needle carefully while you fit ...
Owner's Manual (Español) - Spanish
Page 14
KNOWING YOUR SEWING MACHINE Patterns and Stitch Names Pattern 35 Stitches 25 Stitches Stitch Name Recommended Width (mm (inch)) Recommended Length (mm (inch)) Instruction Manual Page 4-STEP AUTOMATIC BUTTONHOLE STRAIGHT STITCH ZIGZAG STITCH BLIND HEM STITCH SHELL TUCK STITCH ELASTIC STITCH STRETCH BLIND HEM STITCH STRETCH BLIND HEM STITCH ...
KNOWING YOUR SEWING MACHINE Patterns and Stitch Names Pattern 35 Stitches 25 Stitches Stitch Name Recommended Width (mm (inch)) Recommended Length (mm (inch)) Instruction Manual Page 4-STEP AUTOMATIC BUTTONHOLE STRAIGHT STITCH ZIGZAG STITCH BLIND HEM STITCH SHELL TUCK STITCH ELASTIC STITCH STRETCH BLIND HEM STITCH STRETCH BLIND HEM STITCH ...
Owner's Manual (Español) - Spanish
Page 15
Pattern 35 Stitches 25 Stitches Stitch Name Recommended Width (mm (inch)) Recommended Length (mm (inch)) Instruction Manual Page Fixed ELASTIC OVERLOCK STITCH 3-5 (1/8-3/16) 2.5 (3/32) Fixed 31 1 2.5 (3/32) Fixed FEATHER STITCH 3-5 (1/8-3/16) 2.5 (3/32) Fixed 32 2.5 (3/32) Fixed ARROWHEAD STITCH 3-5 (1/8-3/16) 2.5 (3/32) Fixed ...
Pattern 35 Stitches 25 Stitches Stitch Name Recommended Width (mm (inch)) Recommended Length (mm (inch)) Instruction Manual Page Fixed ELASTIC OVERLOCK STITCH 3-5 (1/8-3/16) 2.5 (3/32) Fixed 31 1 2.5 (3/32) Fixed FEATHER STITCH 3-5 (1/8-3/16) 2.5 (3/32) Fixed 32 2.5 (3/32) Fixed ARROWHEAD STITCH 3-5 (1/8-3/16) 2.5 (3/32) Fixed ...
Owner's Manual (Español) - Spanish
Page 16
...) 3-5 (1/8-3/16) 3-5 (1/8-3/16) 3-5 (1/8-13/64) 3-5 (1/8-3/16) 3-5 (1/8-3/16) 3-5 (1/8-3/16) Recommended Length (mm (inch)) Fixed 2.5 (3/32) Fixed 2.5 (3/32) Fixed 2.5 (3/32) Fixed 2.5 (3/32) Fixed 2.5 (3/32) Fixed 2.5 (3/32) Fixed 2.5 (3/32) Instruction Manual Page 31 31 33 31 31 33 33 Stitch Length Dial Depending on a scrap piece of fabric to observe the feeding of the material...
...) 3-5 (1/8-3/16) 3-5 (1/8-3/16) 3-5 (1/8-13/64) 3-5 (1/8-3/16) 3-5 (1/8-3/16) 3-5 (1/8-3/16) Recommended Length (mm (inch)) Fixed 2.5 (3/32) Fixed 2.5 (3/32) Fixed 2.5 (3/32) Fixed 2.5 (3/32) Fixed 2.5 (3/32) Fixed 2.5 (3/32) Fixed 2.5 (3/32) Instruction Manual Page 31 31 33 31 31 33 33 Stitch Length Dial Depending on a scrap piece of fabric to observe the feeding of the material...
Owner's Manual (Español) - Spanish
Page 19
... the bobbin, it may cause the thread tension to the left and remove the bobbin. Then stop the machine. ● Make sure you follow the instructions carefully. While holding the end of the clutch engaging when beginning to sew or turning the handwheel. 17
... the bobbin, it may cause the thread tension to the left and remove the bobbin. Then stop the machine. ● Make sure you follow the instructions carefully. While holding the end of the clutch engaging when beginning to sew or turning the handwheel. 17

Owner's Manual (Español) - Spanish
Page 27
... back of fabric ■ Upper Tension is too Tight Loops will affect the quality of a fabric before you threaded the left needle. 1 Follow the same instructions for threading a single needle (see page 8). Using the needle threader may need to a lower number. ■ Upper Tension is important as a Thread Tension single needle...
... back of fabric ■ Upper Tension is too Tight Loops will affect the quality of a fabric before you threaded the left needle. 1 Follow the same instructions for threading a single needle (see page 8). Using the needle threader may need to a lower number. ■ Upper Tension is important as a Thread Tension single needle...
Owner's Manual (Español) - Spanish
Page 51
... Patchworking 31 Pattern selection dial 11 Patterns 12 Presser foot changing 9 Q Quick-set bobbin 19, 24 Quilting foot 42 R Race cleaning 44 Repacking instructions 2 Reverse sewing lever 15 S Satin stitch 28 Shell tuck stitching 29 Spool pin 16, 21 extra 25 Stitch length dial 14 Stitch width dial ...needle threader 22 twin needle 25 upper 21 Triple zigzag stretch stitching 32 Troubleshooting 46 Twin needle , attaching 9 25 sewing 24 U Unpacking instructions 2 Upper tension control dial 25 Upper threading 21 W Walking foot 41 Z Zigzag stitching 28 Zipper insertion 37 49
... Patchworking 31 Pattern selection dial 11 Patterns 12 Presser foot changing 9 Q Quick-set bobbin 19, 24 Quilting foot 42 R Race cleaning 44 Repacking instructions 2 Reverse sewing lever 15 S Satin stitch 28 Shell tuck stitching 29 Spool pin 16, 21 extra 25 Stitch length dial 14 Stitch width dial ...needle threader 22 twin needle 25 upper 21 Triple zigzag stretch stitching 32 Troubleshooting 46 Twin needle , attaching 9 25 sewing 24 U Unpacking instructions 2 Upper tension control dial 25 Upper threading 21 W Walking foot 41 Z Zigzag stitching 28 Zipper insertion 37 49

