Users Manual - English
Page 1
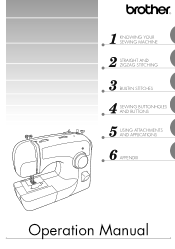
1 KNOWING YOUR SEWING MACHINE 2 STRAIGHT AND ZIGZAG STITCHING 3 BUILT-IN STITCHES 4 SEWING BUTTONHOLES AND BUTTONS 5 USING ATTACHMENTS AND APPLICATIONS 6 APPENDIX Operation Manual
1 KNOWING YOUR SEWING MACHINE 2 STRAIGHT AND ZIGZAG STITCHING 3 BUILT-IN STITCHES 4 SEWING BUTTONHOLES AND BUTTONS 5 USING ATTACHMENTS AND APPLICATIONS 6 APPENDIX Operation Manual
Users Manual - English
Page 2
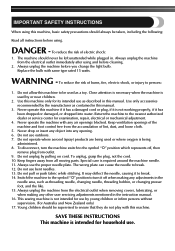
DANGER - Close attention is necessary when the machine is not working properly, if it off , then remove plug from the electrical outlet immediately after using . It may deflect the needle, causing it to ensure that they do not play with this machine. Young children should be supervised to break. 14. The machine should never be left unattended while plugged in the instruction manual. 16. Always unplug the machine before cleaning. 2. WARNING - Never operate the machine with same type rated 15 watts. Do not use the proper needle plate. Always use outdoors. 7....
DANGER - Close attention is necessary when the machine is not working properly, if it off , then remove plug from the electrical outlet immediately after using . It may deflect the needle, causing it to ensure that they do not play with this machine. Young children should be supervised to break. 14. The machine should never be left unattended while plugged in the instruction manual. 16. Always unplug the machine before cleaning. 2. WARNING - Never operate the machine with same type rated 15 watts. Do not use the proper needle plate. Always use outdoors. 7....
Users Manual - English
Page 3
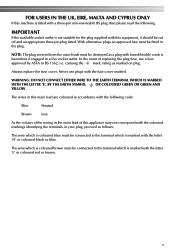
In the event of this appliance may not correspond with the coloured markings identifying the terminals in your plug, proceed as marked on plug. WARNING: DO NOT CONNECT EITHER WIRE TO THE EARTH TERMINAL WHICH IS MARKED WITH THE LETTER 'E', BY THE EARTH SYMBOL OR COLOURED GREEN OR GREEN AND YELLOW. Never use a fuse approved by ASTA to the terminal which is marked with the letter 'L' or coloured red or brown. 1 IMPORTANT If the available socket outlet is not suitable for the plug supplied with this equipment, it should be destroyed as a plug with bared flexible cords ...
In the event of this appliance may not correspond with the coloured markings identifying the terminals in your plug, proceed as marked on plug. WARNING: DO NOT CONNECT EITHER WIRE TO THE EARTH TERMINAL WHICH IS MARKED WITH THE LETTER 'E', BY THE EARTH SYMBOL OR COLOURED GREEN OR GREEN AND YELLOW. Never use a fuse approved by ASTA to the terminal which is marked with the letter 'L' or coloured red or brown. 1 IMPORTANT If the available socket outlet is not suitable for the plug supplied with this equipment, it should be destroyed as a plug with bared flexible cords ...
Users Manual - English
Page 4
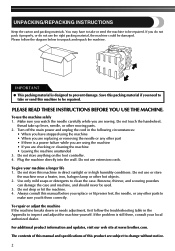
... should never be repaired. If the problem is designed to clean the case. For additional product information and updates, visit our web site at www.brother.com. Do not store anything on the foot controller. 4. UNPACKING/REPACKING INSTRUCTIONS Keep the carton and packing materials.
... should never be repaired. If the problem is designed to clean the case. For additional product information and updates, visit our web site at www.brother.com. Do not store anything on the foot controller. 4. UNPACKING/REPACKING INSTRUCTIONS Keep the carton and packing materials.
Users Manual - English
Page 5
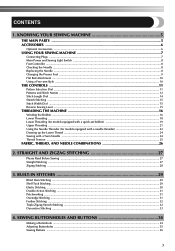
SEWING BUTTONHOLES AND BUTTONS 34 Making a Buttonhole ...34 Adjusting Buttonholes ...35 Sewing Buttons ...36 3 STRAIGHT AND ZIGZAG STITCHING 27 Please Read Before Sewing ...27 Straight Stitching ...27 Zigzag Stitching ...28 3. KNOWING YOUR SEWING MACHINE 5 THE MAIN PARTS ...5 ACCESSORIES ...6 Optional Accessories ...6 USING YOUR SEWING MACHINE 7 Connecting Plugs ...7 Main Power and Sewing Light Switch ...8 Foot Controller ...8 Checking the Needle ...8 Replacing the Needle ...8 Changing the Presser Foot ...9 Flat Bed Attachment ...10 Using a Free-arm Style ...10 THE CONTROLS ...11 ...
SEWING BUTTONHOLES AND BUTTONS 34 Making a Buttonhole ...34 Adjusting Buttonholes ...35 Sewing Buttons ...36 3 STRAIGHT AND ZIGZAG STITCHING 27 Please Read Before Sewing ...27 Straight Stitching ...27 Zigzag Stitching ...28 3. KNOWING YOUR SEWING MACHINE 5 THE MAIN PARTS ...5 ACCESSORIES ...6 Optional Accessories ...6 USING YOUR SEWING MACHINE 7 Connecting Plugs ...7 Main Power and Sewing Light Switch ...8 Foot Controller ...8 Checking the Needle ...8 Replacing the Needle ...8 Changing the Presser Foot ...9 Flat Bed Attachment ...10 Using a Free-arm Style ...10 THE CONTROLS ...11 ...

Users Manual - English
Page 6
APPENDIX ...44 MAINTENANCE ...44 Changing the Light Bulb ...44 Cleaning ...44 Troubleshooting ...46 INDEX ...49 4 5. USING ATTACHMENTS AND APPLICATIONS 37 Zipper Insertion ...37 Gathering ...38 Darning ...38 Appliqués ...39 Monogramming and Embroidering ...39 OPTIONAL ACCESSORIES 41 Using the Walking Foot ...41 Using the Quilting Foot ...42 Using the 1/4-inch Quilting Foot ...43 6.
APPENDIX ...44 MAINTENANCE ...44 Changing the Light Bulb ...44 Cleaning ...44 Troubleshooting ...46 INDEX ...49 4 5. USING ATTACHMENTS AND APPLICATIONS 37 Zipper Insertion ...37 Gathering ...38 Darning ...38 Appliqués ...39 Monogramming and Embroidering ...39 OPTIONAL ACCESSORIES 41 Using the Walking Foot ...41 Using the Quilting Foot ...42 Using the 1/4-inch Quilting Foot ...43 6.
Users Manual - English
Page 7
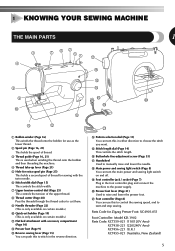
F Buttonhole fine-adjustment screw (Page 35) G Handwheel Used to raise and lower the presser foot. E Stitch length dial (Page 14) This controls the stitch length. H Main power and sewing light switch (Page 8) You can turn this in the foot controller plug and connect the machine to choose the stitch you want. J Presser foot lever (Page 21) Used to manually raise and lower the needle. K Foot controller (Page 8) You can use as the lower thread. 2 Spool pin (Page 16, 21) This holds the spool of thread. 3 Thread guide (Page 16, 21) This is used when winding the thread onto the bobbin...
F Buttonhole fine-adjustment screw (Page 35) G Handwheel Used to raise and lower the presser foot. E Stitch length dial (Page 14) This controls the stitch length. H Main power and sewing light switch (Page 8) You can turn this in the foot controller plug and connect the machine to choose the stitch you want. J Presser foot lever (Page 21) Used to manually raise and lower the needle. K Foot controller (Page 8) You can use as the lower thread. 2 Spool pin (Page 16, 21) This holds the spool of thread. 3 Thread guide (Page 16, 21) This is used when winding the thread onto the bobbin...
Users Manual - English
Page 8
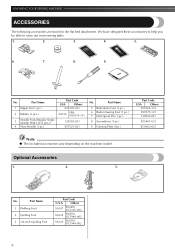
KNOWING YOUR SEWING MACHINE ACCESSORIES The following accessories are stored in the flat bed attachment. We have designed these accessories to help you be able to carry out most sewing tasks. 1. 2. 3. 4. 5. 6. 7. 8. 9. Optional Accessories 1. 2. 3. No. Part Name 5 Buttonhole Foot (1 pc.) 6 Button Sewing Foot (1 pc.) 7 Extra Spool Pin (1 pc.) 8 Screwdriver (1 pc.) 9 Darning Plate (1pc.) Part Code USA Others X59369-321 X59375-121 130920-021 X55467-021 XC6063-021 Note ● The included accessories vary depending on the machine model. Part Name 1 Zipper ...
KNOWING YOUR SEWING MACHINE ACCESSORIES The following accessories are stored in the flat bed attachment. We have designed these accessories to help you be able to carry out most sewing tasks. 1. 2. 3. 4. 5. 6. 7. 8. 9. Optional Accessories 1. 2. 3. No. Part Name 5 Buttonhole Foot (1 pc.) 6 Button Sewing Foot (1 pc.) 7 Extra Spool Pin (1 pc.) 8 Screwdriver (1 pc.) 9 Darning Plate (1pc.) Part Code USA Others X59369-321 X59375-121 130920-021 X55467-021 XC6063-021 Note ● The included accessories vary depending on the machine model. Part Name 1 Zipper ...
Users Manual - English
Page 9
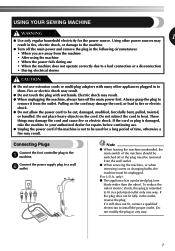
Always grasp the plug to install the proper outlet. Do not place heavy objects on the cord may damage the cord, or lead to fire or electric shock. ● Do not allow the power cord to heat. only) ● This appliance has a polarized plug (one way. To reduce the risk of time, otherwise a fire may result in fire, electric shock, or damage to the machine. ● Turn off the main power first. If it still does not fit, contact a qualified electrician to remove it from the outlet. Fire or electric shock may result. ● Do not touch the plug with many other appliances plugged...
Always grasp the plug to install the proper outlet. Do not place heavy objects on the cord may damage the cord, or lead to fire or electric shock. ● Do not allow the power cord to heat. only) ● This appliance has a polarized plug (one way. To reduce the risk of time, otherwise a fire may result in fire, electric shock, or damage to the machine. ● Turn off the main power first. If it still does not fit, contact a qualified electrician to remove it from the outlet. Fire or electric shock may result. ● Do not touch the plug with many other appliances plugged...
Users Manual - English
Page 10
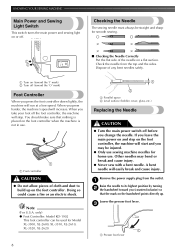
... start and you change the needle. only) ● Foot Controller: Model KD-1902 This foot controller can be straight and sharp for Model XL-3500, XL-2600, XL-3510, XL-2610, XL-3520, XL-2620. 8 1 2 1 Parallel space 2 Level surface (bobbin cover, glass, etc.) Replacing the Needle CAUTION ● Turn the main power switch off (toward the 'I' mark...
... start and you change the needle. only) ● Foot Controller: Model KD-1902 This foot controller can be straight and sharp for Model XL-3500, XL-2600, XL-3510, XL-2610, XL-3520, XL-2620. 8 1 2 1 Parallel space 2 Level surface (bobbin cover, glass, etc.) Replacing the Needle CAUTION ● Turn the main power switch off (toward the 'I' mark...
Users Manual - English
Page 11
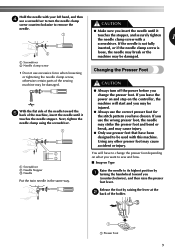
Next, tighten the needle clamp using the screwdriver. 1 ● Always turn the needle clamp screw counterclockwise to remove the CAUTION needle. ● Make sure you insert the needle until it 1 touches the stopper, and securely tighten the needle clamp screw with a 1 screwdriver. If you leave the power on and step on Type Raise the needle to its highest position by raising the lever at the 2 back of the machine, insert the needle until it touches the needle stopper. If you use the wrong presser foot, the needle may strike the presser foot and bend or break, and may be used...
Next, tighten the needle clamp using the screwdriver. 1 ● Always turn the needle clamp screw counterclockwise to remove the CAUTION needle. ● Make sure you insert the needle until it 1 touches the stopper, and securely tighten the needle clamp screw with a 1 screwdriver. If you leave the power on and step on Type Raise the needle to its highest position by raising the lever at the 2 back of the machine, insert the needle until it touches the needle stopper. If you use the wrong presser foot, the needle may strike the presser foot and bend or break, and may be used...
Users Manual - English
Page 12
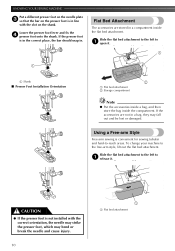
Using a Free-arm Style Free-arm sewing is in the correct place, the bar should snap in a bag, they may bend or break the needle and cause injury. 10 1 1 Flat bed attachment To change your machine to 1 open it . Flat Bed Attachment The accessories are not in . If the presser foot is convenient for sewing tubular and hard-to 1 release it . 1 1 1 Shank ■ Presser Foot Installation Orientation 2 1 Flat bed attachment 2 Storage compartment Note ● Put the accessories inside a bag, and then store the bag inside the flat bed attachment. Slide the flat bed attachment...
Using a Free-arm Style Free-arm sewing is in the correct place, the bar should snap in a bag, they may bend or break the needle and cause injury. 10 1 1 Flat bed attachment To change your machine to 1 open it . Flat Bed Attachment The accessories are not in . If the presser foot is convenient for sewing tubular and hard-to 1 release it . 1 1 1 Shank ■ Presser Foot Installation Orientation 2 1 Flat bed attachment 2 Storage compartment Note ● Put the accessories inside a bag, and then store the bag inside the flat bed attachment. Slide the flat bed attachment...
Users Manual - English
Page 13
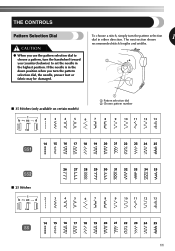
To choose a stitch, simply turn the pattern selection dial, the needle, presser foot or fabric may be damaged. If the needle is in the down position when you (counterclockwise) to choose a pattern, turn the handwheel toward you turn the pattern selection dial in the highest position. The next section shows 1 recommended stitch lengths and widths. 2 ■ 35 Stitches (only available on certain models) 1 1 Pattern selection dial 2 Chosen pattern number ■ 25 Stitches 11 THE CONTROLS Pattern Selection Dial CAUTION ● When you use the pattern selection dial to set ...
To choose a stitch, simply turn the pattern selection dial, the needle, presser foot or fabric may be damaged. If the needle is in the down position when you (counterclockwise) to choose a pattern, turn the handwheel toward you turn the pattern selection dial in the highest position. The next section shows 1 recommended stitch lengths and widths. 2 ■ 35 Stitches (only available on certain models) 1 1 Pattern selection dial 2 Chosen pattern number ■ 25 Stitches 11 THE CONTROLS Pattern Selection Dial CAUTION ● When you use the pattern selection dial to set ...
Users Manual - English
Page 14
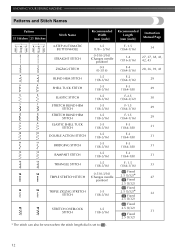
KNOWING YOUR SEWING MACHINE Patterns and Stitch Names Pattern 35 Stitches 25 Stitches Stitch Name Recommended Width (mm (inch)) Recommended Length (mm (inch)) Instruction Manual Page 4-STEP AUTOMATIC BUTTONHOLE STRAIGHT STITCH ZIGZAG STITCH BLIND HEM STITCH SHELL TUCK STITCH ELASTIC STITCH STRETCH BLIND HEM STITCH STRETCH BLIND HEM STITCH ELASTIC SHELL TUCK STITCH DOUBLE ACTION STITCH BRIDGING STITCH RAMPART STITCH TRIANGLE STITCH 3-5 (1/8 - 3/16) 0-5 (0-3/16) (Changes needle position) 0-5 (0-3/16) 3-5 (1/8-3/16) 3-5 (1/8-3/16) 3-5 (1/8-3/16) 3-5 (1/8-3/16) 3-5 (1/8-3/16) 3-5 (1/8-3/...
KNOWING YOUR SEWING MACHINE Patterns and Stitch Names Pattern 35 Stitches 25 Stitches Stitch Name Recommended Width (mm (inch)) Recommended Length (mm (inch)) Instruction Manual Page 4-STEP AUTOMATIC BUTTONHOLE STRAIGHT STITCH ZIGZAG STITCH BLIND HEM STITCH SHELL TUCK STITCH ELASTIC STITCH STRETCH BLIND HEM STITCH STRETCH BLIND HEM STITCH ELASTIC SHELL TUCK STITCH DOUBLE ACTION STITCH BRIDGING STITCH RAMPART STITCH TRIANGLE STITCH 3-5 (1/8 - 3/16) 0-5 (0-3/16) (Changes needle position) 0-5 (0-3/16) 3-5 (1/8-3/16) 3-5 (1/8-3/16) 3-5 (1/8-3/16) 3-5 (1/8-3/16) 3-5 (1/8-3/16) 3-5 (1/8-3/...
Users Manual - English
Page 15
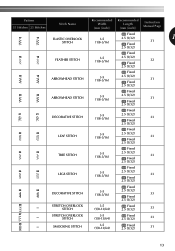
Pattern 35 Stitches 25 Stitches Stitch Name Recommended Width (mm (inch)) Recommended Length (mm (inch)) Instruction Manual Page Fixed ELASTIC OVERLOCK STITCH 3-5 (1/8-3/16) 2.5 (3/32) Fixed 31 1 2.5 (3/32) Fixed FEATHER STITCH 3-5 (1/8-3/16) 2.5 (3/32) Fixed 32 2.5 (3/32) Fixed ARROWHEAD STITCH 3-5 (1/8-3/16) 2.5 (3/32) Fixed 31 2.5 (3/32) Fixed ARROWHEAD STITCH 3-5 (1/8-3/16) 2.5 (3/32) Fixed 31 2.5 (3/32) Fixed DECORATIVE STITCH 3-5 (1/8-3/16) 2.5 (3/32) Fixed 33 2.5 (3/32) LEAF STITCH Fixed 3-5 (1/8-3/16) 2.5 (3/32) Fixed 33 2.5 (3/32) TREE STITCH...
Pattern 35 Stitches 25 Stitches Stitch Name Recommended Width (mm (inch)) Recommended Length (mm (inch)) Instruction Manual Page Fixed ELASTIC OVERLOCK STITCH 3-5 (1/8-3/16) 2.5 (3/32) Fixed 31 1 2.5 (3/32) Fixed FEATHER STITCH 3-5 (1/8-3/16) 2.5 (3/32) Fixed 32 2.5 (3/32) Fixed ARROWHEAD STITCH 3-5 (1/8-3/16) 2.5 (3/32) Fixed 31 2.5 (3/32) Fixed ARROWHEAD STITCH 3-5 (1/8-3/16) 2.5 (3/32) Fixed 31 2.5 (3/32) Fixed DECORATIVE STITCH 3-5 (1/8-3/16) 2.5 (3/32) Fixed 33 2.5 (3/32) LEAF STITCH Fixed 3-5 (1/8-3/16) 2.5 (3/32) Fixed 33 2.5 (3/32) TREE STITCH...
Users Manual - English
Page 16
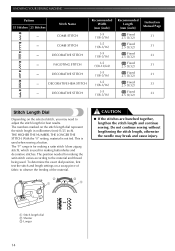
This is used for best results. The position needed for making the satin stitch varies according to observe the feeding of fabric to the material and thread being used. To determine the exact dial position, first test the stitch and length settings on a scrap piece of the material. 2 1 3 1 CAUTION ● If the stitches are bunched together, lengthen the stitch length and continue sewing. With the "0" setting, material is used when sewing a button. The "F" range is for making a satin stitch (close zigzag stitch), which is not fed. KNOWING YOUR SEWING MACHINE Pattern 35...
This is used for best results. The position needed for making the satin stitch varies according to observe the feeding of fabric to the material and thread being used. To determine the exact dial position, first test the stitch and length settings on a scrap piece of the material. 2 1 3 1 CAUTION ● If the stitches are bunched together, lengthen the stitch length and continue sewing. With the "0" setting, material is used when sewing a button. The "F" range is for making a satin stitch (close zigzag stitch), which is not fed. KNOWING YOUR SEWING MACHINE Pattern 35...
Users Manual - English
Page 17
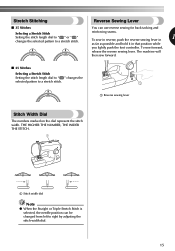
The machine will then sew forward. ■ 25 Stitches Selecting a Stretch Stitch Setting the stitch length dial to " " changes the selected pattern to a stretch stitch. Reverse Sewing Lever You can be changed from left to right by adjusting the stitch width dial. . 15 To sew forward, release the reverse sewing lever. THE HIGHER THE NUMBER, THE WIDER THE STITCH. 1 1 Stitch width dial Note ● When the Straight or Triple Stretch Stitch is selected, the needle position can use reverse sewing for back tacking and reinforcing seams. 1 To sew in reverse, push the reverse sewing lever ...
The machine will then sew forward. ■ 25 Stitches Selecting a Stretch Stitch Setting the stitch length dial to " " changes the selected pattern to a stretch stitch. Reverse Sewing Lever You can be changed from left to right by adjusting the stitch width dial. . 15 To sew forward, release the reverse sewing lever. THE HIGHER THE NUMBER, THE WIDER THE STITCH. 1 1 Stitch width dial Note ● When the Straight or Triple Stretch Stitch is selected, the needle position can use reverse sewing for back tacking and reinforcing seams. 1 To sew in reverse, push the reverse sewing lever ...
Users Manual - English
Page 18
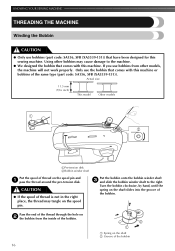
Turn the bobbin clockwise, by hand, until the spring on the spool pin. Only use the bobbin that comes with this machine. CAUTION ● If the spool of thread is not in the right place, the thread may cause damage to the right. If you use bobbins from the inside of the bobbin. 2 1 1 Spring on the spool pin and 1 pass the thread around the pre-tension disk. Put the bobbin onto the bobbin winder shaft 3 and slide the bobbin winder shaft to the machine. ● We designed the bobbin that have been designed for this sewing machine. Actual size 11.5 mm (7/16 inch) This model...
Turn the bobbin clockwise, by hand, until the spring on the spool pin. Only use the bobbin that comes with this machine. CAUTION ● If the spool of thread is not in the right place, the thread may cause damage to the right. If you use bobbins from the inside of the bobbin. 2 1 1 Spring on the spool pin and 1 pass the thread around the pre-tension disk. Put the bobbin onto the bobbin winder shaft 3 and slide the bobbin winder shaft to the machine. ● We designed the bobbin that have been designed for this sewing machine. Actual size 11.5 mm (7/16 inch) This model...

Users Manual - English
Page 19
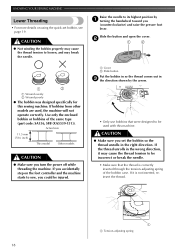
Then stop the machine. ● Make sure you slide the bobbin winder shaft to the right. ● Immediately after winding the bobbin, it may break the needle. Cut the thread, slide the bobbin winder shaft 8 to start. 6 1 2 1 Wound evenly 2 Wound poorly When the bobbin seems full and begins 7 spinning slowly, take your foot off the foot controller. While holding the end of the clutch engaging when beginning to sew or turning the handwheel. 17 Press the foot controller to the left and remove the bobbin. If you do not cut the excess thread completely before winding the ...
Then stop the machine. ● Make sure you slide the bobbin winder shaft to the right. ● Immediately after winding the bobbin, it may break the needle. Cut the thread, slide the bobbin winder shaft 8 to start. 6 1 2 1 Wound evenly 2 Wound poorly When the bobbin seems full and begins 7 spinning slowly, take your foot off the foot controller. While holding the end of the clutch engaging when beginning to sew or turning the handwheel. 17 Press the foot controller to the left and remove the bobbin. If you do not cut the excess thread completely before winding the ...
Users Manual - English
Page 20
CAUTION ● Not winding the bobbin properly may cause the thread tension to loosen, and may cause the thread tension to be incorrect or break the needle. • Make sure that were designed to be injured. 1 Cover 2 Slide button Put the bobbin in so the thread comes out in the right direction. Raise the needle to sew, you turn the power off while threading the machine. CAUTION ● Make sure you set bobbin, see page 19. If bobbins from other models are used with this sewing machine. If you accidentally step on using the quick-set the bobbin so the thread unrolls in 3 ...
CAUTION ● Not winding the bobbin properly may cause the thread tension to loosen, and may cause the thread tension to be incorrect or break the needle. • Make sure that were designed to be injured. 1 Cover 2 Slide button Put the bobbin in so the thread comes out in the right direction. Raise the needle to sew, you turn the power off while threading the machine. CAUTION ● Make sure you set bobbin, see page 19. If bobbins from other models are used with this sewing machine. If you accidentally step on using the quick-set the bobbin so the thread unrolls in 3 ...
