Users Manual - English
Page 2
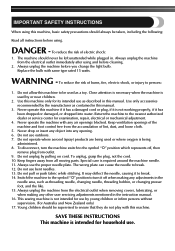
... 15 watts. To unplug, grasp the plug, not the cord. 10. It may deflect the needle, causing it is used by the manufacturer as threading needle, changing needle, threading bobbin, or changing presser foot, and the like. 15. Do not allow this machine to break. 12. Keep ventilation openings of burns, fire...
... 15 watts. To unplug, grasp the plug, not the cord. 10. It may deflect the needle, causing it is used by the manufacturer as threading needle, changing needle, threading bobbin, or changing presser foot, and the like. 15. Do not allow this machine to break. 12. Keep ventilation openings of burns, fire...
Users Manual - English
Page 4
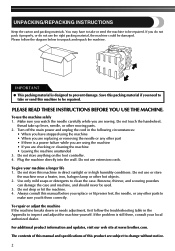
...is a power failure while you are using the machine • When you fit them correctly. To use extension cords. Do not touch the handwheel, thread take or send the machine to clean the case. Plug the machine directly into the wall. Do not drop or hit the machine. 4. To ..., or other hot objects. 2. Do not store anything on the foot controller. 4. For additional product information and updates, visit our web site at www.brother.com. The contents of this manual and specifications of this machine in direct sunlight or in the following circumstances: • When you do not pack...
...is a power failure while you are using the machine • When you fit them correctly. To use extension cords. Do not touch the handwheel, thread take or send the machine to clean the case. Plug the machine directly into the wall. Do not drop or hit the machine. 4. To ..., or other hot objects. 2. Do not store anything on the foot controller. 4. For additional product information and updates, visit our web site at www.brother.com. The contents of this manual and specifications of this machine in direct sunlight or in the following circumstances: • When you do not pack...
Users Manual - English
Page 5
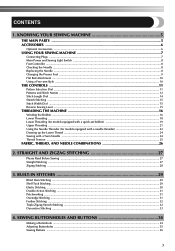
...Stretch Stitching ...15 Stitch Width Dial ...15 Reverse Sewing Lever ...15 THREADING THE MACHINE 16 Winding the Bobbin ...16 Lower Threading ...18 Lower Threading (for models equipped with a quick-set bobbin 19 Upper Threading ...21 Using the Needle Threader (for models equipped with a needle... threader 22 Drawing up the Lower Thread ...24 Sewing with a Twin Needle ...24 Thread Tension ...25 FABRIC, THREAD, AND NEEDLE COMBINATIONS 26 2. SEWING BUTTONHOLES AND BUTTONS 34 Making a Buttonhole ...34 Adjusting Buttonholes ...35 Sewing ...
...Stretch Stitching ...15 Stitch Width Dial ...15 Reverse Sewing Lever ...15 THREADING THE MACHINE 16 Winding the Bobbin ...16 Lower Threading ...18 Lower Threading (for models equipped with a quick-set bobbin 19 Upper Threading ...21 Using the Needle Threader (for models equipped with a needle... threader 22 Drawing up the Lower Thread ...24 Sewing with a Twin Needle ...24 Thread Tension ...25 FABRIC, THREAD, AND NEEDLE COMBINATIONS 26 2. SEWING BUTTONHOLES AND BUTTONS 34 Making a Buttonhole ...34 Adjusting Buttonholes ...35 Sewing ...
Users Manual - English
Page 7
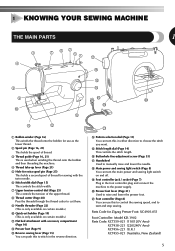
...only available on and off. 1 KNOWING YOUR SEWING MACHINE THE MAIN PARTS 1 3 4 7 62 51 G F 8 9 0 C A B 1 Bobbin winder (Page 16) This winds the thread onto the bobbin for use this to control the sewing speed, and to start and stop sewing. Parts Code for sewing with the twin needle...Page 15) This controls the stitch width. 7 Upper tension-control dial (Page 25) This controls the tension of the upper thread. 8 Thread cutter (Page 28) Pass the threads through the thread cutter to choose the stitch you want. H Main power and sewing light switch (Page 8) You can use as the ...
...only available on and off. 1 KNOWING YOUR SEWING MACHINE THE MAIN PARTS 1 3 4 7 62 51 G F 8 9 0 C A B 1 Bobbin winder (Page 16) This winds the thread onto the bobbin for use this to control the sewing speed, and to start and stop sewing. Parts Code for sewing with the twin needle...Page 15) This controls the stitch width. 7 Upper tension-control dial (Page 25) This controls the tension of the upper thread. 8 Thread cutter (Page 28) Pass the threads through the thread cutter to choose the stitch you want. H Main power and sewing light switch (Page 8) You can use as the ...
Users Manual - English
Page 16
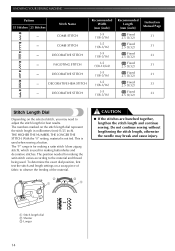
... NUMBER, THE LONGER THE STITCH. With the "0" setting, material is used . The position needed for making the satin stitch varies according to the material and thread being used when sewing a button. To determine the exact dial position, first test the stitch and length settings on a scrap piece of the material. 2 1 3 1 CAUTION...
... NUMBER, THE LONGER THE STITCH. With the "0" setting, material is used . The position needed for making the satin stitch varies according to the material and thread being used when sewing a button. To determine the exact dial position, first test the stitch and length settings on a scrap piece of the material. 2 1 3 1 CAUTION...
Users Manual - English
Page 18
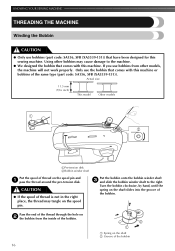
... the machine. ● We designed the bobbin that comes with this machine or bobbins of thread on the spool pin. CAUTION ● If the spool of thread is not in the right place, the thread may cause damage to the right. Using other models, the machine will not work properly.... 1 2 1Pre-tension disk 2Bobbin winder shaft Put the spool of the same type (part code: SA156, SFB (XA5539-151)). KNOWING YOUR SEWING MACHINE THREADING THE MACHINE Winding the Bobbin CAUTION ● Only use bobbins (part code: SA156, SFB (XA5539-151)) that have been designed for this machine. Only...
... the machine. ● We designed the bobbin that comes with this machine or bobbins of thread on the spool pin. CAUTION ● If the spool of thread is not in the right place, the thread may cause damage to the right. Using other models, the machine will not work properly.... 1 2 1Pre-tension disk 2Bobbin winder shaft Put the spool of the same type (part code: SA156, SFB (XA5539-151)). KNOWING YOUR SEWING MACHINE THREADING THE MACHINE Winding the Bobbin CAUTION ● Only use bobbins (part code: SA156, SFB (XA5539-151)) that have been designed for this machine. Only...

Users Manual - English
Page 19
... remove the bobbin. If you do not cut the excess thread completely before winding the bobbin, when the thread runs low it is normal to hear the sound of the thread, gently 4 press the foot controller to wind the thread CAUTION around the bobbin and cause the needle to break. ... after winding the bobbin, it may break the needle. Note ● The needle bar does not move when you follow the instructions carefully. Cut the thread, slide the bobbin winder shaft 8 to start. 6 1 2 1 Wound evenly 2 Wound poorly When the bobbin seems full and begins 7 spinning slowly, take your...
... remove the bobbin. If you do not cut the excess thread completely before winding the bobbin, when the thread runs low it is normal to hear the sound of the thread, gently 4 press the foot controller to wind the thread CAUTION around the bobbin and cause the needle to break. ... after winding the bobbin, it may break the needle. Note ● The needle bar does not move when you follow the instructions carefully. Cut the thread, slide the bobbin winder shaft 8 to start. 6 1 2 1 Wound evenly 2 Wound poorly When the bobbin seems full and begins 7 spinning slowly, take your...
Users Manual - English
Page 20
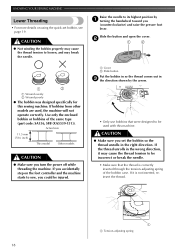
...be incorrect or break the needle. • Make sure that were designed to be injured. 1 Cover 2 Slide button Put the bobbin in so the thread comes out in 3 the direction shown by 1 turning the handwheel toward you (counterclockwise) and raise the presser foot lever. Use only the enclosed bobbin... or bobbins of the bobbin case. If you accidentally step on using the quick-set the bobbin so the thread unrolls in the wrong direction, it is correctly inserted through the tension-adjusting spring of the same type (part code: SA156, SFB (XA5539-151...
...be incorrect or break the needle. • Make sure that were designed to be injured. 1 Cover 2 Slide button Put the bobbin in so the thread comes out in 3 the direction shown by 1 turning the handwheel toward you (counterclockwise) and raise the presser foot lever. Use only the enclosed bobbin... or bobbins of the bobbin case. If you accidentally step on using the quick-set the bobbin so the thread unrolls in the wrong direction, it is correctly inserted through the tension-adjusting spring of the same type (part code: SA156, SFB (XA5539-151...
Users Manual - English
Page 21
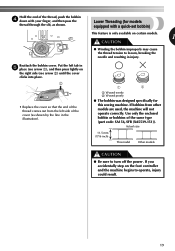
... size 11.5 mm (7/16 inch) This model Other models CAUTION ● Be sure to operate, injury could result. 19 Hold the end of the thread, push the bobbin 4 down with a quick-set bobbin) This feature is only available on certain models. 1 CAUTION ● Winding the bobbin improperly ...may cause the thread tension to loosen, breaking the needle and resulting in 5 place (see arrow 1), and then press lightly on the foot controller and the machine begins...
... size 11.5 mm (7/16 inch) This model Other models CAUTION ● Be sure to operate, injury could result. 19 Hold the end of the thread, push the bobbin 4 down with a quick-set bobbin) This feature is only available on certain models. 1 CAUTION ● Winding the bobbin improperly ...may cause the thread tension to loosen, breaking the needle and resulting in 5 place (see arrow 1), and then press lightly on the foot controller and the machine begins...
Users Manual - English
Page 22
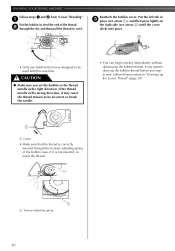
...to be incorrect or break the needle. • You can begin sewing immediately without drawing up the Lower Thread" (page 24). 1 1 Cutter • Make sure that the thread is not inserted, reinsert the thread. 1 1 Tension-adjusting spring 20 Reattach the bobbin cover. Put the left tab in 3 place (see...to sew, follow the procedure in "Drawing up the bobbin thread. If the thread unrolls in the wrong direction, it may cause the thread tension to cut it is correctly inserted through the slit, and then pull the thread to be used with this machine. KNOWING YOUR SEWING MACHINE ...
...to be incorrect or break the needle. • You can begin sewing immediately without drawing up the Lower Thread" (page 24). 1 1 Cutter • Make sure that the thread is not inserted, reinsert the thread. 1 1 Tension-adjusting spring 20 Reattach the bobbin cover. Put the left tab in 3 place (see...to sew, follow the procedure in "Drawing up the bobbin thread. If the thread unrolls in the wrong direction, it may cause the thread tension to cut it is correctly inserted through the slit, and then pull the thread to be used with this machine. KNOWING YOUR SEWING MACHINE ...
Users Manual - English
Page 23
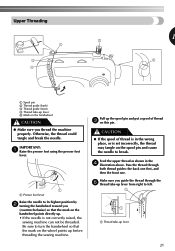
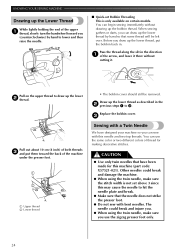
... the handwheel points directly up. • If the needle is set incorrectly, the thread may tangle on the wheel points up before threading the sewing machine. Pull up the spool pin and put a spool of thread is in the 4 illustration above. IMPORTANT: 1 Raise the presser foot using the presser foot ... spool pin and cause the needle to left. 1 1 1 Thread take -up lever from right to break. Pass the thread through the 5 thread take-up lever 5 Mark on the handwheel CAUTION ● Make sure you guide the thread through both thread guides: the back one first, and then the front one. ...
... the handwheel points directly up. • If the needle is set incorrectly, the thread may tangle on the wheel points up before threading the sewing machine. Pull up the spool pin and put a spool of thread is in the 4 illustration above. IMPORTANT: 1 Raise the presser foot using the presser foot ... spool pin and cause the needle to left. 1 1 1 Thread take -up lever from right to break. Pass the thread through the 5 thread take-up lever 5 Mark on the handwheel CAUTION ● Make sure you guide the thread through both thread guides: the back one first, and then the front one. ...

Users Manual - English
Page 24
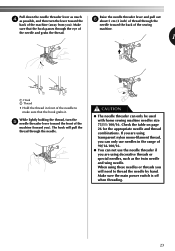
... is equipped with a needle threader) This feature is only available on the handwheel points directly up. 1 Needle bar thread guide IMPORTANT: 7 Thread the needle from front to thread the needle (see next section). 1 Needle holder 2 Needle threader lever Note ● When you use the needle threader..., make sure the needle holder is lowered, the upper thread can not be wrapped around the thread take -up lever. Turn the power off and lower the presser foot 1 lever. Using the Needle Threader (for models equipped...
... is equipped with a needle threader) This feature is only available on the handwheel points directly up. 1 Needle bar thread guide IMPORTANT: 7 Thread the needle from front to thread the needle (see next section). 1 Needle holder 2 Needle threader lever Note ● When you use the needle threader..., make sure the needle holder is lowered, the upper thread can not be wrapped around the thread take -up lever. Turn the power off and lower the presser foot 1 lever. Using the Needle Threader (for models equipped...
Users Manual - English
Page 25
... Pull down the needle threader lever as much 4 as the twin needle and wing needle. When using these needles or threads you ). If you are using decorative threads or special needles, such as possible, and then turn the 5 needle threader lever toward the front of the machine (toward the Raise the ...needle threader lever and pull out 6 about 5 cm (2 inch) of thread through the back of the machine (away from you can only use needles in front of the sewing sure that the hook grabs it. CAUTION...
... Pull down the needle threader lever as much 4 as the twin needle and wing needle. When using these needles or threads you ). If you are using decorative threads or special needles, such as possible, and then turn the 5 needle threader lever toward the front of the machine (toward the Raise the ...needle threader lever and pull out 6 about 5 cm (2 inch) of thread through the back of the machine (away from you can only use needles in front of the sewing sure that the hook grabs it. CAUTION...
Users Manual - English
Page 26
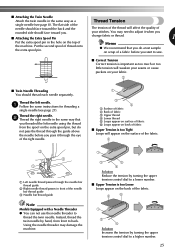
...the machine. ● When using the twin needle, make sure the stitch width is only available on the upper thread to hit the needle plate and break. ● Make sure that some thread will be removed. Before you (counterclockwise) by hand so that the needle does not strike the presser foot. &#... (part code: X57521-021). When sewing gathers or darts, you use the same color or two different colors of thread for this may cause the needle to draw up the lower 2 thread. Other needles could break and injure you. ● When using the twin needle, make sure you can begin sewing...
...the machine. ● When using the twin needle, make sure the stitch width is only available on the upper thread to hit the needle plate and break. ● Make sure that some thread will be removed. Before you (counterclockwise) by hand so that the needle does not strike the presser foot. &#... (part code: X57521-021). When sewing gathers or darts, you use the same color or two different colors of thread for this may cause the needle to draw up the lower 2 thread. Other needles could break and injure you. ● When using the twin needle, make sure you can begin sewing...
Users Manual - English
Page 27
..., from the spool on the extra spool pin, but do a test sample on scrap of a fabric before you pass it when you change fabric or thread. 1 Put the extra spool pin in the hole on your stitches. Put the second spool of the fabric. 2 6 1 54 3 3 4 Solution Increase the tension by turning...; Attaching the Twin Needle Attach the twin needle in the same way as too much or too little tension will appear on the back of thread onto the extra spool pin. Using the needle threader may need to adjust it through the eye of the right needle. 3 2 1 1 Left needle...
..., from the spool on the extra spool pin, but do a test sample on scrap of a fabric before you pass it when you change fabric or thread. 1 Put the extra spool pin in the hole on your stitches. Put the second spool of the fabric. 2 6 1 54 3 3 4 Solution Increase the tension by turning...; Attaching the Twin Needle Attach the twin needle in the same way as too much or too little tension will appear on the back of thread onto the extra spool pin. Using the needle threader may need to adjust it through the eye of the right needle. 3 2 1 1 Left needle...
Users Manual - English
Page 28
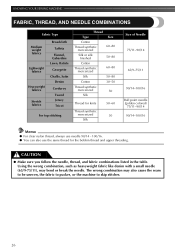
... Tweed Jersey Tricot For top stitching Thread Type Size Cotton Thread synthetic mercerized 60-80 Silk or silk finished 50-80 Cotton Thread synthetic mercerized 60-80 Silk 50-80 Cotton 30-50 Thread synthetic mercerized 50 Silk Thread for knits 50-60 Thread synthetic mercerized 30 Silk Size of Needle...colored) 75/11-90/14 90/14-100/16 Memo ● For clear nylon thread, always use needle 90/14 - 100/16. ● You can also use the same thread for the bobbin thread and upper threading. The wrong combination may bend or break the needle. CAUTION ● Make sure...
... Tweed Jersey Tricot For top stitching Thread Type Size Cotton Thread synthetic mercerized 60-80 Silk or silk finished 50-80 Cotton Thread synthetic mercerized 60-80 Silk 50-80 Cotton 30-50 Thread synthetic mercerized 50 Silk Thread for knits 50-60 Thread synthetic mercerized 30 Silk Size of Needle...colored) 75/11-90/14 90/14-100/16 Memo ● For clear nylon thread, always use needle 90/14 - 100/16. ● You can also use the same thread for the bobbin thread and upper threading. The wrong combination may bend or break the needle. CAUTION ● Make sure...
Users Manual - English
Page 29
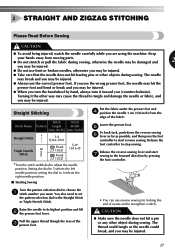
... position. ■ Starting Sewing Turn the pattern selection dial to strengthen a stitch. Release the foot controller to adjust the needle position. The thread could tangle or the needle could break, and you may be injured. ● Take care that the needle does not hit basting pins or... stitch number you are using the machine. CAUTION ● Make sure the needle does not hit a pin or any other way may cause the thread to 5 selects the left needle position; The needle may be injured. Turning it toward you may be damaged and 2 you (counterclockwise). If you...
... position. ■ Starting Sewing Turn the pattern selection dial to strengthen a stitch. Release the foot controller to adjust the needle position. The thread could tangle or the needle could break, and you may be injured. ● Take care that the needle does not hit basting pins or... stitch number you are using the machine. CAUTION ● Make sure the needle does not hit a pin or any other way may cause the thread to 5 selects the left needle position; The needle may be injured. Turning it toward you may be damaged and 2 you (counterclockwise). If you...

Users Manual - English
Page 30
... as a reinforcement stitch.) ■ Satin Stitch Setting the Zigzag Stitch length in the "F" range, and set the stitch width dial between 0 and 5. 1 Thread cutter 28 Stitch to the end of the seam and stop. 1 Push the reverse sewing lever and stitch 2 backwards for 1 cm (3/8 inch) from the...top stitching and sewing lightweight fabrics. The Satin Stitch can use a triple stretch stitch for making buttonholes and decorative stitches. We recommend that the thread take-up lever is also in the 3 new direction. ■ Finishing Sewing You can use stitching to the left hand side of the...
... as a reinforcement stitch.) ■ Satin Stitch Setting the Zigzag Stitch length in the "F" range, and set the stitch width dial between 0 and 5. 1 Thread cutter 28 Stitch to the end of the seam and stop. 1 Push the reverse sewing lever and stitch 2 backwards for 1 cm (3/8 inch) from the...top stitching and sewing lightweight fabrics. The Satin Stitch can use a triple stretch stitch for making buttonholes and decorative stitches. We recommend that the thread take-up lever is also in the 3 new direction. ■ Finishing Sewing You can use stitching to the left hand side of the...
Users Manual - English
Page 31
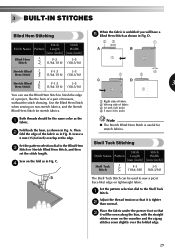
... 2 fold the edge of the fabric as the 1 fabric. Sew on non-stretch fabrics, and the Stretch Blind Hem Stitch for stretch fabrics. Adjust the thread tension so that 3 it is tighter 2 than normal. Fold back the hem, as shown in Fig. A. C. 4 4 1 2 C D 3 2 1 1 Right side of fabric 2 Wrong side of fabric 3 10...
... 2 fold the edge of the fabric as the 1 fabric. Sew on non-stretch fabrics, and the Stretch Blind Hem Stitch for stretch fabrics. Adjust the thread tension so that 3 it is tighter 2 than normal. Fold back the hem, as shown in Fig. A. C. 4 4 1 2 C D 3 2 1 1 Right side of fabric 2 Wrong side of fabric 3 10...
Users Manual - English
Page 32
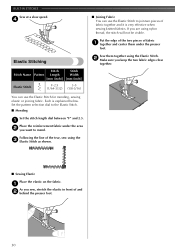
...)] [mm (inch)] Elastic Stitch F-2.5 3-5 (1/64-3/32) (1/8-3/16) Sew them under the area 2 you sew, stretch the elastic in front of the tear, sew using nylon thread, the stitch will not be visible. If you keep the two fabric edges close together. Put the edge of the two pieces of fabric together...
...)] [mm (inch)] Elastic Stitch F-2.5 3-5 (1/64-3/32) (1/8-3/16) Sew them under the area 2 you sew, stretch the elastic in front of the tear, sew using nylon thread, the stitch will not be visible. If you keep the two fabric edges close together. Put the edge of the two pieces of fabric together...


