Users Manual - English
Page 2
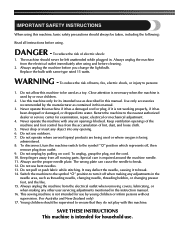
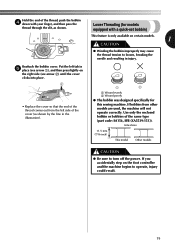
Always unplug the machine from the electrical outlet when removing covers, lubricating, or when making any adjustments in the needle area, such as described in the instruction manual. 16. Always unplug the machine before cleaning. 2. Replace ... from the accumulation of the machine and foot control free from outlet. 9. Use this machine only for household use as threading needle, changing needle, threading bobbin, or changing presser foot, and the like. 15. Never operate this machine if it has a damaged cord or plug, if it is intended for its...
Always unplug the machine from the electrical outlet when removing covers, lubricating, or when making any adjustments in the needle area, such as described in the instruction manual. 16. Always unplug the machine before cleaning. 2. Replace ... from the accumulation of the machine and foot control free from outlet. 9. Use this machine only for household use as threading needle, changing needle, threading bobbin, or changing presser foot, and the like. 15. Never operate this machine if it has a damaged cord or plug, if it is intended for its...
Users Manual - English
Page 10
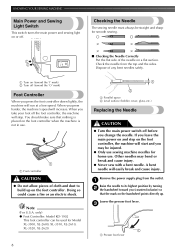
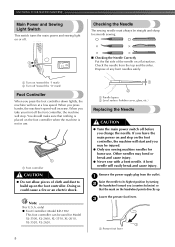
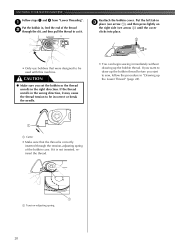
... the needle on the foot controller. only) ● Foot Controller: Model KD-1902 This foot controller can be used for Model XL-3500, XL-2600, XL-3510, XL-2610, XL-3520, XL-2620. 8 1 2 1 Parallel space 2 Level surface (bobbin cover, glass, etc.) Replacing the Needle CAUTION ● Turn the main power switch off . Doing so could cause a fire or an...
... the needle on the foot controller. only) ● Foot Controller: Model KD-1902 This foot controller can be used for Model XL-3500, XL-2600, XL-3510, XL-2610, XL-3520, XL-2620. 8 1 2 1 Parallel space 2 Level surface (bobbin cover, glass, etc.) Replacing the Needle CAUTION ● Turn the main power switch off . Doing so could cause a fire or an...
Users Manual - English
Page 20
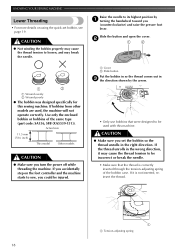
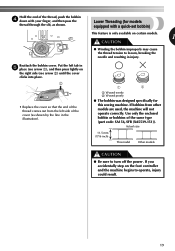
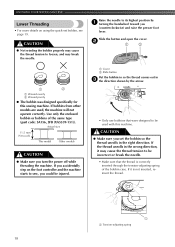
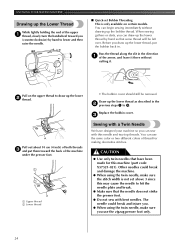
Slide the button and open the cover. 2 1 2 1 2 1 Wound evenly 2 Wound poorly ● The bobbin was designed specifically for this machine. If the thread unrolls in the wrong direction, it is correctly inserted through the tension-adjusting spring of the ... loosen, and may cause the thread tension to be incorrect or break the needle. • Make sure that were designed to be injured. 1 Cover 2 Slide button Put the bobbin in so the thread comes out in the right direction. KNOWING YOUR SEWING MACHINE Lower Threading • For more details on the foot...
Slide the button and open the cover. 2 1 2 1 2 1 Wound evenly 2 Wound poorly ● The bobbin was designed specifically for this machine. If the thread unrolls in the wrong direction, it is correctly inserted through the tension-adjusting spring of the ... loosen, and may cause the thread tension to be incorrect or break the needle. • Make sure that were designed to be injured. 1 Cover 2 Slide button Put the bobbin in so the thread comes out in the right direction. KNOWING YOUR SEWING MACHINE Lower Threading • For more details on the foot...
Users Manual - English
Page 21
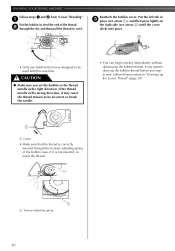
...operate correctly. Use only the enclosed bobbin or bobbins of the thread, push the bobbin 4 down with a quick-set bobbin) This feature is only available on the right side (see arrow 2) until the cover clicks into place. 2 1 • Replace the cover so that the end of the cover (as shown. If you accidentally ...for models equipped with your finger, and then pass the thread through the slit, as shown by the line in injury. Reattach the bobbin cover. If bobbins from the left tab in 5 place (see arrow 1), and then press lightly on certain models. 1 CAUTION ● Winding the...
...operate correctly. Use only the enclosed bobbin or bobbins of the thread, push the bobbin 4 down with a quick-set bobbin) This feature is only available on the right side (see arrow 2) until the cover clicks into place. 2 1 • Replace the cover so that the end of the cover (as shown. If you accidentally ...for models equipped with your finger, and then pass the thread through the slit, as shown by the line in injury. Reattach the bobbin cover. If bobbins from the left tab in 5 place (see arrow 1), and then press lightly on certain models. 1 CAUTION ● Winding the...
Users Manual - English
Page 22
... before you set the bobbin so the thread unrolls in 3 place (see arrow 1), and then press lightly on the right side (see arrow 2) until the cover clicks into place. 2 1 • Only use bobbins that the thread is not inserted, reinsert the thread. 1 1 Tension-adjusting spring ...20 If the thread unrolls in "Drawing up the bobbin thread. If you want to sew, follow the procedure in the wrong direction, it . Reattach the bobbin cover.
... before you set the bobbin so the thread unrolls in 3 place (see arrow 1), and then press lightly on the right side (see arrow 2) until the cover clicks into place. 2 1 • Only use bobbins that the thread is not inserted, reinsert the thread. 1 1 Tension-adjusting spring ...20 If the thread unrolls in "Drawing up the bobbin thread. If you want to sew, follow the procedure in the wrong direction, it . Reattach the bobbin cover.
Users Manual - English
Page 26
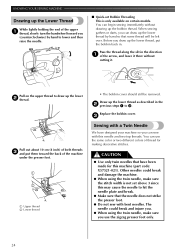
...the handwheel toward the back of the machine under the presser foot. 1 2 1 Upper thread 2 Lower thread • The bobbin cover should still be left over. Replace the bobbin cover. 3 Sewing with a Twin Needle We have been made for making decorative stitches. The needle could break and damage the machine. ...● When using the twin needle, make sure the stitch width is not set Bobbin Threading This is only ...
...the handwheel toward the back of the machine under the presser foot. 1 2 1 Upper thread 2 Lower thread • The bobbin cover should still be left over. Replace the bobbin cover. 3 Sewing with a Twin Needle We have been made for making decorative stitches. The needle could break and damage the machine. ...● When using the twin needle, make sure the stitch width is not set Bobbin Threading This is only ...
Users Manual - English
Page 47
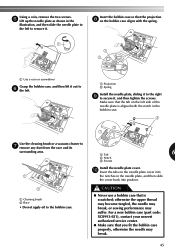
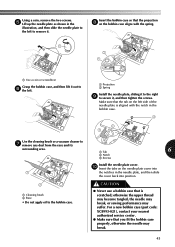
... aligns with the notch in the bobbin case. 3 Use the cleaning brush or a vacuum cleaner to 7 remove any dust from the race and its surrounding area. 1 Tab 6 2 Notch 3 Screws Install the needle plate cover. 0 Insert the tabs on the needle plate cover into position. 1 Cleaning brush 2 ...Race • Do not apply oil to the bobbin case. Make sure that you fit the bobbin case properly, otherwise the needle may suffer. otherwise the upper ...
... aligns with the notch in the bobbin case. 3 Use the cleaning brush or a vacuum cleaner to 7 remove any dust from the race and its surrounding area. 1 Tab 6 2 Notch 3 Screws Install the needle plate cover. 0 Insert the tabs on the needle plate cover into position. 1 Cleaning brush 2 ...Race • Do not apply oil to the bobbin case. Make sure that you fit the bobbin case properly, otherwise the needle may suffer. otherwise the upper ...
Users Manual - English
Page 50
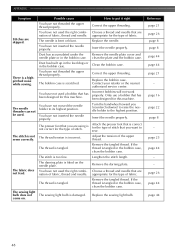
...page 8 - Correct the upper threading. You have not used a bobbin that you are skipped. Dust has accumulated under the Remove the needle plate cover and needle plate or in the bobbin case. clean the plate and the bobbin case. There is scratched. Correct the upper threading. You have ...needle properly. Turn the handwheel toward you want to the highest position. page 25 page 44 - - Replace the needle. Clean the bobbin case. Replace the bobbin case. The thread tension is too fine. Choose a thread and needle that you (counterclockwise) to raise the needle holder to sew...
...page 8 - Correct the upper threading. You have not used a bobbin that you are skipped. Dust has accumulated under the Remove the needle plate cover and needle plate or in the bobbin case. clean the plate and the bobbin case. There is scratched. Correct the upper threading. You have ...needle properly. Turn the handwheel toward you want to the highest position. page 25 page 44 - - Replace the needle. Clean the bobbin case. Replace the bobbin case. The thread tension is too fine. Choose a thread and needle that you (counterclockwise) to raise the needle holder to sew...
Owner's Manual (Español) - Spanish
Page 2
...operate where aerosol (spray) products are being used as a toy. Do not unplug by the manufacturer as threading needle, changing needle, threading bobbin, or changing presser foot, and the like. 15. It may deflect the needle, causing it has been dropped or damaged, or dropped ...To reduce the risk of burns, fire, electric shock, or injury to persons: 1. Always unplug the machine from the electrical outlet when removing covers, lubricating, or when making any adjustments in this manual. SAVE THESE INSTRUCTIONS This machine is being administered. 8. Always unplug the machine before ...
...operate where aerosol (spray) products are being used as a toy. Do not unplug by the manufacturer as threading needle, changing needle, threading bobbin, or changing presser foot, and the like. 15. It may deflect the needle, causing it has been dropped or damaged, or dropped ...To reduce the risk of burns, fire, electric shock, or injury to persons: 1. Always unplug the machine from the electrical outlet when removing covers, lubricating, or when making any adjustments in this manual. SAVE THESE INSTRUCTIONS This machine is being administered. 8. Always unplug the machine before ...
Owner's Manual (Español) - Spanish
Page 10
.... only) ● Foot Controller: Model KD-1902 This foot controller can be used for home use sewing machine needles for Model XL-3500, XL-2600, XL-3510, XL-2610, XL-3520, XL-2620. 8 1 2 1 Parallel space 2 Level surface (bobbin cover, glass, etc.) Replacing the Needle CAUTION ● Turn the main power switch off before you change the needle. When you...
.... only) ● Foot Controller: Model KD-1902 This foot controller can be used for home use sewing machine needles for Model XL-3500, XL-2600, XL-3510, XL-2610, XL-3520, XL-2620. 8 1 2 1 Parallel space 2 Level surface (bobbin cover, glass, etc.) Replacing the Needle CAUTION ● Turn the main power switch off before you change the needle. When you...
Owner's Manual (Español) - Spanish
Page 20
... you (counterclockwise) and raise the presser foot lever. CAUTION ● Make sure you set bobbin, see page 19. Slide the button and open the cover. 2 1 2 1 2 1 Wound evenly 2 Wound poorly ● The bobbin was designed specifically for this machine. If it may cause the thread tension to loosen, and... may cause the thread tension to be injured. 1 Cover 2 Slide button Put the bobbin in so the thread comes out in the right direction. KNOWING YOUR SEWING MACHINE Lower Threading • For more details on...
... you (counterclockwise) and raise the presser foot lever. CAUTION ● Make sure you set bobbin, see page 19. Slide the button and open the cover. 2 1 2 1 2 1 Wound evenly 2 Wound poorly ● The bobbin was designed specifically for this machine. If it may cause the thread tension to loosen, and... may cause the thread tension to be injured. 1 Cover 2 Slide button Put the bobbin in so the thread comes out in the right direction. KNOWING YOUR SEWING MACHINE Lower Threading • For more details on...
Owner's Manual (Español) - Spanish
Page 21
... left side of the cover (as shown. Reattach the bobbin cover. Actual size 11.5 mm (7/16 inch) This model Other models CAUTION ● Be sure to operate, injury could result. 19 Lower Threading (for this sewing machine. Hold the end of the thread, push the bobbin 4 down with a quick-set bobbin) This feature is only...
... left side of the cover (as shown. Reattach the bobbin cover. Actual size 11.5 mm (7/16 inch) This model Other models CAUTION ● Be sure to operate, injury could result. 19 Lower Threading (for this sewing machine. Hold the end of the thread, push the bobbin 4 down with a quick-set bobbin) This feature is only...
Owner's Manual (Español) - Spanish
Page 22
.... Put the left tab in 3 place (see arrow 1), and then press lightly on the right side (see arrow 2) until the cover clicks into place. 2 1 • Only use bobbins that the thread is not inserted, reinsert the thread. 1 1 Tension-adjusting spring 20 If you want to be used with this machine. If the...
.... Put the left tab in 3 place (see arrow 1), and then press lightly on the right side (see arrow 2) until the cover clicks into place. 2 1 • Only use bobbins that the thread is not inserted, reinsert the thread. 1 1 Tension-adjusting spring 20 If you want to be used with this machine. If the...
Owner's Manual (Español) - Spanish
Page 26
...machine (part code: X57521-021). Pass the thread along the slit in the 2 previous steps 1 to 3. Replace the bobbin cover. 3 Sewing with a Twin Needle We have been made for making decorative stitches. Draw up the lower thread as described... in the direction 1 of the arrow, and leave it there without drawing up the bobbin thread. Pull on certain models. You can draw up the lower thread by hand to lower and then raise the... of the machine under the presser foot. 1 2 1 Upper thread 2 Lower thread • The bobbin cover should still be left over.
...machine (part code: X57521-021). Pass the thread along the slit in the 2 previous steps 1 to 3. Replace the bobbin cover. 3 Sewing with a Twin Needle We have been made for making decorative stitches. Draw up the lower thread as described... in the direction 1 of the arrow, and leave it there without drawing up the bobbin thread. Pull on certain models. You can draw up the lower thread by hand to lower and then raise the... of the machine under the presser foot. 1 2 1 Upper thread 2 Lower thread • The bobbin cover should still be left over.
Owner's Manual (Español) - Spanish
Page 47
... the notches in the needle plate, and then slide the cover back into position. 1 Cleaning brush 2 Race • Do not apply oil to the bobbin case. otherwise the upper thread may become tangled, the needle may break, or sewing performance may break. 45 Using a coin, remove the two... left to 7 remove any dust from the race and its surrounding area. 1 Tab 6 2 Notch 3 Screws Install the needle plate cover. 0 Insert the tabs on the left side of the needle plate is scratched; Insert the bobbin case so that you fit the bobbin case properly, otherwise the needle may suffer.
... the notches in the needle plate, and then slide the cover back into position. 1 Cleaning brush 2 Race • Do not apply oil to the bobbin case. otherwise the upper thread may become tangled, the needle may break, or sewing performance may break. 45 Using a coin, remove the two... left to 7 remove any dust from the race and its surrounding area. 1 Tab 6 2 Notch 3 Screws Install the needle plate cover. 0 Insert the tabs on the left side of the needle plate is scratched; Insert the bobbin case so that you fit the bobbin case properly, otherwise the needle may suffer.
Owner's Manual (Español) - Spanish
Page 50
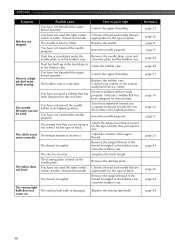
... this machine. You have not threaded the upper thread properly. Dust has accumulated under the Remove the needle plate cover and needle plate or in the bobbin case. Incorrect bobbins will not work properly. Insert the needle properly. The presser foot that has been designed for the type of ... the presser foot that you (counterclockwise) to raise the needle holder to the highest position. There is bent or blunt. Replace the bobbin case. APPENDIX Symptom Possible cause How to put it right You have not inserted the needle properly. Turn the handwheel toward you want to...
... this machine. You have not threaded the upper thread properly. Dust has accumulated under the Remove the needle plate cover and needle plate or in the bobbin case. Incorrect bobbins will not work properly. Insert the needle properly. The presser foot that has been designed for the type of ... the presser foot that you (counterclockwise) to raise the needle holder to the highest position. There is bent or blunt. Replace the bobbin case. APPENDIX Symptom Possible cause How to put it right You have not inserted the needle properly. Turn the handwheel toward you want to...


