Users Manual - English
Page 2
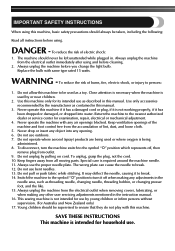
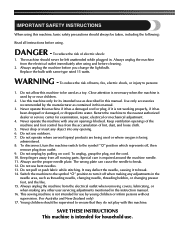
... with any air openings blocked. WARNING - Use this machine only for use . To disconnect, turn it to be taken, including the following: Read all moving parts. Always unplug the machine from outlet. 9. DANGER - To reduce the risk of burns, fire, electric shock, or injury to the nearest authorized dealer or service...
... with any air openings blocked. WARNING - Use this machine only for use . To disconnect, turn it to be taken, including the following: Read all moving parts. Always unplug the machine from outlet. 9. DANGER - To reduce the risk of burns, fire, electric shock, or injury to the nearest authorized dealer or service...
Users Manual - English
Page 4
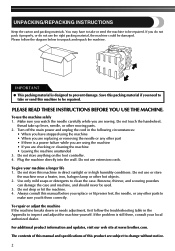
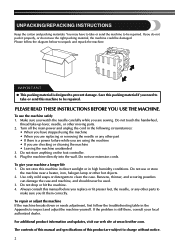
...yourself. The contents of this manual and specifications of this manual before you replace or fit presser feet, the needle, or any other parts to unpack and repack the machine. Always consult this product are checking or cleaning the machine • Leaving the machine unattended 3. UNPACKING... and packing materials. Save this machine to change without notice. 2 For additional product information and updates, visit our web site at www.brother.com. Do not use the machine safely 1. To repair or adjust the machine If the machine breaks down or needs adjustment, first follow...
...yourself. The contents of this manual and specifications of this manual before you replace or fit presser feet, the needle, or any other parts to unpack and repack the machine. Always consult this product are checking or cleaning the machine • Leaving the machine unattended 3. UNPACKING... and packing materials. Save this machine to change without notice. 2 For additional product information and updates, visit our web site at www.brother.com. Do not use the machine safely 1. To repair or adjust the machine If the machine breaks down or needs adjustment, first follow...
Users Manual - English
Page 5
... Action Stitching ...31 Patchworking ...31 Overedge Stitching ...31 Feather Stitching ...32 Triple Zigzag Stretch Stitching ...32 Decorative Stitching ...33 4. KNOWING YOUR SEWING MACHINE 5 THE MAIN PARTS ...5 ACCESSORIES ...6 Optional Accessories ...6 USING YOUR SEWING MACHINE 7 Connecting Plugs ...7 Main Power and Sewing Light Switch ...8 Foot Controller ...8 Checking the Needle ...8 Replacing the Needle ...8 Changing the...
... Action Stitching ...31 Patchworking ...31 Overedge Stitching ...31 Feather Stitching ...32 Triple Zigzag Stretch Stitching ...32 Decorative Stitching ...33 4. KNOWING YOUR SEWING MACHINE 5 THE MAIN PARTS ...5 ACCESSORIES ...6 Optional Accessories ...6 USING YOUR SEWING MACHINE 7 Connecting Plugs ...7 Main Power and Sewing Light Switch ...8 Foot Controller ...8 Checking the Needle ...8 Replacing the Needle ...8 Changing the...
Users Manual - English
Page 7
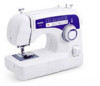
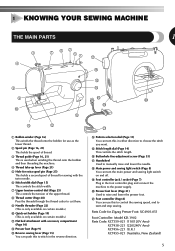
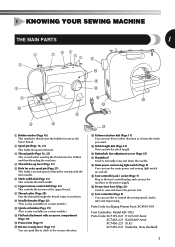
...C Reverse sewing lever (Page 15) You can turn this in either direction to raise and lower the presser foot. Parts Code for Zigzag Presser Foot: XC4901-051 Foot Controller: Model KD-1902 Parts Code: XC7359-021 (110/120V Area) XC7438-221 (220/240V Area) XC7456-221 (U.K.) XC7455-021 (Australia, New ...Zealand) 5 1 KNOWING YOUR SEWING MACHINE THE MAIN PARTS 1 3 4 7 62 51 G F 8 9 0 C A B 1 Bobbin winder (Page 16) This winds the thread onto the bobbin for use this to control the sewing ...
...C Reverse sewing lever (Page 15) You can turn this in either direction to raise and lower the presser foot. Parts Code for Zigzag Presser Foot: XC4901-051 Foot Controller: Model KD-1902 Parts Code: XC7359-021 (110/120V Area) XC7438-221 (220/240V Area) XC7456-221 (U.K.) XC7455-021 (Australia, New ...Zealand) 5 1 KNOWING YOUR SEWING MACHINE THE MAIN PARTS 1 3 4 7 62 51 G F 8 9 0 C A B 1 Bobbin winder (Page 16) This winds the thread onto the bobbin for use this to control the sewing ...
Users Manual - English
Page 8
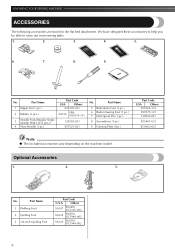
... (1 pc.) 6 Button Sewing Foot (1 pc.) 7 Extra Spool Pin (1 pc.) 8 Screwdriver (1 pc.) 9 Darning Plate (1pc.) Part Code USA Others X59369-321 X59375-121 130920-021 X55467-021 XC6063-021 Note ● The included accessories vary depending on the machine model.... Others SA107 F034N: XC2165-002 SA129 F005N: XC1948-002 SA125 F001N: XC1944-002 6 Part Name 1 Zipper foot (1 pc.) 2 Bobbin (3 pcs.) 3 Needle Pack (Regular Single Needle HAX130 (3 pcs.)) 4 Twin Needle (1 pc.) Part Code USA Others X59370-021 SA156 SFB: XA5539-151 129583-021 X57521-021 No. KNOWING ...
... (1 pc.) 6 Button Sewing Foot (1 pc.) 7 Extra Spool Pin (1 pc.) 8 Screwdriver (1 pc.) 9 Darning Plate (1pc.) Part Code USA Others X59369-321 X59375-121 130920-021 X55467-021 XC6063-021 Note ● The included accessories vary depending on the machine model.... Others SA107 F034N: XC2165-002 SA129 F005N: XC1948-002 SA125 F001N: XC1944-002 6 Part Name 1 Zipper foot (1 pc.) 2 Bobbin (3 pcs.) 3 Needle Pack (Regular Single Needle HAX130 (3 pcs.)) 4 Twin Needle (1 pc.) Part Code USA Others X59370-021 SA156 SFB: XA5539-151 129583-021 X57521-021 No. KNOWING ...
Users Manual - English
Page 11
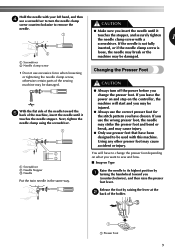
... the machine may be damaged. 1 Screwdriver 2 Needle clamp screw • Do not use excessive force when loosening or tightening the needle clamp screw, otherwise certain parts of the machine, insert the needle until it touches the needle stopper. If you (counterclockwise), and then raise the presser foot lever. Release the foot...
... the machine may be damaged. 1 Screwdriver 2 Needle clamp screw • Do not use excessive force when loosening or tightening the needle clamp screw, otherwise certain parts of the machine, insert the needle until it touches the needle stopper. If you (counterclockwise), and then raise the presser foot lever. Release the foot...
Users Manual - English
Page 18
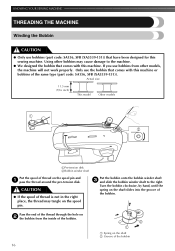
... pin and 1 pass the thread around the pre-tension disk. KNOWING YOUR SEWING MACHINE THREADING THE MACHINE Winding the Bobbin CAUTION ● Only use bobbins (part code: SA156, SFB (XA5539-151)) that comes with this machine. Actual size 11.5 mm (7/16 inch) This model Other models 1 2 1Pre-tension ... the bobbin winder shaft to the machine. ● We designed the bobbin that comes with this machine or bobbins of the same type (part code: SA156, SFB (XA5539-151)). CAUTION ● If the spool of the bobbin 16 Using other models, the machine will not work properly.
... pin and 1 pass the thread around the pre-tension disk. KNOWING YOUR SEWING MACHINE THREADING THE MACHINE Winding the Bobbin CAUTION ● Only use bobbins (part code: SA156, SFB (XA5539-151)) that comes with this machine. Actual size 11.5 mm (7/16 inch) This model Other models 1 2 1Pre-tension ... the bobbin winder shaft to the machine. ● We designed the bobbin that comes with this machine or bobbins of the same type (part code: SA156, SFB (XA5539-151)). CAUTION ● If the spool of the bobbin 16 Using other models, the machine will not work properly.
Users Manual - English
Page 20
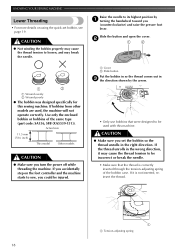
... of the bobbin case. If the thread unrolls in the wrong direction, it is correctly inserted through the tension-adjusting spring of the same type (part code: SA156, SFB (XA5539-151)). KNOWING YOUR SEWING MACHINE Lower Threading • For more details on the foot controller and the machine starts to sew...
... of the bobbin case. If the thread unrolls in the wrong direction, it is correctly inserted through the tension-adjusting spring of the same type (part code: SA156, SFB (XA5539-151)). KNOWING YOUR SEWING MACHINE Lower Threading • For more details on the foot controller and the machine starts to sew...
Users Manual - English
Page 21
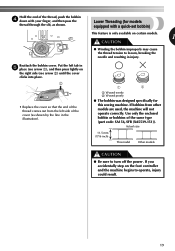
... on the foot controller and the machine begins to operate, injury could result. 19 Use only the enclosed bobbin or bobbins of the same type (part code: SA156, SFB (XA5539-151)). If bobbins from the left side of the cover (as shown. Hold the end of the thread, push the bobbin...
... on the foot controller and the machine begins to operate, injury could result. 19 Use only the enclosed bobbin or bobbins of the same type (part code: SA156, SFB (XA5539-151)). If bobbins from the left side of the cover (as shown. Hold the end of the thread, push the bobbin...
Users Manual - English
Page 26
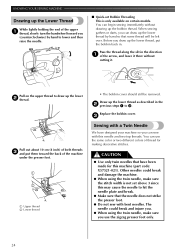
... 2 thread. Before you can draw up the lower thread by hand to lower and then raise the needle. ■ Quick-set above 3 since this machine (part code: X57521-021). You can begin sewing immediately without cutting it. CAUTION ● Use only twin needles that some thread will be removed. KNOWING YOUR...
... 2 thread. Before you can draw up the lower thread by hand to lower and then raise the needle. ■ Quick-set above 3 since this machine (part code: X57521-021). You can begin sewing immediately without cutting it. CAUTION ● Use only twin needles that some thread will be removed. KNOWING YOUR...
Users Manual - English
Page 29
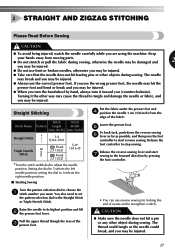
... be injured. ● Do not use the correct presser foot. Put the fabric under the presser foot and 4 position the needle 1 cm (3/8 inch) from moving parts. ● Do not stretch or pull the fabric during sewing. CAUTION ● Make sure the needle does not hit a pin or any other way may...
... be injured. ● Do not use the correct presser foot. Put the fabric under the presser foot and 4 position the needle 1 cm (3/8 inch) from moving parts. ● Do not stretch or pull the fabric during sewing. CAUTION ● Make sure the needle does not hit a pin or any other way may...

Users Manual - English
Page 42
...stitches at the end 2 of the last letter. CAUTION ● Keep fingers away from the inside to the inside and from moving parts, especially needles. Secure with a few straight stitches at a constant speed. USING ATTACHMENTS AND APPLICATIONS Grip the hoop with your thumbs and ... by moving the 1 embroidery hoop. Keep the stitching close together. CAUTION ● Keep fingers away from moving parts, especially needles. ■ Monogramming Sew by moving parts, especially needles. 40 CAUTION ● Keep fingers away from moving the hoop slowly along the 1 lettering at ...
...stitches at the end 2 of the last letter. CAUTION ● Keep fingers away from the inside to the inside and from moving parts, especially needles. Secure with a few straight stitches at a constant speed. USING ATTACHMENTS AND APPLICATIONS Grip the hoop with your thumbs and ... by moving the 1 embroidery hoop. Keep the stitching close together. CAUTION ● Keep fingers away from moving parts, especially needles. ■ Monogramming Sew by moving parts, especially needles. 40 CAUTION ● Keep fingers away from moving the hoop slowly along the 1 lettering at ...
Users Manual - English
Page 43
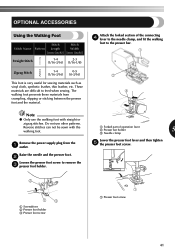
... presser foot and the material. The walking foot prevents these materials from the 1 outlet. These materials are difficult to remove the 3 presser foot holder. 1 Forked part of the connecting 4 lever to the needle clamp, and fit the walking foot to the presser bar. 1 2 3 Note ● Only use other patterns. OPTIONAL ACCESSORIES...
... presser foot and the material. The walking foot prevents these materials from the 1 outlet. These materials are difficult to remove the 3 presser foot holder. 1 Forked part of the connecting 4 lever to the needle clamp, and fit the walking foot to the presser bar. 1 2 3 Note ● Only use other patterns. OPTIONAL ACCESSORIES...
Users Manual - English
Page 44
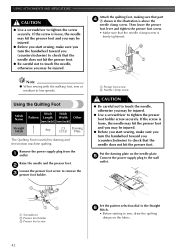
Then lower the presser foot lever and tighten the presser foot screw. • Make sure that part 4 A shown in the illustration is above the needle clamp screw. USING ATTACHMENTS AND APPLICATIONS CAUTION ● Use a screwdriver to sew, draw the quilting design on ...
Then lower the presser foot lever and tighten the presser foot screw. • Make sure that part 4 A shown in the illustration is above the needle clamp screw. USING ATTACHMENTS AND APPLICATIONS CAUTION ● Use a screwdriver to sew, draw the quilting design on ...
Users Manual - English
Page 47
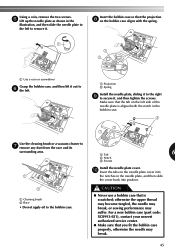
... may break. 45 Insert the bobbin case so that the tab on the left side of the needle plate is scratched; For a new bobbin case (part code: XC8993-021), contact your nearest authorized service center. ● Make sure that is aligned with the notch in the bobbin case. 3 Use the cleaning...
... may break. 45 Insert the bobbin case so that the tab on the left side of the needle plate is scratched; For a new bobbin case (part code: XC8993-021), contact your nearest authorized service center. ● Make sure that is aligned with the notch in the bobbin case. 3 Use the cleaning...
Users Manual - English
Page 51
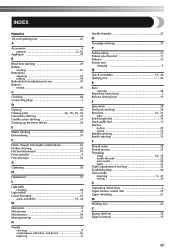
... Foot controller 8 Free-arm style 10 G Gathering 38 H Handwheel 21 L Light bulb changing 44 Light switch 8 Lower threading 18 , quick-set bobbin 19 24 M Main parts 5 Main power 8 Maintenance 44 Monogramming 39 N Needle checking 8 combinations with fabric and thread 26 replacing 8 Needle threader 22 O Overedge stitching 31 P Patchworking 31 Pattern selection...
... Foot controller 8 Free-arm style 10 G Gathering 38 H Handwheel 21 L Light bulb changing 44 Light switch 8 Lower threading 18 , quick-set bobbin 19 24 M Main parts 5 Main power 8 Maintenance 44 Monogramming 39 N Needle checking 8 combinations with fabric and thread 26 replacing 8 Needle threader 22 O Overedge stitching 31 P Patchworking 31 Pattern selection...
Owner's Manual (Español) - Spanish
Page 2
... stitching. Young children should be used as described in the instruction manual. 16. The machine should never be taken, including the following: Read all moving parts. Close attention is necessary when the machine is not working properly, if it off , then remove plug from outlet. 9. Do not use the proper needle...
... stitching. Young children should be used as described in the instruction manual. 16. The machine should never be taken, including the following: Read all moving parts. Close attention is necessary when the machine is not working properly, if it off , then remove plug from outlet. 9. Do not use the proper needle...
Owner's Manual (Español) - Spanish
Page 4
... adjust the machine yourself. Plug the machine directly into the wall. For additional product information and updates, visit our web site at www.brother.com. Make sure you watch the needle carefully while you need to take or send this product are sewing. Do not use the machine...circumstances: • When you do not pack it properly, or do not use or store the machine near a heater, iron, halogen lamp or other moving parts. 2. IMPORTANT ● This packing material is still there, consult your machine a longer life 1. If you have to take -up lever, needle, or ...
... adjust the machine yourself. Plug the machine directly into the wall. For additional product information and updates, visit our web site at www.brother.com. Make sure you watch the needle carefully while you need to take or send this product are sewing. Do not use the machine...circumstances: • When you do not pack it properly, or do not use or store the machine near a heater, iron, halogen lamp or other moving parts. 2. IMPORTANT ● This packing material is still there, consult your machine a longer life 1. If you have to take -up lever, needle, or ...

Owner's Manual (Español) - Spanish
Page 5
SEWING BUTTONHOLES AND BUTTONS 34 Making a Buttonhole ...34 Adjusting Buttonholes ...35 Sewing Buttons ...36 3 KNOWING YOUR SEWING MACHINE 5 THE MAIN PARTS ...5 ACCESSORIES ...6 Optional Accessories ...6 USING YOUR SEWING MACHINE 7 Connecting Plugs ...7 Main Power and Sewing Light Switch ...8 Foot Controller ...8 Checking the Needle ...8 Replacing the Needle ...8 Changing the ...
SEWING BUTTONHOLES AND BUTTONS 34 Making a Buttonhole ...34 Adjusting Buttonholes ...35 Sewing Buttons ...36 3 KNOWING YOUR SEWING MACHINE 5 THE MAIN PARTS ...5 ACCESSORIES ...6 Optional Accessories ...6 USING YOUR SEWING MACHINE 7 Connecting Plugs ...7 Main Power and Sewing Light Switch ...8 Foot Controller ...8 Checking the Needle ...8 Replacing the Needle ...8 Changing the ...
Owner's Manual (Español) - Spanish
Page 7
...connect the machine to start and stop sewing. E Stitch length dial (Page 14) This controls the stitch length. Parts Code for Zigzag Presser Foot: XC4901-051 Foot Controller: Model KD-1902 Parts Code: XC7359-021 (110/120V Area) XC7438-221 (220/240V Area) XC7456-221 (U.K.) XC7455-021 (Australia, New... want. J Presser foot lever (Page 21) Used to stitch in either direction to manually raise and lower the needle. 1 KNOWING YOUR SEWING MACHINE THE MAIN PARTS 1 3 4 7 62 51 G F 8 9 0 C A B 1 Bobbin winder (Page 16) This winds the thread onto the bobbin for use this to control the ...
...connect the machine to start and stop sewing. E Stitch length dial (Page 14) This controls the stitch length. Parts Code for Zigzag Presser Foot: XC4901-051 Foot Controller: Model KD-1902 Parts Code: XC7359-021 (110/120V Area) XC7438-221 (220/240V Area) XC7456-221 (U.K.) XC7455-021 (Australia, New... want. J Presser foot lever (Page 21) Used to stitch in either direction to manually raise and lower the needle. 1 KNOWING YOUR SEWING MACHINE THE MAIN PARTS 1 3 4 7 62 51 G F 8 9 0 C A B 1 Bobbin winder (Page 16) This winds the thread onto the bobbin for use this to control the ...


