
Users Manual - English
Page 2
... 28 29 30 31 31 32 33 34 35 37 38 CAUTION When leaving the sewing machine unattended, the power supply plug must be removed from the outlet. When servicing the sewing machine, removing covers or changing the bulb, the machine or electrical set must be disconnected from the power supply by II removing the...
... 28 29 30 31 31 32 33 34 35 37 38 CAUTION When leaving the sewing machine unattended, the power supply plug must be removed from the outlet. When servicing the sewing machine, removing covers or changing the bulb, the machine or electrical set must be disconnected from the power supply by II removing the...
Users Manual - English
Page 3
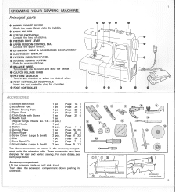
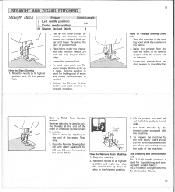
... in any direction to select the desired stitch. ® FOOT CONTROLLER RECEPTACLE Insert the foot controller plug for easy and perfect sewing. For more details, see each page listed. KNOWING YOUR SEWING MACHINE Principal parts O BOBBIN WINDER DEVICE Winds the lower thread onto the bobbin. Then draw the accessory compartment down pushing its...
... in any direction to select the desired stitch. ® FOOT CONTROLLER RECEPTACLE Insert the foot controller plug for easy and perfect sewing. For more details, see each page listed. KNOWING YOUR SEWING MACHINE Principal parts O BOBBIN WINDER DEVICE Winds the lower thread onto the bobbin. Then draw the accessory compartment down pushing its...
Users Manual - English
Page 5
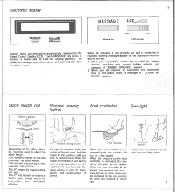
... bobbin winder pin to right for bobbin winding, machine only accept bobbin winding and message of LCD for sewing guidance. The numbers marked on the foot controller is released, the machine will sew forward. When the foot controller is increased, the machine will pick up the speed. The "F" area ... is released, it goes. When the button is placed on the display and instruct you may need to sew forward. Reverse sewing is not in original position and the machine will stop. The guidance message runs three times and automatically back to correct. 1. When you wish to ...
... bobbin winder pin to right for bobbin winding, machine only accept bobbin winding and message of LCD for sewing guidance. The numbers marked on the foot controller is released, the machine will sew forward. When the foot controller is increased, the machine will pick up the speed. The "F" area ... is released, it goes. When the button is placed on the display and instruct you may need to sew forward. Reverse sewing is not in original position and the machine will stop. The guidance message runs three times and automatically back to correct. 1. When you wish to ...
Users Manual - English
Page 6
... foot to a free-arm model, simply lift the extension table then slide it out. To change your machine to the needle bar and fasten the screw. 8 Your sewing machine is convenient. INSERTING TWIN NEEDLE Insert the twin needle in the same manner as single needle. Extension table ...For sewing tubular and hard-toreach garment areas, free-arm sewing is designed for single needle threading (See pagel 1), but ...
... foot to a free-arm model, simply lift the extension table then slide it out. To change your machine to the needle bar and fasten the screw. 8 Your sewing machine is convenient. INSERTING TWIN NEEDLE Insert the twin needle in the same manner as single needle. Extension table ...For sewing tubular and hard-toreach garment areas, free-arm sewing is designed for single needle threading (See pagel 1), but ...
Users Manual - English
Page 10
... fabric under the presser foot and position needle 3/8 inch. (10 mm) beyond fabric edge. 4. Push the Reverse Sewing Button and stitch backward for locking end of the machine. Lift the presser foot and pull out the fabric gently to Remove from end of presser foot. 3. Then stop. 2. Top ... the fabric to its new direction while the needle acts as it goes. Reserve sewing is needed . 6. Stop the machine at the end of the seam or wherever reinforcement is used for 3/8 inch (10 mm) from Machine 1. Raise the needle to its highest position and lift the presser foot. 2. ...
... fabric under the presser foot and position needle 3/8 inch. (10 mm) beyond fabric edge. 4. Push the Reverse Sewing Button and stitch backward for locking end of the machine. Lift the presser foot and pull out the fabric gently to Remove from end of presser foot. 3. Then stop. 2. Top ... the fabric to its new direction while the needle acts as it goes. Reserve sewing is needed . 6. Stop the machine at the end of the seam or wherever reinforcement is used for 3/8 inch (10 mm) from Machine 1. Raise the needle to its highest position and lift the presser foot. 2. ...

Users Manual - English
Page 13
... the two pieces. 2. Scallop stitch Pattern 12 Stitch Length F-1 21 Double action stitch Pattern 13 Stitch Length 1-2 This machine produces decorative stitch (Scallop) automatically. After sewing 1) Remove the basting and the paper. 2) Tie knots at the beginning and the end of fabric to create a... scallop edge. + This stitch is used as a decorative edging. 1. Sew scallop stitch along the edge Pull both threads slightly when starting. * Use thicker threads than for normal sewing. 3. Decorative stitches Pattern 14 (Swan) 15 (Tulip) Stitch Length 4 Fagoting stitch ...
... the two pieces. 2. Scallop stitch Pattern 12 Stitch Length F-1 21 Double action stitch Pattern 13 Stitch Length 1-2 This machine produces decorative stitch (Scallop) automatically. After sewing 1) Remove the basting and the paper. 2) Tie knots at the beginning and the end of fabric to create a... scallop edge. + This stitch is used as a decorative edging. 1. Sew scallop stitch along the edge Pull both threads slightly when starting. * Use thicker threads than for normal sewing. 3. Decorative stitches Pattern 14 (Swan) 15 (Tulip) Stitch Length 4 Fagoting stitch ...
Users Manual - English
Page 14
...actual garment. ® Set the marks on heavier weight stretch fabrics in the orders of buttonhole on the fabric. 3. Draw up If and sew 3/8 inch from the edge. Feather stitch Pattern 18 Stitch Length 4 Rick-rack stitch Pattern 20 Use this lever back slightly as per the illustration.... The stitch will prevent raveling. 23 Stitch Length 4 Sew on the foot and fabric in accordance with the marked line as per the illustration 0 . 6. Using tailor chalk, mark the position of 1-4 as per the illustration (D Stop the machine when bar tack is finished. 24 Holding the upper thread...
...actual garment. ® Set the marks on heavier weight stretch fabrics in the orders of buttonhole on the fabric. 3. Draw up If and sew 3/8 inch from the edge. Feather stitch Pattern 18 Stitch Length 4 Rick-rack stitch Pattern 20 Use this lever back slightly as per the illustration.... The stitch will prevent raveling. 23 Stitch Length 4 Sew on the foot and fabric in accordance with the marked line as per the illustration 0 . 6. Using tailor chalk, mark the position of 1-4 as per the illustration (D Stop the machine when bar tack is finished. 24 Holding the upper thread...
Users Manual - English
Page 15
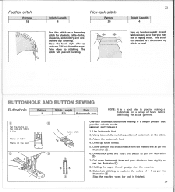
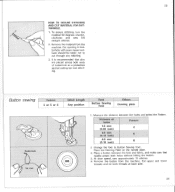
...) Pattern 4 5 6 2 Change the foot to cut through any stitching. 3. To secure stitching, turn the material 90 degrees counterclockwise and sew 5-6 straight stitches. 2. Remove the button from the machine. Care should be taken not to Button Sewing Foot. At slow speed, sew approximately 10 stitches. 6. 25 HOW TO SECURE STITCHING AND CUT MATERIAL FOR BUTT0NH0LE. 1.
...) Pattern 4 5 6 2 Change the foot to cut through any stitching. 3. To secure stitching, turn the material 90 degrees counterclockwise and sew 5-6 straight stitches. 2. Remove the button from the machine. Care should be taken not to Button Sewing Foot. At slow speed, sew approximately 10 stitches. 6. 25 HOW TO SECURE STITCHING AND CUT MATERIAL FOR BUTT0NH0LE. 1.

Users Manual - English
Page 17
...monogramming) or design (for embroidering) on the right side of needle plate. Pull the lower thread up through guide slot, adjust to embroidering.) EMBROIDERING 1. Sew, moving it over the hole on the needle plate. 2. Fill in . Stretch work under the needle and lower the presser bar. 6. MONOGRAMMING 1. ... straight at edge of the outline alternately until design is made by turning thumb screw. 30 Set your sewing machine as possible. 5. Place the work between embroidery hoops as firmly as per the above instructions. 3. 29 Monogramming and Embroidering Pattern 4 or ...
...monogramming) or design (for embroidering) on the right side of needle plate. Pull the lower thread up through guide slot, adjust to embroidering.) EMBROIDERING 1. Sew, moving it over the hole on the needle plate. 2. Fill in . Stretch work under the needle and lower the presser bar. 6. MONOGRAMMING 1. ... straight at edge of the outline alternately until design is made by turning thumb screw. 30 Set your sewing machine as possible. 5. Place the work between embroidery hoops as firmly as per the above instructions. 3. 29 Monogramming and Embroidering Pattern 4 or ...

Users Manual - English
Page 18
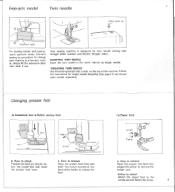
Tighten the screw. 1. machine. 0 4. Stopper • How to check the needle. Remove the needle Lower the presser foot and loosen the screw. 2. m no 11. Face plate 0 0 J Bulb 1. Replace the ... in illustration at right. To check if needle is bent, place flat side of needle down as it will go against the needle stopper. The sewing needle must always be straight and sharp for smooth...
Tighten the screw. 1. machine. 0 4. Stopper • How to check the needle. Remove the needle Lower the presser foot and loosen the screw. 2. m no 11. Face plate 0 0 J Bulb 1. Replace the ... in illustration at right. To check if needle is bent, place flat side of needle down as it will go against the needle stopper. The sewing needle must always be straight and sharp for smooth...
Users Manual - English
Page 20
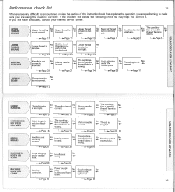
...needle/ not sharp. Inferior needle is used . I "-Page 11 1.--Page 11 111.- No ► wrong. Performance check list 35 Whenever sewing difficulty is encountered, review the section of needle/ No thread/fabric is wrong. No I ---p-Page 31 .-Page 31 N. Page 11 Thread ...correct. No - No The combination of the instruction book that explains the operation you are performing to make sure you are using the machine correctly. No N0o.1 The combina- tangled. Page13 . No Bobbin is wrong. No The combination of needle/ thread/ fabric is ...
...needle/ not sharp. Inferior needle is used . I "-Page 11 1.--Page 11 111.- No ► wrong. Performance check list 35 Whenever sewing difficulty is encountered, review the section of needle/ No thread/fabric is wrong. No I ---p-Page 31 .-Page 31 N. Page 11 Thread ...correct. No - No The combination of the instruction book that explains the operation you are performing to make sure you are using the machine correctly. No N0o.1 The combina- tangled. Page13 . No Bobbin is wrong. No The combination of needle/ thread/ fabric is ...
Users Manual - English
Page 21
... packing material could result in the event you need to transport this sewing machine. Instructions for future use when it is designed to prevent damage in transit. O INDEX Accessories Applique Blind hem stitch Button sewing Buttonhole Changing presser foot Changing the bulb Changing the needle Cleaning Cloth ...stitch Fagoting stitch Feather stitch Foot controller Free-arm model Lower threading Monogramming and Embroidering ( IMPORTANT This packing material is necessary to reship the sewing machine. Page 2 28 18 26 24 8 32 31 33 30 28 22 21 20 22 23 6 7 10 29 Oiling Overedging stitch ...
... packing material could result in the event you need to transport this sewing machine. Instructions for future use when it is designed to prevent damage in transit. O INDEX Accessories Applique Blind hem stitch Button sewing Buttonhole Changing presser foot Changing the bulb Changing the needle Cleaning Cloth ...stitch Fagoting stitch Feather stitch Foot controller Free-arm model Lower threading Monogramming and Embroidering ( IMPORTANT This packing material is necessary to reship the sewing machine. Page 2 28 18 26 24 8 32 31 33 30 28 22 21 20 22 23 6 7 10 29 Oiling Overedging stitch ...


