

Accessory Catalog
Page 4
...-use sewing machines www.brother.com Loosen the clamp screw at the back of the presser foot and slide the presser foot so that the needle fits on the opening on the edge of zipper/piping, avoiding the non-flat parts of zipper/piping, and presses the fabric with a ...screwdriver. 5. Sew. Use these utility presser feet and accessories to add a professional finish to your sewing projects. Brother General Sewing Accessories 05 Sew as you like. Adjustable Zipper &...
...-use sewing machines www.brother.com Loosen the clamp screw at the back of the presser foot and slide the presser foot so that the needle fits on the opening on the edge of zipper/piping, avoiding the non-flat parts of zipper/piping, and presses the fabric with a ...screwdriver. 5. Sew. Use these utility presser feet and accessories to add a professional finish to your sewing projects. Brother General Sewing Accessories 05 Sew as you like. Adjustable Zipper &...

Accessory Catalog
Page 6
...presser foot. 7. Slowly sew 2-3 stitches, making sure the fabric is rolling around the curled part of the foot. 5. Position the edge of the foot. 6. Non Stick Foot Designed for details.) www.brother.com Select an overlock stitch. 2. Hold the fabric from the back and front and roll it...Non Stick Foot Overlock Foot Picot Foot Brother General Sewing Accessories 10 SA126 ABCDEFJKMN SA127 GHILOP Skirt Innov-is Project Book (See page 50 for details.) Narrow Hemmer Foot Designed to protect edges from fraying. 1. Lower the needle into the curled part of the foot. 8. Continue to ...
...presser foot. 7. Slowly sew 2-3 stitches, making sure the fabric is rolling around the curled part of the foot. 5. Position the edge of the foot. 6. Non Stick Foot Designed for details.) www.brother.com Select an overlock stitch. 2. Hold the fabric from the back and front and roll it...Non Stick Foot Overlock Foot Picot Foot Brother General Sewing Accessories 10 SA126 ABCDEFJKMN SA127 GHILOP Skirt Innov-is Project Book (See page 50 for details.) Narrow Hemmer Foot Designed to protect edges from fraying. 1. Lower the needle into the curled part of the foot. 8. Continue to ...
Users Manual - English
Page 2
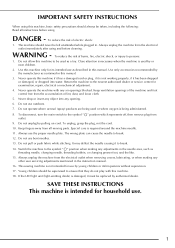
... needle area, such as a toy. IMPORTANT SAFETY INSTRUCTIONS When using this machine, basic safety precautions should always be taken, including the following: Read all moving parts. Use this machine only for household use by pulling on cord. Never operate the machine with this manual. 3. Do not operate where aerosol (spray) products...
... needle area, such as a toy. IMPORTANT SAFETY INSTRUCTIONS When using this machine, basic safety precautions should always be taken, including the following: Read all moving parts. Use this machine only for household use by pulling on cord. Never operate the machine with this manual. 3. Do not operate where aerosol (spray) products...
Users Manual - English
Page 4
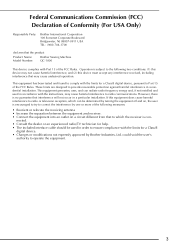
...Conformity (For USA Only) Responsible Party: Brother International Corporation 100 Somerset Corporate Boulevard Bridgewater, NJ 08807-0911 USA TEL : (908) 704-1700 declares that the product Product Name: Model Number: Brother Sewing Machine QC-1000 This device complies with Part 15 of the following two conditions: (1)...interference to ensure compliance with the limits for a Class B digital device. • Changes or modifications not expressly approved by Brother Industries, Ltd. This equipment has been tested and found to comply with the limits for help. • The included interface...
...Conformity (For USA Only) Responsible Party: Brother International Corporation 100 Somerset Corporate Boulevard Bridgewater, NJ 08807-0911 USA TEL : (908) 704-1700 declares that the product Product Name: Model Number: Brother Sewing Machine QC-1000 This device complies with Part 15 of the following two conditions: (1)...interference to ensure compliance with the limits for a Class B digital device. • Changes or modifications not expressly approved by Brother Industries, Ltd. This equipment has been tested and found to comply with the limits for help. • The included interface...
Users Manual - English
Page 5
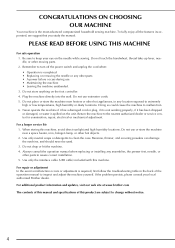
...you study the manual. Be sure to keep your local authorized Brother dealer. Do not store anything on the needle while sewing. Do not place or store the machine near a space heater, iron, halogen lamp, or other moving parts. 2. Return the machine to clean the case. When storing ...locations. Doing so could cause the machine to change without notice. 4 For additional product information and updates, visit our web site at www.brother.com The contents of this manual and specifications of the operation manual to assure correct installation. 5. Do not drop or hit the machine. 4....
...you study the manual. Be sure to keep your local authorized Brother dealer. Do not store anything on the needle while sewing. Do not place or store the machine near a space heater, iron, halogen lamp, or other moving parts. 2. Return the machine to clean the case. When storing ...locations. Doing so could cause the machine to change without notice. 4 For additional product information and updates, visit our web site at www.brother.com The contents of this manual and specifications of the operation manual to assure correct installation. 5. Do not drop or hit the machine. 4....

Users Manual - English
Page 6
..., and storing combined patterns. HOW TO USE THIS MANUAL Chapters 1 and 2 describe to select a stitch and sew using the various stitches. Chapter 1 Chapter 2 Chapter 4 • Parts related to operations described in the procedures are highlighted in addition to operations such as combining and editing patterns to . 5 Chapter 1 Chapter 2 Chapter 3 To sew...
..., and storing combined patterns. HOW TO USE THIS MANUAL Chapters 1 and 2 describe to select a stitch and sew using the various stitches. Chapter 1 Chapter 2 Chapter 4 • Parts related to operations described in the procedures are highlighted in addition to operations such as combining and editing patterns to . 5 Chapter 1 Chapter 2 Chapter 3 To sew...

Users Manual - English
Page 7
CONTENTS NAMES OF MACHINE PARTS AND THEIR Scalloping 81 FUNCTIONS 9 Machine 9 Needle and Presser Foot Section 10 Operation Buttons 11 Included Accessories 11 Options 16 Chapter 1 Getting Ready 17 Top ...
CONTENTS NAMES OF MACHINE PARTS AND THEIR Scalloping 81 FUNCTIONS 9 Machine 9 Needle and Presser Foot Section 10 Operation Buttons 11 Included Accessories 11 Options 16 Chapter 1 Getting Ready 17 Top ...
Users Manual - English
Page 10
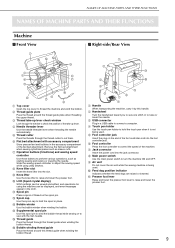
... raise and lower the presser foot. 9 j Feed dog position indicator Indicates whether the feed dogs are raised or lowered. NAMES OF MACHINE PARTS AND THEIR FUNCTIONS NAMES OF MACHINE PARTS AND THEIR FUNCTIONS Machine ■ Front View ■ Right-side/Rear View a Top cover Open the top cover to sew with accessory...
... raise and lower the presser foot. 9 j Feed dog position indicator Indicates whether the feed dogs are raised or lowered. NAMES OF MACHINE PARTS AND THEIR FUNCTIONS NAMES OF MACHINE PARTS AND THEIR FUNCTIONS Machine ■ Front View ■ Right-side/Rear View a Top cover Open the top cover to sew with accessory...
Users Manual - English
Page 11
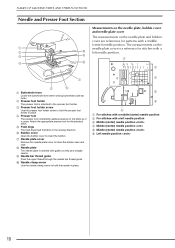
... lever when sewing buttonholes and bar tacks. j Needle clamp screw Use the needle clamp screw to clean the bobbin case and race. NAMES OF MACHINE PARTS AND THEIR FUNCTIONS Needle and Presser Foot Section Measurements on the needle plate, bobbin cover and needle plate cover The measurements on the needle plate...
... lever when sewing buttonholes and bar tacks. j Needle clamp screw Use the needle clamp screw to clean the bobbin case and race. NAMES OF MACHINE PARTS AND THEIR FUNCTIONS Needle and Presser Foot Section Measurements on the needle plate, bobbin cover and needle plate cover The measurements on the needle plate...

Users Manual - English
Page 12
... sewing speed controller to the left to sew at a lower speed until they become tangled, or damage to the fabric. Operation Buttons NAMES OF MACHINE PARTS AND THEIR FUNCTIONS Included Accessories The accessories are stored in small areas. Press this button to lower the presser foot and apply pressure to the...
... sewing speed controller to the left to sew at a lower speed until they become tangled, or damage to the fabric. Operation Buttons NAMES OF MACHINE PARTS AND THEIR FUNCTIONS Included Accessories The accessories are stored in small areas. Press this button to lower the presser foot and apply pressure to the...

Users Manual - English
Page 13
... upper cover to the right so that the top of the thread guide is parallel to release the cover from the latch. NAMES OF MACHINE PARTS AND THEIR FUNCTIONS ■ How to securely tighten the screw from the spool support. With your right hand, snap the cover toward you. 12 In...
... upper cover to the right so that the top of the thread guide is parallel to release the cover from the latch. NAMES OF MACHINE PARTS AND THEIR FUNCTIONS ■ How to securely tighten the screw from the spool support. With your right hand, snap the cover toward you. 12 In...

Users Manual - English
Page 14
Memo For details on using the spool stand, refer to the left so that the pin fits into the hole in the machine, and then fit the spool stand into the groove in the latch. NAMES OF MACHINE PARTS AND THEIR FUNCTIONS f With the lower part of the machine is positioned toward you and that the spool stand firmly fits into the latch. b a a Latch b Spool stand Note Make sure that the latch of the stand between the handle and machine, slide the spool stand to the enclosed instruction sheet. 13
Memo For details on using the spool stand, refer to the left so that the pin fits into the hole in the machine, and then fit the spool stand into the groove in the latch. NAMES OF MACHINE PARTS AND THEIR FUNCTIONS f With the lower part of the machine is positioned toward you and that the spool stand firmly fits into the latch. b a a Latch b Spool stand Note Make sure that the latch of the stand between the handle and machine, slide the spool stand to the enclosed instruction sheet. 13

Users Manual - English
Page 15
NAMES OF MACHINE PARTS AND THEIR FUNCTIONS 1 2 3 4 5 6 7 8 9 10 11 12 13 14 15 16 17 18 19 20 75/11 2 needles 90/14 2 needles 90/14 2 needles: Ball point needle (gold colored) 21 22 23 24 25 26 27 28 29 30 31 32 33 34 35 36 37 38 39 40 14
NAMES OF MACHINE PARTS AND THEIR FUNCTIONS 1 2 3 4 5 6 7 8 9 10 11 12 13 14 15 16 17 18 19 20 75/11 2 needles 90/14 2 needles 90/14 2 needles: Ball point needle (gold colored) 21 22 23 24 25 26 27 28 29 30 31 32 33 34 35 36 37 38 39 40 14

Users Manual - English
Page 16
Memo (For U.S.A. only) Foot controller: Model T This foot controller can be used with this machine model QC-1000. 15 Part Name U.S.A./ Canada Others 1 Buttonhole foot "A" X57789-151 2 Overcasting foot "G" XC3098-051 3 Monogramming foot "N" X53840-351 4 Zipper foot "I" X59370-051 5 Zigzag foot "J" (on... XE0783-001 38 Quick Reference Guide XE0996-001 39 Wide table XE0802-001 40 Soft cover XE1121-001 Memo • For details on using parts 13, 17 and 39, refer to the enclosed instruction sheet. • Always use accessories recommended for this machine. • The screw...
Memo (For U.S.A. only) Foot controller: Model T This foot controller can be used with this machine model QC-1000. 15 Part Name U.S.A./ Canada Others 1 Buttonhole foot "A" X57789-151 2 Overcasting foot "G" XC3098-051 3 Monogramming foot "N" X53840-351 4 Zipper foot "I" X59370-051 5 Zigzag foot "J" (on... XE0783-001 38 Quick Reference Guide XE0996-001 39 Wide table XE0802-001 40 Soft cover XE1121-001 Memo • For details on using parts 13, 17 and 39, refer to the enclosed instruction sheet. • Always use accessories recommended for this machine. • The screw...
Users Manual - English
Page 17
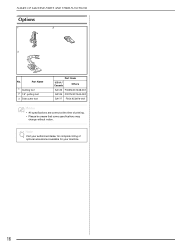
NAMES OF MACHINE PARTS AND THEIR FUNCTIONS Options 1 2 3 No. Note Visit your authorized dealer for your machine. 16 Part Name 1 Quilting foot 2 1/4" quilting foot 3 Side cutter foot Part Code U.S.A./ Canada Others SA129 F005N:XC1948-002 SA125 F001N:XC1944-052 SA177 F054:XC3879-002 Memo • All specifications are correct at the time of optional accessories available for complete listing of printing. • Please be aware that some specifications may change without notice.
NAMES OF MACHINE PARTS AND THEIR FUNCTIONS Options 1 2 3 No. Note Visit your authorized dealer for your machine. 16 Part Name 1 Quilting foot 2 1/4" quilting foot 3 Side cutter foot Part Code U.S.A./ Canada Others SA129 F005N:XC1948-002 SA125 F001N:XC1944-052 SA177 F054:XC3879-002 Memo • All specifications are correct at the time of optional accessories available for complete listing of printing. • Please be aware that some specifications may change without notice.

Users Manual - English
Page 20
... immediately after the machine is stopped. Do not use a mechanical pencil, screwdriver or any other changes in front of a malfunction. Getting Ready • All or part of a malfunction. After approximately 10 minutes, the display should reach its brightness (see page 22). Be sure to read. Lightly press the display with the...
... immediately after the machine is stopped. Do not use a mechanical pencil, screwdriver or any other changes in front of a malfunction. Getting Ready • All or part of a malfunction. After approximately 10 minutes, the display should reach its brightness (see page 22). Be sure to read. Lightly press the display with the...
Users Manual - English
Page 21
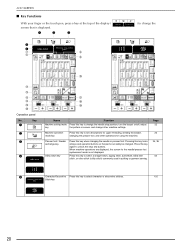
LCD SCREEN ■ Key Functions With your finger or the touch pen, press a key at the top of the display ( screen that parts can safely be changed. Pressing this key again to change other stitch (utility stitch) commonly used in quilting or garment sewing. Press this key locks ...
LCD SCREEN ■ Key Functions With your finger or the touch pen, press a key at the top of the display ( screen that parts can safely be changed. Pressing this key again to change other stitch (utility stitch) commonly used in quilting or garment sewing. Press this key locks ...
Users Manual - English
Page 24
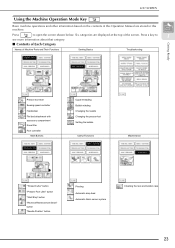
... this machine. Press a key to open the screen shown below. Six categories are stored in this Operation Manual are displayed at the top of Machine Parts and Their Functions Sewing Basics Troubleshooting Getting Ready Presser foot lever Sewing speed controller Handwheel Flat bed attachment with accessory compartment Knee lifter Foot controller...
... this machine. Press a key to open the screen shown below. Six categories are stored in this Operation Manual are displayed at the top of Machine Parts and Their Functions Sewing Basics Troubleshooting Getting Ready Presser foot lever Sewing speed controller Handwheel Flat bed attachment with accessory compartment Knee lifter Foot controller...

Users Manual - English
Page 26
... the spool cap (large, medium, or small) that the thread unwinds from the front. Use only the included bobbin or bobbins of the same type (part code: SA156, SFB: XA5539-051). 11.5 mm (approx. 7/16 inch) Actual size This model Other models a Supplemental spool pin d Place the spool of the spool...
... the spool cap (large, medium, or small) that the thread unwinds from the front. Use only the included bobbin or bobbins of the same type (part code: SA156, SFB: XA5539-051). 11.5 mm (approx. 7/16 inch) Actual size This model Other models a Supplemental spool pin d Place the spool of the spool...
Users Manual - English
Page 33
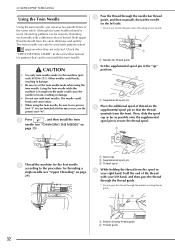
.... a Spool cap b Supplemental spool pin c Thread spool f While holding the thread from the front. Check the "STITCH SETTING CHART" at the end of this machine (part code X59296-151). Using the twin needle while the machine is used, interesting patterns can sew two parallel lines of the thread with bent needles...
.... a Spool cap b Supplemental spool pin c Thread spool f While holding the thread from the front. Check the "STITCH SETTING CHART" at the end of this machine (part code X59296-151). Using the twin needle while the machine is used, interesting patterns can sew two parallel lines of the thread with bent needles...

