
Quick Setup Guide - English
Page 2
...with your closest service center, call 1-800-284-4357. *KEEP ALL PACKING MATERIAL AND CARTON FOR FUTURE TRANSPORT. Push the latch levers into the sewing position. ***READ ME FIRST*** Should you still need assistance, call 1-901-379-1010 for entangled thread. Replace the bobbin cace. (See A.) ... thread and fabric according to the procedure below. 2 3 4 5 1 2 Raise the needle to raise the needle, then remove the fabric. ∗If machine runs but needle does not move, look for customer service. *For the address of the hook, match the hook position opposite the driver and insert...
...with your closest service center, call 1-800-284-4357. *KEEP ALL PACKING MATERIAL AND CARTON FOR FUTURE TRANSPORT. Push the latch levers into the sewing position. ***READ ME FIRST*** Should you still need assistance, call 1-901-379-1010 for entangled thread. Replace the bobbin cace. (See A.) ... thread and fabric according to the procedure below. 2 3 4 5 1 2 Raise the needle to raise the needle, then remove the fabric. ∗If machine runs but needle does not move, look for customer service. *For the address of the hook, match the hook position opposite the driver and insert...
Users Manual - English
Page 2
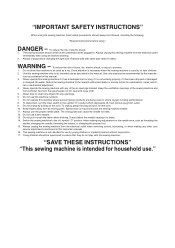
...off , symbol "O" position when making any openings. 6. Do not operate this sewing machine only for use this sewing machine. Do not unplug by the manufac- Always unplug the sewing machine from the electrical outlet immediately after using ." Always unplug before using and before cleaning...Special care is intended for examination, repair, electrical or mechanical adjustment. 4. "SAVE THESE INSTRUCTIONS" "This sewing machine is required around the sewing machine needle. 11. DANGER - Use only accessories recommended by pulling on the cord. turer as described in this ...
...off , symbol "O" position when making any openings. 6. Do not operate this sewing machine only for use this sewing machine. Do not unplug by the manufac- Always unplug the sewing machine from the electrical outlet immediately after using ." Always unplug before using and before cleaning...Special care is intended for examination, repair, electrical or mechanical adjustment. 4. "SAVE THESE INSTRUCTIONS" "This sewing machine is required around the sewing machine needle. 11. DANGER - Use only accessories recommended by pulling on the cord. turer as described in this ...
Users Manual - English
Page 6
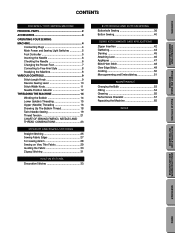
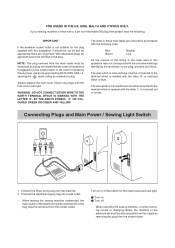
...in the main lead of replacing the plug fuse, use plugs with the fuse cover removed. When leaving the sewing machine unattended, the main switch of the machine must be switched off or the plug must be fitted in a live socket outlet. IMPORTANT If the available ...be removed from the socket outlet. Connecting Plugs and Main Power / Sewing Light Switch 1 2 1. Connect the electrical supply plug into the machine. 2. When servicing the sewing machine, or when removing covers or changing lamps, the machine or the electrical set must be disconnected from the supply by ASTA to...
...in the main lead of replacing the plug fuse, use plugs with the fuse cover removed. When leaving the sewing machine unattended, the main switch of the machine must be switched off or the plug must be fitted in a live socket outlet. IMPORTANT If the available ...be removed from the socket outlet. Connecting Plugs and Main Power / Sewing Light Switch 1 2 1. Connect the electrical supply plug into the machine. 2. When servicing the sewing machine, or when removing covers or changing lamps, the machine or the electrical set must be disconnected from the supply by ASTA to...
Users Manual - English
Page 7
... KNOWING YOUR SEWING MACHINE STRAIGHT AND ZIGZAG BUILT-IN STITCHES STITCHING KNOWING YOUR SEWING MACHINE PRINCIPAL PARTS 2 ACCESSORIES 3 OPERATING YOUR SEWING MACHINE 4 Connecting Plugs 4 Main Power and Sewing Light Switches 5 Foot Controller 5 Inserting the Needle 6 Checking the Needle 6 Changing the Presser Foot 7 Converting to Free-Arm Style 8 Steadying the Machine 8 VARIOUS CONTROLS 9 Stitch Length Knob 9 Reverse Sewing Lever 10...
... KNOWING YOUR SEWING MACHINE STRAIGHT AND ZIGZAG BUILT-IN STITCHES STITCHING KNOWING YOUR SEWING MACHINE PRINCIPAL PARTS 2 ACCESSORIES 3 OPERATING YOUR SEWING MACHINE 4 Connecting Plugs 4 Main Power and Sewing Light Switches 5 Foot Controller 5 Inserting the Needle 6 Checking the Needle 6 Changing the Presser Foot 7 Converting to Free-Arm Style 8 Steadying the Machine 8 VARIOUS CONTROLS 9 Stitch Length Knob 9 Reverse Sewing Lever 10...
Users Manual - English
Page 21
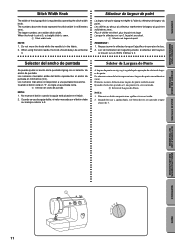
...;lecteur est sur 0, le point sera droit. 1 Sélecteur de largeur de point NOTE: REMARQUE : 1. BUTTONHOLE AND USING ATTACHMENTS BUTTON SEWING AND APPLICATIONS MAINTENANCE 1 45 3 2 1 0 11 INDEX CONTENTS KNOWING YOUR SEWING MACHINE STRAIGHT AND ZIGZAG BUILT-IN STITCHES STITCHING Stitch Width Knob Sélecteur de largeur de point The width of the zigzag...
...;lecteur est sur 0, le point sera droit. 1 Sélecteur de largeur de point NOTE: REMARQUE : 1. BUTTONHOLE AND USING ATTACHMENTS BUTTON SEWING AND APPLICATIONS MAINTENANCE 1 45 3 2 1 0 11 INDEX CONTENTS KNOWING YOUR SEWING MACHINE STRAIGHT AND ZIGZAG BUILT-IN STITCHES STITCHING Stitch Width Knob Sélecteur de largeur de point The width of the zigzag...

Users Manual - English
Page 23
CONTENTS KNOWING YOUR SEWING MACHINE STRAIGHT AND ZIGZAG BUILT-IN STITCHES STITCHING BUTTONHOLE AND USING ATTACHMENTS BUTTON SEWING AND APPLICATIONS MAINTENANCE INDEX 1 2 3 4 13
CONTENTS KNOWING YOUR SEWING MACHINE STRAIGHT AND ZIGZAG BUILT-IN STITCHES STITCHING BUTTONHOLE AND USING ATTACHMENTS BUTTON SEWING AND APPLICATIONS MAINTENANCE INDEX 1 2 3 4 13
Users Manual - English
Page 29
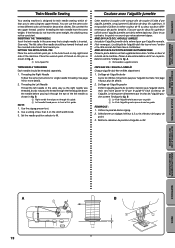
... THREADING Each needle should face toward the back and the rounded side should be consistent. NOTE: 1. Couture avec l'aiguille jumelée Cette machine à coudre a été conçue afin de coudre à l'aide d'une aiguille jumelée, ce qui permet l'... L'AIGUILLE JUMELÉE Introduire l'aiguille jumelée de la même épaisseur. CONTENTS KNOWING YOUR SEWING MACHINE STRAIGHT AND ZIGZAG BUILT-IN STITCHES STITCHING Twin-Needle Sewing Your sewing machine is inserted. (See note.) The flat side of the needle should face toward you to M. Enfilage de...
... THREADING Each needle should face toward the back and the rounded side should be consistent. NOTE: 1. Couture avec l'aiguille jumelée Cette machine à coudre a été conçue afin de coudre à l'aide d'une aiguille jumelée, ce qui permet l'... L'AIGUILLE JUMELÉE Introduire l'aiguille jumelée de la même épaisseur. CONTENTS KNOWING YOUR SEWING MACHINE STRAIGHT AND ZIGZAG BUILT-IN STITCHES STITCHING Twin-Needle Sewing Your sewing machine is inserted. (See note.) The flat side of the needle should face toward you to M. Enfilage de...
Users Manual - English
Page 33
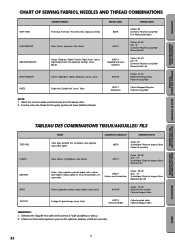
...the upper (spool) and lower (bobbin) threads. CONTENTS KNOWING YOUR SEWING MACHINE STRAIGHT AND ZIGZAG BUILT-IN STITCHES STITCHING CHART OF SEWING FABRICS, NEEDLES AND THREAD COMBINATIONS VERY THIN LIGHTWEIGHT MEDIUM WEIGHT HEAVYWEIGHT KNITS SEWING FABRICS Fine tricot, Fine lace, Thin linen, Silk, Organza, Chiffon...Fiber Fine Mercerized Cotton #75/11 Cotton: 60~80 Silk: "A" Synthetic/ Polyester Long Fiber Mercerized 50 #90/14 (Supplied with your machine.) Cotton: 50~60 Silk: "A" Synthetic/ Polyester Long Fiber Mercerized 50~60 #100/16 Cotton: 40~50 Mercerized Heavy Duty Polyester ...
...the upper (spool) and lower (bobbin) threads. CONTENTS KNOWING YOUR SEWING MACHINE STRAIGHT AND ZIGZAG BUILT-IN STITCHES STITCHING CHART OF SEWING FABRICS, NEEDLES AND THREAD COMBINATIONS VERY THIN LIGHTWEIGHT MEDIUM WEIGHT HEAVYWEIGHT KNITS SEWING FABRICS Fine tricot, Fine lace, Thin linen, Silk, Organza, Chiffon...Fiber Fine Mercerized Cotton #75/11 Cotton: 60~80 Silk: "A" Synthetic/ Polyester Long Fiber Mercerized 50 #90/14 (Supplied with your machine.) Cotton: 50~60 Silk: "A" Synthetic/ Polyester Long Fiber Mercerized 50~60 #100/16 Cotton: 40~50 Mercerized Heavy Duty Polyester ...
Users Manual - English
Page 44
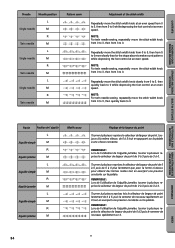
...lecteur de largeur de point de 0 à 3 puis le ramener de nouveau rapidement sur 0. 34 MAINTENANCE INDEX CONTENTS KNOWING YOUR SEWING MACHINE STRAIGHT AND ZIGZAG BUILT-IN STITCHES STITCHING Needle Needle position L Single needle M R Twin needle M L Single needle M R Twin...0 to 3, then quickly back to make round patterns while depressing the foot control at an even speed. BUTTONHOLE AND USING ATTACHMENTS BUTTON SEWING AND APPLICATIONS Aguja Position de l'aiguille L Aiguille simple M R Aiguille jumelée M L Aiguille simple M R Aiguille jumelée...
...lecteur de largeur de point de 0 à 3 puis le ramener de nouveau rapidement sur 0. 34 MAINTENANCE INDEX CONTENTS KNOWING YOUR SEWING MACHINE STRAIGHT AND ZIGZAG BUILT-IN STITCHES STITCHING Needle Needle position L Single needle M R Twin needle M L Single needle M R Twin...0 to 3, then quickly back to make round patterns while depressing the foot control at an even speed. BUTTONHOLE AND USING ATTACHMENTS BUTTON SEWING AND APPLICATIONS Aguja Position de l'aiguille L Aiguille simple M R Aiguille jumelée M L Aiguille simple M R Aiguille jumelée...
Users Manual - English
Page 67
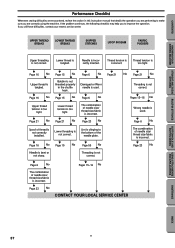
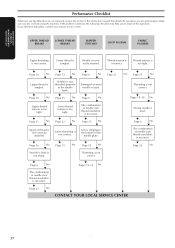
CONTENTS KNOWING YOUR SEWING MACHINE STRAIGHT AND ZIGZAG BUILT-IN STITCHES STITCHING Performance Checklist Whenever sewing difficulties are encountered, review the section in the shuttle hook. UPPER THREAD BREAKS LOWER THREAD BREAKS SKIPPED STITCHES LOOP IN SEAM FABRIC ... incorrect. w Page 15 w No Page 55 No w Threading is not correct. If the problem continues, the following checklist may help you are correctly using the machine. Needle is bent or not sharp. w Page 16 No w Needle is incorrectly inserted. w Page 15 No w Lower thread tension is used . w Pages...
CONTENTS KNOWING YOUR SEWING MACHINE STRAIGHT AND ZIGZAG BUILT-IN STITCHES STITCHING Performance Checklist Whenever sewing difficulties are encountered, review the section in the shuttle hook. UPPER THREAD BREAKS LOWER THREAD BREAKS SKIPPED STITCHES LOOP IN SEAM FABRIC ... incorrect. w Page 15 w No Page 55 No w Threading is not correct. If the problem continues, the following checklist may help you are correctly using the machine. Needle is bent or not sharp. w Page 16 No w Needle is incorrectly inserted. w Page 15 No w Lower thread tension is used . w Pages...
Users Manual - English
Page 68
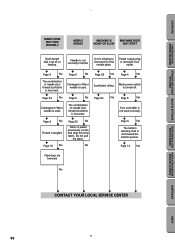
... w Page 55 No w Insufficient oiling. w Page 5 No w The bobbin winding shaft is not correctly inserted. Let the feed dogs move the fabric. CONTENTS KNOWING YOUR SEWING MACHINE STRAIGHT AND ZIGZAG BUILT-IN STITCHES STITCHING FABRIC DOES NOT FEED PROPERLY NEEDLE BREAKS...
... w Page 55 No w Insufficient oiling. w Page 5 No w The bobbin winding shaft is not correctly inserted. Let the feed dogs move the fabric. CONTENTS KNOWING YOUR SEWING MACHINE STRAIGHT AND ZIGZAG BUILT-IN STITCHES STITCHING FABRIC DOES NOT FEED PROPERLY NEEDLE BREAKS...
Users Manual - English
Page 76
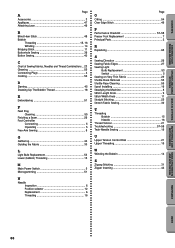
CONTENTS KNOWING YOUR SEWING MACHINE STRAIGHT AND ZIGZAG BUILT-IN STITCHES STITCHING Page A Accessories 3 Appliques 47 Attaching Lace 46 B Blind Hem Stitch 48 Bobbin Threading 15, 16 Winding 14 Bridging Stitch 11 Buttonhole Sewing 36 Button Sewing 40 C Chart of Sewing Fabrics, Needles and Thread Combinations ... 23 Cleaning 55 Connecting Plugs 4 Cording 50 D Darning 45 Drawing...
CONTENTS KNOWING YOUR SEWING MACHINE STRAIGHT AND ZIGZAG BUILT-IN STITCHES STITCHING Page A Accessories 3 Appliques 47 Attaching Lace 46 B Blind Hem Stitch 48 Bobbin Threading 15, 16 Winding 14 Bridging Stitch 11 Buttonhole Sewing 36 Button Sewing 40 C Chart of Sewing Fabrics, Needles and Thread Combinations ... 23 Cleaning 55 Connecting Plugs 4 Cording 50 D Darning 45 Drawing...

Users Manual - English
Page 80
CONTENTS KNOWING YOUR SEWING MACHINE STRAIGHT AND ZIGZAG BUILT-IN STITCHES STITCHING BUTTONHOLE AND USING ATTACHMENTS BUTTON SEWING AND APPLICATIONS MAINTENANCE INDEX 70
CONTENTS KNOWING YOUR SEWING MACHINE STRAIGHT AND ZIGZAG BUILT-IN STITCHES STITCHING BUTTONHOLE AND USING ATTACHMENTS BUTTON SEWING AND APPLICATIONS MAINTENANCE INDEX 70
User Manual - French
Page 2
...including the following: "Read all moving parts. Do not allow this instruction manual. 16. Keep the ventilation openings of the sewing machine and foot controller free from the electrical outlet immediately after using ." WARNING - To reduce the risk of lint, dust and... loose cloth. 5. Never operate this machine outdoors. 7. This sewing machine is required around the sewing machine needle. 11. To reduce the risk of the air openings blocked. Return the sewing machine to break. 12. Special care is not intended for examination, repair, ...
...including the following: "Read all moving parts. Do not allow this instruction manual. 16. Keep the ventilation openings of the sewing machine and foot controller free from the electrical outlet immediately after using ." WARNING - To reduce the risk of lint, dust and... loose cloth. 5. Never operate this machine outdoors. 7. This sewing machine is required around the sewing machine needle. 11. To reduce the risk of the air openings blocked. Return the sewing machine to break. 12. Special care is not intended for examination, repair, ...
User Manual - French
Page 6
...YELLOW. The wires in these main leads are coloured in accordance with the fuse cover removed. Connecting Plugs and Main Power / Sewing Light Switch 1 2 1. When leaving the sewing machine unattended, the main switch of replacing the plug fuse, use plugs with the following . NOTE: The plug severed from the... or off the switch for the plug supplied with this appliance may not correspond with the coloured markings identifying the terminals in your sewing machine is coloured brown must be removed from the socket outlet. If your plug, proceed as marked on 2 Turn off and an ...
...YELLOW. The wires in these main leads are coloured in accordance with the fuse cover removed. Connecting Plugs and Main Power / Sewing Light Switch 1 2 1. When leaving the sewing machine unattended, the main switch of replacing the plug fuse, use plugs with the following . NOTE: The plug severed from the... or off the switch for the plug supplied with this appliance may not correspond with the coloured markings identifying the terminals in your sewing machine is coloured brown must be removed from the socket outlet. If your plug, proceed as marked on 2 Turn off and an ...
User Manual - French
Page 7
CONTENTS KNOWING YOUR SEWING MACHINE PRINCIPAL PARTS 2 ACCESSORIES 3 OPERATING YOUR SEWING MACHINE 4 Connecting Plugs 4 Main Power and Sewing Light Switches 5 Foot Controller 5 Inserting the Needle 6 Checking the Needle 6 Changing the Presser Foot 7 Converting to Free-Arm Style 8 Steadying the Machine 8 VARIOUS CONTROLS 9 Stitch Length Knob 9 Reverse Sewing Lever 10 Stitch Width Knob 11 Needle Position Selector 12 THREADING...
CONTENTS KNOWING YOUR SEWING MACHINE PRINCIPAL PARTS 2 ACCESSORIES 3 OPERATING YOUR SEWING MACHINE 4 Connecting Plugs 4 Main Power and Sewing Light Switches 5 Foot Controller 5 Inserting the Needle 6 Checking the Needle 6 Changing the Presser Foot 7 Converting to Free-Arm Style 8 Steadying the Machine 8 VARIOUS CONTROLS 9 Stitch Length Knob 9 Reverse Sewing Lever 10 Stitch Width Knob 11 Needle Position Selector 12 THREADING...
User Manual - French
Page 67
...Lower thread tension is incorrect. M Page 6 No M The combination of needle size/ thread size/fabric is too tight. If you are correctly using the machine. Thread tension is used . M Page 6 No M Damaged or worn needle is too tight. M Page 23 No M M M M CONTACT YOUR ...SKIPPED STITCHES LOOP IN SEAM FABRIC PUCKERS Upper threading is used . MAINTENANCE ENTRETIEN MANTENIMIENTO MANUTENÇÃO Performance Checklist Whenever sewing difficulties are encountered, review the section in the shuttle hook. M Page 23 No M M Page 15 No M Bobbin is clinging ...
...Lower thread tension is incorrect. M Page 6 No M The combination of needle size/ thread size/fabric is too tight. If you are correctly using the machine. Thread tension is used . M Page 6 No M Damaged or worn needle is too tight. M Page 23 No M M M M CONTACT YOUR ...SKIPPED STITCHES LOOP IN SEAM FABRIC PUCKERS Upper threading is used . MAINTENANCE ENTRETIEN MANTENIMIENTO MANUTENÇÃO Performance Checklist Whenever sewing difficulties are encountered, review the section in the shuttle hook. M Page 23 No M M Page 15 No M Bobbin is clinging ...
User Manual - French
Page 76
... Replacement 7 Principal Parts 2 R Repacking 65 S Sewing Direction 26 Sewing Fabric Edges 27 Sewing Light Bulb Replacement 53 Switch 5 Sewing on Very Thin Fabric 29 Shuttle Hook Removal 55 Shuttle Race Cleaning 55 Spool Installing 16 Steadying the Machine 8 Stitch Length Knob 9 Stitch Width Knob 11 ...Straight Stitching 25 T Threading Bobbin 15 Needle 16 Thread Tension 21 Troubleshooting 57-58 Twin-Needle Sewing 19 U Upper Tension Control Dial 21 Upper Threading...
... Replacement 7 Principal Parts 2 R Repacking 65 S Sewing Direction 26 Sewing Fabric Edges 27 Sewing Light Bulb Replacement 53 Switch 5 Sewing on Very Thin Fabric 29 Shuttle Hook Removal 55 Shuttle Race Cleaning 55 Spool Installing 16 Steadying the Machine 8 Stitch Length Knob 9 Stitch Width Knob 11 ...Straight Stitching 25 T Threading Bobbin 15 Needle 16 Thread Tension 21 Troubleshooting 57-58 Twin-Needle Sewing 19 U Upper Tension Control Dial 21 Upper Threading...


