Users Manual - English
Page 2
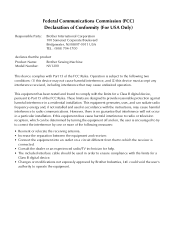
... cable should be determined by turning the equipment off and on, the user is encouraged to try to correct the interference by Brother Industries, Ltd. These limits are designed to comply with the limits for a Class B digital device. • Changes or modifications...Machine NV1200 This device complies with the instructions, may cause harmful interference to Part 15 of the FCC Rules. Federal Communications Commission (FCC) Declaration of Conformity (For USA Only) Responsible Party: Brother International Corporation 100 Somerset Corporate Boulevard Bridgewater, NJ 08807-0911 USA TEL : (...
... cable should be determined by turning the equipment off and on, the user is encouraged to try to correct the interference by Brother Industries, Ltd. These limits are designed to comply with the limits for a Class B digital device. • Changes or modifications...Machine NV1200 This device complies with the instructions, may cause harmful interference to Part 15 of the FCC Rules. Federal Communications Commission (FCC) Declaration of Conformity (For USA Only) Responsible Party: Brother International Corporation 100 Somerset Corporate Boulevard Bridgewater, NJ 08807-0911 USA TEL : (...
Users Manual - English
Page 3
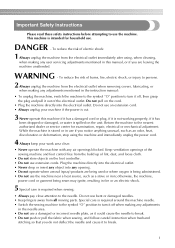
... center for household use extension cords. Do not use the machine. Keep ventilation openings of the sewing machine and foot control free from all moving parts. Plug the machine directly into the electrical outlet. • Never drop or insert any object into the electrical outlet. Special care is spilled on the...
... center for household use extension cords. Do not use the machine. Keep ventilation openings of the sewing machine and foot control free from all moving parts. Plug the machine directly into the electrical outlet. • Never drop or insert any object into the electrical outlet. Special care is spilled on the...
Users Manual - English
Page 4
...to obtain the correct lead. Benzene, thinner, and scouring powders can damage the case and machine, and should contact your local authorized Brother dealer. If the problem persists, please consult your authorized dealer to clean the case. For additional product information, visit our web site ..., you should never be used. • Always consult the operation manual when replacing or installing any assemblies, the presser feet, needle, or other parts to assure correct installation. 8 For repair or adjustment: • If the Light unit (light-emitting diode) is damaged, it must be replaced...
...to obtain the correct lead. Benzene, thinner, and scouring powders can damage the case and machine, and should contact your local authorized Brother dealer. If the problem persists, please consult your authorized dealer to clean the case. For additional product information, visit our web site ..., you should never be used. • Always consult the operation manual when replacing or installing any assemblies, the presser feet, needle, or other parts to assure correct installation. 8 For repair or adjustment: • If the Light unit (light-emitting diode) is damaged, it must be replaced...
Users Manual - English
Page 5
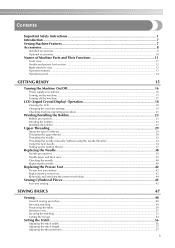
Contents Important Safety Instructions 1 Introduction ...7 Sewing Machine Features ...7 Accessories...8 Included accessories ...8 Optional accessories ...10 Names of Machine Parts and Their Functions 11 Front view ...11 Needle and presser foot section ...12 Right-side/rear view ...12 Operation buttons ...13 Operation panel ...14 GETTING ...
Contents Important Safety Instructions 1 Introduction ...7 Sewing Machine Features ...7 Accessories...8 Included accessories ...8 Optional accessories ...10 Names of Machine Parts and Their Functions 11 Front view ...11 Needle and presser foot section ...12 Right-side/rear view ...12 Operation buttons ...13 Operation panel ...14 GETTING ...

Users Manual - English
Page 10
... is available through your dealer. z The screw for the presser foot holder is available through your authorized dealer. (Part code: XA4813-051) z The organized accessory tray is missing or damaged, contact your authorized dealer. (Part code: XC4489-051) 1. 2. 3. 4. 5. 6. 7. 8. 9. 10. 11. 12. 13. 14.* 15. 16. 17. 18. 19. 20. 21. 22. 23...
... is available through your dealer. z The screw for the presser foot holder is available through your authorized dealer. (Part code: XA4813-051) z The organized accessory tray is missing or damaged, contact your authorized dealer. (Part code: XC4489-051) 1. 2. 3. 4. 5. 6. 7. 8. 9. 10. 11. 12. 13. 14.* 15. 16. 17. 18. 19. 20. 21. 22. 23...
Users Manual - English
Page 11
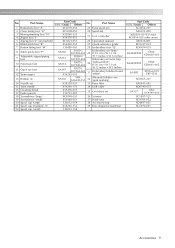
Part Name Part Code U.S.A. / Canada Others No. Part Name 1 Buttonhole foot "A" XC2691-053 23 Extra spool pin 2 Overcasting foot "G" XC3098-051 24 Spool net 3 Monogramming foot "N" 4 Zipper foot "I" X53840-351 X59370-051 25 ... 20 Spool cap (large) 130012-054 38 Accessory bag 21 Spool cap (medium) (2) X55260-153 39 Disc-shaped screwdriver 22 Spool cap (small) 130013-154 Part Code U.S.A. / Canada Others XC4654-051 XA5523-050 XD0501-021(EU area) XC8816-021(other areas) XE0535-001 XD1237-021 XD0474-051 SA444/EF84 EF84: XD0600...
Part Name Part Code U.S.A. / Canada Others No. Part Name 1 Buttonhole foot "A" XC2691-053 23 Extra spool pin 2 Overcasting foot "G" XC3098-051 24 Spool net 3 Monogramming foot "N" 4 Zipper foot "I" X53840-351 X59370-051 25 ... 20 Spool cap (large) 130012-054 38 Accessory bag 21 Spool cap (medium) (2) X55260-153 39 Disc-shaped screwdriver 22 Spool cap (small) 130013-154 Part Code U.S.A. / Canada Others XC4654-051 XA5523-050 XD0501-021(EU area) XC8816-021(other areas) XE0535-001 XD1237-021 XD0474-051 SA444/EF84 EF84: XD0600...
Users Manual - English
Page 12
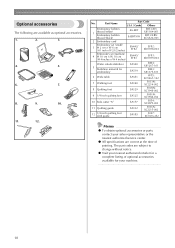
... your sales representative or the nearest authorized service center. z All specifications are subject to change without notice. The part codes are correct at the time of optional accessories available for embroidery SA520 SA519 BM4: X81267-101 BM3: X81175-101...002 11 Quilting guide SA132 F016N: XC2215-002 12 1/4 inch quilting foot with guide SA185 F057: XC7416-252 Memo z To obtain optional accessories or parts, contact your machine. 10 No. z Visit your nearest authorized retailer for a complete listing of printing. Optional accessories The following are available as ...
... your sales representative or the nearest authorized service center. z All specifications are subject to change without notice. The part codes are correct at the time of optional accessories available for embroidery SA520 SA519 BM4: X81267-101 BM3: X81175-101...002 11 Quilting guide SA132 F016N: XC2215-002 12 1/4 inch quilting foot with guide SA185 F057: XC7416-252 Memo z To obtain optional accessories or parts, contact your machine. 10 No. z Visit your nearest authorized retailer for a complete listing of printing. Optional accessories The following are available as ...
Users Manual - English
Page 13
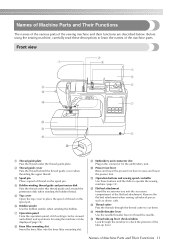
.... f Bobbin winder Use the bobbin winder when winding the bobbin. e Top cover Open the top cover to check the position of the machine parts. i Embroidery unit connector slot Plug in the connector for using the sewing machine, carefully read these buttons and the slide to learn the names... lower the presser foot. Names of the sewing machine and their functions are described below. Names of Machine Parts and Their Functions The names of the various parts of Machine Parts and Their Functions 11 m Thread cutter Pass the threads through the window to place the spool of thread ...
.... f Bobbin winder Use the bobbin winder when winding the bobbin. e Top cover Open the top cover to check the position of the machine parts. i Embroidery unit connector slot Plug in the connector for using the sewing machine, carefully read these buttons and the slide to learn the names... lower the presser foot. Names of the sewing machine and their functions are described below. Names of Machine Parts and Their Functions The names of the various parts of Machine Parts and Their Functions 11 m Thread cutter Pass the threads through the window to place the spool of thread ...
Users Manual - English
Page 15
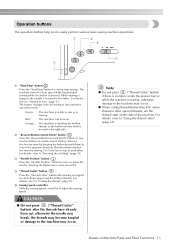
... after the threads have already been cut both the upper and the bobbin threads. The machine sews at a slow speed at the beginning of Machine Parts and Their Functions 13 Reinforcement stitches are sewn by sewing 3 to the machine may occur. For details, refer to easily perform various basic sewing machine...
... after the threads have already been cut both the upper and the bobbin threads. The machine sews at a slow speed at the beginning of Machine Parts and Their Functions 13 Reinforcement stitches are sewn by sewing 3 to the machine may occur. For details, refer to easily perform various basic sewing machine...

Users Manual - English
Page 25
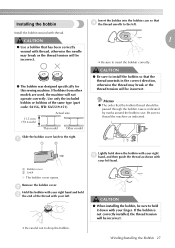
... the included bobbin or bobbins of any other models are used, the machine will not operate correctly. CAUTION ● Only use the Bobbin (part code: SA156, SFB: XA5539-151) designed specifically for winding the bobbin is indicated by a broken line on the sewing machine. Winding/Installing ...the Bobbin 23 Use of the same type (part code: SA156, SFB: XA5539-151). If bobbins from other bobbin may result in injuries or damage to prepare the bobbin thread. 1 a Bobbin...
... the included bobbin or bobbins of any other models are used, the machine will not operate correctly. CAUTION ● Only use the Bobbin (part code: SA156, SFB: XA5539-151) designed specifically for winding the bobbin is indicated by a broken line on the sewing machine. Winding/Installing ...the Bobbin 23 Use of the same type (part code: SA156, SFB: XA5539-151). If bobbins from other bobbin may result in injuries or damage to prepare the bobbin thread. 1 a Bobbin...
Users Manual - English
Page 29
... should be passed through the bobbin case is not correctly installed, the thread tension will be sure to hold c the end of the same type (part code: SA156, SFB: XA5539-151). If the bobbin is indicated by marks around the bobbin case. Use only the included bobbin or bobbins of the...
... should be passed through the bobbin case is not correctly installed, the thread tension will be sure to hold c the end of the same type (part code: SA156, SFB: XA5539-151). If the bobbin is indicated by marks around the bobbin case. Use only the included bobbin or bobbins of the...
Users Manual - English
Page 36
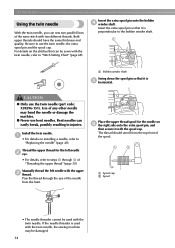
... the extra spool pin, and then secure it is used with the spool cap. For details on installing a needle, refer to use the twin needle (part code: X59296-151). If the needle threader is e horizontal. Use of "Threading the upper thread" (page 30). Pass the thread through k of any other needle...
... the extra spool pin, and then secure it is used with the spool cap. For details on installing a needle, refer to use the twin needle (part code: X59296-151). If the needle threader is e horizontal. Use of "Threading the upper thread" (page 30). Pass the thread through k of any other needle...

Users Manual - English
Page 43
... tighten the needle clamp screw. 1 1 2 a Screwdriver b Needle clamp screw • Do not apply a strong force when loosening or tightening the needle clamp screw, otherwise certain parts of the sewing machine may result. a Needle stopper Replacing the Needle 41 With the flat side of the needle toward you (counterclockwise) to remove the...
... tighten the needle clamp screw. 1 1 2 a Screwdriver b Needle clamp screw • Do not apply a strong force when loosening or tightening the needle clamp screw, otherwise certain parts of the sewing machine may result. a Needle stopper Replacing the Needle 41 With the flat side of the needle toward you (counterclockwise) to remove the...

Users Manual - English
Page 47
a X With the flat bed attachment removed, freearm sewing is possible. When you wish to sew onto the b arm, and then sew from the top. Slide the part that you are finished with free-arm sewing, c install the flat bed attachment back in its original position. Pull the flat bed attachment off to sew cylindrical pieces such as sleeve cuffs and pant legs. Sewing Cylindrical Pieces Free-arm sewing makes sewing cylindrical pieces easy. 1 Free-arm sewing Removing the flat bed attachment allows for free-arm sewing, making it easier to the left. Sewing Cylindrical Pieces 45
a X With the flat bed attachment removed, freearm sewing is possible. When you wish to sew onto the b arm, and then sew from the top. Slide the part that you are finished with free-arm sewing, c install the flat bed attachment back in its original position. Pull the flat bed attachment off to sew cylindrical pieces such as sleeve cuffs and pant legs. Sewing Cylindrical Pieces Free-arm sewing makes sewing cylindrical pieces easy. 1 Free-arm sewing Removing the flat bed attachment allows for free-arm sewing, making it easier to the left. Sewing Cylindrical Pieces 45

Users Manual - English
Page 50
CAUTION ● While the machine is in operation, pay special attention to be sewn. In addition, keep your hands away from all moving parts such as the needle and handwheel, otherwise injuries may occur. ● Do not pull or push the fabric too hard while sewing, otherwise injuries may ...
CAUTION ● While the machine is in operation, pay special attention to be sewn. In addition, keep your hands away from all moving parts such as the needle and handwheel, otherwise injuries may occur. ● Do not pull or push the fabric too hard while sewing, otherwise injuries may ...

Users Manual - English
Page 90
... back, as shown below . UTILITY STITCHES Buttonhole sewing The maximum buttonhole length is used for sewing buttonholes, are indicated below . 1 1 1 1 a Reinforcement stitching The names of parts of buttonhole b foot "A", and then insert the button that will be put through the buttonhole. 88
... back, as shown below . UTILITY STITCHES Buttonhole sewing The maximum buttonhole length is used for sewing buttonholes, are indicated below . 1 1 1 1 a Reinforcement stitching The names of parts of buttonhole b foot "A", and then insert the button that will be put through the buttonhole. 88

Users Manual - English
Page 93
... width" (page 56). Attach buttonhole foot "A". Lower the presser foot lever and the f buttonhole lever, and then start sewing. Hook the gimp thread onto the part of a buttonhole foot "A" shown in the illustration. • For details, refer to the thickness of the e gimp thread. d Adjust the stitch width to "Adjusting the...
... width" (page 56). Attach buttonhole foot "A". Lower the presser foot lever and the f buttonhole lever, and then start sewing. Hook the gimp thread onto the part of a buttonhole foot "A" shown in the illustration. • For details, refer to the thickness of the e gimp thread. d Adjust the stitch width to "Adjusting the...

Users Manual - English
Page 108
...b 1 a Seam (3.2 mm (1/8 inch)) Start sewing. c Align the mark at the lower edge of the 1/4 inch quilting foot aligns with the right edge of the narrow part of the 1/4 inch quilting foot. 1 2 a Mark on 1/4 inch quilting foot b Beginning of stitching 106 Select stitch 3 . UTILITY STITCHES ■ For a seam allowance ... with the edge of the fabric, and sew using stitch 22 . 1 When sewing with a seam allowance, align the left edge of the narrow part of the 1/4 inch quilting foot with a seam allowance of 6.4 mm (1/4 inch). Align the right edge of the fabric with the lower edge of...
...b 1 a Seam (3.2 mm (1/8 inch)) Start sewing. c Align the mark at the lower edge of the 1/4 inch quilting foot aligns with the right edge of the narrow part of the 1/4 inch quilting foot. 1 2 a Mark on 1/4 inch quilting foot b Beginning of stitching 106 Select stitch 3 . UTILITY STITCHES ■ For a seam allowance ... with the edge of the fabric, and sew using stitch 22 . 1 When sewing with a seam allowance, align the left edge of the narrow part of the 1/4 inch quilting foot with a seam allowance of 6.4 mm (1/4 inch). Align the right edge of the fabric with the lower edge of...

Users Manual - English
Page 137
e If the part of the pattern indicated in Decorative Patterns 135 Press . To adjust the horizontal position, press for vertical pattern adjustment. d Press f (Settings key) on the operation ...
e If the part of the pattern indicated in Decorative Patterns 135 Press . To adjust the horizontal position, press for vertical pattern adjustment. d Press f (Settings key) on the operation ...

Users Manual - English
Page 167
... a little slack. c a b d e a Embroidery frames that can be used for embroidering b Current color step/Number of colors in design c Current name of color d Current color part e Next color part Set the embroidery thread, and thread the b needle. 4 • Refer to "Threading the upper thread" (page • The thread color number set displayed for...
... a little slack. c a b d e a Embroidery frames that can be used for embroidering b Current color step/Number of colors in design c Current name of color d Current color part e Next color part Set the embroidery thread, and thread the b needle. 4 • Refer to "Threading the upper thread" (page • The thread color number set displayed for...

