BR-Receipts Users Guide Windows
Page 20
...setting is Auto Detect. To use an automatic document feeder (ADF). Threshold: When you have several drivers available, click the File menu and select Select Scanner..., and then specify a driver for specific scanners. When you finish configuring your scanner, and some features are scanning a long receipt,...total amount items shown. NOTE: Carrier sheets may differ depending on your scan settings, you have placed the receipt in the scanner's document feeder. • Brightness And Contrast: Drag the sliders to adjust the contrast and brightness of the scanned image. If you ...
...setting is Auto Detect. To use an automatic document feeder (ADF). Threshold: When you have several drivers available, click the File menu and select Select Scanner..., and then specify a driver for specific scanners. When you finish configuring your scanner, and some features are scanning a long receipt,...total amount items shown. NOTE: Carrier sheets may differ depending on your scan settings, you have placed the receipt in the scanner's document feeder. • Brightness And Contrast: Drag the sliders to adjust the contrast and brightness of the scanned image. If you ...
BR-Receipts Users Guide Macintosh
Page 22
...will appear. 3. Click OK. NOTE: Carrier sheets may differ depending on your scanner model. Scan Size: The default setting is Auto Detect. to select other options from the list. Enable Document Feeder: Select this check box if you want to use this option, the... selected scanner must have placed the receipt in the scanner's document feeder. Brightness and Contrast: Drag the sliders to adjust the ...
...will appear. 3. Click OK. NOTE: Carrier sheets may differ depending on your scanner model. Scan Size: The default setting is Auto Detect. to select other options from the list. Enable Document Feeder: Select this check box if you want to use this option, the... selected scanner must have placed the receipt in the scanner's document feeder. Brightness and Contrast: Drag the sliders to adjust the ...
Users Guide
Page 4
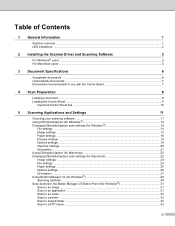
Table of Contents 1 General Information 1 Scanner overview ...1 LED indications ...2 2 Installing the Scanner Driver and Scanning Software 3 For Windows ® users ...3 For Macintosh users ...5 3 Document Specifications 6 Acceptable documents ...6 Unacceptable documents ...7 Documents recommended for use with the Carrier Sheet 7 4 Scan Preparation 8 Loading a document ...8 Loading the Carrier Sheet ...9 Important Carrier Sheet tips ...10 5 Scanning Applications and Settings 11 Choosing your scanning...
Table of Contents 1 General Information 1 Scanner overview ...1 LED indications ...2 2 Installing the Scanner Driver and Scanning Software 3 For Windows ® users ...3 For Macintosh users ...5 3 Document Specifications 6 Acceptable documents ...6 Unacceptable documents ...7 Documents recommended for use with the Carrier Sheet 7 4 Scan Preparation 8 Loading a document ...8 Loading the Carrier Sheet ...9 Important Carrier Sheet tips ...10 5 Scanning Applications and Settings 11 Choosing your scanning...
Users Guide
Page 6
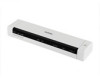
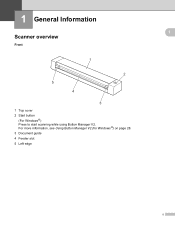
For more information, see Using Button Manager V2 (for Windows®) on page 28. 3 Document guide 4 Feeder slot 5 Left edge 1 1 General Information 1 1 Scanner overview Front 1 2 5 4 3 1 Top cover 2 Start button (For Windows ®) Press to start scanning while using Button Manager V2.
For more information, see Using Button Manager V2 (for Windows®) on page 28. 3 Document guide 4 Feeder slot 5 Left edge 1 1 General Information 1 1 Scanner overview Front 1 2 5 4 3 1 Top cover 2 Start button (For Windows ®) Press to start scanning while using Button Manager V2.
Users Guide
Page 9
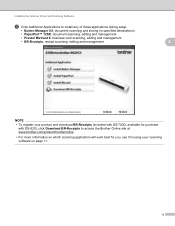
Installing the Scanner Driver and Scanning Software c Click Additional Applications to access the Brother Online site at www.brother.com/product/brotheronline • For more information on which scanning application will work best for purchase with DS-720D; available for you, see Choosing your product and download BR-Receipts (included with DS-620), click Download BR-Receipts...
Installing the Scanner Driver and Scanning Software c Click Additional Applications to access the Brother Online site at www.brother.com/product/brotheronline • For more information on which scanning application will work best for purchase with DS-720D; available for you, see Choosing your product and download BR-Receipts (included with DS-620), click Download BR-Receipts...
Users Guide
Page 10
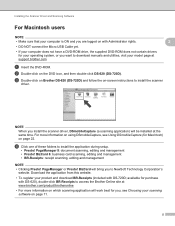
... at the same time. PageManager 9: document scanning, editing and management • Presto! PageManager or Presto! NOTE When you to NewSoft Technology Corporation's website. For more information on which scanning application will be installed at support.brother.com a Insert the DVD-ROM....for Macintosh) on with DS-720D; c Double-click on Brother DS-620 (DS-720D) and follow the on the DVD icon, and then double-click DS-620 (DS-720D). available for purchase with DS-620), double-click BR-Receipts to install the scanner driver. Installing the Scanner Driver and Scanning Software For...
... at the same time. PageManager 9: document scanning, editing and management • Presto! PageManager or Presto! NOTE When you to NewSoft Technology Corporation's website. For more information on which scanning application will be installed at support.brother.com a Insert the DVD-ROM....for Macintosh) on with DS-720D; c Double-click on Brother DS-620 (DS-720D) and follow the on the DVD icon, and then double-click DS-620 (DS-720D). available for purchase with DS-620), double-click BR-Receipts to install the scanner driver. Installing the Scanner Driver and Scanning Software For...
Users Guide
Page 13
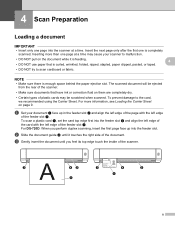
...DS-720D: When you feel its top edge touch the inside of the scanner. 3 42 3 4 2 1 1 8 Insert the next page only after the first one page at a time. a Set your scanner to malfunction. • DO NOT pull on the document while it touches the right side of the feeder slot c. c Gently insert the document... completely dry. • Certain types of the feeder slot c. 4 Scan Preparation 4 Loading a document IMPORTANT • Insert only one page into the scanner at a time may cause your document a face up into the feeder slot b and align the left edge of the card with the...
...DS-720D: When you feel its top edge touch the inside of the scanner. 3 42 3 4 2 1 1 8 Insert the next page only after the first one page at a time. a Set your scanner to malfunction. • DO NOT pull on the document while it touches the right side of the feeder slot c. c Gently insert the document... completely dry. • Certain types of the feeder slot c. 4 Scan Preparation 4 Loading a document IMPORTANT • Insert only one page into the scanner at a time may cause your document a face up into the feeder slot b and align the left edge of the card with the...
Users Guide
Page 14
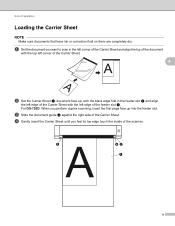
... of the Carrier Sheet and align the top of the document with the left corner of the feeder slot c. c Slide the document guide d against the right side of the scanner. 3 42 1 9 Scan Preparation Loading the Carrier Sheet NOTE Make sure documents that have ink or correction fluid on them are completely ...dry. a Set the document you want to scan in the feeder slot b and align the left edge of the Carrier Sheet with the top left edge of the Carrier Sheet. 4 b Set the Carrier Sheet a, document face up into the feeder slot. For DS-720D: When you feel its top edge...
... of the Carrier Sheet and align the top of the document with the left corner of the feeder slot c. c Slide the document guide d against the right side of the scanner. 3 42 1 9 Scan Preparation Loading the Carrier Sheet NOTE Make sure documents that have ink or correction fluid on them are completely ...dry. a Set the document you want to scan in the feeder slot b and align the left edge of the Carrier Sheet with the top left edge of the Carrier Sheet. 4 b Set the Carrier Sheet a, document face up into the feeder slot. For DS-720D: When you feel its top edge...
Users Guide
Page 16
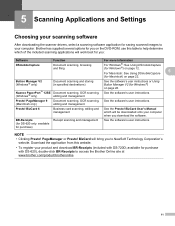
...on page 22. PageManager 9 (Macintosh only) Document scanning, OCR scanning, See the software's user instructions. 5 Scanning Applications and Settings 5 Choosing your scanning software After downloading the scanner drivers, select a scanning software application for Windows...DS-720D; BizCard will be downloaded onto your product and download BR-Receipts (included with DS-620), double-click BR-Receipts to NewSoft Technology Corporation's website. BizCard User's Manual which of the included scanning applications will work best for you to access the Brother Online site at www.brother...
...on page 22. PageManager 9 (Macintosh only) Document scanning, OCR scanning, See the software's user instructions. 5 Scanning Applications and Settings 5 Choosing your scanning software After downloading the scanner drivers, select a scanning software application for Windows...DS-720D; BizCard will be downloaded onto your product and download BR-Receipts (included with DS-620), double-click BR-Receipts to NewSoft Technology Corporation's website. BizCard User's Manual which of the included scanning applications will work best for you to access the Brother Online site at www.brother...
Users Guide
Page 18
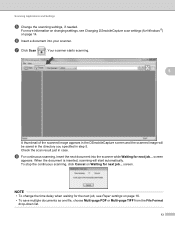
...the directory you specified in step 5. screen. h For continuous scanning, insert the next document into your scanner. For more information on changing settings, see Paper settings on page 16. • To save multiple documents as one file, choose Multi-page PDF or Multi-page TIFF from the File Format ...drop-down list. 13 screen appears. To stop the continuous scanning, click Cancel on page 14. Your scanner starts scanning. 5 A thumbnail of the scanned ...
...the directory you specified in step 5. screen. h For continuous scanning, insert the next document into your scanner. For more information on changing settings, see Paper settings on page 16. • To save multiple documents as one file, choose Multi-page PDF or Multi-page TIFF from the File Format ...drop-down list. 13 screen appears. To stop the continuous scanning, click Cancel on page 14. Your scanner starts scanning. 5 A thumbnail of the scanned ...
Users Guide
Page 20
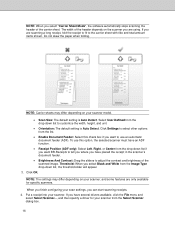
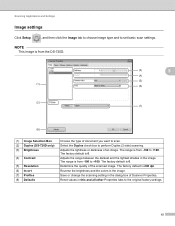
...Scanner Properties. Scanning Applications and Settings Image settings Click Setup , and then click the Image tab to choose image type and to perform Duplex (2 side) scanning. NOTE This image is from the DS-720D. (3) 5 (4) (5) (1) (6) (2) (7) (8) (1) Image Selection Box (2) Duplex (DS-720D... only) (3) Brightness (4) Contrast (5) Resolution (6) Invert (7) Profiles (8) Defaults Choose the type of the scanned image. The range is from -100 to +100. Determine the quality of document you...
...Scanner Properties. Scanning Applications and Settings Image settings Click Setup , and then click the Image tab to choose image type and to perform Duplex (2 side) scanning. NOTE This image is from the DS-720D. (3) 5 (4) (5) (1) (6) (2) (7) (8) (1) Image Selection Box (2) Duplex (DS-720D... only) (3) Brightness (4) Contrast (5) Resolution (6) Invert (7) Profiles (8) Defaults Choose the type of the scanned image. The range is from -100 to +100. Determine the quality of document you...
Users Guide
Page 22
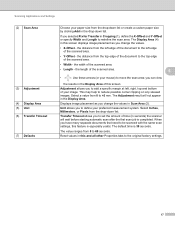
If you selected Fix for Transfer in seconds) the scanner will not appear in this screen displays image placement as you to...will wait before starting automatic scan after the first scan job is completed. Transfer Timeout allows you have many separate documents that need to the left , right, top and bottom of time (in Cropping (1), define the X-Offset ...and Y-Offset or specify Width and Length to +5 mm. the distance from the left edge of the document to reduce possible corner clipping on any skewed images. When you to move the scan area; Unit allows you change...
If you selected Fix for Transfer in seconds) the scanner will not appear in this screen displays image placement as you to...will wait before starting automatic scan after the first scan job is completed. Transfer Timeout allows you have many separate documents that need to the left , right, top and bottom of time (in Cropping (1), define the X-Offset ...and Y-Offset or specify Width and Length to +5 mm. the distance from the left edge of the document to reduce possible corner clipping on any skewed images. When you to move the scan area; Unit allows you change...

Users Guide
Page 27
e Insert a document into your scanner. Check the scan result just in step 4. c DSmobileCapture launches. 5 d Change the scanning settings, if needed. For more information on changing settings, see Changing DSmobileCapture scan ... computer. The scanned image will be saved in the directory you specified in case. 22 Connect the cable to the Micro USB port on your scanner. Your scanner starts scanning. Scanning Applications and Settings Using DSmobileCapture (for Macintosh) on your desktop. f Click Scan in the DSmobileCapture screen. b Double-click the DSmobileCapture ...
e Insert a document into your scanner. Check the scan result just in step 4. c DSmobileCapture launches. 5 d Change the scanning settings, if needed. For more information on changing settings, see Changing DSmobileCapture scan ... computer. The scanned image will be saved in the directory you specified in case. 22 Connect the cable to the Micro USB port on your scanner. Your scanner starts scanning. Scanning Applications and Settings Using DSmobileCapture (for Macintosh) on your desktop. f Click Scan in the DSmobileCapture screen. b Double-click the DSmobileCapture ...
Users Guide
Page 28
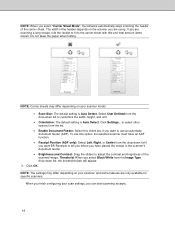
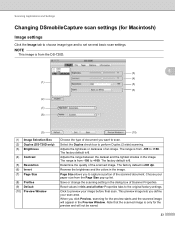
...the image. The factory default is from the DS-720D. 5 (3) (4) (1) (5) (6) (2) (7) (8) (9) (1) Image Selection Box (2) Duplex (DS-720D only) (3) Brightness (4) Contrast (5) Resolution (6) Invert (7) Page Size (8) Profiles (9) Default (10) Preview Window (10) Choose the type of the scanned document. The range is 200 dpi. Reverse the... brightness and the colors in the image. Save or change the scanning setting in the dialog box of the scanned image. When you define your image before final scan. Determine the quality of Scanner...
...the image. The factory default is from the DS-720D. 5 (3) (4) (1) (5) (6) (2) (7) (8) (9) (1) Image Selection Box (2) Duplex (DS-720D only) (3) Brightness (4) Contrast (5) Resolution (6) Invert (7) Page Size (8) Profiles (9) Default (10) Preview Window (10) Choose the type of the scanned document. The range is 200 dpi. Reverse the... brightness and the colors in the image. Save or change the scanning setting in the dialog box of the scanned image. When you define your image before final scan. Determine the quality of Scanner...
Users Guide
Page 35
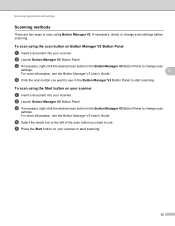
...V2 Button Panel to start scanning. 30 e Press the Start button on your scanner to change scan settings before scanning. To scan using the scan button on your scanner a Insert a document into your scanner. c If necessary, right-click the desired scan button in the Button Manager ...more information, see the Button Manager V2 User's Guide. To scan using the Start button on Button Manager V2 Button Panel a Insert a document into your scanner. d Click the scan button you want to use . b Launch Button Manager V2 Button Panel. If necessary, check or change scan settings...
...V2 Button Panel to start scanning. 30 e Press the Start button on your scanner to change scan settings before scanning. To scan using the scan button on your scanner a Insert a document into your scanner. c If necessary, right-click the desired scan button in the Button Manager ...more information, see the Button Manager V2 User's Guide. To scan using the Start button on Button Manager V2 Button Panel a Insert a document into your scanner. d Click the scan button you want to use . b Launch Button Manager V2 Button Panel. If necessary, check or change scan settings...
Users Guide
Page 36
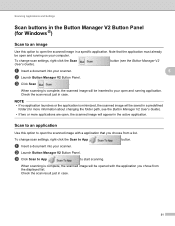
...the application must already be open and running application. Note that you chose from a list. c Click Scan . a Insert a document into your scanner. When scanning is minimized, the scanned image will be inserted to your computer. Scanning Applications and Settings Scan buttons in the Button... User's Guide). • If two or more information about changing the folder path, see the Button Manager V2 a Insert a document into your scanner. 5 b Launch Button Manager V2 Button Panel. To change scan settings, right-click the Scan User's Guide). Scan to an application...
...the application must already be open and running application. Note that you chose from a list. c Click Scan . a Insert a document into your scanner. When scanning is minimized, the scanned image will be inserted to your computer. Scanning Applications and Settings Scan buttons in the Button... User's Guide). • If two or more information about changing the folder path, see the Button Manager V2 a Insert a document into your scanner. 5 b Launch Button Manager V2 Button Panel. To change scan settings, right-click the Scan User's Guide). Scan to an application...
Users Guide
Page 37
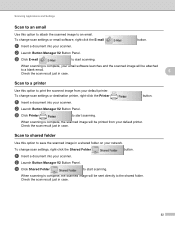
...case. 32 b Launch Button Manager V2 Button Panel. To change scan settings or destination printer, right-click the Printer a Insert a document into your scanner. c Click Printer to save the scanned image in case. 5 Scan to a printer Use this option to start scanning. Scan to... Panel. To change scan settings or email software, right-click the E-mail a Insert a document into your scanner. To change scan settings, right-click the Shared Folder a Insert a document into your scanner. Check the scan result just in a shared folder on your email software launches and the scanned...
...case. 32 b Launch Button Manager V2 Button Panel. To change scan settings or destination printer, right-click the Printer a Insert a document into your scanner. c Click Printer to save the scanned image in case. 5 Scan to a printer Use this option to start scanning. Scan to... Panel. To change scan settings or email software, right-click the E-mail a Insert a document into your scanner. To change scan settings, right-click the Shared Folder a Insert a document into your scanner. Check the scan result just in a shared folder on your email software launches and the scanned...
Users Guide
Page 38
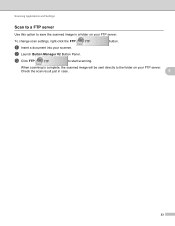
To change scan settings, right-click the FTP button. a Insert a document into your FTP server. Check the scan result just in a folder on your FTP server. Scanning Applications and Settings Scan to a FTP server Use this option to start scanning. b Launch Button Manager V2 Button Panel. c Click FTP to save the scanned image in case. 5 33 When scanning is complete, the scanned image will be sent directly to the folder on your scanner.
To change scan settings, right-click the FTP button. a Insert a document into your FTP server. Check the scan result just in a folder on your FTP server. Scanning Applications and Settings Scan to a FTP server Use this option to start scanning. b Launch Button Manager V2 Button Panel. c Click FTP to save the scanned image in case. 5 33 When scanning is complete, the scanned image will be sent directly to the folder on your scanner.
Users Guide
Page 46
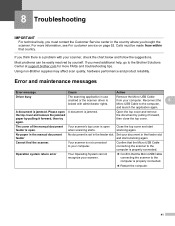
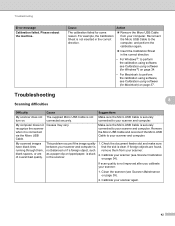
... the computer is a problem with administrator rights. The cover of the manual document Your scanner's top cover is open feeder is jammed. Cannot find the scanner. If you think there is properly connected. Restart the computer. 41 Using non-Brother supplies may affect scan quality, hardware performance and product reliability. when scanning starts...
... the computer is a problem with administrator rights. The cover of the manual document Your scanner's top cover is open feeder is jammed. Cannot find the scanner. If you think there is properly connected. Restart the computer. 41 Using non-Brother supplies may affect scan quality, hardware performance and product reliability. when scanning starts...
Users Guide
Page 47
...;) on page 34. • For Macintosh: to your scanner again. 42 Cause The supplied Micro USB Cable is not inserted in the scanner. This problem occurs if the image quality between your scanner. 2. Check the document feeder slot and make sure that the slot is connected via... the Micro USB Cable. Calibrate your scanner (see Scanner Maintenance on page 34). My computer does not recognize the scanner when it is clear. Clean the scanner (see Scanner Calibration on page ...
...;) on page 34. • For Macintosh: to your scanner again. 42 Cause The supplied Micro USB Cable is not inserted in the scanner. This problem occurs if the image quality between your scanner. 2. Check the document feeder slot and make sure that the slot is connected via... the Micro USB Cable. Calibrate your scanner (see Scanner Maintenance on page 34). My computer does not recognize the scanner when it is clear. Clean the scanner (see Scanner Calibration on page ...


