
Operation Manual
Page 1
We recommend that you keep this document before using the machine. Operation Manual Sewing Machine Product Code: 888-V67 KNOWING YOUR SEWING MACHINE SEWING BASICS UTILITY STITCHES APPENDIX Be sure to read this document nearby for future reference.
We recommend that you keep this document before using the machine. Operation Manual Sewing Machine Product Code: 888-V67 KNOWING YOUR SEWING MACHINE SEWING BASICS UTILITY STITCHES APPENDIX Be sure to read this document nearby for future reference.

Operation Manual
Page 6
...Needle and presser foot section ...9 Operation buttons ...9 Operation panel ...10 Spool pin ...10 USING YOUR SEWING MACHINE 12 Power supply precautions ...12 Power supply ...12 Foot controller ...13 Sewing speed controller (for models equipped with the start/stop button 13 Changing the needle stop position ......13 Changing the initial needle position ...14 Cancelling the operation beep ...14 THREADING THE MACHINE 15 Winding the bobbin ...15 Lower...
...Needle and presser foot section ...9 Operation buttons ...9 Operation panel ...10 Spool pin ...10 USING YOUR SEWING MACHINE 12 Power supply precautions ...12 Power supply ...12 Foot controller ...13 Sewing speed controller (for models equipped with the start/stop button 13 Changing the needle stop position ......13 Changing the initial needle position ...14 Cancelling the operation beep ...14 THREADING THE MACHINE 15 Winding the bobbin ...15 Lower...
Operation Manual
Page 8
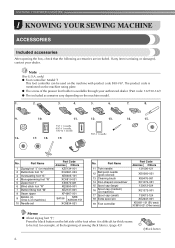
...Foot controller: Model T This foot controller can be fed, for example, at the beginning of sewing thick fabrics. (page 43) aBlack button 6 Part Name Part Code Americas Others 1 Zigzag foot "J" (on machine) XZ5134-001 2 Buttonhole foot "A" XC2691-033 3 Overcasting foot "G" XE6305-101 4 Monogramming foot ...Memo ● About zigzag foot "J"; If any item is available through your dealer. KNOWING YOUR SEWING MACHINE 1 KNOWING YOUR SEWING MACHINE ACCESSORIES Included accessories After opening the box, check that the following accessories are included. The product code is mentioned...
...Foot controller: Model T This foot controller can be fed, for example, at the beginning of sewing thick fabrics. (page 43) aBlack button 6 Part Name Part Code Americas Others 1 Zigzag foot "J" (on machine) XZ5134-001 2 Buttonhole foot "A" XC2691-033 3 Overcasting foot "G" XE6305-101 4 Monogramming foot ...Memo ● About zigzag foot "J"; If any item is available through your dealer. KNOWING YOUR SEWING MACHINE 1 KNOWING YOUR SEWING MACHINE ACCESSORIES Included accessories After opening the box, check that the following accessories are included. The product code is mentioned...
Operation Manual
Page 10
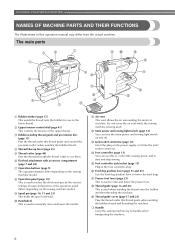
...55 and 65) Use the feed dog position lever to select the stitch and specify the various settings. t Handle Carry the sewing machine by its handle when transporting the machine. 8 c Bobbin-winding thread guide and pre-tension disc (page 15) Pass the thread under this operation manual may differ ...from the actual machine. m Jack/socket connector (page 12) Insert the plug on the sewing machine model. h Operation panel (page 10) This is used to lower the feed dogs. The main parts a ...
...55 and 65) Use the feed dog position lever to select the stitch and specify the various settings. t Handle Carry the sewing machine by its handle when transporting the machine. 8 c Bobbin-winding thread guide and pre-tension disc (page 15) Pass the thread under this operation manual may differ ...from the actual machine. m Jack/socket connector (page 12) Insert the plug on the sewing machine model. h Operation panel (page 10) This is used to lower the feed dogs. The main parts a ...
Operation Manual
Page 11
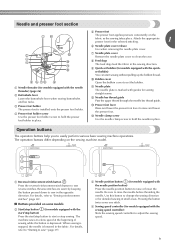
...presser foot is depressed. Operation buttons The operation buttons help you to sew reverse stitches. a Reverse/reinforcement stitch button Press the reverse/reinforcement stitch button to easily perform various basic sewing machine operations. Use this button to raise and lower the presser foot....section e Presser foot The presser foot applies pressure consistently on the sewing machine model. Reverse stitches are sewn by keeping the button pressed down to adjust the sewing speed. 9 For details, refer to "Sewing reinforcement stitches" (page 40). ■ Buttons provided on some ...
...presser foot is depressed. Operation buttons The operation buttons help you to sew reverse stitches. a Reverse/reinforcement stitch button Press the reverse/reinforcement stitch button to easily perform various basic sewing machine operations. Use this button to raise and lower the presser foot....section e Presser foot The presser foot applies pressure consistently on the sewing machine model. Reverse stitches are sewn by keeping the button pressed down to adjust the sewing speed. 9 For details, refer to "Sewing reinforcement stitches" (page 40). ■ Buttons provided on some ...

Operation Manual
Page 12
...here. f Utility stitch indicator This indicator lights up when the mirror image stitch is selected with the stitch category selection key. KNOWING YOUR SEWING MACHINE Operation panel The operation panel, located on the front of the selected stitch (1), the presser foot type to raise the spool pin. For...panel differs depending on the spool pin lever with the stitch category selection key. a LCD (liquid crystal display) The number of the sewing machine, allows you wish to the spool pin as shown in the illustration. When attaching the spool cap, position it to use. Spool pin...
...here. f Utility stitch indicator This indicator lights up when the mirror image stitch is selected with the stitch category selection key. KNOWING YOUR SEWING MACHINE Operation panel The operation panel, located on the front of the selected stitch (1), the presser foot type to raise the spool pin. For...panel differs depending on the spool pin lever with the stitch category selection key. a LCD (liquid crystal display) The number of the sewing machine, allows you wish to the spool pin as shown in the illustration. When attaching the spool cap, position it to use. Spool pin...

Operation Manual
Page 13
■ Storing the spool pin ■ Installing the spool pin When placing the cover on the back of the machine, as fold up the spool pin, as shown in the illustration, shown. 1 until it locks into place to its storage position. a Hole b Tab Push the spool pin down until it . If the spool pin has been removed from the a machine, insert the tab on the spool pin into Remove the spool from the spool pin, and then the hole on the sewing machine before storing or if the spool pin will not be used, return the spool pin to secure it snaps into b place. 11
■ Storing the spool pin ■ Installing the spool pin When placing the cover on the back of the machine, as fold up the spool pin, as shown in the illustration, shown. 1 until it locks into place to its storage position. a Hole b Tab Push the spool pin down until it . If the spool pin has been removed from the a machine, insert the tab on the spool pin into Remove the spool from the spool pin, and then the hole on the sewing machine before storing or if the spool pin will not be used, return the spool pin to secure it snaps into b place. 11

Operation Manual
Page 14
...use extension cords or multi-plug adapters with this plug is being operated, turn off the main power first. KNOWING YOUR SEWING MACHINE USING YOUR SEWING MACHINE Power supply precautions Be sure to observe the following circumstances: • When you are firmly inserted into the electrical outlet ...plug does not fit fully in any way. 12 To reduce the risk of time. Note ● If a power outage occurs while the sewing machine is intended to a bad connection or a disconnection • During electrical storms CAUTION ● Use only the power cord included with many other...
...use extension cords or multi-plug adapters with this plug is being operated, turn off the main power first. KNOWING YOUR SEWING MACHINE USING YOUR SEWING MACHINE Power supply precautions Be sure to observe the following circumstances: • When you are firmly inserted into the electrical outlet ...plug does not fit fully in any way. 12 To reduce the risk of time. Note ● If a power outage occurs while the sewing machine is intended to a bad connection or a disconnection • During electrical storms CAUTION ● Use only the power cord included with many other...

Operation Manual
Page 15
...selection b key) on the left and turn off the sewing machine in the fabric when sewing is not in , the start/stop position Normally, the sewing machine is stopped. Slower a Sewing speed controller • The speed set using the sewing speed controller is plugged in use. Changing the needle stop...needle stop button). a Foot controller jack/socket CAUTION ● When connecting the foot controller, be sure to turn on the sewing machine. Instead, the machine can be used to the lowered position. 13 a Faster You should make sure that nothing is placed on the foot controller....
...selection b key) on the left and turn off the sewing machine in the fabric when sewing is not in , the start/stop position Normally, the sewing machine is stopped. Slower a Sewing speed controller • The speed set using the sewing speed controller is plugged in use. Changing the needle stop...needle stop button). a Foot controller jack/socket CAUTION ● When connecting the foot controller, be sure to turn on the sewing machine. Instead, the machine can be used to the lowered position. 13 a Faster You should make sure that nothing is placed on the foot controller....

Operation Manual
Page 16
... side of (stitch width b adjustment key) and turn on the sewing machine. Memo ● The specified initial needle position is maintained even after the machine is turned off the sewing machine. KNOWING YOUR SEWING MACHINE Changing the initial needle position Normally, the straight stitch (left and ... selected when it is purchased, it will not beep. After turning on the sewing machine, release the "-" side of (stitch selection key). a Cancelling the operation beep When the sewing machine is turned on . Memo ● Perform the same operation to change the ...
... side of (stitch width b adjustment key) and turn on the sewing machine. Memo ● The specified initial needle position is maintained even after the machine is turned off the sewing machine. KNOWING YOUR SEWING MACHINE Changing the initial needle position Normally, the straight stitch (left and ... selected when it is purchased, it will not beep. After turning on the sewing machine, release the "-" side of (stitch selection key). a Cancelling the operation beep When the sewing machine is turned on . Memo ● Perform the same operation to change the ...
Operation Manual
Page 17
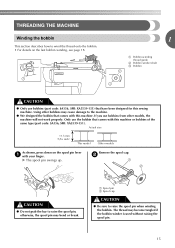
... Bobbin winder shaft c Bobbin CAUTION ● Only use bobbins (part code: SA156, SFB: XA5539-151) that have been designed for this sewing machine. THREADING THE MACHINE Winding the bobbin This section describes how to raise the spool pin when winding the bobbin. Only use bobbins from other bobbins may cause... without raising the spool pin. 15 If you use the bobbin that comes with this machine. b CAUTION ● Do not grab the bar to the machine. ● We designed the bobbin that comes with this machine or bobbins of the same type (part code: SA156, SFB: XA5539-151). Remove...
... Bobbin winder shaft c Bobbin CAUTION ● Only use bobbins (part code: SA156, SFB: XA5539-151) that have been designed for this sewing machine. THREADING THE MACHINE Winding the bobbin This section describes how to raise the spool pin when winding the bobbin. Only use bobbins from other bobbins may cause... without raising the spool pin. 15 If you use the bobbin that comes with this machine. b CAUTION ● Do not grab the bar to the machine. ● We designed the bobbin that comes with this machine or bobbins of the same type (part code: SA156, SFB: XA5539-151). Remove...

Operation Manual
Page 18
... thread guide cover with your right hand so that there is no slack in the spool or the machine may be damaged. a Thread guide Pass the thread under the thread guide. KNOWING YOUR SEWING MACHINE Fully insert the spool of thread for the spool being used . cb Slide the spool cap onto the... that is not positioned correctly, the thread may become tangled around the spool pin or the machine may be damaged. ● Three spool cap sizes are available, allowing you to the front. Memo ● When sewing with your left , slide the spool cap onto the spool pin as far as possible to...
... thread guide cover with your right hand so that there is no slack in the spool or the machine may be damaged. a Thread guide Pass the thread under the thread guide. KNOWING YOUR SEWING MACHINE Fully insert the spool of thread for the spool being used . cb Slide the spool cap onto the... that is not positioned correctly, the thread may become tangled around the spool pin or the machine may be damaged. ● Three spool cap sizes are available, allowing you to the front. Memo ● When sewing with your left , slide the spool cap onto the spool pin as far as possible to...

Operation Manual
Page 19
... completely, and the bobbin is pulled as far as possible. Turn the bobbin clockwise, by hand, until the spring on the bobbin. a Spring on the sewing machine. Turn on the shaft b Notch c 7-10 cm (2-3/4 - 3-15/16 inches) Trim the excess thread above the bobbin. Note ● If the... sewing machine is to be used to start sewing (only for models equipped with the start /stop button). b Hook c Pre-tension disk d Pull it in as far as possible. ● Pull the thread...
... completely, and the bobbin is pulled as far as possible. Turn the bobbin clockwise, by hand, until the spring on the bobbin. a Spring on the sewing machine. Turn on the shaft b Notch c 7-10 cm (2-3/4 - 3-15/16 inches) Trim the excess thread above the bobbin. Note ● If the... sewing machine is to be used to start sewing (only for models equipped with the start /stop button). b Hook c Pre-tension disk d Pull it in as far as possible. ● Pull the thread...

Operation Manual
Page 20
...controller Press the foot controller or press (start/ m stop button) (for models equipped with the start/stop button). Memo ● When the sewing machine is started or the handwheel is not a malfunction. ● The needle bar does not move when you slide the bobbin winding shaft to the...into the notch in "Winding the bobbin" to pass the thread around the bobbin, the machine will make a clicking sound; Cut the thread, slide the bobbin winder shaft o to the right. KNOWING YOUR SEWING MACHINE Slide the sewing speed controller to the right l (to set the speed to fast). (For models ...
...controller Press the foot controller or press (start/ m stop button) (for models equipped with the start/stop button). Memo ● When the sewing machine is started or the handwheel is not a malfunction. ● The needle bar does not move when you slide the bobbin winding shaft to the...into the notch in "Winding the bobbin" to pass the thread around the bobbin, the machine will make a clicking sound; Cut the thread, slide the bobbin winder shaft o to the right. KNOWING YOUR SEWING MACHINE Slide the sewing speed controller to the right l (to set the speed to fast). (For models ...

Operation Manual
Page 21
...the start/stop button) to start. Note ● If the sewing machine is to be used to run out. Slide the sewing speed controller to the right f (to set the speed to the right. 19 a Sewing speed controller Turn on the machine. ● When the foot controller is wound without cutting the ... in the bobbin winder seat. g Press the foot controller or press (start /stop button). 1 2 a Wound evenly b Wound poorly Memo ● When the sewing machine is started or the handwheel is not a malfunction. ● The needle bar does not move when you slide the bobbin winding shaft to fast) (for...
...the start/stop button) to start. Note ● If the sewing machine is to be used to run out. Slide the sewing speed controller to the right f (to set the speed to the right. 19 a Sewing speed controller Turn on the machine. ● When the foot controller is wound without cutting the ... in the bobbin winder seat. g Press the foot controller or press (start /stop button). 1 2 a Wound evenly b Wound poorly Memo ● When the sewing machine is started or the handwheel is not a malfunction. ● The needle bar does not move when you slide the bobbin winding shaft to fast) (for...
Operation Manual
Page 22
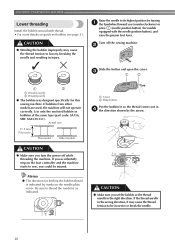
...arrow. If you accidentally step on the foot controller and the machine starts to be injured. CAUTION ● Make sure you turn the power off the sewing machine. Memo ● The direction for this sewing machine. CAUTION ● Winding the bobbin improperly may cause the ...thread tension to sew, you (counterclockwise) or press (needle position button) (for models equipped with ...
...arrow. If you accidentally step on the foot controller and the machine starts to be injured. CAUTION ● Make sure you turn the power off the sewing machine. Memo ● The direction for this sewing machine. CAUTION ● Winding the bobbin improperly may cause the ...thread tension to sew, you (counterclockwise) or press (needle position button) (for models equipped with ...

Operation Manual
Page 23
... the left, and then, after pulling the thread firmly around the tab with your finger, and then pass the Raise the needle to thread the machine as shown. b Slide the button and open the cover. a Cover b Slide button Insert the bobbin with your right hand so that the d end of the... spring Replace the bobbin cover. If the thread unrolls in f place (see arrow a), and then press lightly on the needle plate cover. Turn off the sewing machine. Be sure to its highest position by marks on the right side (see arrow b) until the cover clicks into place. press (needle position button) (for...
... the left, and then, after pulling the thread firmly around the tab with your finger, and then pass the Raise the needle to thread the machine as shown. b Slide the button and open the cover. a Cover b Slide button Insert the bobbin with your right hand so that the d end of the... spring Replace the bobbin cover. If the thread unrolls in f place (see arrow a), and then press lightly on the needle plate cover. Turn off the sewing machine. Be sure to its highest position by marks on the right side (see arrow b) until the cover clicks into place. press (needle position button) (for...

Operation Manual
Page 24
... without drawing up the lower thread" (page 28). 1 a Tension-adjusting spring 22 Replace the bobbin cover. KNOWING YOUR SEWING MACHINE While lightly holding down the bobbin with e your right hand as shown, guide the thread through the tension-adjusting spring of the bobbin case, it ...
... without drawing up the lower thread" (page 28). 1 a Tension-adjusting spring 22 Replace the bobbin cover. KNOWING YOUR SEWING MACHINE While lightly holding down the bobbin with e your right hand as shown, guide the thread through the tension-adjusting spring of the bobbin case, it ...

Operation Manual
Page 25
...page 29). or a Mark b Needle position button • If the needle is not correctly raised, the sewing machine can not be threaded correctly. If the upper threading is not raised, the sewing machine cannot be threaded. a Raise the presser foot using the presser foot b lever. a Presser foot lever CAUTION... When threading the upper thread, carefully follow the instructions. For details on the sewing machine. Be sure to turn the handwheel so that the mark on the wheel points up before threading the sewing machine. 23 Turn on the correct combination of 20 or lower. ● Use ...
...page 29). or a Mark b Needle position button • If the needle is not correctly raised, the sewing machine can not be threaded correctly. If the upper threading is not raised, the sewing machine cannot be threaded. a Raise the presser foot using the presser foot b lever. a Presser foot lever CAUTION... When threading the upper thread, carefully follow the instructions. For details on the sewing machine. Be sure to turn the handwheel so that the mark on the wheel points up before threading the sewing machine. 23 Turn on the correct combination of 20 or lower. ● Use ...

Operation Manual
Page 26
... thread f onto the spool pin. CAUTION ● If the spool or the spool cap is set incorrectly, the thread may bend or break. KNOWING YOUR SEWING MACHINE As shown, press down on the spool pin and cause the needle to break.
... thread f onto the spool pin. CAUTION ● If the spool or the spool cap is set incorrectly, the thread may bend or break. KNOWING YOUR SEWING MACHINE As shown, press down on the spool pin and cause the needle to break.


