

Instruction Manual - English
Page 1
NINE NEEDLE SIX HEAD ELECTRONIC EMBROIDERY MACHINE TWELVE NEEDLE SIX HEAD ELECTRONIC EMBROIDERY MACHINE BES-962BC BES-1262BC INSTRUCTION MANUAL Please read this manual within easy reach for quick reference. Please keep this manual before using the machine.
NINE NEEDLE SIX HEAD ELECTRONIC EMBROIDERY MACHINE TWELVE NEEDLE SIX HEAD ELECTRONIC EMBROIDERY MACHINE BES-962BC BES-1262BC INSTRUCTION MANUAL Please read this manual within easy reach for quick reference. Please keep this manual before using the machine.

Instruction Manual - English
Page 8
... of the following chapters: Chapter 1 An Introduction of Embroidery Machine Provides information on the operation panel and briefly reviews the flow of Embroidery Machine Describes machine installation and preparation to use the production report program. 6 BES-962BC • BES-1262BC Chapter 5 Editing Embroidery Data Explains how to use the Machine Controller. Chapter 8 Creating Production Report Explains how to...
... of the following chapters: Chapter 1 An Introduction of Embroidery Machine Provides information on the operation panel and briefly reviews the flow of Embroidery Machine Describes machine installation and preparation to use the production report program. 6 BES-962BC • BES-1262BC Chapter 5 Editing Embroidery Data Explains how to use the Machine Controller. Chapter 8 Creating Production Report Explains how to...

Instruction Manual - English
Page 10
... Flowchart of Preparation for connecting 4 sets) ..... 39 2-8 Connection of Power Supply 41 2-9 Installation of Software 17 2-3 Notes on the Machine Power 63 8 BES-962BC • BES-1262BC Contents SAFETY INSTRUCTIONS 1 Procedure of Reading This Manual 6 Chapter 1 An Introduction of Embroidery Machine 1. Software 17 2-1 Necessary Systems 17 2-2 Configuration of Software 42 3. Installation 27 2-1 Transportation of...
... Flowchart of Preparation for connecting 4 sets) ..... 39 2-8 Connection of Power Supply 41 2-9 Installation of Software 17 2-3 Notes on the Machine Power 63 8 BES-962BC • BES-1262BC Contents SAFETY INSTRUCTIONS 1 Procedure of Reading This Manual 6 Chapter 1 An Introduction of Embroidery Machine 1. Software 17 2-1 Necessary Systems 17 2-2 Configuration of Software 42 3. Installation 27 2-1 Transportation of...
Instruction Manual - English
Page 17
Chapter 1 An Introduction of Embroidery Machine Chapter 1 An Introduction of Embroidery Machine BES-962BC • BES-1262BC 15
Chapter 1 An Introduction of Embroidery Machine Chapter 1 An Introduction of Embroidery Machine BES-962BC • BES-1262BC 15
Instruction Manual - English
Page 18
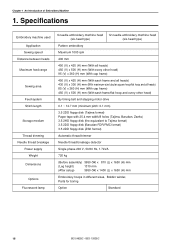
... length Storage medium Thread trimming Needle thread breakage Power supply Weight Dimensions Options Fluorescent lamp 9 needle embroidery machine head 12 needle embroidery machine head (six-head type) (six-head type) Pattern embroidery Maximum 1000 rpm 400 mm 450 (V) x 420 (H) mm (With all heads) 450 (V) ...) 3650 (W) x 810 (L) x 1650 (H) mm (Leg height) 1310 mm (After setup) 3650 (W) x 1400 (L) x 1650 (H) mm Embroidery hoops in different sizes, Bobbin winder, Parts for boring Option Standard 16 BES-962BC • BES-1262BC Chapter 1 An Introduction of Embroidery Machine 1.
... length Storage medium Thread trimming Needle thread breakage Power supply Weight Dimensions Options Fluorescent lamp 9 needle embroidery machine head 12 needle embroidery machine head (six-head type) (six-head type) Pattern embroidery Maximum 1000 rpm 400 mm 450 (V) x 420 (H) mm (With all heads) 450 (V) ...) 3650 (W) x 810 (L) x 1650 (H) mm (Leg height) 1310 mm (After setup) 3650 (W) x 1400 (L) x 1650 (H) mm Embroidery hoops in different sizes, Bobbin winder, Parts for boring Option Standard 16 BES-962BC • BES-1262BC Chapter 1 An Introduction of Embroidery Machine 1.
Instruction Manual - English
Page 19
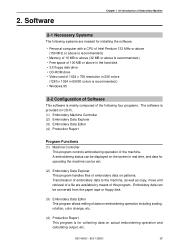
... program is provided on actual embroidering operation and calculating output, etc. Embroidery data can be converted from the paper tape or floppy disk. (3) Embroidery Data Editor This program allows editing of the machine. BES-962BC • BES-1262BC 17 Software Chapter 1 An Introduction of Embroidery Machine 2-1 Necessary Systems The following systems are available by means of...
... program is provided on actual embroidering operation and calculating output, etc. Embroidery data can be converted from the paper tape or floppy disk. (3) Embroidery Data Editor This program allows editing of the machine. BES-962BC • BES-1262BC 17 Software Chapter 1 An Introduction of Embroidery Machine 2-1 Necessary Systems The following systems are available by means of...
Instruction Manual - English
Page 20
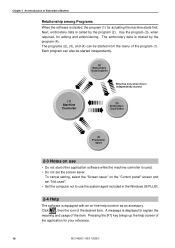
... Use the program (3), when required, for your reference. 18 BES-962BC • BES-1262BC Each program can be started independently. (2) Embroidery Data Explorer Effective only when this is independently started (1) Machine Controller (3) Embroidery Data Editor (4) Production report 2-3 Notes on use • Do not start other application ... • Do not set "Not used". • Set the computer not to explain the meaning and usage of Embroidery Machine Relationship among Programs When the software is equipped with an on the "Control panel" screen and set the screen saver. ...
... Use the program (3), when required, for your reference. 18 BES-962BC • BES-1262BC Each program can be started independently. (2) Embroidery Data Explorer Effective only when this is independently started (1) Machine Controller (3) Embroidery Data Editor (4) Production report 2-3 Notes on use • Do not start other application ... • Do not set "Not used". • Set the computer not to explain the meaning and usage of Embroidery Machine Relationship among Programs When the software is equipped with an on the "Control panel" screen and set the screen saver. ...
Instruction Manual - English
Page 21
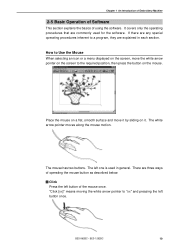
...on the screen to Use the Mouse When selecting an icon or a menu displayed on the screen, move it . BES-962BC • BES-1262BC 19 The left button of the mouse once. How to the required position, then press the button on it by sliding on the mouse. ...two buttons. "Click [xx]" means moving the white arrow pointer to a program, they are commonly used in each section. Chapter 1 An Introduction of Embroidery Machine 2-5 Basic Operation of Software This section explains the basics of operating the mouse button as described below: Click Press the left one is used for...
...on the screen to Use the Mouse When selecting an icon or a menu displayed on the screen, move it . BES-962BC • BES-1262BC 19 The left button of the mouse once. How to the required position, then press the button on it by sliding on the mouse. ...two buttons. "Click [xx]" means moving the white arrow pointer to a program, they are commonly used in each section. Chapter 1 An Introduction of Embroidery Machine 2-5 Basic Operation of Software This section explains the basics of operating the mouse button as described below: Click Press the left one is used for...
Instruction Manual - English
Page 22
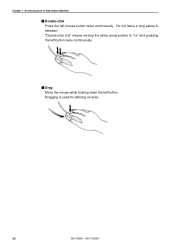
"Double-click [xx]" means moving the white arrow pointer to "xx" and pressing the left mouse button twice continuously. Do not leave a long pause in between. Dragging is used for defining an area. 20 BES-962BC • BES-1262BC Chapter 1 An Introduction of Embroidery Machine Double-click Press the left button twice continuously. Drag Move the mouse while holding down the left button.
"Double-click [xx]" means moving the white arrow pointer to "xx" and pressing the left mouse button twice continuously. Do not leave a long pause in between. Dragging is used for defining an area. 20 BES-962BC • BES-1262BC Chapter 1 An Introduction of Embroidery Machine Double-click Press the left button twice continuously. Drag Move the mouse while holding down the left button.
Instruction Manual - English
Page 23
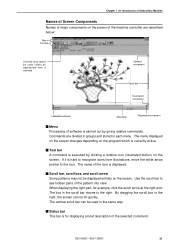
... by clicking a relative icon (illustrated button) on the program which is for example, click the scroll arrow at the right end. BES-962BC • BES-1262BC 21 Chapter 1 An Introduction of Embroidery Machine Names of Screen Components Names of major components on the screen of the...
... by clicking a relative icon (illustrated button) on the program which is for example, click the scroll arrow at the right end. BES-962BC • BES-1262BC 21 Chapter 1 An Introduction of Embroidery Machine Names of Screen Components Names of major components on the screen of the...

Instruction Manual - English
Page 24
...the symbols described in "SAFETY INSTRUCTIONS" on page 1. Important: This symbol indicates a problem if it occurs. 22 BES-962BC • BES-1262BC When the arrow pointer is moved to continue the current operation. Warning: This symbol indicates a warning if user's judgment is needed to another ... by the mouse as described below: 1. A command can be used unless an appropriate item is selected. Chapter 1 An Introduction of Embroidery Machine Selection of Menu Processing of commands is displayed. Move the arrow pointer to be displayed on the result of the latter menu are displayed...
...the symbols described in "SAFETY INSTRUCTIONS" on page 1. Important: This symbol indicates a problem if it occurs. 22 BES-962BC • BES-1262BC When the arrow pointer is moved to continue the current operation. Warning: This symbol indicates a warning if user's judgment is needed to another ... by the mouse as described below: 1. A command can be used unless an appropriate item is selected. Chapter 1 An Introduction of Embroidery Machine Selection of Menu Processing of commands is displayed. Move the arrow pointer to be displayed on the result of the latter menu are displayed...
Instruction Manual - English
Page 25
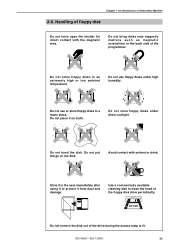
... a dusty place. Do not bend the disk. Store it to clean the head of Embroidery Machine 2-6. Do not put things on cloth. Use a commercially available cleaning disk to protect it on the disk. BES-962BC • BES-1262BC 23 Do not place it from dust and damage. Do not use floppy disks under...
... a dusty place. Do not bend the disk. Store it to clean the head of Embroidery Machine 2-6. Do not put things on cloth. Use a commercially available cleaning disk to protect it on the disk. BES-962BC • BES-1262BC 23 Do not place it from dust and damage. Do not use floppy disks under...
Instruction Manual - English
Page 26
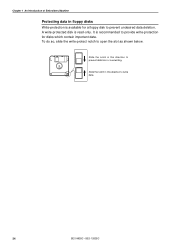
A write-protected disk is available for disks which contain important data. Chapter 1 An Introduction of Embroidery Machine Protecting data in this direction to prevent data loss or overwriting. It is recommended to provide write-protection for a floppy disk to prevent undesired data deletion. Slide the notch in floppy disks Write-protection is read-only. Slide the notch in this direction to open the slot as shown below. To do so, slide the write-protect notch to write data. 24 BES-962BC • BES-1262BC
A write-protected disk is available for disks which contain important data. Chapter 1 An Introduction of Embroidery Machine Protecting data in this direction to prevent data loss or overwriting. It is recommended to provide write-protection for a floppy disk to prevent undesired data deletion. Slide the notch in floppy disks Write-protection is read-only. Slide the notch in this direction to open the slot as shown below. To do so, slide the write-protect notch to write data. 24 BES-962BC • BES-1262BC

Instruction Manual - English
Page 27
Chapter 2 Preparation of Embroidery Machine Chapter 2 Preparation of Embroidery Machine BES-962BC • BES-1262BC 25
Chapter 2 Preparation of Embroidery Machine Chapter 2 Preparation of Embroidery Machine BES-962BC • BES-1262BC 25

Instruction Manual - English
Page 28
... BES-1262BC Operation panel Thread tension dial Pulley cover Pulley Fluorescent lamp switch Control box Power switch F table Head switch Leg Thread tension switch Thread guide A Thread guide B Thread guide C Cotton stand Rear Fluorescent lamp The machine heads are numbered 1 to 6 from the right front. 26 BES-962BC • BES-1262BC Names of Embroidery Machine 1.
... BES-1262BC Operation panel Thread tension dial Pulley cover Pulley Fluorescent lamp switch Control box Power switch F table Head switch Leg Thread tension switch Thread guide A Thread guide B Thread guide C Cotton stand Rear Fluorescent lamp The machine heads are numbered 1 to 6 from the right front. 26 BES-962BC • BES-1262BC Names of Embroidery Machine 1.

Instruction Manual - English
Page 29
... occur. BES-962BC • BES-1262BC 27 If the ground connection is not secure, you run a high risk of receiving a serious electric shock, and problems with the adjustment bolts on the sound floor so that may start the machine unintentionally through an accidental activation of Embroidery Machine DANGER Embroidery machines should be laid by a lift or...
... occur. BES-962BC • BES-1262BC 27 If the ground connection is not secure, you run a high risk of receiving a serious electric shock, and problems with the adjustment bolts on the sound floor so that may start the machine unintentionally through an accidental activation of Embroidery Machine DANGER Embroidery machines should be laid by a lift or...
Instruction Manual - English
Page 30
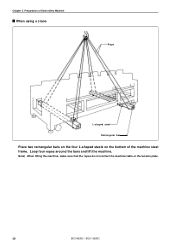
Chapter 2 Preparation of Embroidery Machine When using a crane Rope L-shaped steel Rectangular bar Place two rectangular bars on the four L-shaped steels on the bottom of the machine steel frame. Loop four ropes around the bars and lift the machine. Note) When lifting the machine, make sure that the ropes do not contact the machine table or the tension plate. 28 BES-962BC • BES-1262BC
Chapter 2 Preparation of Embroidery Machine When using a crane Rope L-shaped steel Rectangular bar Place two rectangular bars on the four L-shaped steels on the bottom of the machine steel frame. Loop four ropes around the bars and lift the machine. Note) When lifting the machine, make sure that the ropes do not contact the machine table or the tension plate. 28 BES-962BC • BES-1262BC
Instruction Manual - English
Page 31
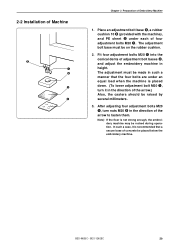
Fit four adjustment bolts M20 q into the conical dents of Embroidery Machine 1. After adjusting four adjustment bolts M20 q, turn it in the direction of four adjustment bolts M20 q. BES-962BC • BES-1262BC 29 In such a case, it is recommended that the four bolts are under each of the arrow....) Also, the casters should be placed below the embroidery machine. The adjustment bolt base must be made in such a manner that...
Fit four adjustment bolts M20 q into the conical dents of Embroidery Machine 1. After adjusting four adjustment bolts M20 q, turn it in the direction of four adjustment bolts M20 q. BES-962BC • BES-1262BC 29 In such a case, it is recommended that the four bolts are under each of the arrow....) Also, the casters should be placed below the embroidery machine. The adjustment bolt base must be made in such a manner that...
Instruction Manual - English
Page 32
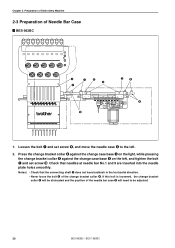
... case base y on the left, and tighten the bolt q and set screw o, and move the needle case w to be adjusted. 30 BES-962BC • BES-1262BC If this bolt is loosened, the change bracket coller r. Loosen the bolt q and set screw !.0 Check that the connecting shaft u does not have backlash in...; Never loose the bolt i of the change bracket coller r will be dislocated and the position of Needle Bar Case BES-962BC w q y o u t ei r 1. Chapter 2 Preparation of Embroidery Machine 2-3 Preparation of the needle bar case w will need to the left. 2.
... case base y on the left, and tighten the bolt q and set screw o, and move the needle case w to be adjusted. 30 BES-962BC • BES-1262BC If this bolt is loosened, the change bracket coller r. Loosen the bolt q and set screw !.0 Check that the connecting shaft u does not have backlash in...; Never loose the bolt i of the change bracket coller r will be dislocated and the position of Needle Bar Case BES-962BC w q y o u t ei r 1. Chapter 2 Preparation of Embroidery Machine 2-3 Preparation of the needle bar case w will need to the left. 2.
Instruction Manual - English
Page 33
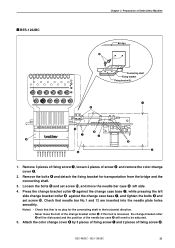
... the change cover e. 2. Attach the color change cover e by 3 pieces of fixing screw q and 2 pieces of screw w and remove the color change bracket coller i. BES-1262BC Chapter 2 Preparation of Embroidery Machine Bridge r Connecting shaft Fixing bracket Fixing bracket B q t o q o u y i w e 1. Loosen the bolts t and set screw !0.
... the change cover e. 2. Attach the color change cover e by 3 pieces of fixing screw q and 2 pieces of screw w and remove the color change bracket coller i. BES-1262BC Chapter 2 Preparation of Embroidery Machine Bridge r Connecting shaft Fixing bracket Fixing bracket B q t o q o u y i w e 1. Loosen the bolts t and set screw !0.


