
Instruction Manual - English
Page 1
BES-916AC BES-1216AC INSTRUCTION MANUAL Please read this manual within easy reach for quick reference. Please keep this manual before using the machine. ELECTRONIC EMBROIDERY MACHINE
BES-916AC BES-1216AC INSTRUCTION MANUAL Please read this manual within easy reach for quick reference. Please keep this manual before using the machine. ELECTRONIC EMBROIDERY MACHINE
Instruction Manual - English
Page 10
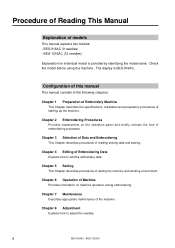
... describes procedures of reading sewing data and sewing. BES-1216AC (12 needles) Explanation for individual model is BES-916AC. Procedure of Reading This Manual Explanation of starting up the machine. Configuration of this manual This manual consists of the following chapters: Chapter 1 Preparation of Embroidery Machine This Chapter describes the specifications, installation and preparatory...
... describes procedures of reading sewing data and sewing. BES-1216AC (12 needles) Explanation for individual model is BES-916AC. Procedure of Reading This Manual Explanation of starting up the machine. Configuration of this manual This manual consists of the following chapters: Chapter 1 Preparation of Embroidery Machine This Chapter describes the specifications, installation and preparatory...
Instruction Manual - English
Page 14
... from Floppy Disk 49 Reading from Memory 52 12 BES-916AC • BES-1216AC Specifications 18 2. Installation 20 3-1 Transportation of Machine 20 3-2 Installation of Machine 20 3-3 Installation of Operation Panel 21 3-4 Mounting of Guard Bar 21 3-5 Mounting of Embroidery Machine 1. Contents SAFETY INSTRUCTIONS 1 Before Starting Operation 6 Procedure of Reading This Manual 8 Screen Composition 10 Chapter...
... from Floppy Disk 49 Reading from Memory 52 12 BES-916AC • BES-1216AC Specifications 18 2. Installation 20 3-1 Transportation of Machine 20 3-2 Installation of Machine 20 3-3 Installation of Operation Panel 21 3-4 Mounting of Guard Bar 21 3-5 Mounting of Embroidery Machine 1. Contents SAFETY INSTRUCTIONS 1 Before Starting Operation 6 Procedure of Reading This Manual 8 Screen Composition 10 Chapter...
Instruction Manual - English
Page 19
Chapter 1 Preparation of Embroidery Machine
Chapter 1 Preparation of Embroidery Machine
Instruction Manual - English
Page 20
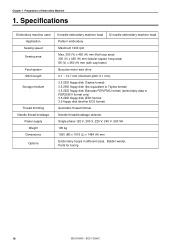
... area Feed system Stitch length Storage medium Thread trimming Needle thread breakage Power supply Weight Dimensions Options 9 needle embroidery machine head 12 needle embroidery machine head Pattern embroidery Maximum 1200 rpm Max. 300 (V) x 450 (H) mm (flat hoop area) 300 (V) x 450 ...brother ECS format) Automatic thread trimmer Needle thread breakage detector Single phase 120 V, 200 V, 220 V, 240 V, 500 VA 195 kg 1050 (W) x 1016 (L) x 1484 (H) mm Embroidery hoops in different sizes, Bobbin winder, Parts for boring 18 BES-916AC • BES-1216AC Chapter 1 Preparation of Embroidery Machine...
... area Feed system Stitch length Storage medium Thread trimming Needle thread breakage Power supply Weight Dimensions Options 9 needle embroidery machine head 12 needle embroidery machine head Pattern embroidery Maximum 1200 rpm Max. 300 (V) x 450 (H) mm (flat hoop area) 300 (V) x 450 ...brother ECS format) Automatic thread trimmer Needle thread breakage detector Single phase 120 V, 200 V, 220 V, 240 V, 500 VA 195 kg 1050 (W) x 1016 (L) x 1484 (H) mm Embroidery hoops in different sizes, Bobbin winder, Parts for boring 18 BES-916AC • BES-1216AC Chapter 1 Preparation of Embroidery Machine...
Instruction Manual - English
Page 21
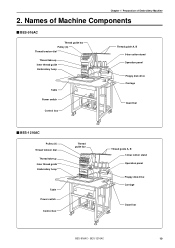
Chapter 1 Preparation of Machine Components BES-916AC Thread guide bar Pulley (A) Thread tension dial Thread take-up Inner thread guide Embroidery hoop Table Power switch Control box Thread guide A, B 9-bar cotton stand Operation panel Floppy disk drive Carriage Guard bar BES-1216AC Pulley (A) Thread tension dial Thread take-up Inner thread guide Embroidery hoop Thread guide bar Table Power switch Control box Thread guide A, B 12-bar cotton stand Operation panel Floppy disk drive Carriage Guard bar BES-916AC • BES-1216AC 19 Names of Embroidery Machine 2.
Chapter 1 Preparation of Machine Components BES-916AC Thread guide bar Pulley (A) Thread tension dial Thread take-up Inner thread guide Embroidery hoop Table Power switch Control box Thread guide A, B 9-bar cotton stand Operation panel Floppy disk drive Carriage Guard bar BES-1216AC Pulley (A) Thread tension dial Thread take-up Inner thread guide Embroidery hoop Thread guide bar Table Power switch Control box Thread guide A, B 12-bar cotton stand Operation panel Floppy disk drive Carriage Guard bar BES-916AC • BES-1216AC 19 Names of Embroidery Machine 2.

Instruction Manual - English
Page 22
.... Be sure to do so may start the machine unintentionally through an accidental activation of Embroidery Machine 3. If the ground connection is completed, get the power supply from a highfrequency welding machine or other machines that it will not move by placing the leveling...Note) Never lift the machine by trained engineers. Installation DANGER Embroidery machines should be installed only by the table or the guard bar. 3-2 Installation of receiving a serious electric shock, and problems with casters e. 20 BES-916AC • BES-1216AC Failure to connect the ...
.... Be sure to do so may start the machine unintentionally through an accidental activation of Embroidery Machine 3. If the ground connection is completed, get the power supply from a highfrequency welding machine or other machines that it will not move by placing the leveling...Note) Never lift the machine by trained engineers. Installation DANGER Embroidery machines should be installed only by the table or the guard bar. 3-2 Installation of receiving a serious electric shock, and problems with casters e. 20 BES-916AC • BES-1216AC Failure to connect the ...
Instruction Manual - English
Page 23
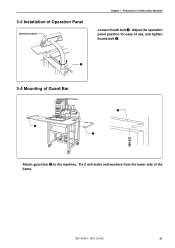
Adjust the operation panel position for ease of the frame. Fix it with bolts and washers from the lower side of use, and tighten thumb bolt q. q 3-4 Mounting of Embroidery Machine Loosen thumb bolt q. BES-916AC • BES-1216AC 21 3-3 Installation of Operation Panel Operation panel Chapter 1 Preparation of Guard Bar q q q Attach guard bar q to the machine.
Adjust the operation panel position for ease of the frame. Fix it with bolts and washers from the lower side of use, and tighten thumb bolt q. q 3-4 Mounting of Embroidery Machine Loosen thumb bolt q. BES-916AC • BES-1216AC 21 3-3 Installation of Operation Panel Operation panel Chapter 1 Preparation of Guard Bar q q q Attach guard bar q to the machine.
Instruction Manual - English
Page 24
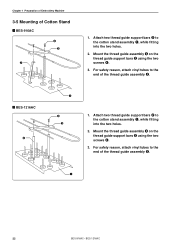
...; BES-1216AC Attach two thread guide support bars w to the cotton stand assembly q, while fitting into the two holes. 2. For safety reason, attach vinyl tubes to the end of the thread guide assembly e. For safety reason, attach vinyl tubes to the end of the thread guide assembly e. Chapter 1 Preparation of Embroidery Machine 3-5 Mounting...
...; BES-1216AC Attach two thread guide support bars w to the cotton stand assembly q, while fitting into the two holes. 2. For safety reason, attach vinyl tubes to the end of the thread guide assembly e. For safety reason, attach vinyl tubes to the end of the thread guide assembly e. Chapter 1 Preparation of Embroidery Machine 3-5 Mounting...
Instruction Manual - English
Page 25
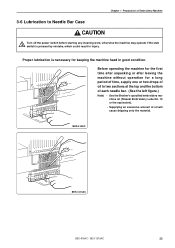
... each needle bar. (See the left figure.) Note) • Use the Brother's specified embroidery machine oil (Nisseki Embroidery Lube No. 10 or the equivalent). • Supplying an excessive amount of Embroidery Machine 3-6 Lubrication to Needle Bar Case CAUTION Turn off the power switch before starting any... which could result in good condition. BES-916AC BES-1216AC BES-916AC • BES-1216AC 23 Before operating the machine for the first time after unpacking or after leaving the machine without operation for keeping the machine head in injury. Chapter 1 Preparation of oil will ...
... each needle bar. (See the left figure.) Note) • Use the Brother's specified embroidery machine oil (Nisseki Embroidery Lube No. 10 or the equivalent). • Supplying an excessive amount of Embroidery Machine 3-6 Lubrication to Needle Bar Case CAUTION Turn off the power switch before starting any... which could result in good condition. BES-916AC BES-1216AC BES-916AC • BES-1216AC 23 Before operating the machine for the first time after unpacking or after leaving the machine without operation for keeping the machine head in injury. Chapter 1 Preparation of oil will ...
Instruction Manual - English
Page 26
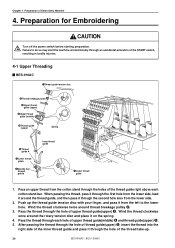
... and then pass it on the spring. 4. Push up the thread guide tension disc with your finger, and pass it through the hole of Embroidery Machine 4. Pass the thread through the hole of the START switch, resulting in bodily injuries. 4-1 Upper Threading BES-916AC qThread guide tension disc wThread ...clockwise twice around the rotary tension disc and place it through an accidental activation of the thread take-up. 24 BES-916AC • BES-1216AC After passing the thread through the hole of thread guide(upper) t, insert the thread into the right side of the inner thread guide ...
... and then pass it on the spring. 4. Push up the thread guide tension disc with your finger, and pass it through the hole of Embroidery Machine 4. Pass the thread through the hole of the START switch, resulting in bodily injuries. 4-1 Upper Threading BES-916AC qThread guide tension disc wThread ...clockwise twice around the rotary tension disc and place it through an accidental activation of the thread take-up. 24 BES-916AC • BES-1216AC After passing the thread through the hole of thread guide(upper) t, insert the thread into the right side of the inner thread guide ...
Instruction Manual - English
Page 27
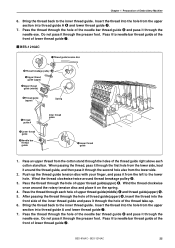
... the thread through the needle eye. Insert the thread into the hole from the lower side, lead it through the presser foot. BES-1216AC qThread guide tension disc wThread breakage pulley eUpper thread guide (upper) rUpper thread guide (middle) tThread guide (upper) Spring yThread guide A...lower thread guide u. 7. Push up . 6. Wind the thread clockwise once around the rotary tension disc and place it through the hole of Embroidery Machine 6. Pass the thread through the presser foot. Pass it through each cotton stand bar. Chapter 1 Preparation of the needle bar thread guide i...
... the thread through the needle eye. Insert the thread into the hole from the lower side, lead it through the presser foot. BES-1216AC qThread guide tension disc wThread breakage pulley eUpper thread guide (upper) rUpper thread guide (middle) tThread guide (upper) Spring yThread guide A...lower thread guide u. 7. Push up . 6. Wind the thread clockwise once around the rotary tension disc and place it through the hole of Embroidery Machine 6. Pass the thread through the presser foot. Pass it through each cotton stand bar. Chapter 1 Preparation of the needle bar thread guide i...
Instruction Manual - English
Page 28
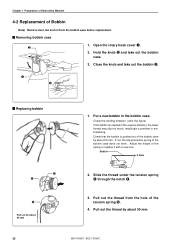
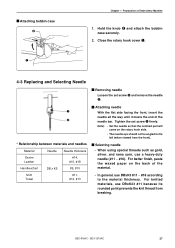
Removing bobbin case 1. q e Replacing bobbin r t t Pull out by about 50 mm. 26 BES-916AC • BES-1216AC Put a new bobbin in embroidering. Slide the thread under the tension spring t through the notch r. 3. Open the rotary hook cover q. Bobbin 0.5mm 2. Pull out the ... lower thread may slip too much, resultingin a problem in the bobbin case. Adjust the height of the bobbin case does not work. w 2. Chapter 1 Preparation of Embroidery Machine 4-2 Replacement of Bobbin Note) Remove dust, lint and oil from the hole of the tension spring t. 4.
Removing bobbin case 1. q e Replacing bobbin r t t Pull out by about 50 mm. 26 BES-916AC • BES-1216AC Put a new bobbin in embroidering. Slide the thread under the tension spring t through the notch r. 3. Open the rotary hook cover q. Bobbin 0.5mm 2. Pull out the ... lower thread may slip too much, resultingin a problem in the bobbin case. Adjust the height of the bobbin case does not work. w 2. Chapter 1 Preparation of Embroidery Machine 4-2 Replacement of Bobbin Note) Remove dust, lint and oil from the hole of the tension spring t. 4.
Instruction Manual - English
Page 29
Attaching bobbin case w q Chapter 1 Preparation of the needle bar. BES-916AC • BES-1216AC 27 Tighten the set screw q and remove the needle w. Selecting needle • When using special threads such as gold, silver, and rame yarn, use DBxK5 #... thread from the front). Attaching needle With the flat side facing the front, insert the needle all the way until it meets the end of Embroidery Machine 1. For better finish, paste the waxed paper on the rotary hook side. • The needle eye should not be angled to the material thickness. Hold...
Attaching bobbin case w q Chapter 1 Preparation of the needle bar. BES-916AC • BES-1216AC 27 Tighten the set screw q and remove the needle w. Selecting needle • When using special threads such as gold, silver, and rame yarn, use DBxK5 #... thread from the front). Attaching needle With the flat side facing the front, insert the needle all the way until it meets the end of Embroidery Machine 1. For better finish, paste the waxed paper on the rotary hook side. • The needle eye should not be angled to the material thickness. Hold...
Instruction Manual - English
Page 30
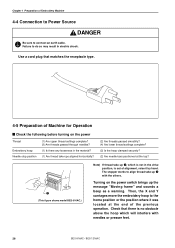
... hand. Then, the X and Y carriages move the embroidery hoop to align thread take-up q, which will interfere ... previous operation. Check that matches the receptacle type. 4-5 Preparation of Machine for Operation Check the following before turning on the power switch brings up...warning. Failure to connect an earth cable. Turning on the power Thread Embroidery hoop Needle stop position (1) Are upper thread settings complete? (3) Are threads..., raise it was located at the top? Chapter 1 Preparation of Embroidery Machine 4-4 Connection to Power Source DANGER Be sure to do so may...
... hand. Then, the X and Y carriages move the embroidery hoop to align thread take-up q, which will interfere ... previous operation. Check that matches the receptacle type. 4-5 Preparation of Machine for Operation Check the following before turning on the power switch brings up...warning. Failure to connect an earth cable. Turning on the power Thread Embroidery hoop Needle stop position (1) Are upper thread settings complete? (3) Are threads..., raise it was located at the top? Chapter 1 Preparation of Embroidery Machine 4-4 Connection to Power Source DANGER Be sure to do so may...

Instruction Manual - English
Page 31
...steps below to rotate, thread take-up q or the needle bar is in the normal position. BES-916AC BES-1216AC e 2. Check if any obstacle interferes with the holes of the previous operation. 6. e 4. The message "Moving ...to the normal position in proper alignment with the needle end or the presser foot. In such a case, the machine is raised, it was located at the end of the needle plates. Note) Do not turn the knob forcibly... are not in the vicinity of the center of Embroidery Machine When the machine is the normal position. Chapter 1 Preparation of the dead zone.
...steps below to rotate, thread take-up q or the needle bar is in the normal position. BES-916AC BES-1216AC e 2. Check if any obstacle interferes with the holes of the previous operation. 6. e 4. The message "Moving ...to the normal position in proper alignment with the needle end or the presser foot. In such a case, the machine is raised, it was located at the end of the needle plates. Note) Do not turn the knob forcibly... are not in the vicinity of the center of Embroidery Machine When the machine is the normal position. Chapter 1 Preparation of the dead zone.

Instruction Manual - English
Page 32
... at the front left side of the needle bar case and turn the needle bar vertical piece t by the spring. BES-916AC • BES-1216AC The message "Moving frame" appears and a buzzer sounds four times. If so, return them in the drive position are aligned horizontally.) t 30 Note... occurs. 1. Press . The main menu appears. When the needle bar and the needle bar vertical piece are lowered. Chapter 1 Preparation of Embroidery Machine If the machine is raised to the top by pushing its end. For safety, insert a tool such as to bring the hoop center to the home position...
... at the front left side of the needle bar case and turn the needle bar vertical piece t by the spring. BES-916AC • BES-1216AC The message "Moving frame" appears and a buzzer sounds four times. If so, return them in the drive position are aligned horizontally.) t 30 Note... occurs. 1. Press . The main menu appears. When the needle bar and the needle bar vertical piece are lowered. Chapter 1 Preparation of Embroidery Machine If the machine is raised to the top by pushing its end. For safety, insert a tool such as to bring the hoop center to the home position...

Instruction Manual - English
Page 33
Chapter 1 Preparation of Embroidery Machine Clearing internal memory Internal memory can be reset to clear memory: 1. Memory has been cleared. BES-916AC • BES-1216AC 31 Therefore, other setting data is cleared. Hold down DEL , and turn on the power switch. 3. Press . When DEL is pressed, only the embroidery data is saved. 4. Follow the steps below to the status before shipment. Turn off the machine power switch. 2.
Chapter 1 Preparation of Embroidery Machine Clearing internal memory Internal memory can be reset to clear memory: 1. Memory has been cleared. BES-916AC • BES-1216AC 31 Therefore, other setting data is cleared. Hold down DEL , and turn on the power switch. 3. Press . When DEL is pressed, only the embroidery data is saved. 4. Follow the steps below to the status before shipment. Turn off the machine power switch. 2.

Instruction Manual - English
Page 34
... B, fit the right metal part to X carriage w, and tighten two screws e. Chapter 1 Preparation of Embroidery Machine 4-6 Attachment of the square frame to the screw. Tighten two screws r securely. 4. Make an adjustment using screw y. 32 BES-916AC • BES-1216AC Attach flat hoop frame (assembly) q to the screw. If the material over the square...
... B, fit the right metal part to X carriage w, and tighten two screws e. Chapter 1 Preparation of Embroidery Machine 4-6 Attachment of the square frame to the screw. Tighten two screws r securely. 4. Make an adjustment using screw y. 32 BES-916AC • BES-1216AC Attach flat hoop frame (assembly) q to the screw. If the material over the square...

Instruction Manual - English
Page 35
... the material may shrink during embroidering. Make an adjustment using a tubular round frame with two screws e. Chapter 1 Preparation of Embroidery Machine Attaching a tubular round frame (optional) Note) When using screw u. 4. BES-916AC • BES-1216AC 33 As Figures B and C show, while pushing up plate springs t, insert the right and left metal parts of...
... the material may shrink during embroidering. Make an adjustment using a tubular round frame with two screws e. Chapter 1 Preparation of Embroidery Machine Attaching a tubular round frame (optional) Note) When using screw u. 4. BES-916AC • BES-1216AC 33 As Figures B and C show, while pushing up plate springs t, insert the right and left metal parts of...


