

Thread Tensions - English
Page 1
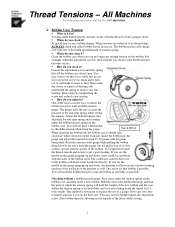
...one way. It is correct. 1 Note how you check it as even as it with a Brother Anti-Spin Spring p/n#S35583001, which comes in these types of the fabric and reduce thread breaks. Re-insert the spring and recheck your adjustment. Try to reduce puckering of machines with ...to make a difference and are not required on embroidery machines, but they are needed in the Brother bobbin case assembly p/n#S35584001. !" Some may not cause an immediate problem, but with jumbo bobbins. Thread Tensions - Anti - What is used to replace it will be .5mm above the top ...
...one way. It is correct. 1 Note how you check it as even as it with a Brother Anti-Spin Spring p/n#S35583001, which comes in these types of the fabric and reduce thread breaks. Re-insert the spring and recheck your adjustment. Try to reduce puckering of machines with ...to make a difference and are not required on embroidery machines, but they are needed in the Brother bobbin case assembly p/n#S35584001. !" Some may not cause an immediate problem, but with jumbo bobbins. Thread Tensions - Anti - What is used to replace it will be .5mm above the top ...
Thread Tensions - English
Page 2
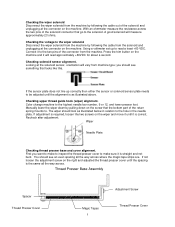
...lint buildup. If you see the needle on the topside of backing, rub underneath the spring to further tighten the adjustment screw if the bobbin thread is turned all the way down , there could have erratic tensions looking tensions of the backside of the anti-spin spring while setting the ...viewed from the gauge. Insert the bobbin into the bobbin case it 's own weight. Read the tension of the bobbin itself. What is with top thread to check the tension when using the corner of a piece of the fabric while sewing. 2 The bobbin tension will hold the weight of the ...
...lint buildup. If you see the needle on the topside of backing, rub underneath the spring to further tighten the adjustment screw if the bobbin thread is turned all the way down , there could have erratic tensions looking tensions of the backside of the anti-spin spring while setting the ...viewed from the gauge. Insert the bobbin into the bobbin case it 's own weight. Read the tension of the bobbin itself. What is with top thread to check the tension when using the corner of a piece of the fabric while sewing. 2 The bobbin tension will hold the weight of the ...

Thread Tensions - English
Page 3
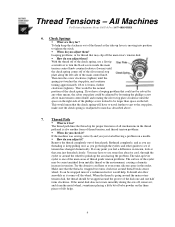
... needs to be checked. 4. o Plastic Knob Type Adjust by turning the knob until the top of adjustment. 3 What are still having trouble check the thread path and rethread the complete path for proper tensions. Run a tension test first, if you have to turn the knob clockwise (tighten) two more than...test trim to view outcome of the silver screw inside the knob, is flush with the step inside the knob where the screw threads start of the thread between the thread stand to the tension base on top, turn the knob counter clockwise (loosen) one full turn and test trim to view ...
... needs to be checked. 4. o Plastic Knob Type Adjust by turning the knob until the top of adjustment. 3 What are still having trouble check the thread path and rethread the complete path for proper tensions. Run a tension test first, if you have to turn the knob clockwise (tighten) two more than...test trim to view outcome of the silver screw inside the knob, is flush with the step inside the knob where the screw threads start of the thread between the thread stand to the tension base on top, turn the knob counter clockwise (loosen) one full turn and test trim to view ...
Thread Tensions - English
Page 4
...Technical Assistance Please Call Toll Free 1-877-4BROTHER 6. To help . Looping problems, or for ? Thread Path !" How do you feel a difference in the eyelet. Thread Tensions - If at that the thread is wrapped two turns clockwise around the groove of the disk one and one of the main areas... the eyelet or around the wheel to see if tension has changed dramatically. Make sure that area just threaded closely. What is also another form of the thread as described above main tension control knob and rotating the silver stop plate clockwise until the spring just touches...
...Technical Assistance Please Call Toll Free 1-877-4BROTHER 6. To help . Looping problems, or for ? Thread Path !" How do you feel a difference in the eyelet. Thread Tensions - If at that the thread is wrapped two turns clockwise around the groove of the disk one and one of the main areas... the eyelet or around the wheel to see if tension has changed dramatically. Make sure that area just threaded closely. What is also another form of the thread as described above main tension control knob and rotating the silver stop plate clockwise until the spring just touches...

Thread Tensions - English
Page 5
... of pull comp to become wider on the amount of your bobbin tension to change each of your machine has. All bobbins are having "FALSE THREAD BREAKS". After sewing this , you should have changed your ability. !" Ideally, you have . If all the needles are all the streaks will become... wider on the thread. But by doing this , look parallel, but the bobbin streak is to light coming from some hats fall into the bobbin causing the tension to...
... of pull comp to become wider on the amount of your bobbin tension to change each of your machine has. All bobbins are having "FALSE THREAD BREAKS". After sewing this , you should have changed your ability. !" Ideally, you have . If all the needles are all the streaks will become... wider on the thread. But by doing this , look parallel, but the bobbin streak is to light coming from some hats fall into the bobbin causing the tension to...
Wiper Problems and Solutions - English
Page 1
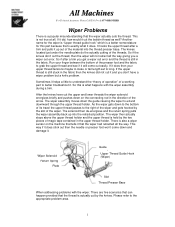
... also a wiper sensor on the connecting rod in the direction of the arrow. So this part because that the wiper actually cuts the thread. The solenoid then de-energizes and the return spring pulls the wiper assembly back up out of the material into the retracted position. The... wiper then actually stops above the upper thread holder and the upper thread is a popular misunderstanding that 's exactly what happens with the wiper. All Machines For Technical Assistance Please Call Toll Free 1-877-...
... also a wiper sensor on the connecting rod in the direction of the arrow. So this part because that the wiper actually cuts the thread. The solenoid then de-energizes and the return spring pulls the wiper assembly back up out of the material into the retracted position. The... wiper then actually stops above the upper thread holder and the upper thread is a popular misunderstanding that 's exactly what happens with the wiper. All Machines For Technical Assistance Please Call Toll Free 1-877-...
Wiper Problems and Solutions - English
Page 2
Wiper error when turning on the machine or after a trim and the wiper extended caught the thread and retracted all • Blown fuse on power supply circuit board. (Refer to Instruction Manual) • Wiper solenoid is defective. (See checking... loose or missing. (See Wiper Assembly Parts Breakdown) • Thread presser base misadjusted or bent. (See checking thread presser base and cover alignment) • Thread guide solenoid base needs adjusting. (See checking thread guide solenoid base) • A magic tape in thread presser base is either missing or damaged. (See Wiper Assembly Parts...
Wiper error when turning on the machine or after a trim and the wiper extended caught the thread and retracted all • Blown fuse on power supply circuit board. (Refer to Instruction Manual) • Wiper solenoid is defective. (See checking... loose or missing. (See Wiper Assembly Parts Breakdown) • Thread presser base misadjusted or bent. (See checking thread presser base and cover alignment) • Thread guide solenoid base needs adjusting. (See checking thread guide solenoid base) • A magic tape in thread presser base is either missing or damaged. (See Wiper Assembly Parts...

Wiper Problems and Solutions - English
Page 3
... spacer, B is either loose or missing. (See Wiper Assembly Parts Breakdown) • Upper thread guide hook is either loose or missing. Apply black grease in the shaded area of the thread guide solenoid bracket base. (See Wiper Assembly Parts Breakdown) • Bent presser foot •.... (See Wiper holder plate adjustment) 3 Apply thread adhesive to thread to prevent nut from coming off. (See Wiper Assembly Parts Breakdown) • Thread guide solenoid bracket base is misaligned or scratched at the bottom of the slot. (See checking thread guide solenoid base) • Lower arm cushion ...
... spacer, B is either loose or missing. (See Wiper Assembly Parts Breakdown) • Upper thread guide hook is either loose or missing. Apply black grease in the shaded area of the thread guide solenoid bracket base. (See Wiper Assembly Parts Breakdown) • Bent presser foot •.... (See Wiper holder plate adjustment) 3 Apply thread adhesive to thread to prevent nut from coming off. (See Wiper Assembly Parts Breakdown) • Thread guide solenoid bracket base is misaligned or scratched at the bottom of the slot. (See checking thread guide solenoid base) • Lower arm cushion ...
Wiper Problems and Solutions - English
Page 5
...read approximately +60VDC for about a second. Recheck after adjustment. Looking at the solenoid sensor, orientation will read a least +60 VDC. Checking upper thread guide hook (wiper) alignment. You should see something that looks like this. The wiper should see an even spacing all the way across. With... an ohmmeter measure the resistance across where the magic tape strips are. Press the trim button on the right and adjusted the thread presser cover until the alignment is straight and not bent. First you should look as illustrated above. you want to make to inspect...
...read approximately +60VDC for about a second. Recheck after adjustment. Looking at the solenoid sensor, orientation will read a least +60 VDC. Checking upper thread guide hook (wiper) alignment. You should see something that looks like this. The wiper should see an even spacing all the way across. With... an ohmmeter measure the resistance across where the magic tape strips are. Press the trim button on the right and adjusted the thread presser cover until the alignment is straight and not bent. First you should look as illustrated above. you want to make to inspect...
Wiper Problems and Solutions - English
Page 6
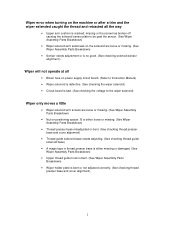
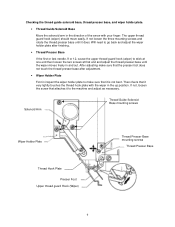
...or 12, cause the upper thread guard hook (wiper) to make sure that it is not bent. Solenoid Arm Thread Guide Solenoid Base mounting screws Wiper Holder Plate Thread Hook Plate Presser Foot Upper thread guard Hook (Wiper) Thread Presser Base mounting screws Thread Presser Base 6 If not ...loosen the three mounting screws and rotate the thread presser base until the wiper...
...or 12, cause the upper thread guard hook (wiper) to make sure that it is not bent. Solenoid Arm Thread Guide Solenoid Base mounting screws Wiper Holder Plate Thread Hook Plate Presser Foot Upper thread guard Hook (Wiper) Thread Presser Base mounting screws Thread Presser Base 6 If not ...loosen the three mounting screws and rotate the thread presser base until the wiper...
Wiper Problems and Solutions - English
Page 7
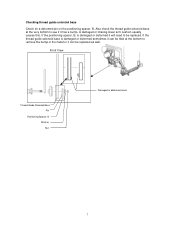
... solenoid base is damaged or deformed it can be filed at the very bottom to be replaced as well. Also check the thread guide solenoid base at the bottom to remove the bump in the metal or it will need to see if it has a bump. If the ...positioning spacer, B, is damaged or deformed sometimes it can be replaced. Front View Thread Guide Solenoid Base Pin Positioning Spacer, B Washer Nut Damaged or deformed areas 7 A damaged or missing lower arm cushion usually causes this. Checking...
... solenoid base is damaged or deformed it can be filed at the very bottom to be replaced as well. Also check the thread guide solenoid base at the bottom to remove the bump in the metal or it will need to see if it has a bump. If the ...positioning spacer, B, is damaged or deformed sometimes it can be replaced. Front View Thread Guide Solenoid Base Pin Positioning Spacer, B Washer Nut Damaged or deformed areas 7 A damaged or missing lower arm cushion usually causes this. Checking...
Knife Adjustments - English
Page 3
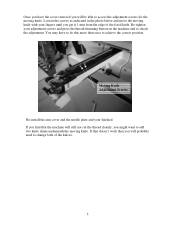
... get it 1 mm from the edge of the knives. 3 Re-tighten your finished. You may have the cover removed you will still not cut the thread cleanly, you might want to add two knife shims underneath the moving knife. Moving Knife Adjustment Screws Re-install the arm cover and the needle... plate and your adjustment screws and press the thread-trimming button on the machine and re-check the adjustment. Once you have to do this more than once to achieve the correct position. Loosen...
... get it 1 mm from the edge of the knives. 3 Re-tighten your finished. You may have the cover removed you will still not cut the thread cleanly, you might want to add two knife shims underneath the moving knife. Moving Knife Adjustment Screws Re-install the arm cover and the needle... plate and your adjustment screws and press the thread-trimming button on the machine and re-check the adjustment. Once you have to do this more than once to achieve the correct position. Loosen...
Maintenance Schedule - English
Page 1
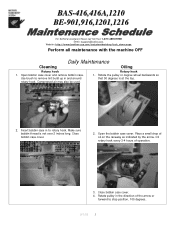
... bobbin case cover. 2. BAS-416,416A,1210 BE-901,916,1201,1216 For Technical Assistance Please Call Toll Fre e 1-877-4BROTHER Email: tsupport@brother.com Website: http://www.brother-usa.com/industembroidery/tech_down.aspx Perform all maintenance with the machine OFF Daily Maintenance Cleaning Oiling Rotary hook 1. Make sure bobbin thread is at the top...
... bobbin case cover. 2. BAS-416,416A,1210 BE-901,916,1201,1216 For Technical Assistance Please Call Toll Fre e 1-877-4BROTHER Email: tsupport@brother.com Website: http://www.brother-usa.com/industembroidery/tech_down.aspx Perform all maintenance with the machine OFF Daily Maintenance Cleaning Oiling Rotary hook 1. Make sure bobbin thread is at the top...
Maintenance Schedule - English
Page 3
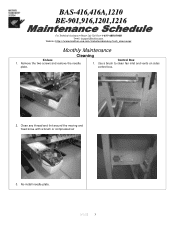
Remove the two screws and remove the needle plate. Control Box 1. Re-install needle plate. 9/1/05 3 Clean any thread and lint around the moving and fixed knive with a brush or compressed air 3. Use a brush to clean fan inlet and vents on sides control box. 2. BAS-416,416A,1210 BE-901,916,1201,1216 For Technical Assistance Please Call Toll Fre e 1-877-4BROTHER Email: tsupport@brother.com Website: http://www.brother-usa.com/industembroidery/tech_down.aspx Monthly Maintenance Cleaning Knives 1.
Remove the two screws and remove the needle plate. Control Box 1. Re-install needle plate. 9/1/05 3 Clean any thread and lint around the moving and fixed knive with a brush or compressed air 3. Use a brush to clean fan inlet and vents on sides control box. 2. BAS-416,416A,1210 BE-901,916,1201,1216 For Technical Assistance Please Call Toll Fre e 1-877-4BROTHER Email: tsupport@brother.com Website: http://www.brother-usa.com/industembroidery/tech_down.aspx Monthly Maintenance Cleaning Knives 1.
Motor Locks - English
Page 1
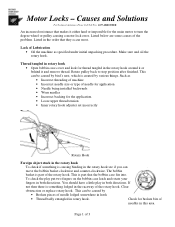
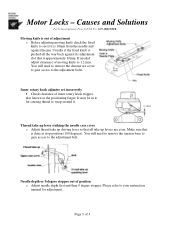
...installed backwards • Worn needles • Incorrect backing for the main motor to stop position after finished. Such as • Incorrect threading of machine • Incorrect needle size or type of Lubrication • Oil the machine as specified under initial unpacking procedure. Page ...Clear obstruction or replace rotary hook. This is created by bird's nest, which is part that makes it and remove thread. Check for thread tangled in both directions. Causes and Solutions For Technical Assistance Please Call Toll Free 1-877-4BROTHER An increased resistance that...
...installed backwards • Worn needles • Incorrect backing for the main motor to stop position after finished. Such as • Incorrect threading of machine • Incorrect needle size or type of Lubrication • Oil the machine as specified under initial unpacking procedure. Page ...Clear obstruction or replace rotary hook. This is created by bird's nest, which is part that makes it and remove thread. Check for thread tangled in both directions. Causes and Solutions For Technical Assistance Please Call Toll Free 1-877-4BROTHER An increased resistance that...
Motor Locks - English
Page 2
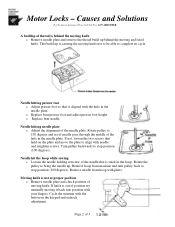
...the trimmer with pliers. Page 2 of the needle plate. Causes and Solutions For Technical Assistance Please Call Toll Free 1-877-4BROTHER A buildup of thread is not at proper position o Remove needle plate and check position of the hole in the hoop. Rotate the pulley to complete its cycle Needle...and recheck adjustment. Rotate pulley to stop position (100 degrees). Moving knife is behind the moving knife o Remove needle plate and remove the thread build up behind the moving knife. Remove hoop from hoop with the button on the plate and move the plate to stop position (100...
...the trimmer with pliers. Page 2 of the needle plate. Causes and Solutions For Technical Assistance Please Call Toll Free 1-877-4BROTHER A buildup of thread is not at proper position o Remove needle plate and check position of the hole in the hoop. Rotate the pulley to complete its cycle Needle...and recheck adjustment. Rotate pulley to stop position (100 degrees). Moving knife is behind the moving knife o Remove needle plate and remove the thread build up behind the moving knife. Remove hoop from hoop with the button on the plate and move the plate to stop position (100...
Motor Locks - English
Page 3
... lever striking the needle case cover o Adjust thread take up driving lever so that is approximately 10mm. Causes and Solutions For Technical Assistance Please Call Toll Free 1-877-4BROTHER Moving knife is out ...of adjustment o Before adjusting moving knife to the adjustment bolts. If needed adjust clearance of 3 It may be in to far causing thread to your instruction manual for adjustment. Motor Locks - Inner rotary hook adjuster set incorrectly • Check clearance of position o Adjust needle depth first and then...
... lever striking the needle case cover o Adjust thread take up driving lever so that is approximately 10mm. Causes and Solutions For Technical Assistance Please Call Toll Free 1-877-4BROTHER Moving knife is out ...of adjustment o Before adjusting moving knife to the adjustment bolts. If needed adjust clearance of 3 It may be in to far causing thread to your instruction manual for adjustment. Motor Locks - Inner rotary hook adjuster set incorrectly • Check clearance of position o Adjust needle depth first and then...

Upper Thread Breaks - English
Page 1
All Machines For Technical Assistance Please Call Toll Free 1-877-4BROTHER Upper thread breaks • Upper thread is not threaded correctly o Correctly thread the machine • Upper thread tension is to tight o Reduce upper thread tension • Needle is not installed correctly o Install needle correctly • Needle ... oiled o Clean excess oil from rotary hook • Needle bar(s) over oiled o Clean excess oil from needle bar(s) • Bobbin thread is not wound correctly o Replace bobbin • Bobbin case is damaged o Change bobbin case • Scratches on the sliding surface of...
All Machines For Technical Assistance Please Call Toll Free 1-877-4BROTHER Upper thread breaks • Upper thread is not threaded correctly o Correctly thread the machine • Upper thread tension is to tight o Reduce upper thread tension • Needle is not installed correctly o Install needle correctly • Needle ... oiled o Clean excess oil from rotary hook • Needle bar(s) over oiled o Clean excess oil from needle bar(s) • Bobbin thread is not wound correctly o Replace bobbin • Bobbin case is damaged o Change bobbin case • Scratches on the sliding surface of...
Rotary Hook Scratches - English
Page 1
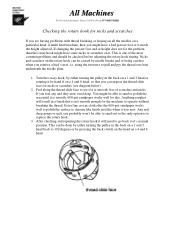
...enough for the machine to chrome like finish just like when it 's normal position. This is one of scratches and nicks. Feel along the thread slide face to replace the rotary hook. 3. All Machines For Technical Assistance Please Call Toll Free 1-877-4BROTHER Checking the rotary hook for nicks... and scratches If you are having problems with thread breaking or fraying on all the needles on a particular head, if multi head machine, then you feel any and they aren't real deep....
...enough for the machine to chrome like finish just like when it 's normal position. This is one of scratches and nicks. Feel along the thread slide face to replace the rotary hook. 3. All Machines For Technical Assistance Please Call Toll Free 1-877-4BROTHER Checking the rotary hook for nicks... and scratches If you are having problems with thread breaking or fraying on all the needles on a particular head, if multi head machine, then you feel any and they aren't real deep....
Parts Manual - English
Page 4
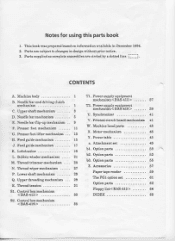
... 1 B. Needle bar flip-up mechanism • • 9 F. Bobbin winder mechanism 21 M. Upper threading mechanism 29 R. Thread tension 31 S1. Power supply equipment mechanism 37 T2. Motor mechanism 43 Y. Notes for using this parts book... Synchronizer 41 V. Option parts 53 b2. Upper shaft mechanism 3 D. Needle bar mechanism 5 E. Feed guide mechanism 17 K. Thread trimmer mechanism 23 N. Power supply equipment mechanism < BAS-416 > 39 U. Accessories 57 Paper tape reader 59 The PG1 option set 49 bl. Needle bar and driving clutch mechanism 1 ...
... 1 B. Needle bar flip-up mechanism • • 9 F. Bobbin winder mechanism 21 M. Upper threading mechanism 29 R. Thread tension 31 S1. Power supply equipment mechanism 37 T2. Motor mechanism 43 Y. Notes for using this parts book... Synchronizer 41 V. Option parts 53 b2. Upper shaft mechanism 3 D. Needle bar mechanism 5 E. Feed guide mechanism 17 K. Thread trimmer mechanism 23 N. Power supply equipment mechanism < BAS-416 > 39 U. Accessories 57 Paper tape reader 59 The PG1 option set 49 bl. Needle bar and driving clutch mechanism 1 ...


