
Upper Thread Breaks - English
Page 2
• Wrong type of backing o Use the correct backing for garment • Design contains many small stitches of .2 mm or less o Modify design to eliminate stitches of .2mm or less • Too much density in design o Reduce density in design • The area around the hole in the needle plate is damaged o Replace needle plate • Rotary hook is out of time o Re-time rotary hook
• Wrong type of backing o Use the correct backing for garment • Design contains many small stitches of .2 mm or less o Modify design to eliminate stitches of .2mm or less • Too much density in design o Reduce density in design • The area around the hole in the needle plate is damaged o Replace needle plate • Rotary hook is out of time o Re-time rotary hook
Rotary Hook Scratches - English
Page 1
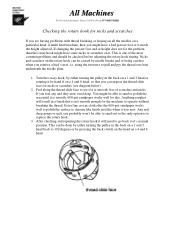
... that is one of scratches and nicks. Feel along the thread slide face to pull and pry the thread out from underneath the needle plate. 1. using the tweezers to see diagram below). 2. If you remove a bird's nest, i.e. If changing the presser foot and or height does not fix the problem than...
... that is one of scratches and nicks. Feel along the thread slide face to pull and pry the thread out from underneath the needle plate. 1. using the tweezers to see diagram below). 2. If you remove a bird's nest, i.e. If changing the presser foot and or height does not fix the problem than...

Quick Reference Guide - English
Page 1
...an empty memory location. 2. ENTER Press ENTER to copy the design to pick an empty memory location. Program color sequence (see Step 12) 13. # 14. Use ARROW keys to start sewing. NEEDLE SET 9. 10. 11. A = Needle Number 10 B = Needle Number 11 C = Needle Number 12 Press FORWARD arrow ... reading computer directory. Press START to start sewing (see Step 14) ENTER A DESIGN FROM THE MACHINE MEMORY ENTER Use BACK and FORWARD keys to start sewing (see Step 14) BAS-415 - Press (#) key to assign needle number (Color). Press UP or Down arrow keys to trace the mask of...
...an empty memory location. 2. ENTER Press ENTER to copy the design to pick an empty memory location. Program color sequence (see Step 12) 13. # 14. Use ARROW keys to start sewing. NEEDLE SET 9. 10. 11. A = Needle Number 10 B = Needle Number 11 C = Needle Number 12 Press FORWARD arrow ... reading computer directory. Press START to start sewing (see Step 14) ENTER A DESIGN FROM THE MACHINE MEMORY ENTER Use BACK and FORWARD keys to start sewing (see Step 14) BAS-415 - Press (#) key to assign needle number (Color). Press UP or Down arrow keys to trace the mask of...

Quick Reference Guide - English
Page 2
... move BACK only to the first stitch of the option you choose END START To EXIT the edit mode To return to change the position Use the ARROW keys to move the frame to a new position ENTER HOOP FEED Press ENTER to store the new HOOP FEED position Press HOOP FEED... a design after you have started sewing you wish to the above display with changes in small increments to correct registration ERASING A STORED DESIGN FROM MEMORY Use BACK and FORWARD keys to delete the design from memory. ENTER CLEAR END Press ENTER to view design name Press CLEAR to pick a design from...
... move BACK only to the first stitch of the option you choose END START To EXIT the edit mode To return to change the position Use the ARROW keys to move the frame to a new position ENTER HOOP FEED Press ENTER to store the new HOOP FEED position Press HOOP FEED... a design after you have started sewing you wish to the above display with changes in small increments to correct registration ERASING A STORED DESIGN FROM MEMORY Use BACK and FORWARD keys to delete the design from memory. ENTER CLEAR END Press ENTER to view design name Press CLEAR to pick a design from...

Parts Manual - English
Page 4
... line . 2. Presser foot mechanism 22 L . Drive, feed mechanism 24 M . Synchronizer S Printed circuit boards mechanism T . Thread trimmer mechanism 14 F . CONTENTS A . Motor mechanism 32 01. Notes for using this parts book 1. This book was prepared based on information available in design without prior notice.
... line . 2. Presser foot mechanism 22 L . Drive, feed mechanism 24 M . Synchronizer S Printed circuit boards mechanism T . Thread trimmer mechanism 14 F . CONTENTS A . Motor mechanism 32 01. Notes for using this parts book 1. This book was prepared based on information available in design without prior notice.

Instruction Manual - English
Page 4
... rec T ' e I t % eyy , , 0: , : it is possible to fully embroider the back of the jacket. Also, convenient bobbin thread counter is equipped as standard use . id,.....e ewini . i_ '' : , , 9 needle embroidery machine Pattern embroidery Maximum 1000 spm ( 4 levels) normal rotation rate 650 spm V 285 mm x H 450 mm ...and Zangs format (1 inch/8 holes), and the floppy disk of the embroidery frame can be used. [NOTE) Brother format data cannot be used_ 5) By removing the table and using an optional hoop. Machine features 1) This interactive machine is based on ready made caps. ...
... rec T ' e I t % eyy , , 0: , : it is possible to fully embroider the back of the jacket. Also, convenient bobbin thread counter is equipped as standard use . id,.....e ewini . i_ '' : , , 9 needle embroidery machine Pattern embroidery Maximum 1000 spm ( 4 levels) normal rotation rate 650 spm V 285 mm x H 450 mm ...and Zangs format (1 inch/8 holes), and the floppy disk of the embroidery frame can be used. [NOTE) Brother format data cannot be used_ 5) By removing the table and using an optional hoop. Machine features 1) This interactive machine is based on ready made caps. ...

Instruction Manual - English
Page 6
M Carrying machine When holding the machine, be sure to hold the machine body (frame). [NOTE] Do NOT hold the table or the guard bar. ' El Installing machine 1) Secure the four level adjusters 0 so that the/upper surface of the table is horizontal. 2) If the table wobbles, loosen the four nuts @ and turn the four level adjusters 0 to adjust. 1:1 Installing operation panel Attach the set screws 0 so that the panel is in the best position for the operator to use. - 3 - * After installing, get the power supply from a dedicated outlet.
M Carrying machine When holding the machine, be sure to hold the machine body (frame). [NOTE] Do NOT hold the table or the guard bar. ' El Installing machine 1) Secure the four level adjusters 0 so that the/upper surface of the table is horizontal. 2) If the table wobbles, loosen the four nuts @ and turn the four level adjusters 0 to adjust. 1:1 Installing operation panel Attach the set screws 0 so that the panel is in the best position for the operator to use. - 3 - * After installing, get the power supply from a dedicated outlet.

Instruction Manual - English
Page 8
oR 2) Add a drop of the needle bar. (18 places should be lubricated in total.) Ar 5 Too much lubrication may cause the oil to use the brother-specified sewing machine oil for keeping the machine in the figure. [NOTE] O Be sure to drip on the material. 1) Lubricate the six places at the ... rotary hook. [NOTE] Do not lubricate other than the rotary hook. 00 3) Lubricate the two places of each arrow in good condition. Every day before using the machine, add 1-2 drop(s) of oil at the each needle of oil at the arrows. 3 t-• Lubrication is necessary for lubrication.
oR 2) Add a drop of the needle bar. (18 places should be lubricated in total.) Ar 5 Too much lubrication may cause the oil to use the brother-specified sewing machine oil for keeping the machine in the figure. [NOTE] O Be sure to drip on the material. 1) Lubricate the six places at the ... rotary hook. [NOTE] Do not lubricate other than the rotary hook. 00 3) Lubricate the two places of each arrow in good condition. Every day before using the machine, add 1-2 drop(s) of oil at the each needle of oil at the arrows. 3 t-• Lubrication is necessary for lubrication.

Instruction Manual - English
Page 9
.... -6 4) Move the needle bar case all the way to the base needle bar and the base needle bar felt. When the machine is used every day, lubricate daily before using. 1. Replacing bobbin 3. The thread should be wrapped to the right around the bobbin. 1) Open the rotary hook base cover 0. 2) Hold the knob...
.... -6 4) Move the needle bar case all the way to the base needle bar and the base needle bar felt. When the machine is used every day, lubricate daily before using. 1. Replacing bobbin 3. The thread should be wrapped to the right around the bobbin. 1) Open the rotary hook base cover 0. 2) Hold the knob...

Instruction Manual - English
Page 10
...Tighten the thumb screw 0 firmly. [NOTE] Set the needle so that the notched part comes on the back of the material. For general materials, use DB x K23 #11. Its round end prevents the knit thread from breaking. 7 Attaching needle With the flat side facing the front, insert the ...needle @. For better finishing, paste the waxed paper on the rotary hook side. [NOTE1] [NOTE2] When using special threads such as the gold, silver and rams yarn, use a heavy-duty needle (#11-#16). For knitted materials, use DB x K5 #11 or #18 according to the thickness of the needle bar. kf 1.
...Tighten the thumb screw 0 firmly. [NOTE] Set the needle so that the notched part comes on the back of the material. For general materials, use DB x K23 #11. Its round end prevents the knit thread from breaking. 7 Attaching needle With the flat side facing the front, insert the ...needle @. For better finishing, paste the waxed paper on the rotary hook side. [NOTE1] [NOTE2] When using special threads such as the gold, silver and rams yarn, use a heavy-duty needle (#11-#16). For knitted materials, use DB x K5 #11 or #18 according to the thickness of the needle bar. kf 1.

Instruction Manual - English
Page 12
... thread Lower stitch width If the needle thread tension is about 1/3 of the upper stitch width. Bobbin thread tension Correct bobbin thread tension (20-30g) Use a tension gauge to prevent machine trouble. Caution: Do not clean with a soft, dry cloth. Adjust the tension dial so that the needle thread is pulled...
... thread Lower stitch width If the needle thread tension is about 1/3 of the upper stitch width. Bobbin thread tension Correct bobbin thread tension (20-30g) Use a tension gauge to prevent machine trouble. Caution: Do not clean with a soft, dry cloth. Adjust the tension dial so that the needle thread is pulled...

Instruction Manual - English
Page 14
When using gauge (optional) 0 0 0 lower shaft O 9 rnm gauge c=t> lower shaft 1) Loosen the screw 0 and remove the rotary hook @ from the lower shaft. 2) Fit the gauge (optional) into the lower shaft 3) Loosen the screw O of the needle bar clamp €), turn the pulley and make the needle tip contact gauge lightly. [NOTE] Make the needle tip contact gauge in the place except the cut section of the gauge. 4) Tighten the screw O of the needle bar clamp P. [NOTE] Check the stopper position again referring to page 10.
When using gauge (optional) 0 0 0 lower shaft O 9 rnm gauge c=t> lower shaft 1) Loosen the screw 0 and remove the rotary hook @ from the lower shaft. 2) Fit the gauge (optional) into the lower shaft 3) Loosen the screw O of the needle bar clamp €), turn the pulley and make the needle tip contact gauge lightly. [NOTE] Make the needle tip contact gauge in the place except the cut section of the gauge. 4) Tighten the screw O of the needle bar clamp P. [NOTE] Check the stopper position again referring to page 10.
Instruction Manual - English
Page 17
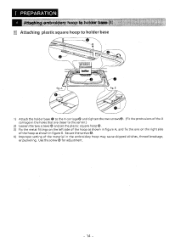
... X carriage@ and tighten the two screws©. (Fit the protrusions of the X carriage in the holes that are closer to holder base [ uuuuuuuuu bother fig. Use the screw @ for adjustment. - 14 - I PREPARATION [1] Attaching plastic square hoop to the center.) 2) Loosen the two screws 0 and set the plastic square hoop 0. 3) Fix the...
... X carriage@ and tighten the two screws©. (Fit the protrusions of the X carriage in the holes that are closer to holder base [ uuuuuuuuu bother fig. Use the screw @ for adjustment. - 14 - I PREPARATION [1] Attaching plastic square hoop to the center.) 2) Loosen the two screws 0 and set the plastic square hoop 0. 3) Fix the...

Instruction Manual - English
Page 18
B 4 fig. Use the screw 0 for adjustment. - 15 - C 1) Attach the tubular square frame eeto the X carriage Owith the two screws @ as shown in figure A. (Fit the protrusions (5 of ... closer to the center.) 2) Attach the metal fittings of the embroidery machine. 11111101111A a5 fig. ❑2 Attaching tubular square hoop to holder base [NOTE] Before using the tubular square hoop and the holder base, remove table (C) of the tubular square hoop O as shown in figures B and C. When attaching them, lift the...
B 4 fig. Use the screw 0 for adjustment. - 15 - C 1) Attach the tubular square frame eeto the X carriage Owith the two screws @ as shown in figure A. (Fit the protrusions (5 of ... closer to the center.) 2) Attach the metal fittings of the embroidery machine. 11111101111A a5 fig. ❑2 Attaching tubular square hoop to holder base [NOTE] Before using the tubular square hoop and the holder base, remove table (C) of the tubular square hoop O as shown in figures B and C. When attaching them, lift the...

Instruction Manual - English
Page 21
...in selecting number.) • Enter current needle location as hoop feed point and to display its coordinates. • If data is displayed alternately.) Use this key to; • Exit from each mode after setting rotation, mirror or repeat sewing) and to set values of the registered number ...system data entry. • Exit from the sewing mode. • Cancel error during suspension. • Start after the carriage moved to start point. Use this key to; • Clear file data displayed on the upper row and the screen. • Cancel error. • Return set value in ...
...in selecting number.) • Enter current needle location as hoop feed point and to display its coordinates. • If data is displayed alternately.) Use this key to; • Exit from each mode after setting rotation, mirror or repeat sewing) and to set values of the registered number ...system data entry. • Exit from the sewing mode. • Cancel error during suspension. • Start after the carriage moved to start point. Use this key to; • Clear file data displayed on the upper row and the screen. • Cancel error. • Return set value in ...

Instruction Manual - English
Page 22
V Use this key to; • Change the cursor position on the number in setting bobbin thread counter. • Move needle location to the desired hoop feed ... data when sewing is suspended. • Inch hoop to move hoop back or forward along stitch line on the number in inching mode. . M BACK FORWARD Use this key to; • Scroll file names registered in floppy disk or editing system. • Select paper tape type (from Tajima, Barudan, Zangs). • Scroll...
V Use this key to; • Change the cursor position on the number in setting bobbin thread counter. • Move needle location to the desired hoop feed ... data when sewing is suspended. • Inch hoop to move hoop back or forward along stitch line on the number in inching mode. . M BACK FORWARD Use this key to; • Scroll file names registered in floppy disk or editing system. • Select paper tape type (from Tajima, Barudan, Zangs). • Scroll...

Instruction Manual - English
Page 23
... file name displayed on the upper row when data is ON, the left upper indicator will light. (Setting ON and OFF can be done cyclically.) Use this key to set needle order after returning from floppy disk or editing system. • Check set values of registered number that was selected on... mode (main menu mode, floppy disk data entry mode, paper tape data entry mode, editing system data entry mode) and entering sewing mode. THREAD SENSOR Use this key to enter thread sensor and bobbin thread counter setting mode from each mode (main menu mode, floppy disk data entry mode, paper tape...
... file name displayed on the upper row when data is ON, the left upper indicator will light. (Setting ON and OFF can be done cyclically.) Use this key to set needle order after returning from floppy disk or editing system. • Check set values of registered number that was selected on... mode (main menu mode, floppy disk data entry mode, paper tape data entry mode, editing system data entry mode) and entering sewing mode. THREAD SENSOR Use this key to enter thread sensor and bobbin thread counter setting mode from each mode (main menu mode, floppy disk data entry mode, paper tape...

Instruction Manual - English
Page 24
Use this key is invalid. • Decide automatic hoop feed after entering sewing mode. • Enter inching mode or jump mode in sewing suspension. • Set ... alternately displayed. • Perform trial feeding just after sewing mode or not. * " S " (set) mark is turned on. • Stop the machine during sewing. - 21 - EMERGENCY Use this key to; • Select registered data number and to ; • Clear the back-up memory when the power is displayed alternately.
Use this key is invalid. • Decide automatic hoop feed after entering sewing mode. • Enter inching mode or jump mode in sewing suspension. • Set ... alternately displayed. • Perform trial feeding just after sewing mode or not. * " S " (set) mark is turned on. • Stop the machine during sewing. - 21 - EMERGENCY Use this key to; • Select registered data number and to ; • Clear the back-up memory when the power is displayed alternately.
Instruction Manual - English
Page 26
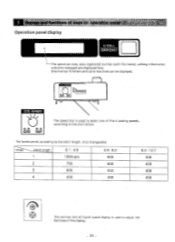
... line has 16 letters and up to two lines can be displayed_ OA SLOW o O 00000000 OM MST i /SPEED IE 2 SLOW 2 FAST The speed dial is used to select one of the 4 sewing speeds, according to adjust the darkness of the display. - 23 - 3 tio-ns cif keys on operation Epanef Operation panel... changeable) rarTjes------_ stitch length 1 2 3 4 0.1 - 4.8 1000rpm 750 650 450 4.9 - 8.2 650 600 550 450 8.3 - 12.7 450 450 450 450 0 The contrast dial of liquid crystal display is used to the chart below.
... line has 16 letters and up to two lines can be displayed_ OA SLOW o O 00000000 OM MST i /SPEED IE 2 SLOW 2 FAST The speed dial is used to select one of the 4 sewing speeds, according to adjust the darkness of the display. - 23 - 3 tio-ns cif keys on operation Epanef Operation panel... changeable) rarTjes------_ stitch length 1 2 3 4 0.1 - 4.8 1000rpm 750 650 450 4.9 - 8.2 650 600 550 450 8.3 - 12.7 450 450 450 450 0 The contrast dial of liquid crystal display is used to the chart below.

Instruction Manual - English
Page 27
... or sewing OFF of a character (pattern), machine will stop operation at that point. OFF Spare (Use with OFF.) ON SW5 OFF ON Spare (Use with OFF.) SW6 OFF ON Spare (Use with OFF.) SW7 OFF ON Spare (Use with OFF.) SW8 OFF To display Japanese ON To display English NOTE: The power of the...
... or sewing OFF of a character (pattern), machine will stop operation at that point. OFF Spare (Use with OFF.) ON SW5 OFF ON Spare (Use with OFF.) SW6 OFF ON Spare (Use with OFF.) SW7 OFF ON Spare (Use with OFF.) SW8 OFF To display Japanese ON To display English NOTE: The power of the...


