

Instruction Manual - English
Page 1
SINGLE HEAD ELECTRONIC EMBROIDERY MACHINE INSTRUCTION MANUAL BAS-415
SINGLE HEAD ELECTRONIC EMBROIDERY MACHINE INSTRUCTION MANUAL BAS-415

Instruction Manual - English
Page 2
... height. 12 CHAPTER 2 Sewing procedures 13 Flow chart 13 I PREPARATION 14 1 Attaching embroidery hoop to holder base 14 2 Inserting floppy disk 16 3 Names and functions of operation panel 17 4 Dip switch functions 24 5 Preparation of machine 26 6 Data available in BAS-415 32 I] MAIN MENU 33 Summary of main menu 33 1 Setting hoop feed...
... height. 12 CHAPTER 2 Sewing procedures 13 Flow chart 13 I PREPARATION 14 1 Attaching embroidery hoop to holder base 14 2 Inserting floppy disk 16 3 Names and functions of operation panel 17 4 Dip switch functions 24 5 Preparation of machine 26 6 Data available in BAS-415 32 I] MAIN MENU 33 Summary of main menu 33 1 Setting hoop feed...

Instruction Manual - English
Page 3
... 40 40 44 , 47 50 50 53 53 54 55 57 57 58 \I COMMUNICATION 66 1 Connecting paper tape reader with machine 66 Connecting cable with machine 66 El Connecting the cable with the paper tape reader 67 E Operating and preparing paper tape reader 67 ERROR MESSAGES when receiving ...data from paper tape reader . 68 Notes for paper tape reader 69 2 Connecting editing system with machine 71 E Connecting cable with machine 71 El Connecting cable with editing system 71 ERROR MESSAGES when receiving data from editing system 72 What is needed" 73 Error...
... 40 40 44 , 47 50 50 53 53 54 55 57 57 58 \I COMMUNICATION 66 1 Connecting paper tape reader with machine 66 Connecting cable with machine 66 El Connecting the cable with the paper tape reader 67 E Operating and preparing paper tape reader 67 ERROR MESSAGES when receiving ...data from paper tape reader . 68 Notes for paper tape reader 69 2 Connecting editing system with machine 71 E Connecting cable with machine 71 El Connecting cable with editing system 71 ERROR MESSAGES when receiving data from editing system 72 What is needed" 73 Error...

Instruction Manual - English
Page 4
...set, bobbin winder, accessory case, cap frame device, boring attachment, plate for tubular materials can be done easily. r ' ,- i_ '' : , , 9 needle embroidery machine Pattern embroidery Maximum 1000 spm ( 4 levels) normal rotation rate 650 spm V 285 mm x H 450 mm (holder base area) V 240 mm x H 420 mm (tubular...), and the floppy disk of Tajima, and the receive data from Brother's editing system can be used. [NOTE) Brother format data cannot be used_ 5) By removing the table and using the cylinder bed, embroidery for shelf, marking light, memory expansion board 1 By attaching cap ...
...set, bobbin winder, accessory case, cap frame device, boring attachment, plate for tubular materials can be done easily. r ' ,- i_ '' : , , 9 needle embroidery machine Pattern embroidery Maximum 1000 spm ( 4 levels) normal rotation rate 650 spm V 285 mm x H 450 mm (holder base area) V 240 mm x H 420 mm (tubular...), and the floppy disk of Tajima, and the receive data from Brother's editing system can be used. [NOTE) Brother format data cannot be used_ 5) By removing the table and using the cylinder bed, embroidery for shelf, marking light, memory expansion board 1 By attaching cap ...

Instruction Manual - English
Page 16
... 2 Sewing procedures I Preparation II Entry III Editing IV Sewing 1. Attaching embroidery hoop to be done by changing dip switch. 1. Inserting floppy disc 3. counter and thread breakage sensor setting mode - 13 - Names and functions of machine Floppy data entry Paper tape data entry Brother editing system data entry 1. Sewing (function selection) mode 2 Sewing 3. Rotation...
... 2 Sewing procedures I Preparation II Entry III Editing IV Sewing 1. Attaching embroidery hoop to be done by changing dip switch. 1. Inserting floppy disc 3. counter and thread breakage sensor setting mode - 13 - Names and functions of machine Floppy data entry Paper tape data entry Brother editing system data entry 1. Sewing (function selection) mode 2 Sewing 3. Rotation...

Instruction Manual - English
Page 18
...;2 Attaching tubular square hoop to holder base [NOTE] Before using the tubular square hoop and the holder base, remove table (C) of the material in the embroidery hoop may cause skipped stitches, thread breakage or puckering. When attaching them, lift the plate spring roller slightly and be sure to the center.) 2) Attach... C. B 4 fig. C 1) Attach the tubular square frame eeto the X carriage Owith the two screws @ as shown in the holes of the frame. 3) Improper setting of the embroidery machine. 11111101111A a5 fig. Use the screw 0 for adjustment. - 15 -
...;2 Attaching tubular square hoop to holder base [NOTE] Before using the tubular square hoop and the holder base, remove table (C) of the material in the embroidery hoop may cause skipped stitches, thread breakage or puckering. When attaching them, lift the plate spring roller slightly and be sure to the center.) 2) Attach... C. B 4 fig. C 1) Attach the tubular square frame eeto the X carriage Owith the two screws @ as shown in the holes of the frame. 3) Improper setting of the embroidery machine. 11111101111A a5 fig. Use the screw 0 for adjustment. - 15 -
Instruction Manual - English
Page 29
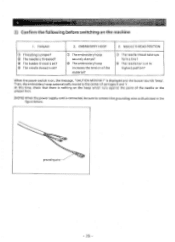
... a line? ® The needle bar is threaded? e The needle is at its highest position? THREAD r 2. At this time, check that there is nothing on the machine 1. CI Confirm the following before switching on the hoop which runs against the point of the needle or the presser foot. [NOTE] When the power... supply cord is connected, be sure to the center of the material? Then, the embroidery hoop automatically moves to connect the grounding wire as illustrated in the figure below. 4E> grounding wire - 26 -
... a line? ® The needle bar is threaded? e The needle is at its highest position? THREAD r 2. At this time, check that there is nothing on the machine 1. CI Confirm the following before switching on the hoop which runs against the point of the needle or the presser foot. [NOTE] When the power... supply cord is connected, be sure to the center of the material? Then, the embroidery hoop automatically moves to connect the grounding wire as illustrated in the figure below. 4E> grounding wire - 26 -

Instruction Manual - English
Page 32
liy l - ,4r fq, Looking into the inside memory storage is reset. After having exchanged the P-ROM on the main printed circuit board of the embroidery area). 2. Carriages X and Y return to the ordinary operation after turning on the power. To separate them, insert a screw driver in the sewing position, should... in the gap according to the diagram, then push and rotate. Release the key after returning to the home position (the center of the machine. (The power switch should be disengaged from the gap, each needle bar is in the jump condition and at the highest position. Turn off...
liy l - ,4r fq, Looking into the inside memory storage is reset. After having exchanged the P-ROM on the main printed circuit board of the embroidery area). 2. Carriages X and Y return to the ordinary operation after turning on the power. To separate them, insert a screw driver in the sewing position, should... in the gap according to the diagram, then push and rotate. Release the key after returning to the home position (the center of the machine. (The power switch should be disengaged from the gap, each needle bar is in the jump condition and at the highest position. Turn off...
Instruction Manual - English
Page 33
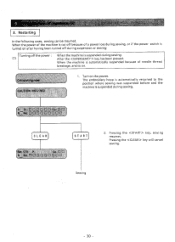
3. The embroidery hoop is automatically returned to the position where sewing was suspended before and the machine is cut off the power : (1) When the machine is suspended during sewing. Pressing the key, sewing resumes. Pressing the key will cancel sewing. s. Sewing - 30 - When the machine is automatically ...suspension or sewing: Turning off because of needle thread breakage, and so on the power. When the power of the machine is suspended during sewing. Turn on . 1. After the key has been pressed. Restarting In the following cases, sewing can be...
3. The embroidery hoop is automatically returned to the position where sewing was suspended before and the machine is cut off the power : (1) When the machine is suspended during sewing. Pressing the key, sewing resumes. Pressing the key will cancel sewing. s. Sewing - 30 - When the machine is automatically ...suspension or sewing: Turning off because of needle thread breakage, and so on the power. When the power of the machine is suspended during sewing. Turn on . 1. After the key has been pressed. Restarting In the following cases, sewing can be...
Instruction Manual - English
Page 37
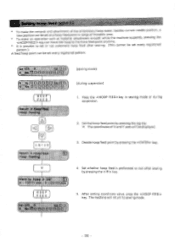
Decide hoop feed point by pressing the key. 5. After setting coordinate value, press the key. The machine wil l return to set or not automatic hoop feed after sewing by pressing the key. f Hoop k FEED) 4. Set whether hoop feed is possible to sewing ... point in sewing mode or during suspension) 1. • To make the removal and attachment of the embroidery hoop easier, besides current needle position, a new position can be set as material attachment smooth while the machine suspends, pressing the key can move the hoop to the hoop feed point anytime. * It is performed...
Decide hoop feed point by pressing the key. 5. After setting coordinate value, press the key. The machine wil l return to set or not automatic hoop feed after sewing by pressing the key. f Hoop k FEED) 4. Set whether hoop feed is possible to sewing ... point in sewing mode or during suspension) 1. • To make the removal and attachment of the embroidery hoop easier, besides current needle position, a new position can be set as material attachment smooth while the machine suspends, pressing the key can move the hoop to the hoop feed point anytime. * It is performed...
Instruction Manual - English
Page 45
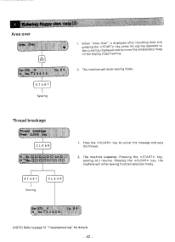
..., sewing will enter sewing mode. Press the key to page 74 "Troubleshooting" for details. - 42 - Thread breakage CLEAR START Sewing CLEAR 1. Pressing the key, the machine will enter sewing function selection mode. [NOTE] Refer to cancel the message and pass the thread. 2. When "Area Over" is displayed after inputting data and... pressing the key, press the jog key opposite to the currently displayed one to move the embroidery hoop till the display stops flashing. 2. Area over (A) START Sewing f rat 1.
..., sewing will enter sewing mode. Press the key to page 74 "Troubleshooting" for details. - 42 - Thread breakage CLEAR START Sewing CLEAR 1. Pressing the key, the machine will enter sewing function selection mode. [NOTE] Refer to cancel the message and pass the thread. 2. When "Area Over" is displayed after inputting data and... pressing the key, press the jog key opposite to the currently displayed one to move the embroidery hoop till the display stops flashing. 2. Area over (A) START Sewing f rat 1.
Instruction Manual - English
Page 80
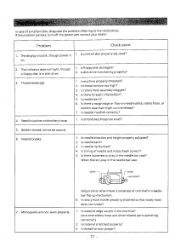
The display is blank, though power is in the machine? (Are embroidery hoop and other related parts operating correctly? ) 2. Is machine properly threaded? 2. Is there thread in needle bar flip-up mechanism. 6. Is needle bent? 6. Is needle bent? 3. Monograms are not ... below. Is rotary hook holder properly attached so that might cut the thread? 7. Is material stretched properly? 3. Is floppy disk damaged? 2. Needle touches embroidery hoop. 1. Bobbin thread cannot be wound. 6. When there is looseness of cam shaft in the bobbin? 5. Is thread tension proper? - 77 -...
The display is blank, though power is in the machine? (Are embroidery hoop and other related parts operating correctly? ) 2. Is machine properly threaded? 2. Is there thread in needle bar flip-up mechanism. 6. Is needle bent? 6. Is needle bent? 3. Monograms are not ... below. Is rotary hook holder properly attached so that might cut the thread? 7. Is material stretched properly? 3. Is floppy disk damaged? 2. Needle touches embroidery hoop. 1. Bobbin thread cannot be wound. 6. When there is looseness of cam shaft in the bobbin? 5. Is thread tension proper? - 77 -...

Instruction Manual - English
Page 83
... occurs on other embroidery machine. Consult with shop you bought it or its maker. (3) Following floppy disk cannot be used in BAS-415 even though it occurs at a first-time use normally before, the floppy disk may be originally defective. If it is not clear what is impossible.) Carefully deal with Brother's shop. - 80 - When...
... occurs on other embroidery machine. Consult with shop you bought it or its maker. (3) Following floppy disk cannot be used in BAS-415 even though it occurs at a first-time use normally before, the floppy disk may be originally defective. If it is not clear what is impossible.) Carefully deal with Brother's shop. - 80 - When...


