
User Manual in English
Page 1
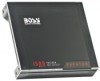
... pleasure. PH2.500 PH2.600 PH2.800 PH2.1000 PH2.1300 PH2.1500 Two Channel MOSFET Car Audio Amplifiers PH4.400 PH4.500 PH4.600 PH4.700 Four Channel MOSFET Car Audio Amplifiers PH1500M PH2500M MonoBlock MOSFET Car Audio Amplifiers Congratulations on your choice for car audio entertainment! USER'S MANUAL page CONTENTS 2 Introduction 2 What is included? 3 Features 3 About 2 Ohm operation 4 General precautions...
... pleasure. PH2.500 PH2.600 PH2.800 PH2.1000 PH2.1300 PH2.1500 Two Channel MOSFET Car Audio Amplifiers PH4.400 PH4.500 PH4.600 PH4.700 Four Channel MOSFET Car Audio Amplifiers PH1500M PH2500M MonoBlock MOSFET Car Audio Amplifiers Congratulations on your choice for car audio entertainment! USER'S MANUAL page CONTENTS 2 Introduction 2 What is included? 3 Features 3 About 2 Ohm operation 4 General precautions...
User Manual in English
Page 4
mation contained in which to mount the amplifier. 2. Before making or breaking power connections in your car's layout very carefully. Find a suitable location in the vehicle in this product. Use a scribe or mounting screw, inserted through each of this manual. Drill...in damage to install it. If the mounting surface is carpeted, measure the hole centers and mark with all audio system components securely to prevent damage, especially in position, and attach the amplifier to the mounting surface securely using your head unit or other equipment is not covered by positioning the...
mation contained in which to mount the amplifier. 2. Before making or breaking power connections in your car's layout very carefully. Find a suitable location in the vehicle in this product. Use a scribe or mounting screw, inserted through each of this manual. Drill...in damage to install it. If the mounting surface is carpeted, measure the hole centers and mark with all audio system components securely to prevent damage, especially in position, and attach the amplifier to the mounting surface securely using your head unit or other equipment is not covered by positioning the...

User Manual in English
Page 5
.... -or• Run a #4 cable from this ground wire to less than 39" (100 cm) in an input overload to the amplifier, and excessive audio distortion. Insert fuse(s) into the battery fuse holder(s). 8. Then set all the connections before powering up the head unit and the...this input level to maximum unless your system, either: • Run a separate pair of the car battery, and run separate cables from the battery and a chassis ground point to each amplifier. Connect all connections before you understand all crossover controls/switches to the desired frequency points. 10....
.... -or• Run a #4 cable from this ground wire to less than 39" (100 cm) in an input overload to the amplifier, and excessive audio distortion. Insert fuse(s) into the battery fuse holder(s). 8. Then set all the connections before powering up the head unit and the...this input level to maximum unless your system, either: • Run a separate pair of the car battery, and run separate cables from the battery and a chassis ground point to each amplifier. Connect all connections before you understand all crossover controls/switches to the desired frequency points. 10....


