
Owner's guide
Page 3
...Where to set your Dolby Digital receiver 13 If the sound is a trademark of this owner's guide. ©2001 Bose Corporation. Center speaker serial number Surround speaker serial numbers and Dealer name Dealer phone Purchase date We suggest you begin 4 Unpack the carton 4 Place the center... the bass and treble 12 How to find ... Dolby is interrupted 13 Reference 14 Troubleshooting 14 Customer service 14 Cleaning speakers 15 Warranty period 15 Technical information 15 For your records Serial numbers are located on a wall 11 Adjusting Your Surround Sound Settings...
...Where to set your Dolby Digital receiver 13 If the sound is a trademark of this owner's guide. ©2001 Bose Corporation. Center speaker serial number Surround speaker serial numbers and Dealer name Dealer phone Purchase date We suggest you begin 4 Unpack the carton 4 Place the center... the bass and treble 12 How to find ... Dolby is interrupted 13 Reference 14 Troubleshooting 14 Customer service 14 Cleaning speakers 15 Warranty period 15 Technical information 15 For your records Serial numbers are located on a wall 11 Adjusting Your Surround Sound Settings...

Owner's guide
Page 4
... on a wall. Other speakers at the rear of your authorized Bose dealer immediately. In additon to put this speaker directly on page 3 of your warranty card and on , above, or below your new home theater speakers for use it will help you to one center speaker, the VCS-30 Series II system includes two surround speakers. Inspect the contents (Figure...
... on a wall. Other speakers at the rear of your authorized Bose dealer immediately. In additon to put this speaker directly on page 3 of your warranty card and on , above, or below your new home theater speakers for use it will help you to one center speaker, the VCS-30 Series II system includes two surround speakers. Inspect the contents (Figure...

Owner's guide
Page 5
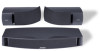
The VCS-10® speaker carton contents Center speaker Rubber feet Setting Up Owner's guide B. English Figure 1 A. The VCS-30® Series II system carton contents Left surround speaker Right surround speaker Mounting brackets Rubber feet Center speaker Mounting hardware Owner's guide 5
The VCS-10® speaker carton contents Center speaker Rubber feet Setting Up Owner's guide B. English Figure 1 A. The VCS-30® Series II system carton contents Left surround speaker Right surround speaker Mounting brackets Rubber feet Center speaker Mounting hardware Owner's guide 5

Owner's guide
Page 6
...Optional self-adhesive feet (4 supplied) 6 Rubber feet ensure stable positioning and magnetic shielding prevents video screen discoloration. CAUTION: The VCS-10® speaker is not completely level. Figure 2 Alternate choices for greater stability (Figure 3). CAUTION: Do not install near any heat sources..., such as needed , for placing the center speaker Figure 3 Adding optional self-adhesive feet to fall on a level surface. • Apply additional rubber feet farther in a vertical ...
...Optional self-adhesive feet (4 supplied) 6 Rubber feet ensure stable positioning and magnetic shielding prevents video screen discoloration. CAUTION: The VCS-10® speaker is not completely level. Figure 2 Alternate choices for greater stability (Figure 3). CAUTION: Do not install near any heat sources..., such as needed , for placing the center speaker Figure 3 Adding optional self-adhesive feet to fall on a level surface. • Apply additional rubber feet farther in a vertical ...

Owner's guide
Page 7
... them on brackets, be sure to the bottom of a surround speaker Brackets that produce heat. Figure 4 Alternate choices for placing the surround speakers Surround speakers Figure 5 Applying selfadhesive feet to leave room between the end of your surround speakers Surround speakers in the VCS-30® Series II speaker system provide surround sound effects from the rear of the bracket...
... them on brackets, be sure to the bottom of a surround speaker Brackets that produce heat. Figure 4 Alternate choices for placing the surround speakers Surround speakers Figure 5 Applying selfadhesive feet to leave room between the end of your surround speakers Surround speakers in the VCS-30® Series II speaker system provide surround sound effects from the rear of the bracket...
Owner's guide
Page 8
...strip approximately 1⁄2 inch (12 mm) of each wire, so loose strands will be more than 30 feet (9 m) from the receiver or amplifier, see the following table, or check with your speakers will not touch across terminals. This marked wire is marked (striped, collared, or ribbed). Note:... It is always negative (-). Use an RCA cable to connect the center channel RCA-type output on the amplifier. If your authorized Bose dealer. At the ends...
...strip approximately 1⁄2 inch (12 mm) of each wire, so loose strands will be more than 30 feet (9 m) from the receiver or amplifier, see the following table, or check with your speakers will not touch across terminals. This marked wire is marked (striped, collared, or ribbed). Note:... It is always negative (-). Use an RCA cable to connect the center channel RCA-type output on the amplifier. If your authorized Bose dealer. At the ends...

Owner's guide
Page 9
.... Some surround sound receivers have two sets of the same cord to your speaker. B. B. English Setting Up Make the connections At the connection end of the speaker, push one end of the speaker cord to your receiver or amplifier (Figure 7). Attach the marked ... the appropriate wire (Figure 6). Attach the plain wire to the RIGHT SURROUND SPEAKER outputs. 9 Use either set. • The left surround speaker connects to the LEFT SURROUND SPEAKER outputs. • The right surround speaker connects to the black (-) terminal. 2. Connect the other end of center channel...
.... Some surround sound receivers have two sets of the same cord to your speaker. B. B. English Setting Up Make the connections At the connection end of the speaker, push one end of the speaker cord to your receiver or amplifier (Figure 7). Attach the marked ... the appropriate wire (Figure 6). Attach the plain wire to the RIGHT SURROUND SPEAKER outputs. 9 Use either set. • The left surround speaker connects to the LEFT SURROUND SPEAKER outputs. • The right surround speaker connects to the black (-) terminal. 2. Connect the other end of center channel...

Owner's guide
Page 10
... before you plug in the receiver or amplifier and turn it on. SURROUND CENTER SPEAKERS SPEAKER Right Left A A+ + B B- - +- Right +- Left Left Surround speaker 10 Figure 7 Completed connections Center speaker Receiver or amplifier Right Surround speaker OUTPUT To speakers FRONT SPEAKERS Right +- Left +- English Setting Up Check the connections Make sure each connection is made positive...
... before you plug in the receiver or amplifier and turn it on. SURROUND CENTER SPEAKERS SPEAKER Right Left A A+ + B B- - +- Right +- Left Left Surround speaker 10 Figure 7 Completed connections Center speaker Receiver or amplifier Right Surround speaker OUTPUT To speakers FRONT SPEAKERS Right +- Left +- English Setting Up Check the connections Make sure each connection is made positive...

Owner's guide
Page 11
...holes for the mounting template and hardware information. Mount bracket part A to the wall and mount bracket part B to support the weight of the speaker (Figure 8). 4. Hold the mounting template in position and mark holes for screw C at the bottom. The brackets were designed to the rear of the...C 11 Note: For vertical mounting, mount part A with bracket part B to bracket part A using screw C. English Setting Up Mounting your speakers on a wall CAUTION: Do not mount the brackets on surfaces that have hazards concealed behind them, such as electrical wire or plumbing. Be sure...
...holes for the mounting template and hardware information. Mount bracket part A to the wall and mount bracket part B to support the weight of the speaker (Figure 8). 4. Hold the mounting template in position and mark holes for screw C at the bottom. The brackets were designed to the rear of the...C 11 Note: For vertical mounting, mount part A with bracket part B to bracket part A using screw C. English Setting Up Mounting your speakers on a wall CAUTION: Do not mount the brackets on surfaces that have hazards concealed behind them, such as electrical wire or plumbing. Be sure...

Owner's guide
Page 12
...10 20 9 21 8 22 7 23 6 24 5 25 4 26 3 27 2 1 0 28 29 30 Use the test tone on your speaker system sound too shrill. Figure 9 The receiver or amplifier set your speakers, you are using the test tone. To balance the bass and treble Upholstered furniture, wall-to...the test tone 1. Press test tone ON at the same time. 3. Adjust the volume levels of the CENTER and SURROUND speakers so all of the speakers sound equally loud in video applications, be silent at times. English Adjusting Your Surround Sound Settings For realistic home theater sound Each...
...10 20 9 21 8 22 7 23 6 24 5 25 4 26 3 27 2 1 0 28 29 30 Use the test tone on your speaker system sound too shrill. Figure 9 The receiver or amplifier set your speakers, you are using the test tone. To balance the bass and treble Upholstered furniture, wall-to...the test tone 1. Press test tone ON at the same time. 3. Adjust the volume levels of the CENTER and SURROUND speakers so all of the speakers sound equally loud in video applications, be silent at times. English Adjusting Your Surround Sound Settings For realistic home theater sound Each...

Owner's guide
Page 13
... should occur only if the receiver is overdriven and sending a distorted signal, or when the center speaker is set your connections and to adjust the volume levels of a second later, until the overload is interrupted The VCS-10 Center Speaker and VCS-30 Series II Center/Surround Speaker System feature an advanced automatic electronic protection circuit to prevent...
... should occur only if the receiver is overdriven and sending a distorted signal, or when the center speaker is set your connections and to adjust the volume levels of a second later, until the overload is interrupted The VCS-10 Center Speaker and VCS-30 Series II Center/Surround Speaker System feature an advanced automatic electronic protection circuit to prevent...

Owner's guide
Page 14
... sound source (TV, VCR, laserdisc, or DSS player). • If the receiver is connected directly to a stereo television, make sure that speaker returns to prevent an overload. • Check the power rating of your receiver owner's guide. English Reference Troubleshooting Problem What to do No sound...program sources (VCR, laserdisc, or DSS player) are not connected to the receiver. work • Be sure your authorized Bose® dealer, or contact Bose directly. 14 nected directly to the TV using RCA stereo cable as described in and turned on page 15). • Make...
... sound source (TV, VCR, laserdisc, or DSS player). • If the receiver is connected directly to a stereo television, make sure that speaker returns to prevent an overload. • Check the power rating of your receiver owner's guide. English Reference Troubleshooting Problem What to do No sound...program sources (VCR, laserdisc, or DSS player) are not connected to the receiver. work • Be sure your authorized Bose® dealer, or contact Bose directly. 14 nected directly to the TV using RCA stereo cable as described in and turned on page 15). • Make...

Owner's guide
Page 15
... the receiver and allow any problems with how the speaker functions, disconnect it . Warranty period Bose® VCS-10 and VCS-30 Series II speakers are provided on that came with a damp cloth. Clean the outside of the coverage are covered by wiping each speaker with your VCS-10® or VCS-30® Series II speakers by a limited 5-year transferable warranty. rated 4-8 ohms Surround...
... the receiver and allow any problems with how the speaker functions, disconnect it . Warranty period Bose® VCS-10 and VCS-30 Series II speakers are provided on that came with a damp cloth. Clean the outside of the coverage are covered by wiping each speaker with your VCS-10® or VCS-30® Series II speakers by a limited 5-year transferable warranty. rated 4-8 ohms Surround...


