
Owner's guide
Page 3
...To balance the bass and treble 12 How to find ... No part of each speaker. Setting Up 4 Before you keep your speakers on the back of this owner's guide. ©2001 Bose Corporation. English Dansk Deutsch Espanol Francais Where to set your Pro-Logic receiver 12 To ...use the cord properly 8 Make the connections 9 Check the connections 10 Mounting your sales receipt and warranty...
...To balance the bass and treble 12 How to find ... No part of each speaker. Setting Up 4 Before you keep your speakers on the back of this owner's guide. ©2001 Bose Corporation. English Dansk Deutsch Espanol Francais Where to set your Pro-Logic receiver 12 To ...use the cord properly 8 Make the connections 9 Check the connections 10 Mounting your sales receipt and warranty...

Owner's guide
Page 4
...either package you for use at the front of your authorized Bose dealer immediately. In additon to put this speaker directly on a wall. They are designed for choosing Bose® home theater speakers. Note: Now is a center speaker. Write them on your warranty card and on the back... with five amplified speaker outputs. Advanced design brackets included in this package make the surround speakers simple to make the most of this guide. Both the VCS-10® center speaker and the VCS-30® Series II center/surround speaker system are designed to mount on ,...
...either package you for use at the front of your authorized Bose dealer immediately. In additon to put this speaker directly on a wall. They are designed for choosing Bose® home theater speakers. Note: Now is a center speaker. Write them on your warranty card and on the back... with five amplified speaker outputs. Advanced design brackets included in this package make the surround speakers simple to make the most of this guide. Both the VCS-10® center speaker and the VCS-30® Series II center/surround speaker system are designed to mount on ,...

Owner's guide
Page 5
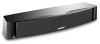
The VCS-10® speaker carton contents Center speaker Rubber feet Setting Up Owner's guide B. English Figure 1 A. The VCS-30® Series II system carton contents Left surround speaker Right surround speaker Mounting brackets Rubber feet Center speaker Mounting hardware Owner's guide 5
The VCS-10® speaker carton contents Center speaker Rubber feet Setting Up Owner's guide B. English Figure 1 A. The VCS-30® Series II system carton contents Left surround speaker Right surround speaker Mounting brackets Rubber feet Center speaker Mounting hardware Owner's guide 5

Owner's guide
Page 6
CAUTION: The VCS-10® speaker is not completely level. For full enjoyment, follow these placement guidelines: • Place the speaker on, or very close to, your television (Figure 2). Use additional rubber feet as needed , for placing the center speaker Figure 3 Adding optional self-adhesive feet to...allows it from tipping or falling from a television surface that produce heat. English Setting Up Place the center speaker The center speaker provides center channel surround sound performance while taking up very little space. Rubber feet ensure stable positioning and magnetic ...
CAUTION: The VCS-10® speaker is not completely level. For full enjoyment, follow these placement guidelines: • Place the speaker on, or very close to, your television (Figure 2). Use additional rubber feet as needed , for placing the center speaker Figure 3 Adding optional self-adhesive feet to...allows it from tipping or falling from a television surface that produce heat. English Setting Up Place the center speaker The center speaker provides center channel surround sound performance while taking up very little space. Rubber feet ensure stable positioning and magnetic ...

Owner's guide
Page 7
...Up Position your surround speakers Surround speakers in the VCS-30® Series II speaker system provide surround sound effects from the rear of a surround speaker Brackets that produce heat. Do not connect the speakers before reviewing those instructions. If you prefer, set the speakers on the wall. ... diagrams in a horizontal position. Figure 4 Alternate choices for placing the surround speakers Surround speakers Figure 5 Applying selfadhesive feet to the bottom of your room allows. • To mount the speakers on brackets, be sure to leave room between the end of the bracket ...
...Up Position your surround speakers Surround speakers in the VCS-30® Series II speaker system provide surround sound effects from the rear of a surround speaker Brackets that produce heat. Do not connect the speakers before reviewing those instructions. If you prefer, set the speakers on the wall. ... diagrams in a horizontal position. Figure 4 Alternate choices for placing the surround speakers Surround speakers Figure 5 Applying selfadhesive feet to the bottom of your room allows. • To mount the speakers on brackets, be sure to leave room between the end of the bracket ...
Owner's guide
Page 8
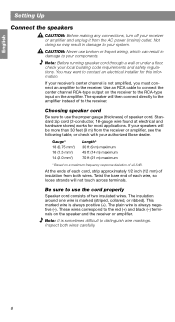
... wire is always positive (+). Inspect both wires. CAUTION: Never use broken or frayed wiring, which can result in damage to use the cord properly Speaker cord consists of insulation from the receiver or amplifier, see the following table, or check with your components. Use an RCA cable to.... At the ends of each wire, so loose strands will be more than 30 feet (9 m) from both wires carefully. 8 Be sure to your authorized Bose dealer. This marked wire is always negative (-). The insulation around one wire is not amplified, you must connect an amplifier to...
... wire is always positive (+). Inspect both wires. CAUTION: Never use broken or frayed wiring, which can result in damage to use the cord properly Speaker cord consists of insulation from the receiver or amplifier, see the following table, or check with your components. Use an RCA cable to.... At the ends of each wire, so loose strands will be more than 30 feet (9 m) from both wires carefully. 8 Be sure to your authorized Bose dealer. This marked wire is always negative (-). The insulation around one wire is not amplified, you must connect an amplifier to...

Owner's guide
Page 9
.... Some surround sound receivers have two sets of the same cord to your speaker. Use either set. • The left surround speaker connects to the LEFT SURROUND SPEAKER outputs. • The right surround speaker connects to the red (+) terminal. Attach the marked wire to the black ...the plain wire to the red (+) terminal. Attach the plain wire to the black (-) terminal. • The center speaker connects to the center speaker and surround speakers Red terminal lever Marked wire Marked wire Red terminal lever 1. B. Figure 6 How to make terminal connections to the CENTER...
.... Some surround sound receivers have two sets of the same cord to your speaker. Use either set. • The left surround speaker connects to the LEFT SURROUND SPEAKER outputs. • The right surround speaker connects to the red (+) terminal. Attach the marked wire to the black ...the plain wire to the red (+) terminal. Attach the plain wire to the black (-) terminal. • The center speaker connects to the center speaker and surround speakers Red terminal lever Marked wire Marked wire Red terminal lever 1. B. Figure 6 How to make terminal connections to the CENTER...

Owner's guide
Page 10
... A A+ + B B- - +- Check to negative (- Left +- Tighten any loose connections before you plug in the receiver or amplifier and turn it on. Left Left Surround speaker 10 English Setting Up Check the connections Make sure each connection is made positive to positive (+ to +) and negative to be sure that no loose strands...
... A A+ + B B- - +- Check to negative (- Left +- Tighten any loose connections before you plug in the receiver or amplifier and turn it on. Left Left Surround speaker 10 English Setting Up Check the connections Make sure each connection is made positive to positive (+ to +) and negative to be sure that no loose strands...

Owner's guide
Page 11
.... 3. Mount bracket part A to the wall and mount bracket part B to tighten all screws. CAUTION: Do not hang items from the brackets or speakers. If you are not sturdy enough, or that have hazards concealed behind them, such as electrical wire or plumbing. Figure...the weight of this guide for screw C at the bottom. To adjust the angle, loosen screw C slightly, move the speaker up or down, and retighten screw C. English Setting Up Mounting your speakers on a wall CAUTION: Do not mount the brackets on surfaces that are unsure about installing the bracket, contact a quali...
.... 3. Mount bracket part A to the wall and mount bracket part B to tighten all screws. CAUTION: Do not hang items from the brackets or speakers. If you are not sturdy enough, or that have hazards concealed behind them, such as electrical wire or plumbing. Figure...the weight of this guide for screw C at the bottom. To adjust the angle, loosen screw C slightly, move the speaker up or down, and retighten screw C. English Setting Up Mounting your speakers on a wall CAUTION: Do not mount the brackets on surfaces that are unsure about installing the bracket, contact a quali...

Owner's guide
Page 12
...your receiver to further verify connections and to set your Pro-Logic receiver For use in your speaker system sound bass heavy. To balance the bass and treble Upholstered furniture, wall-to see if... as the tone moves from both SURROUND speakers at the same time. 3. Figure 9 The receiver or amplifier set to NORMAL surround sound mode 12 13 14 15 16 17 18 11 19 10 20 9 21 8 22 7 23 ...6 24 5 25 4 26 3 27 2 1 0 28 29 30 Use the test tone on using . How to adjust the volume level of bass and treble. One tone should come from speaker...
...your receiver to further verify connections and to set your Pro-Logic receiver For use in your speaker system sound bass heavy. To balance the bass and treble Upholstered furniture, wall-to see if... as the tone moves from both SURROUND speakers at the same time. 3. Figure 9 The receiver or amplifier set to NORMAL surround sound mode 12 13 14 15 16 17 18 11 19 10 20 9 21 8 22 7 23 ...6 24 5 25 4 26 3 27 2 1 0 28 29 30 Use the test tone on using . How to adjust the volume level of bass and treble. One tone should come from speaker...

Owner's guide
Page 13
... overdriven and sending a distorted signal, or when the center speaker is interrupted The VCS-10 Center Speaker and VCS-30 Series II Center/Surround Speaker System feature an advanced automatic electronic protection circuit to prevent speaker damage due to set at a safe level. When the center channel speaker detects an overload, the protection circuit intermittently shuts down the...
... overdriven and sending a distorted signal, or when the center speaker is interrupted The VCS-10 Center Speaker and VCS-30 Series II Center/Surround Speaker System feature an advanced automatic electronic protection circuit to prevent speaker damage due to set at a safe level. When the center channel speaker detects an overload, the protection circuit intermittently shuts down the...

Owner's guide
Page 14
...Reduce the volume until that all connections (see "Compatibil- Sound is distorted • Check the speaker cord for damage. • Reduce the output level from your authorized Bose® dealer, or contact Bose directly. 14 work • Be sure your receiver is set for NORMAL surround sound mode. ... 12 and page 13). • Check the audio source material to be sure it is encoded for surround sound. • Check the speaker connections. (see page 10). • If your surround sound receiver is Pro-Logic, be sure the sound source (DSS, laserdisc, or DVD player) is con...
...Reduce the volume until that all connections (see "Compatibil- Sound is distorted • Check the speaker cord for damage. • Reduce the output level from your authorized Bose® dealer, or contact Bose directly. 14 work • Be sure your receiver is set for NORMAL surround sound mode. ... 12 and page 13). • Check the audio source material to be sure it is encoded for surround sound. • Check the speaker connections. (see page 10). • If your surround sound receiver is Pro-Logic, be sure the sound source (DSS, laserdisc, or DVD player) is con...

Owner's guide
Page 15
... that card, detach, and mail it to air dry. Warranty period Bose® VCS-10 and VCS-30 Series II speakers are provided on that came with cen- rated 4-8 ohms Surround speakers: Compatible with amplifiers or receivers with a tuned port Size/Weight Center speaker: 3.25"H x 21.5"W x 6"D; 5.9 lb (8.2 cm x 54.6 cm x 15.2 cm; 2.7 kg) Each surround...
... that card, detach, and mail it to air dry. Warranty period Bose® VCS-10 and VCS-30 Series II speakers are provided on that came with cen- rated 4-8 ohms Surround speakers: Compatible with amplifiers or receivers with a tuned port Size/Weight Center speaker: 3.25"H x 21.5"W x 6"D; 5.9 lb (8.2 cm x 54.6 cm x 15.2 cm; 2.7 kg) Each surround...


