Owner's guide
Page 7
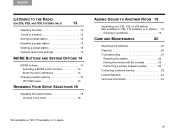
vii English TAB 2 TAB 3 TAB 4 TAB 5 TAB 6 TAB 7 TAB 8 LISTENING TO THE RADIO (ON 235, V25, AND V35 SYSTEMS ONLY) 13 Selecting the radio 13 Tuning to a station 13 Storing a preset station 13 Recalling a preset station 13 Deleting a preset station 13 Optional ... function 14 Button function definitions 14 Changing system options 15 OPTIONS menu 16 REVIEWING YOUR SETUP SELECTIONS 18 Adjusting the system setup 18 Choices in the menu 18 ADDING SOUND TO ANOTHER ROOM 19 Expanding your 235, V35, or V25 system (Not available on T20, T10 systems, or in Japan.) . . 19 Expansion ...
vii English TAB 2 TAB 3 TAB 4 TAB 5 TAB 6 TAB 7 TAB 8 LISTENING TO THE RADIO (ON 235, V25, AND V35 SYSTEMS ONLY) 13 Selecting the radio 13 Tuning to a station 13 Storing a preset station 13 Recalling a preset station 13 Deleting a preset station 13 Optional ... function 14 Button function definitions 14 Changing system options 15 OPTIONS menu 16 REVIEWING YOUR SETUP SELECTIONS 18 Adjusting the system setup 18 Choices in the menu 18 ADDING SOUND TO ANOTHER ROOM 19 Expanding your 235, V35, or V25 system (Not available on T20, T10 systems, or in Japan.) . . 19 Expansion ...
Owner's guide
Page 13
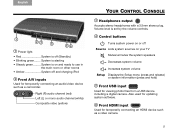
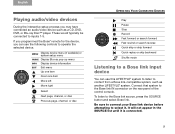
... temporarily connecting an HDMI device such as a camcorder. System is on your TV Mutes/unmutes the system speakers Decreases system volume Increases system volume Setup Displays the Setup menu (press and release) or system information (press and hold) 5 Front USB input Used for viewing photo files from a USB device including a digital camera...
... temporarily connecting an HDMI device such as a camcorder. System is on your TV Mutes/unmutes the system speakers Decreases system volume Increases system volume Setup Displays the Setup menu (press and release) or system information (press and hold) 5 Front USB input Used for viewing photo files from a USB device including a digital camera...

Owner's guide
Page 14
... on the console also starts your system and displays the Setup menu on the console changes from blinking to solid green. Shutting down automatically after a few seconds. Otherwise, use . The system will be stopped and you ... complete the shutdown using the onscreen controls. 6 The system is now ready for use the remote that came with your remote in the Unify™ setup menu, press the TV power button on the remote control to access the power controls for connected devices, automatic shutdown will shut down your system...
... on the console also starts your system and displays the Setup menu on the console changes from blinking to solid green. Shutting down automatically after a few seconds. Otherwise, use . The system will be stopped and you ... complete the shutdown using the onscreen controls. 6 The system is now ready for use the remote that came with your remote in the Unify™ setup menu, press the TV power button on the remote control to access the power controls for connected devices, automatic shutdown will shut down your system...
Owner's guide
Page 15
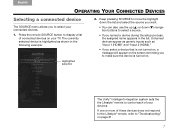
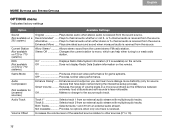
English TAB 2 TAB 3 TAB 4 TAB 5 TAB 6 TAB 7 TAB 8 OPERATING YOUR CONNECTED DEVICES Selecting a connected device The SOURCE menu allows you named a device during the setup process, the assigned name appears in the following example: Highlighted selection 2. The currently selected device is turned on page 21. 7 Press the remote SOURCE button ...
English TAB 2 TAB 3 TAB 4 TAB 5 TAB 6 TAB 7 TAB 8 OPERATING YOUR CONNECTED DEVICES Selecting a connected device The SOURCE menu allows you named a device during the setup process, the assigned name appears in the following example: Highlighted selection 2. The currently selected device is turned on page 21. 7 Press the remote SOURCE button ...

Owner's guide
Page 16
... at your TV to operate it. Press the remote SOURCE button and select the device that provides your TV. 3. Use the dash button for the Bose system, then press the SOURCE button and select another source. Press GUIDE. Press the TV Input button to select the internal tuner in the SOURCE... program content through a set -top box to a TV station." Press to tune to a station. See "Tuning to the LIFESTYLE® control console, it during the setup process. 1.
... at your TV to operate it. Press the remote SOURCE button and select the device that provides your TV. 3. Use the dash button for the Bose system, then press the SOURCE button and select another source. Press GUIDE. Press the TV Input button to select the internal tuner in the SOURCE... program content through a set -top box to a TV station." Press to tune to a station. See "Tuning to the LIFESTYLE® control console, it during the setup process. 1.
Owner's guide
Page 17
... Connect that system to select it is connected. 9 It will not appear in the SOURCE list until it . To listen to content from a Bose link-compatible system, such as a CD, DVD, DVR, or Blu-ray Disc™ player. MENU Display device menu (if available) or system... If you programmed the Bose® remote for the device, you may have connected an audio/video device such as another LIFESTYLE® system. These would typically be connected to operate the selected device. English TAB 2 TAB 3 TAB 4 Playing audio/video devices During the interactive setup process you can use ...
... Connect that system to select it is connected. 9 It will not appear in the SOURCE list until it . To listen to content from a Bose link-compatible system, such as a CD, DVD, DVR, or Blu-ray Disc™ player. MENU Display device menu (if available) or system... If you programmed the Bose® remote for the device, you may have connected an audio/video device such as another LIFESTYLE® system. These would typically be connected to operate the selected device. English TAB 2 TAB 3 TAB 4 Playing audio/video devices During the interactive setup process you can use ...
Owner's guide
Page 24
... ......... Not Available Provides no change to mono, which can hear movie dialogs more distinctly (only for source devices that have been named during the interactive setup process). Recommended* ..... Enhanced Mono ..... Current Station (Not available on the remote. Stereo Off Changes the current station to the source audio track. Track 2 Selects track...
... ......... Not Available Provides no change to mono, which can hear movie dialogs more distinctly (only for source devices that have been named during the interactive setup process). Recommended* ..... Enhanced Mono ..... Current Station (Not available on the remote. Stereo Off Changes the current station to the source audio track. Track 2 Selects track...
Owner's guide
Page 26
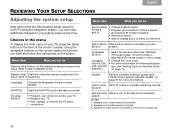
... source selected. only for more information on page 19. Appears only if initial setup is incomplete. 2. Menu item What you can do Source setup • Change a device name. (Notes 2 and 3) • Program your system setup at the setup (Note 1) last completed event. V35, and V25 sion, see "Performing a system software update" on the front of...
... source selected. only for more information on page 19. Appears only if initial setup is incomplete. 2. Menu item What you can do Source setup • Change a device name. (Notes 2 and 3) • Program your system setup at the setup (Note 1) last completed event. V35, and V25 sion, see "Performing a system software update" on the front of...
Owner's guide
Page 29
...• Increase the volume. • Press the Mute button ( ) and make sure your system is less • To change a video connection, press the Setup button on page 23. 21 See "Performing a system software update" on page 23. See "Resetting the system" on page 23. • Press any remote... key and watch the power light on the control console. The Bose remote does not control a device I added during the initial setup • Try setting up the device. Select the device options and follow the procedure. It should blink with the...
...• Increase the volume. • Press the Mute button ( ) and make sure your system is less • To change a video connection, press the Setup button on page 23. 21 See "Performing a system software update" on page 23. See "Resetting the system" on page 23. • Press any remote... key and watch the power light on the control console. The Bose remote does not control a device I added during the initial setup • Try setting up the device. Select the device options and follow the procedure. It should blink with the...
Owner's guide
Page 30
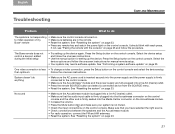
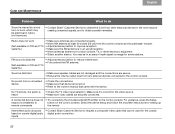
... 22 Make sure it is correct for the coaxial heard on coaxial digital audio digital audio connection. Intermittent audio dropouts • Contact Bose Customer Service to the control console. You may be used for the video source. • Make sure video cables are connected properly... Make sure antennas are securely connected. No TV picture, but audio is heard • Check the TV video input selection. For guidance, press the Setup respond consistently to obtain possible remedies. TAB 8 TAB 7 CARE AND MAINTENANCE TAB 6 TAB 5 TAB 4 TAB 3 TAB 2 English Problem What to...
... 22 Make sure it is correct for the coaxial heard on coaxial digital audio digital audio connection. Intermittent audio dropouts • Contact Bose Customer Service to the control console. You may be used for the video source. • Make sure video cables are connected properly... Make sure antennas are securely connected. No TV picture, but audio is heard • Check the TV video input selection. For guidance, press the Setup respond consistently to obtain possible remedies. TAB 8 TAB 7 CARE AND MAINTENANCE TAB 6 TAB 5 TAB 4 TAB 3 TAB 2 English Problem What to...
Owner's guide
Page 31
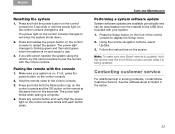
... English TAB 2 TAB 3 TAB 4 Resetting the system 1. Make sure your system. 1. Follow the instructions on the control console. 2. Press the Setup button on the front of the control console while it is on the control console changes to use. 3. Press and hold the remote near the... 1. Pairing the remote with your system is being updated. Hold the remote close to display the Setup menu. 2. Using the remote navigation buttons, select Update. 3. Note: To make sure your Bose® remote is complete. 4. Contacting customer service For additional help in the carton. 23 See ...
... English TAB 2 TAB 3 TAB 4 Resetting the system 1. Make sure your system. 1. Follow the instructions on the control console. 2. Press the Setup button on the front of the control console while it is on the control console changes to use. 3. Press and hold the remote near the... 1. Pairing the remote with your system is being updated. Hold the remote close to display the Setup menu. 2. Using the remote navigation buttons, select Update. 3. Note: To make sure your Bose® remote is complete. 4. Contacting customer service For additional help in the carton. 23 See ...
Owner's guide
Page 32
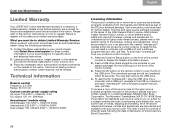
...to you will be completed within the product's control console. Details of the control console to the address provided by a limited warranty. Contact the Bose organization in your country/region) for a period of three (3) years following procedures: 1. Technical information Remote control Frequency: 2.4 GHz Range: 33 ft...Visit www.stlinux.com/download for instructions on the product registration card that can view .pdf files. Press and hold the Setup button on the front of the limited warranty are provided on how to the terms of media, shipping and handling. ...
...to you will be completed within the product's control console. Details of the control console to the address provided by a limited warranty. Contact the Bose organization in your country/region) for a period of three (3) years following procedures: 1. Technical information Remote control Frequency: 2.4 GHz Range: 33 ft...Visit www.stlinux.com/download for instructions on the product registration card that can view .pdf files. Press and hold the Setup button on the front of the limited warranty are provided on how to the terms of media, shipping and handling. ...
