Owner's guide
Page 2
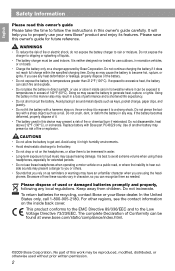
... enjoy its features. Do not expose the charger to a strong shock. It is best to avoid extreme volume when using these headphones, especially for use your Bose dealer. If the battery becomes deformed, properly dispose of it around metal objects such as reminders or warnings may cause hearing damage.... to the EMC Directive 89/336/EEC and to generate heat, rupture, or ignite. Avoid using the head- Be aware of how these headphones when operating a motor vehicle on , throw or drop it to expose it does not reach full charge within the specified charging time. If...
... enjoy its features. Do not expose the charger to a strong shock. It is best to avoid extreme volume when using these headphones, especially for use your Bose dealer. If the battery becomes deformed, properly dispose of it around metal objects such as reminders or warnings may cause hearing damage.... to the EMC Directive 89/336/EEC and to generate heat, rupture, or ignite. Avoid using the head- Be aware of how these headphones when operating a motor vehicle on , throw or drop it to expose it does not reach full charge within the specified charging time. If...
Owner's guide
Page 4
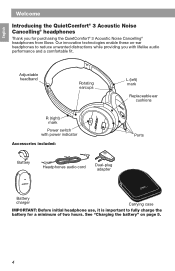
See "Charging the battery" on -ear headphones to fully charge the battery for purchasing the QuietComfort® 3 Acoustic Noise Cancelling® headphones from Bose. English Français Español Welcome WIelcnome troducing the QuietComfort® 3 Acoustic Noise Cancelling® headphones Thank you with power indicator Accessories included: Ports Battery Headphones audio cord Dual-plug adapter Battery...
See "Charging the battery" on -ear headphones to fully charge the battery for purchasing the QuietComfort® 3 Acoustic Noise Cancelling® headphones from Bose. English Français Español Welcome WIelcnome troducing the QuietComfort® 3 Acoustic Noise Cancelling® headphones Thank you with power indicator Accessories included: Ports Battery Headphones audio cord Dual-plug adapter Battery...
Owner's guide
Page 5
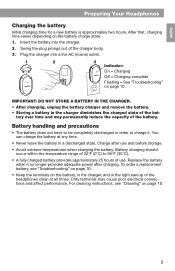
...2 3 Indicator: On = Charging Off = Charging complete Flashing = See "Troubleshooting" on the battery, in the charger, and in the right earcup of the headphones clean at any time. • Never leave the battery in a discharged state. IMPORTANT: DO NOT STORE A BATTERY IN THE CHARGER. • After charging,..." on page 10. • Keep the terminals on page 10. English Español Français Preparing Your Headphones Charging the battery Preparing Your Headphones Initial charging time for a new battery is approximately two hours. After that, charging time varies depending on page 10. ...
...2 3 Indicator: On = Charging Off = Charging complete Flashing = See "Troubleshooting" on the battery, in the charger, and in the right earcup of the headphones clean at any time. • Never leave the battery in a discharged state. IMPORTANT: DO NOT STORE A BATTERY IN THE CHARGER. • After charging,..." on page 10. • Keep the terminals on page 10. English Español Français Preparing Your Headphones Charging the battery Preparing Your Headphones Initial charging time for a new battery is approximately two hours. After that, charging time varies depending on page 10. ...
Owner's guide
Page 6
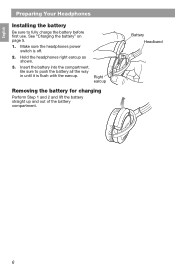
Make sure the headphones power switch is flush with the earcup. Be sure to fully charge the battery before first use. Right earcup Removing the battery for charging Perform Step 1 and 2 and lift the battery straight up and out of the battery compartment. Insert the battery into the compartment. Battery Headband Français Español 6 Hold the headphones right earcup as shown. 3. English Preparing Your Headphones Installing the battery Be sure to push the battery all the way in until it is off. 2. See "Charging the battery" on page 5. 1.
Make sure the headphones power switch is flush with the earcup. Be sure to fully charge the battery before first use. Right earcup Removing the battery for charging Perform Step 1 and 2 and lift the battery straight up and out of the battery compartment. Insert the battery into the compartment. Battery Headband Français Español 6 Hold the headphones right earcup as shown. 3. English Preparing Your Headphones Installing the battery Be sure to push the battery all the way in until it is off. 2. See "Charging the battery" on page 5. 1.
Owner's guide
Page 7
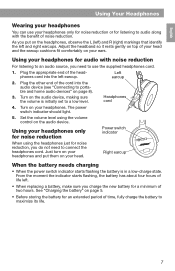
... benefit of the cord into the left earcup. Just turn on your headphones and put on your head. English Español Français Using Your Headphones Wearing your headphones UsingYourHeadphones You can use the supplied headphones cord. 1. Adjust the headband so it rests gently on top of ...your head and the earcup cushions fit comfortably on your headphones for a minimum of time, fully charge the battery to use your headphones only for noise reduction or for noise reduction, you need to portable and home audio devices" on page ...
... benefit of the cord into the left earcup. Just turn on your headphones and put on your head. English Español Français Using Your Headphones Wearing your headphones UsingYourHeadphones You can use the supplied headphones cord. 1. Adjust the headband so it rests gently on top of ...your head and the earcup cushions fit comfortably on your headphones for a minimum of time, fully charge the battery to use your headphones only for noise reduction or for noise reduction, you need to portable and home audio devices" on page ...
Owner's guide
Page 8
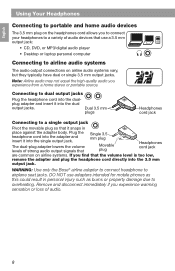
... to airplane seat jacks. The dual-plug adapter lowers the volume levels of strong audio output signals that Single 3.5 mm plug Movable plug Headphones cord jack are common on airline audio systems vary, but they typically have dual or single 3.5 mm output jacks. Note: Airline audio may.... plug adapter and insert it into the 3.5 mm output jack. WARNING: Use only the Bose® airline adapter to connect headphone to dual output jacks Plug the headphone cord into the dual output jacks. Plug the headphone cord into the adapter and insert it into the dual- Dual 3.5 mm plugs...
... to airplane seat jacks. The dual-plug adapter lowers the volume levels of strong audio output signals that Single 3.5 mm plug Movable plug Headphones cord jack are common on airline audio systems vary, but they typically have dual or single 3.5 mm output jacks. Note: Airline audio may.... plug adapter and insert it into the 3.5 mm output jack. WARNING: Use only the Bose® airline adapter to connect headphone to dual output jacks Plug the headphone cord into the dual output jacks. Plug the headphone cord into the adapter and insert it into the dual- Dual 3.5 mm plugs...
Owner's guide
Page 9
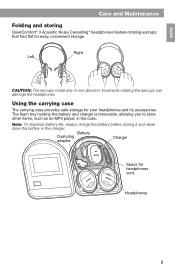
... English Español Français Care and Maintenance Folding and storing CareandMaintenance QuietComfort® 3 Acoustic Noise Cancelling® headphones feature rotating earcups that fold flat for your headphones and its accessories. Right Left CAUTION: The earcups rotate only in the charger.... Incorrectly rotating the earcups can damage the headphones. Battery Dual-plug adapter Charger Space for headphones cord Headphones 9 Note: To maximize battery life, always charge the battery before storing it and never store ...
... English Español Français Care and Maintenance Folding and storing CareandMaintenance QuietComfort® 3 Acoustic Noise Cancelling® headphones feature rotating earcups that fold flat for your headphones and its accessories. Right Left CAUTION: The earcups rotate only in the charger.... Incorrectly rotating the earcups can damage the headphones. Battery Dual-plug adapter Charger Space for headphones cord Headphones 9 Note: To maximize battery life, always charge the battery before storing it and never store ...
Owner's guide
Page 10
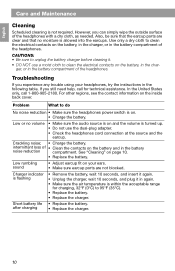
... contacts on and the volume is turned up. • Do not use a moist cloth to do No noise reduction • Make sure the headphones power switch is flashing • Remove the battery, wait 10 seconds, and insert it again. • Unplug the charger, wait 10 seconds, ... (0°C) to unplug the battery charger before cleaning it in the following table. See "Cleaning" on the battery and in the battery compartment of the headphones with a dry cloth, as needed. Crackling noise; • Charge the battery. Short battery life • Replace the battery. after charging • ...
... contacts on and the volume is turned up. • Do not use a moist cloth to do No noise reduction • Make sure the headphones power switch is flashing • Remove the battery, wait 10 seconds, and insert it again. • Unplug the charger, wait 10 seconds, ... (0°C) to unplug the battery charger before cleaning it in the following table. See "Cleaning" on the battery and in the battery compartment of the headphones with a dry cloth, as needed. Crackling noise; • Charge the battery. Short battery life • Replace the battery. after charging • ...


