
Installation Guide
Page 14
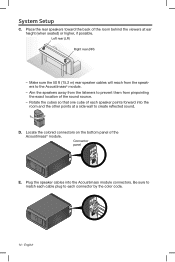
... to match each connector by the color code. 14 - English Plug the speaker cables into the room and the other points at ear height (when seated) or higher, if possible. Connector panel E. System Setup C. Place the rear speakers toward the back of the Acoustimass® module.
... to match each connector by the color code. 14 - English Plug the speaker cables into the room and the other points at ear height (when seated) or higher, if possible. Connector panel E. System Setup C. Place the rear speakers toward the back of the Acoustimass® module.
Owner's Guide
Page 27
...Resetting the system" on page 29. • Press any possible sources of my Bose® remote • Make sure the control console is firmly seated into the Audio In connector on the speaker array. • (135 series II systems only) Try moving any remote key and watch the system status indicator on ...the audio input cable is firmly plugged into the Audio Out connector (not Bose link) on the control console and the other end is firmly seated into the Media Center connector on the Acoustimass module. • (135 series II systems only) Make sure that the audio input cable is firmly ...
...Resetting the system" on page 29. • Press any possible sources of my Bose® remote • Make sure the control console is firmly seated into the Audio In connector on the speaker array. • (135 series II systems only) Try moving any remote key and watch the system status indicator on ...the audio input cable is firmly plugged into the Audio Out connector (not Bose link) on the control console and the other end is firmly seated into the Media Center connector on the Acoustimass module. • (135 series II systems only) Make sure that the audio input cable is firmly ...