Bose® link AL8 homewide wireless audio link - Owner's guide
Page 10
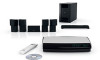
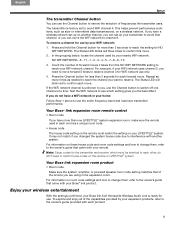
...the Channel button to narrow the selection of the remote you the best effect. Count the number of the capabilities provided by your remote. Press and hold the Channel button for the transmitter and receiver, which setting gives you are using in the expansion room. For example, if..., locate the channel used in your transmitter to avoid that channel, or you have more than one LIFESTYLE® system expansion room, make sure the remote used by your WiFi network: 1. Your Bose link expansion room product • Room code Make sure the system, amplifier, or powered speaker room...
...the Channel button to narrow the selection of the remote you the best effect. Count the number of the capabilities provided by your remote. Press and hold the Channel button for the transmitter and receiver, which setting gives you are using in the expansion room. For example, if..., locate the channel used in your transmitter to avoid that channel, or you have more than one LIFESTYLE® system expansion room, make sure the remote used by your WiFi network: 1. Your Bose link expansion room product • Room code Make sure the system, amplifier, or powered speaker room...
Lifestyle® VS-2 video enhancer - Owner's guide
Page 4
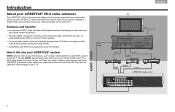
With this accessory installed, a single button press selects the source video and audio at the same time. VS-2 cable AUDIO VIDEO TV VS-2 English Video out to TV Video AUX Video Video CBL•SAT VCR Audio Audio Audio LIFESTYLE® media center 4 The VS-2 video...and HDMI). • Compatible with HDTV and progressive scan TV formats. When you to connect more than one audio/video device to your LIFESTYLE® home entertainment system. Features and benefits • Incorporates HDMITM (High-Definition Multimedia Interface) technology to help maximize your home theater ...
With this accessory installed, a single button press selects the source video and audio at the same time. VS-2 cable AUDIO VIDEO TV VS-2 English Video out to TV Video AUX Video Video CBL•SAT VCR Audio Audio Audio LIFESTYLE® media center 4 The VS-2 video...and HDMI). • Compatible with HDTV and progressive scan TV formats. When you to connect more than one audio/video device to your LIFESTYLE® home entertainment system. Features and benefits • Incorporates HDMITM (High-Definition Multimedia Interface) technology to help maximize your home theater ...
Lifestyle® VS-2 video enhancer - Owner's guide
Page 19
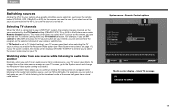
...Enabling Persistent Video allows you want to an audio source from another source, such as FM or AM radio. navigate select Media center display - Just press the remote button (CD/DVD, VCR, CBL•SAT, or AUX) for the source you to continue viewing the video portion of the sources connected... the TV source unless you see and hear the TV channel coming from a local radio station. If your TV. For example, you to your LIFESTYLE® system, the remote changes channels on your TV screen is connected to select the correct video input on the source selected by the TV...
...Enabling Persistent Video allows you want to an audio source from another source, such as FM or AM radio. navigate select Media center display - Just press the remote button (CD/DVD, VCR, CBL•SAT, or AUX) for the source you to continue viewing the video portion of the sources connected... the TV source unless you see and hear the TV channel coming from a local radio station. If your TV. For example, you to your LIFESTYLE® system, the remote changes channels on your TV screen is connected to select the correct video input on the source selected by the TV...
SL2 wireless surround link - Owner's guide
Page 9
... ventilation and reposition the unit upright with large metal objects in solving problems, contact Bose Customer Service. Refer to blink red, unplug the unit from the power outlet and contact Bose® Customer Service. If the ventilation was obstructed, allow the unit a few minutes... connection between them does not intersect with clear space around the ventilation openings on each other obstructions (like a straightened paper clip), press inside the opening on the receiver. • Move the receiver, the transmitter, or both so the transmission path between the SL2...
... ventilation and reposition the unit upright with large metal objects in solving problems, contact Bose Customer Service. Refer to blink red, unplug the unit from the power outlet and contact Bose® Customer Service. If the ventilation was obstructed, allow the unit a few minutes... connection between them does not intersect with clear space around the ventilation openings on each other obstructions (like a straightened paper clip), press inside the opening on the receiver. • Move the receiver, the transmitter, or both so the transmission path between the SL2...

Installation guide
Page 13
... rear left, right speakers Front center speaker The cables for the type of the two types shown here. B. Orient the plug with its respective speaker. Press the terminal tab to insert each cable plug and match it to the speaker in that connect to maintain proper + and -
... rear left, right speakers Front center speaker The cables for the type of the two types shown here. B. Orient the plug with its respective speaker. Press the terminal tab to insert each cable plug and match it to the speaker in that connect to maintain proper + and -

Installation guide
Page 25
...it is time to the AUX connectors on the headset so it can listen (as directed by Disc 2. C. D. Lift up ) and press Open/Close again. Replace Disc 1 with Disc 2 in your ears. Figure 17 Connecting the ADAPTiQ calibration headset Media center connection panel AUX L &... R Headset 25 Press CD/DVD on the control panel. B. Note: You may need to temporarily disconnect a previously connected device. ADAPTiQ® audio calibration system A....
...it is time to the AUX connectors on the headset so it can listen (as directed by Disc 2. C. D. Lift up ) and press Open/Close again. Replace Disc 1 with Disc 2 in your ears. Figure 17 Connecting the ADAPTiQ calibration headset Media center connection panel AUX L &... R Headset 25 Press CD/DVD on the control panel. B. Note: You may need to temporarily disconnect a previously connected device. ADAPTiQ® audio calibration system A....

Installation guide
Page 27
... the optical output of a Bose® link connection for expansion into other rooms. Making coaxial digital audio connections Using a 75Ω coaxial cable with RCA connectors. • Optical digital audio connection - Turn on the LIFESTYLE® system remote. 3. Press the System button on your TV and LIFESTYLE® system. 2. Press the down arrow key and...
... the optical output of a Bose® link connection for expansion into other rooms. Making coaxial digital audio connections Using a 75Ω coaxial cable with RCA connectors. • Optical digital audio connection - Turn on the LIFESTYLE® system remote. 3. Press the System button on your TV and LIFESTYLE® system. 2. Press the down arrow key and...
Installation guide
Page 28
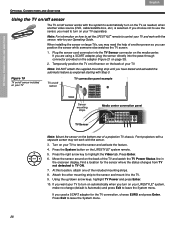
..., refer to the TV. 9. Turn on the back of the included mounting strips. 8. Move the sensor around on your LIFESTYLE® system, make no change (default is selected. Using the up/down arrow keys, highlight TV Power and press Enter. 10. If you turn on your TV to leave the System menu.... Press the System button on page 30). 2. If you want your TV to turn on automatically when you are using a SCART adapter, plug the sensor directly into the TV Sensor connector on how to set the LIFESTYLE® remote to control your TV and...
..., refer to the TV. 9. Turn on the back of the included mounting strips. 8. Move the sensor around on your LIFESTYLE® system, make no change (default is selected. Using the up/down arrow keys, highlight TV Power and press Enter. 10. If you turn on your TV to leave the System menu.... Press the System button on page 30). 2. If you want your TV to turn on automatically when you are using a SCART adapter, plug the sensor directly into the TV Sensor connector on how to set the LIFESTYLE® remote to control your TV and...
uMusic®+ guide
Page 3
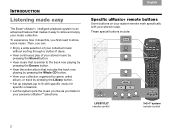
... collection organized by genre, artist, album, or track by pressing the Encore button. • Hear the entire album that makes it does this, you listen to your personal uStationTM selections. These special buttons include: LIFESTYLE® remote control 3•2•1® system remote control ... and enjoy your music collection. TAB 8 TAB 7 TAB 6 INTRODUCTION Listening made easy TAB 5 The Bose® uMusic®+ intelligent playback system is similar to the track now playing by pressing the Library button. • Set up playlists (up to 9) with your stored music.
... collection organized by genre, artist, album, or track by pressing the Encore button. • Hear the entire album that makes it does this, you listen to your personal uStationTM selections. These special buttons include: LIFESTYLE® remote control 3•2•1® system remote control ... and enjoy your music collection. TAB 8 TAB 7 TAB 6 INTRODUCTION Listening made easy TAB 5 The Bose® uMusic®+ intelligent playback system is similar to the track now playing by pressing the Library button. • Set up playlists (up to 9) with your stored music.

uMusic®+ guide
Page 4
... and album for an Audio CD. If the system does not recognize an album when you can store. MP3s on the display for each track. Press the Store button on the media center. 2. Note: While storing an MP3 disc, you can choose to store this information when they are burned onto...
... and album for an Audio CD. If the system does not recognize an album when you can store. MP3s on the display for each track. Press the Store button on the media center. 2. Note: While storing an MP3 disc, you can choose to store this information when they are burned onto...
uMusic®+ guide
Page 6
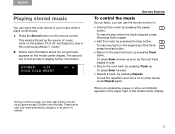
...off, and begins to display further information. Or press Seek forward. • Repeat a track, by pressing Track up. When you press play, pause, or stop button. STORED 3:38 u1 COLD COLD HEART *During continuous play only when selected by pressing the pause button. To halt the repetition and ... except Children's and Holiday. These tracks play , you can enjoy the wide variety of the track, press the play button. • Return to the previous track, by pressing Track down. The second line of a playlist. Notice that information about the current track appears on the...
...off, and begins to display further information. Or press Seek forward. • Repeat a track, by pressing Track up. When you press play, pause, or stop button. STORED 3:38 u1 COLD COLD HEART *During continuous play only when selected by pressing the pause button. To halt the repetition and ... except Children's and Holiday. These tracks play , you can enjoy the wide variety of the track, press the play button. • Return to the previous track, by pressing Track down. The second line of a playlist. Notice that information about the current track appears on the...
uMusic®+ guide
Page 7
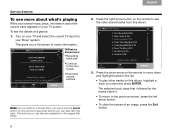
...press the left arrow button. • To clear the screen of music information. The actions you can take with this track. Don't Know Why (3:05) 2. uMusic: Now Playing Come Away With Me by the tracks below it. • To return to see what 's playing While your Bose...play other stored tracks from this album, highlight a track you a full screen of an image, press the Exit button. Feelin' The Same Way (2:55) 5. Turn on this album. uMusic: Now Playing 1. Cold Cold Heart (3:38) 4. Come Away With Me (3:18) 6. Lonestar (3:05) Elapsed Time 1:08/3:31 Navigate Actions...
...press the left arrow button. • To clear the screen of music information. The actions you can take with this track. Don't Know Why (3:05) 2. uMusic: Now Playing Come Away With Me by the tracks below it. • To return to see what 's playing While your Bose...play other stored tracks from this album, highlight a track you a full screen of an image, press the Exit button. Feelin' The Same Way (2:55) 5. Turn on this album. uMusic: Now Playing 1. Cold Cold Heart (3:38) 4. Come Away With Me (3:18) 6. Lonestar (3:05) Elapsed Time 1:08/3:31 Navigate Actions...

uMusic®+ guide
Page 8
...play, as shown below. This number appears on the media center display when any track from an MP3 disc. To turn off Shuffle, press again. • Repeat a track by pressing the Encore button. This tells the system to all the tracks on the media center display. To turn off Repeat.... The CD number applies to one album from the Music Library are playing. You can: • Play tracks randomly by pressing Playlist and a number button, 1-9, for this disc. Randomly playing Repeating the track Repeating selected tracks or a playlist *During continuous uMusic® or ...
...play, as shown below. This number appears on the media center display when any track from an MP3 disc. To turn off Shuffle, press again. • Repeat a track by pressing the Encore button. This tells the system to all the tracks on the media center display. To turn off Repeat.... The CD number applies to one album from the Music Library are playing. You can: • Play tracks randomly by pressing Playlist and a number button, 1-9, for this disc. Randomly playing Repeating the track Repeating selected tracks or a playlist *During continuous uMusic® or ...
uMusic®+ guide
Page 9
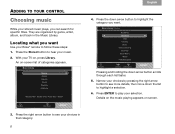
... Jazz Country Blues Easy Listening New Age Vocal Music World Folk/Bluegrass Navigate Actions Information Pressing and holding the down arrow button to highlight the category you want Use your Bose® remote to highlight a selection. 6. Music Library Genres Artists Albums Tracks Playlists ...uStations Albums 180 • Tracks 1642 • Total Time • 202:17 Navigate Information 3. An on screen. Press the right arrow button to hear...
... Jazz Country Blues Easy Listening New Age Vocal Music World Folk/Bluegrass Navigate Actions Information Pressing and holding the down arrow button to highlight the category you want Use your Bose® remote to highlight a selection. 6. Music Library Genres Artists Albums Tracks Playlists ...uStations Albums 180 • Tracks 1642 • Total Time • 202:17 Navigate Information 3. An on screen. Press the right arrow button to hear...

uMusic®+ guide
Page 10
...main list of options. Highlight the new genre for confirmation appears on screen. 5. A request for this album and press the ENTER button. This returns you can take. 3. Press the Guide button to see the list of actions you to the right genre and named as it appears in the...album genre 1. In the Music Library, highlight the album that you can : • Play all the tracks in a highlighted genre, album, or artist by pressing ENTER. If it is possible only when a left arrow button. English TAB 2 TAB 3 TAB 4 Choices in the Music Library When you locate a specific ...
...main list of options. Highlight the new genre for confirmation appears on screen. 5. A request for this album and press the ENTER button. This returns you can take. 3. Press the Guide button to see the list of actions you to the right genre and named as it appears in the...album genre 1. In the Music Library, highlight the album that you can : • Play all the tracks in a highlighted genre, album, or artist by pressing ENTER. If it is possible only when a left arrow button. English TAB 2 TAB 3 TAB 4 Choices in the Music Library When you locate a specific ...

uMusic®+ guide
Page 11
... system is spelled differently for an album 1. This returns you can take . 3. To change . 2. To change how the tracks from a stored album play - Press ENTER to complete your other genres as a linked unit. If there is also set to a previous screen. 10 TAB 4 TAB 3 TAB 2 English Linking or ...unlinking tracks You can take . 3. Press the Guide button to see both names listed in other albums or discs. Note: If the same artist name is set to change the artist...
... system is spelled differently for an album 1. This returns you can take . 3. To change . 2. To change how the tracks from a stored album play - Press ENTER to complete your other genres as a linked unit. If there is also set to a previous screen. 10 TAB 4 TAB 3 TAB 2 English Linking or ...unlinking tracks You can take . 3. Press the Guide button to see both names listed in other albums or discs. Note: If the same artist name is set to change the artist...
uMusic®+ guide
Page 12
... or all the tracks from an artist, album, or genre to each one. Edit Name Delete this Selection - Press the Guide button to see more details and narrow your choices. Press the down arrow button to highlight a category for a playlist Use the Music Library to locate the music you want.... 1. With your search. Press the right arrow button to move into that helps you narrow your music selection highlighted: 1. Music Library: Track Actions Play this Selection Add to...
... or all the tracks from an artist, album, or genre to each one. Edit Name Delete this Selection - Press the Guide button to see more details and narrow your choices. Press the down arrow button to highlight a category for a playlist Use the Music Library to locate the music you want.... 1. With your search. Press the right arrow button to move into that helps you narrow your music selection highlighted: 1. Music Library: Track Actions Play this Selection Add to...

uMusic®+ guide
Page 13
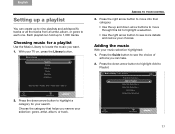
...TAB 8 TAB 7 TAB 6 TAB 5 ADDING TO YOUR CONTROL 3. Select the playlist you can press the right arrow to see the nine playlists. 4. Press the right arrow button to P1 Exercise A OK Navigate Information 6. Press the right arrow button to add the selection to the highlighted playlist. 12 TAB 4 TAB 3 TAB... to Playlist This Selection has been added to see the playlist contents, move down arrow button to highlight the playlist you want to hear and press the ENTER button to a previous screen. Listening to a Playlist P1 Exercise A P2 Jazz 1 P3 Jazz 2 P4 Jazz 3 P5 Exercise B P6 Jo...
...TAB 8 TAB 7 TAB 6 TAB 5 ADDING TO YOUR CONTROL 3. Select the playlist you can press the right arrow to see the nine playlists. 4. Press the right arrow button to P1 Exercise A OK Navigate Information 6. Press the right arrow button to add the selection to the highlighted playlist. 12 TAB 4 TAB 3 TAB... to Playlist This Selection has been added to see the playlist contents, move down arrow button to highlight the playlist you want to hear and press the ENTER button to a previous screen. Listening to a Playlist P1 Exercise A P2 Jazz 1 P3 Jazz 2 P4 Jazz 3 P5 Exercise B P6 Jo...

uMusic®+ guide
Page 14
...playlists you select, the the media center displays a notice and the system resumes continuous play resumes. Select Playlists from the Music Library main categories and press the right arrow button. 2. English TAB 2 TAB 3 TAB 4 When the playlist ends, uMusic® play of your stored music. While listening... to hear the last playlist selected. 2. By using a Personal® music center II to select a playlist, press the Playlist button, then press the Preset button to see the list of its number and name (up to 8 characters) appear on the remote to your stored ...
...playlists you select, the the media center displays a notice and the system resumes continuous play resumes. Select Playlists from the Music Library main categories and press the right arrow button. 2. English TAB 2 TAB 3 TAB 4 When the playlist ends, uMusic® play of your stored music. While listening... to hear the last playlist selected. 2. By using a Personal® music center II to select a playlist, press the Playlist button, then press the Preset button to see the list of its number and name (up to 8 characters) appear on the remote to your stored ...

uMusic®+ guide
Page 16
... Guide button to edit. 3. The blank moves left of the button. • To change to see the actions you can take. 4. Press the Library button on the remote: • Right, left, up, and down arrows to move around the keyboard and highlight characters. • ENTER to add .... • Left and down to the Special Characters keyboard and select the letter. • To save your additions or edits, move up to Save and press ENTER. • To exit the edit screen without saving, move up to the left and deletes a character for a Playlist or uStation name is 16 characters...
... Guide button to edit. 3. The blank moves left of the button. • To change to see the actions you can take. 4. Press the Library button on the remote: • Right, left, up, and down arrows to move around the keyboard and highlight characters. • ENTER to add .... • Left and down to the Special Characters keyboard and select the letter. • To save your additions or edits, move up to Save and press ENTER. • To exit the edit screen without saving, move up to the left and deletes a character for a Playlist or uStation name is 16 characters...