
The Bose® Lifestyle® amplifier - Owner's guide
Page 5
... Purchase date We suggest you have a dual voltage Lifestyle® amplifier 15 Powering-up the remote control 10 Setting Zone 2 Protocol 10 Connecting the Lifestyle® stereo amplifier to a Model 20 music center 11 Connecting the Lifestyle® stereo amplifier to a Model 5 music center 13 Connecting speakers to your Lifestyle® stereo amplifier 14 Checking to see if...
... Purchase date We suggest you have a dual voltage Lifestyle® amplifier 15 Powering-up the remote control 10 Setting Zone 2 Protocol 10 Connecting the Lifestyle® stereo amplifier to a Model 20 music center 11 Connecting the Lifestyle® stereo amplifier to a Model 5 music center 13 Connecting speakers to your Lifestyle® stereo amplifier 14 Checking to see if...

The Bose® Lifestyle® amplifier - Owner's guide
Page 9
...right) INPUT jack of the audio input cable, insert the 3.5 mm mini-plug into the L (left) INPUT jack. SPSEPAEKAEKREROOUUTPTUPUTSTS INPUT 30-ft audio input cable (supplied) AM262840_00_V.pdf January 4, 2002 7 Insert the single multi-pin connector at one of the unused ROOM ... R L SYSTEM RR CONTROL L R +- Setting Up Your Lifestyle® Stereo Amplifier Connecting the Lifestyle® stereo amplifier to a multi-room interface CAUTION: Before making any connections, turn the Lifestyle® system off and disconnect the music center from the AC (mains) power outlet.
...right) INPUT jack of the audio input cable, insert the 3.5 mm mini-plug into the L (left) INPUT jack. SPSEPAEKAEKREROOUUTPTUPUTSTS INPUT 30-ft audio input cable (supplied) AM262840_00_V.pdf January 4, 2002 7 Insert the single multi-pin connector at one of the unused ROOM ... R L SYSTEM RR CONTROL L R +- Setting Up Your Lifestyle® Stereo Amplifier Connecting the Lifestyle® stereo amplifier to a multi-room interface CAUTION: Before making any connections, turn the Lifestyle® system off and disconnect the music center from the AC (mains) power outlet.

The Bose® Lifestyle® amplifier - Owner's guide
Page 10
... room (the one used for a one-room system). The Personal music center allows you to control up the Personal music center for more information on operating your system in individual rooms. These rooms are connected to your Lifestyle® system owner's guide for the first time. If ...Figure 7 shows an example display for setting up to control more than one room of Bose® powered speakers placed in more than one room. Press the ROOM button to your system, the Personal music center displays ROOM and HOUSE buttons, and room indicators (A, B, C, and/or D). Note: ...
... room (the one used for a one-room system). The Personal music center allows you to control up the Personal music center for more information on operating your system in individual rooms. These rooms are connected to your Lifestyle® system owner's guide for the first time. If ...Figure 7 shows an example display for setting up to control more than one room of Bose® powered speakers placed in more than one room. Press the ROOM button to your system, the Personal music center displays ROOM and HOUSE buttons, and room indicators (A, B, C, and/or D). Note: ...

The Bose® Lifestyle® amplifier - Owner's guide
Page 13
...64257;er. 3. Insert the red RCA piggyback connector into the SPEAKER ZONES 2 output jack on the rear panel of the music center (Figure 10). 2. Lifestyle® stereo amplifier rear panel 4 Ω MINIMUM LL R L SYSTEM RR CONTROL L R +- Insert ...music center ® Figure 10 Cable connections between the Model 20 music center and the Lifestyle® stereo amplifier CAUTION: Before making connections, turn the Lifestyle® system off and disconnect the music center from the AC (mains) power outlet. SPEAKER OUTPUTS INPUT Model 20 music center rear panel 30...
...64257;er. 3. Insert the red RCA piggyback connector into the SPEAKER ZONES 2 output jack on the rear panel of the music center (Figure 10). 2. Lifestyle® stereo amplifier rear panel 4 Ω MINIMUM LL R L SYSTEM RR CONTROL L R +- Insert ...music center ® Figure 10 Cable connections between the Model 20 music center and the Lifestyle® stereo amplifier CAUTION: Before making connections, turn the Lifestyle® system off and disconnect the music center from the AC (mains) power outlet. SPEAKER OUTPUTS INPUT Model 20 music center rear panel 30...

The Bose® Lifestyle® amplifier - Owner's guide
Page 14
...20 music center, you need to set up the RC-20 remote control for more information on ). Make sure that the house code settings (switches 1, 2, 3, and 4) match those in more than one room. ON K40 l 2345678 12 January 4, 2002 AM262840_00_V.pdf Note: Refer to your Lifestyle&#...174; system owner's guide for Zone 2 If your first remote. 3. Remove the remote control battery cover and locate the miniature switches (Figure 11). 2. Setting Up Your Lifestyle® Stereo Amplifier Figure 11 Setting up a Zone...
...20 music center, you need to set up the RC-20 remote control for more information on ). Make sure that the house code settings (switches 1, 2, 3, and 4) match those in more than one room. ON K40 l 2345678 12 January 4, 2002 AM262840_00_V.pdf Note: Refer to your Lifestyle&#...174; system owner's guide for Zone 2 If your first remote. 3. Remove the remote control battery cover and locate the miniature switches (Figure 11). 2. Setting Up Your Lifestyle® Stereo Amplifier Figure 11 Setting up a Zone...

The Bose® Lifestyle® amplifier - Owner's guide
Page 15
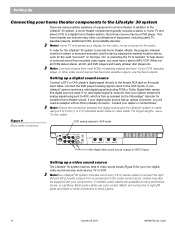
... IN 1.0A ANTENNA SEE INSTRUCTION MANUAL Fixed speaker outputs 30-ft audio input cable (supplied) Acoustimass module cable AM262840_00_V.pdf January 4, 2002 13 Setting Up Your Lifestyle® Stereo Amplifier Connecting the Lifestyle® stereo amplifier to a Model 5 music center In systems using a Model 5 music center, home theater speakers are connected to the FIXED OUTPUT...
... IN 1.0A ANTENNA SEE INSTRUCTION MANUAL Fixed speaker outputs 30-ft audio input cable (supplied) Acoustimass module cable AM262840_00_V.pdf January 4, 2002 13 Setting Up Your Lifestyle® Stereo Amplifier Connecting the Lifestyle® stereo amplifier to a Model 5 music center In systems using a Model 5 music center, home theater speakers are connected to the FIXED OUTPUT...

The Bose® Lifestyle® amplifier - Owner's guide
Page 16
...speaker cable to the SPEAKER OUTPUT R terminals (Figure 14). Setting Up Your Lifestyle® Stereo Amplifier ® Figure 13 RC-5 remote switch settings Setting up the RC-5 remote control If your system uses a Model 5 music center, you face it should always be connected to the positive (+ or red)... terminal. Slide switch 5 down (off) and 6 up a second RC-5 remote control to operate your Lifestyle® stereo amplifier CAUTION: DO NOT connect ...
...speaker cable to the SPEAKER OUTPUT R terminals (Figure 14). Setting Up Your Lifestyle® Stereo Amplifier ® Figure 13 RC-5 remote switch settings Setting up the RC-5 remote control If your system uses a Model 5 music center, you face it should always be connected to the positive (+ or red)... terminal. Slide switch 5 down (off) and 6 up a second RC-5 remote control to operate your Lifestyle® stereo amplifier CAUTION: DO NOT connect ...

The Bose® Lifestyle® amplifier - Owner's guide
Page 17
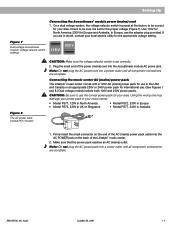
... if you own a 230V version, there is preset at the factory to 230V. ume to your Lifestyle® music system to an AC (mains) outlet. 3. Using the power cord included with your Personal® music center or your system CAUTION: DO NOT plug the AC power cord into the AC power jack on... the rear panel (Figure 15). 115 V Setting Up Your Lifestyle® Stereo Amplifier Checking to see if your unit has this switch...
... if you own a 230V version, there is preset at the factory to 230V. ume to your Lifestyle® music system to an AC (mains) outlet. 3. Using the power cord included with your Personal® music center or your system CAUTION: DO NOT plug the AC power cord into the AC power jack on... the rear panel (Figure 15). 115 V Setting Up Your Lifestyle® Stereo Amplifier Checking to see if your unit has this switch...

The Bose® Lifestyle® amplifier - Owner's guide
Page 18
...CD, AUX, etc.). Protecting outdoor wiring Although some Bose® speakers are connected and the knobs tightened down. You may become dusty over time. Troubleshooting If you do Neither speaker plays • Make sure the Lifestyle® music center and the amplifier are plugged in and ... ends of the speaker wire can be connected to the piggyback jacks on . • If using a Model 5 music center for correct phone numbers. Maintaining Your Lifestyle® Stereo Amplifier Cleaning the amplifier The amplifier, which is designed only for service, or contact...
...CD, AUX, etc.). Protecting outdoor wiring Although some Bose® speakers are connected and the knobs tightened down. You may become dusty over time. Troubleshooting If you do Neither speaker plays • Make sure the Lifestyle® music center and the amplifier are plugged in and ... ends of the speaker wire can be connected to the piggyback jacks on . • If using a Model 5 music center for correct phone numbers. Maintaining Your Lifestyle® Stereo Amplifier Cleaning the amplifier The amplifier, which is designed only for service, or contact...
Owner's guide
Page 2
... to alert the user to follow this owner's guide. The compact disc player should not be located on the back panel and bottom of your Lifestyle® music center and the bottom panel of your Acoustimass® module: The lightning flash with this owner's guide carefully. Please read this owner's guide Please take...
... to alert the user to follow this owner's guide. The compact disc player should not be located on the back panel and bottom of your Lifestyle® music center and the bottom panel of your Acoustimass® module: The lightning flash with this owner's guide carefully. Please read this owner's guide Please take...

Owner's guide
Page 5
...period ...35 Customer service ...35 Product Information Technical information 36 Accessories ...36 Index ...37 Bose® Corporation inside back cover For your Lifestyle® 30 system 22 Operating the special features 23 Chimes ...23 Listening to digital sound 24 Listening ... you begin ...4 Unpacking the carton 5 Selecting the locations for your Lifestyle® 30 Series II system 6 Connecting the speakers and Lifestyle® music center 9 Connecting your home theater components to the Lifestyle® 30 system 12 Connecting the antennas 16 Installing the batteries in the remote...
...period ...35 Customer service ...35 Product Information Technical information 36 Accessories ...36 Index ...37 Bose® Corporation inside back cover For your Lifestyle® 30 system 22 Operating the special features 23 Chimes ...23 Listening to digital sound 24 Listening ... you begin ...4 Unpacking the carton 5 Selecting the locations for your Lifestyle® 30 Series II system 6 Connecting the speakers and Lifestyle® music center 9 Connecting your home theater components to the Lifestyle® 30 system 12 Connecting the antennas 16 Installing the batteries in the remote...

Owner's guide
Page 6
Your system is fully compatible with digital program material and includes: • A Lifestyle® music center with built-in Dolby Digital decoding of movies at home is enhanced by a loud special effect (e.g., a crash or explosion). up...material from DVD, digital TV, next-generation cable boxes, and satellite receivers provides "5.1" capability - The result is especially useful for purchasing the Bose® Lifestyle® 30 Series II system. Compatibility Your system is equipped with : • Digital-audio bitstreams. Look for operating two listening zones • An easy-to ...
Your system is fully compatible with digital program material and includes: • A Lifestyle® music center with built-in Dolby Digital decoding of movies at home is enhanced by a loud special effect (e.g., a crash or explosion). up...material from DVD, digital TV, next-generation cable boxes, and satellite receivers provides "5.1" capability - The result is especially useful for purchasing the Bose® Lifestyle® 30 Series II system. Compatibility Your system is equipped with : • Digital-audio bitstreams. Look for operating two listening zones • An easy-to ...

Owner's guide
Page 7
...Bose dealer immediately. Notify Bose® or your system. Figure 1 What comes with your Lifestyle® 30 system contains the parts identified in the spaces provided on page 3. The original packing materials provide the safest way to be sure your Lifestyle® 30 Series II system: Acoustimass module • Lifestyle® music center...: To avoid danger of suffocation, keep plastic bags out of the reach of the music center. Note: Find the serial numbers on your Lifestyle® 30 system. AM199736_06_V.pdf Europe UK/Singapore October 28, 2001 Australia 5 Save all packing ...
...Bose dealer immediately. Notify Bose® or your system. Figure 1 What comes with your Lifestyle® 30 system contains the parts identified in the spaces provided on page 3. The original packing materials provide the safest way to be sure your Lifestyle® 30 Series II system: Acoustimass module • Lifestyle® music center...: To avoid danger of suffocation, keep plastic bags out of the reach of the music center. Note: Find the serial numbers on your Lifestyle® 30 system. AM199736_06_V.pdf Europe UK/Singapore October 28, 2001 Australia 5 Save all packing ...

Owner's guide
Page 10
...or near the corners of the audio input cable, speaker cables, and an AC power (mains) outlet. 4. Place the Acoustimass module within 30 feet (9.1 m) of the Acoustimass module (the length of the Acoustimass module. For proper ventilation, place it on either end, as the front...the long edge, with the connectors facing the floor. An alternate position is not an immediate risk to your dealer or call Bose®. 3. Music center Select a location for the Acoustimass module. Setting Up Figure 4 Acoustimass module positions Acoustimass® module Follow these guidelines to select ...
...or near the corners of the audio input cable, speaker cables, and an AC power (mains) outlet. 4. Place the Acoustimass module within 30 feet (9.1 m) of the Acoustimass module (the length of the Acoustimass module. For proper ventilation, place it on either end, as the front...the long edge, with the connectors facing the floor. An alternate position is not an immediate risk to your dealer or call Bose®. 3. Music center Select a location for the Acoustimass module. Setting Up Figure 4 Acoustimass module positions Acoustimass® module Follow these guidelines to select ...
Owner's guide
Page 11
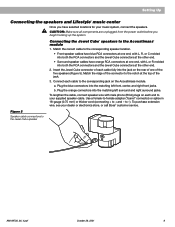
... at one end, with male phono (RCA) plugs on the Acoustimass module. Match the correct cable to + and - Setting Up Connecting the speakers and Lifestyle® music center Once you begin hooking up the system. CAUTION: Make sure all components are unplugged from the power outlet before you have blue RCA connectors at... mm2) or thicker cord (connecting + to the corresponding speaker location. • Front speaker cables have selected locations for your dealer or electronics store, or call Bose® customer service.
... at one end, with male phono (RCA) plugs on the Acoustimass module. Match the correct cable to + and - Setting Up Connecting the speakers and Lifestyle® music center Once you begin hooking up the system. CAUTION: Make sure all components are unplugged from the power outlet before you have blue RCA connectors at... mm2) or thicker cord (connecting + to the corresponding speaker location. • Front speaker cables have selected locations for your dealer or electronics store, or call Bose® customer service.
Owner's guide
Page 12
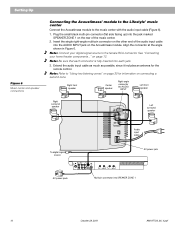
...30 for the remote control. Insert the single right-angle multi-pin connector on connecting a second zone. Extend the audio input cable as much as possible, since it includes an antenna for information on the other end of the music center. 2. Setting Up Figure 6 Music center... and speaker connections Connecting the Acoustimass® module to the Lifestyle® music center Connect the Acoustimass module to the female RCA connector. Note: Connect your home...
...30 for the remote control. Insert the single right-angle multi-pin connector on connecting a second zone. Extend the audio input cable as much as possible, since it includes an antenna for information on the other end of the music center. 2. Setting Up Figure 6 Music center... and speaker connections Connecting the Acoustimass® module to the Lifestyle® music center Connect the Acoustimass module to the female RCA connector. Note: Connect your home...
Owner's guide
Page 13
...switch is preset at the factory to be sure it is set correctly. 2. Plug the small end of the Lifestyle® music center. 2. Using the wrong one may damage your power pack or your music center. • Model PS71, 120V in North America • Model PS74, 230V in UK or Singapore •...all component connections are complete. On a dual voltage system, the voltage selector switch is set for the appropriate voltage setting. Connecting the music center AC (mains) power pack The Lifestyle® music center comes with a 120V AC (mains) power pack for use the adapter plug provided.
...switch is preset at the factory to be sure it is set correctly. 2. Plug the small end of the Lifestyle® music center. 2. Using the wrong one may damage your power pack or your music center. • Model PS71, 120V in North America • Model PS74, 230V in UK or Singapore •...all component connections are complete. On a dual voltage system, the voltage selector switch is set for the appropriate voltage setting. Connecting the music center AC (mains) power pack The Lifestyle® music center comes with a 120V AC (mains) power pack for use the adapter plug provided.
Owner's guide
Page 14
... to the female RCA jack on the tape, CD, or preceding the TV broadcast. Most audio cables are many electronics stores, or call Bose. Note:A mono TV only serves as a display for the audio. To hear stereo or surround sound from encoded video tapes, you will...a component to the AUX inputs. Connect the DVD player's analog signal output to the music center inputs. If your components. If your digital audio source has an optical connector, you must be a DVD player. Note:Your Lifestyle® 30 system includes one 6-foot (1.8 m) stereo cable to connect the right (R) and left ...
... to the female RCA jack on the tape, CD, or preceding the TV broadcast. Most audio cables are many electronics stores, or call Bose. Note:A mono TV only serves as a display for the audio. To hear stereo or surround sound from encoded video tapes, you will...a component to the AUX inputs. Connect the DVD player's analog signal output to the music center inputs. If your components. If your digital audio source has an optical connector, you must be a DVD player. Note:Your Lifestyle® 30 system includes one 6-foot (1.8 m) stereo cable to connect the right (R) and left ...

Owner's guide
Page 15
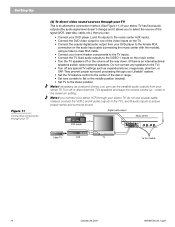
...stereo TV as expanded ster eo, mega-bass, phantom, or SAP. Do not connect any special TV settings such as the switching center to the Lifestyle® 30 system inputs DVD player L R V Music center Cable TV L TAPE IN RL R TAPE OUT L L R R V VCR To the module TV AM199736_06_V.pdf October 29, ...control panel. Setting Up How to -male RCA cable. It is best to connect components directly to the Lifestyle® 30 music center, and select the source from your DVD player to the female RCA connection on the music center. • Turn the TV speakers off any speakers to AUX.
...stereo TV as expanded ster eo, mega-bass, phantom, or SAP. Do not connect any special TV settings such as the switching center to the Lifestyle® 30 system inputs DVD player L R V Music center Cable TV L TAPE IN RL R TAPE OUT L L R R V VCR To the module TV AM199736_06_V.pdf October 29, ...control panel. Setting Up How to -male RCA cable. It is best to connect components directly to the Lifestyle® 30 music center, and select the source from your DVD player to the female RCA connection on the music center. • Turn the TV speakers off any speakers to AUX.
Owner's guide
Page 16
... on the audio input cable (connecting the music center with the module), using a male-to-male RCA cable. • Connect your stereo TV, do not use the variable audio outputs from your Lifestyle® system. • Set the TV balance control to the center of the signal (VCR, laser disc, cable..., etc.), then you to the VIDEO 1 inputs on the music center. • Turn the TV speakers off or disconnect the TV's...
... on the audio input cable (connecting the music center with the module), using a male-to-male RCA cable. • Connect your stereo TV, do not use the variable audio outputs from your Lifestyle® system. • Set the TV balance control to the center of the signal (VCR, laser disc, cable..., etc.), then you to the VIDEO 1 inputs on the music center. • Turn the TV speakers off or disconnect the TV's...


