
The Bose® Lifestyle® amplifier - Owner's guide
Page 5
... a multi-room interface 7 Connecting the Lifestyle® stereo amplifier to a Lifestyle® media center 9 Setting up the remote control 10 Setting Zone 2 Protocol 10 Connecting the Lifestyle® stereo amplifier to a Model 20 music center 11 Connecting the Lifestyle® stereo amplifier to a Model 5 music center 13 Connecting speakers to your Lifestyle® stereo amplifier 14 Checking...
... a multi-room interface 7 Connecting the Lifestyle® stereo amplifier to a Lifestyle® media center 9 Setting up the remote control 10 Setting Zone 2 Protocol 10 Connecting the Lifestyle® stereo amplifier to a Model 20 music center 11 Connecting the Lifestyle® stereo amplifier to a Model 5 music center 13 Connecting speakers to your Lifestyle® stereo amplifier 14 Checking...

The Bose® Lifestyle® amplifier - Owner's guide
Page 9
...CONTROL jack on the rear of the amplifier. 3. Figure 6 Cable connections between a multi-room interface and the Lifestyle® stereo amplifier Lifestyle® stereo amplifier rear panel Multi-room interface rear panel 4 Ω MINIMUM LL R L SYSTEM RR ...AM262840_00_V.pdf January 4, 2002 7 Setting Up Your Lifestyle® Stereo Amplifier Connecting the Lifestyle® stereo amplifier to a multi-room interface CAUTION: Before making any connections, turn the Lifestyle® system off and disconnect the music center from the AC (mains) power outlet. ...
...CONTROL jack on the rear of the amplifier. 3. Figure 6 Cable connections between a multi-room interface and the Lifestyle® stereo amplifier Lifestyle® stereo amplifier rear panel Multi-room interface rear panel 4 Ω MINIMUM LL R L SYSTEM RR ...AM262840_00_V.pdf January 4, 2002 7 Setting Up Your Lifestyle® Stereo Amplifier Connecting the Lifestyle® stereo amplifier to a multi-room interface CAUTION: Before making any connections, turn the Lifestyle® system off and disconnect the music center from the AC (mains) power outlet. ...

The Bose® Lifestyle® amplifier - Owner's guide
Page 10
... by the ROOM or HOUSE button 8 January 4, 2002 AM262840_00_V.pdf Setting Up Your Lifestyle® Stereo Amplifier Figure 7 Sample display for a tworoom system Operating speakers in other rooms with the Personal® music center Systems that share a source Press the HOUSE button to control all connected rooms...on operating your system in more than one room of Bose® powered speakers placed in individual rooms. These rooms are referred to as one The room indicators tell you what was selected by the Personal music center which requires no internal switch settings before it allows...
... by the ROOM or HOUSE button 8 January 4, 2002 AM262840_00_V.pdf Setting Up Your Lifestyle® Stereo Amplifier Figure 7 Sample display for a tworoom system Operating speakers in other rooms with the Personal® music center Systems that share a source Press the HOUSE button to control all connected rooms...on operating your system in more than one room of Bose® powered speakers placed in individual rooms. These rooms are referred to as one The room indicators tell you what was selected by the Personal music center which requires no internal switch settings before it allows...

The Bose® Lifestyle® amplifier - Owner's guide
Page 13
...fier rear panel 4 Ω MINIMUM LL R L SYSTEM RR CONTROL L R +- Setting Up Your Lifestyle® Stereo Amplifier Connecting the Lifestyle® stereo amplifier to a Model 20 music center ® Figure 10 Cable connections between the Model 20 music center and the Lifestyle® stereo amplifier CAUTION: Before making connections, turn the...
...fier rear panel 4 Ω MINIMUM LL R L SYSTEM RR CONTROL L R +- Setting Up Your Lifestyle® Stereo Amplifier Connecting the Lifestyle® stereo amplifier to a Model 20 music center ® Figure 10 Cable connections between the Model 20 music center and the Lifestyle® stereo amplifier CAUTION: Before making connections, turn the...

The Bose® Lifestyle® amplifier - Owner's guide
Page 14
... switches (Figure 11). 2. ON K40 l 2345678 12 January 4, 2002 AM262840_00_V.pdf Note: Refer to operate the ZONE 2 outputs. 1. Setting Up Your Lifestyle® Stereo Amplifier Figure 11 Setting up a Zone 2 remote control Setting up the RC-20 remote control for Zone 2 If your system uses a Model... 20 music center, you need to set up (on operating your system in your Lifestyle® system owner's guide for more than one room. Make sure that the house code settings (switches 1, 2, 3,...
... switches (Figure 11). 2. ON K40 l 2345678 12 January 4, 2002 AM262840_00_V.pdf Note: Refer to operate the ZONE 2 outputs. 1. Setting Up Your Lifestyle® Stereo Amplifier Figure 11 Setting up a Zone 2 remote control Setting up the RC-20 remote control for Zone 2 If your system uses a Model... 20 music center, you need to set up (on operating your system in your Lifestyle® system owner's guide for more than one room. Make sure that the house code settings (switches 1, 2, 3,...

The Bose® Lifestyle® amplifier - Owner's guide
Page 15
...;er into the L (left) FIXED OUTPUT jack. 5. Figure 12 Cable connections between the Model 5 music center and the Lifestyle® stereo amplifier Model 5 music center rear panel Lifestyle® stereo amplifier rear panel 4 Ω MINIMUM LL LL SYSTEM RR CONTROL R +- At... the other connections. Setting Up Your Lifestyle® Stereo Amplifier Connecting the Lifestyle® stereo amplifier to a Model 5 music center In systems using a Model 5 music center, home theater speakers are connected to the FIXED OUTPUT jacks on the ...
...;er into the L (left) FIXED OUTPUT jack. 5. Figure 12 Cable connections between the Model 5 music center and the Lifestyle® stereo amplifier Model 5 music center rear panel Lifestyle® stereo amplifier rear panel 4 Ω MINIMUM LL LL SYSTEM RR CONTROL R +- At... the other connections. Setting Up Your Lifestyle® Stereo Amplifier Connecting the Lifestyle® stereo amplifier to a Model 5 music center In systems using a Model 5 music center, home theater speakers are connected to the FIXED OUTPUT jacks on the ...

The Bose® Lifestyle® amplifier - Owner's guide
Page 16
...• Connect the left speaker cable to the negative (- Setting Up Your Lifestyle® Stereo Amplifier ® Figure 13 RC-5 remote switch settings Setting up the RC-5 remote control If your system uses a Model 5 music center, you face it should always be connected to the SPEAKER OUTPUT R ...on ). or black) terminal. ON K40 l 2345678 Connecting speakers to your Lifestyle® stereo amplifier CAUTION: DO NOT connect the amplifier to powered speakers of any amplified music sources. The plain wire should be connected to the SPEAKER OUTPUT L terminals ...
...• Connect the left speaker cable to the negative (- Setting Up Your Lifestyle® Stereo Amplifier ® Figure 13 RC-5 remote switch settings Setting up the RC-5 remote control If your system uses a Model 5 music center, you face it should always be connected to the SPEAKER OUTPUT R ...on ). or black) terminal. ON K40 l 2345678 Connecting speakers to your Lifestyle® stereo amplifier CAUTION: DO NOT connect the amplifier to powered speakers of any amplified music sources. The plain wire should be connected to the SPEAKER OUTPUT L terminals ...

The Bose® Lifestyle® amplifier - Owner's guide
Page 17
... your liking. If you have a dual voltage Lifestyle® amplifier • Dual voltage units have a voltage selection switch on the rear panel of the amplifier (Figure 16). 2. Select a music source with your Lifestyle® music system to 230V. Figure 16 Power cord connection ...on one end of the Lifestyle® stereo amplifier and your Lifestyle® stereo amplifier, firmly insert the small connector...
... your liking. If you have a dual voltage Lifestyle® amplifier • Dual voltage units have a voltage selection switch on the rear panel of the amplifier (Figure 16). 2. Select a music source with your Lifestyle® music system to 230V. Figure 16 Power cord connection ...on one end of the Lifestyle® stereo amplifier and your Lifestyle® stereo amplifier, firmly insert the small connector...

The Bose® Lifestyle® amplifier - Owner's guide
Page 18
...64257;rmly connected at hardware stores. You may become dusty over time. Troubleshooting If you do Neither speaker plays • Make sure the Lifestyle® music center and the amplifier are plugged in and turned on the audio input cable.) • Disconnect any solvents, chemicals, or... material, such as needed. Do not use any openings. This is especially true of the enclosure. If you have a problem operating your Bose dealer to spill into the FIXED OUTPUTs on page 14. 16 January 4, 2002 AM262840_00_V.pdf Check the caulking annually, and re-apply as ...
...64257;rmly connected at hardware stores. You may become dusty over time. Troubleshooting If you do Neither speaker plays • Make sure the Lifestyle® music center and the amplifier are plugged in and turned on the audio input cable.) • Disconnect any solvents, chemicals, or... material, such as needed. Do not use any openings. This is especially true of the enclosure. If you have a problem operating your Bose dealer to spill into the FIXED OUTPUTs on page 14. 16 January 4, 2002 AM262840_00_V.pdf Check the caulking annually, and re-apply as ...
Owner's guide
Page 2
... to wide slot, insert fully. These CAUTION marks are located on the system, is classified as marked on the back panel and bottom of your Lifestyle" music center and the bottom panel of your owner's guide for future reference. specified herein may be adjusted or repaired by anyone except properly qualified service...
... to wide slot, insert fully. These CAUTION marks are located on the system, is classified as marked on the back panel and bottom of your Lifestyle" music center and the bottom panel of your owner's guide for future reference. specified herein may be adjusted or repaired by anyone except properly qualified service...

Owner's guide
Page 3
... Fine-tuning your system Changing the house code settings Adding speakers Troubleshooting Warranty period Customer service Cleaning the Lifestyle' 3 music system Product Information Technical information Accessories Index Bose' Corporation 4 5 6 8 11 12 12 13 13 13 14 14 15 15 16 17 17 18 19 20 21 22 22... 22 23 23 24 inside back cover For your Lifestyle' 3 music system Connect the speakers and Lifestyle' music center Connecting other components to the Lifestyle' 3 music system Connect ...
... Fine-tuning your system Changing the house code settings Adding speakers Troubleshooting Warranty period Customer service Cleaning the Lifestyle' 3 music system Product Information Technical information Accessories Index Bose' Corporation 4 5 6 8 11 12 12 13 13 13 14 14 15 15 16 17 17 18 19 20 21 22 22... 22 23 23 24 inside back cover For your Lifestyle' 3 music system Connect the speakers and Lifestyle' music center Connecting other components to the Lifestyle' 3 music system Connect ...
Owner's guide
Page 4
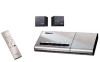
This complete audio system a offers superb sound, elegance, technology, and simplicity for music and home entertainmenW Your system includes: • A Lifestyle' music center with built-in AM/FM radio and compact disc (CD) player • Inputs for purchasing the Bose` Lifestyle's 3 music system. Setting Up Before youbegin Thank you for a video sound source, an auxiliary source, and a tape deck • Powered Acoustimasse speakers with a hide-away Acoustimass module • An easy-to-use remote control • • 4
This complete audio system a offers superb sound, elegance, technology, and simplicity for music and home entertainmenW Your system includes: • A Lifestyle' music center with built-in AM/FM radio and compact disc (CD) player • Inputs for purchasing the Bose` Lifestyle's 3 music system. Setting Up Before youbegin Thank you for a video sound source, an auxiliary source, and a tape deck • Powered Acoustimasse speakers with a hide-away Acoustimass module • An easy-to-use remote control • • 4

Owner's guide
Page 5
...; system CD Remote control Power cordandpack shown above are shown below. Use goodlifting practice to use . c Zs"' Europe 117;:tt.. Notify Bose° or your Lifestyle" 3 music system. Check to transport your authorized Bose dealer immediately. A WARNING: The Acoustimass module weighs 19 pounds (5.6 kg). andAustralia are USA/Canada versions. Figure What comes with your...
...; system CD Remote control Power cordandpack shown above are shown below. Use goodlifting practice to use . c Zs"' Europe 117;:tt.. Notify Bose° or your Lifestyle" 3 music system. Check to transport your authorized Bose dealer immediately. A WARNING: The Acoustimass module weighs 19 pounds (5.6 kg). andAustralia are USA/Canada versions. Figure What comes with your...

Owner's guide
Page 6
...most pleasing to you place your system" on page 23. Figure 2 Recommended speaker locations Left speaker Right speaker Acoustimass module • Contact Bose Customer Service (see "Fine-tuning your speakers according to the guidelines below. They can be sure toplace each one at the front edge of... cover). This effect is designed to provide a good stereo image when you . Setting Up 40 Select the locations for your Lifestyle° 3 music system Your Lifestyle system is minimizedif the shelves are magnetically shielded so you can place them close as 3 feet (1 m) or as far apart...
...most pleasing to you place your system" on page 23. Figure 2 Recommended speaker locations Left speaker Right speaker Acoustimass module • Contact Bose Customer Service (see "Fine-tuning your speakers according to the guidelines below. They can be sure toplace each one at the front edge of... cover). This effect is designed to provide a good stereo image when you . Setting Up 40 Select the locations for your Lifestyle° 3 music system Your Lifestyle system is minimizedif the shelves are magnetically shielded so you can place them close as 3 feet (1 m) or as far apart...
Owner's guide
Page 7
...2). 2. Place the module within 30 feet (9.1 m) of the Acoustimass module (the length of your dealer or call Bose. 3. For proper ventilation, place it on top of the audio input cable). Place the music center close enough to any two walls or from any additional sound sources (N, VCR, etc.) to allow furniture... or drapes to avoidplacing the music center directly on the long edge, with the proper operation of a CD player or tuner, you need additional audio and/or video cables to...
...2). 2. Place the module within 30 feet (9.1 m) of the Acoustimass module (the length of your dealer or call Bose. 3. For proper ventilation, place it on top of the audio input cable). Place the music center close enough to any two walls or from any additional sound sources (N, VCR, etc.) to allow furniture... or drapes to avoidplacing the music center directly on the long edge, with the proper operation of a CD player or tuner, you need additional audio and/or video cables to...
Owner's guide
Page 8
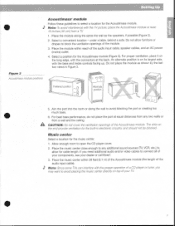
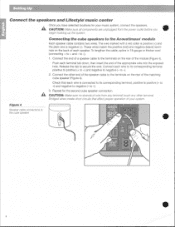
... to the Acoustimasse module Each speaker cable contains two wires. to -). 2. Connect the end of a speaker cable to the terminals on the rear of your music system, connect the speakers. Bridged wires create short circuits that each speaker. to -). 1. Repeat for your system. A CAUTION: Make sure no strands of each wire...
... to the Acoustimasse module Each speaker cable contains two wires. to -). 2. Connect the end of a speaker cable to the terminals on the rear of your music system, connect the speakers. Bridged wires create short circuits that each speaker. to -). 1. Repeat for your system. A CAUTION: Make sure no strands of each wire...

Owner's guide
Page 9
...as possible, since it includes an antenna for the remote control. Music center and speaker connections 110-120V 10 t CN` Connecting the Acoustimass° module to the Lifestyle' music center Connect the Acoustimass module to the music center with the audio input cable (Figure 5). 1. Insert the ...three connectors at one end of the audio input cable into the jacks on the rear panel of the music center: • Black connector...
...as possible, since it includes an antenna for the remote control. Music center and speaker connections 110-120V 10 t CN` Connecting the Acoustimass° module to the Lifestyle' music center Connect the Acoustimass module to the music center with the audio input cable (Figure 5). 1. Insert the ...three connectors at one end of the audio input cable into the jacks on the rear panel of the music center: • Black connector...
Owner's guide
Page 10
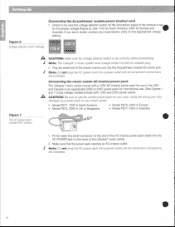
...voltage setting Figure 6 Voltage selector switch settings 115 V 230 V Figure 7 The AC power pack (model P371 shown) A CAUTION. Note: The Lifestyle• 3 music system dual voltage model includes an adapter plug. 2. Make sure that the power pack reaches an AC (mains) outlet. Check o be sure ... 1' Note: Do not plug the AC power cord into the AC POWER jack on the connection panel of the Lifestyle music center. 2. Connecting the music center AC (mains)powerpack The Lifestyle• music center comes with a 120V AC (mains) power pack for use . (See Figures 1 and 7.) Dual voltage ...
...voltage setting Figure 6 Voltage selector switch settings 115 V 230 V Figure 7 The AC power pack (model P371 shown) A CAUTION. Note: The Lifestyle• 3 music system dual voltage model includes an adapter plug. 2. Make sure that the power pack reaches an AC (mains) outlet. Check o be sure ... 1' Note: Do not plug the AC power cord into the AC POWER jack on the connection panel of the Lifestyle music center. 2. Connecting the music center AC (mains)powerpack The Lifestyle• music center comes with a 120V AC (mains) power pack for use . (See Figures 1 and 7.) Dual voltage ...

Owner's guide
Page 11
... to R (right) and black or white plug to L (left and right speakers then play video sound through the L andR connections). ii You can use the TV remote control to select the correct TV inputs (for the video (picture) signal. Connect the outputs from the VCR...connect a mono source. Other connections Tape deck To use one of your TV to the music center, be connected to the Lifestyle' music system. If you may need a phono preamplifier (with connecting other components to your Lifestyle" music system, matching the red connector to R (right) and white or black connector to L...
... to R (right) and black or white plug to L (left and right speakers then play video sound through the L andR connections). ii You can use the TV remote control to select the correct TV inputs (for the video (picture) signal. Connect the outputs from the VCR...connect a mono source. Other connections Tape deck To use one of your TV to the music center, be connected to the Lifestyle' music system. If you may need a phono preamplifier (with connecting other components to your Lifestyle" music system, matching the red connector to R (right) and white or black connector to L...
Owner's guide
Page 12
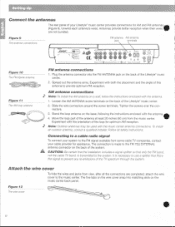
...provide better reception when their wires are completed, attach the wire cover to the FM 75U EXTERNAL antenna connector on the back of the Lifestyles' music center. 2. nectors. 3. Connecting to a cable radio signal To connect your system to provide optimum FM reception. It is 4. ... five tabs on the wire cover snap into the FM ANTENNA jack on a wall, follow the instructions enclosed with the orientation of the Lifestyle' music center. 2. Experiment with the antenna. 1. A CAUTION: Be certain that the installation includes a signal splitter so that filters the signal ...
...provide better reception when their wires are completed, attach the wire cover to the FM 75U EXTERNAL antenna connector on the back of the Lifestyles' music center. 2. nectors. 3. Connecting to a cable radio signal To connect your system to provide optimum FM reception. It is 4. ... five tabs on the wire cover snap into the FM ANTENNA jack on a wall, follow the instructions enclosed with the orientation of the Lifestyle' music center. 2. Experiment with the antenna. 1. A CAUTION: Be certain that the installation includes a signal splitter so that filters the signal ...


