
Multilingual Owners Guide
Page 2
...part of Conformity can be required to qualified service personnel. Only use caution when moving the cart/apparatus combination to the product; Use only with the apparatus. When a cart is damaged; F1 Model 812 Loudspeaker F1 Subwoofer 2 - The lightning flash with the limits for replacement of ...record the serial numbers of time. 14. Install in a commercial environment. liquid has been spilled or objects have any electronic products, use at www.Bose.com/compliance. You can cause a failure and/or a fire hazard. • Do not place any heat sources, such as ...
...part of Conformity can be required to qualified service personnel. Only use caution when moving the cart/apparatus combination to the product; Use only with the apparatus. When a cart is damaged; F1 Model 812 Loudspeaker F1 Subwoofer 2 - The lightning flash with the limits for replacement of ...record the serial numbers of time. 14. Install in a commercial environment. liquid has been spilled or objects have any electronic products, use at www.Bose.com/compliance. You can cause a failure and/or a fire hazard. • Do not place any heat sources, such as ...
Multilingual Owners Guide
Page 3
... Product Description...4 Features and Benefits...4 Carton Contents...4 F1 Model 812 Flexible Array Loudspeaker...5 F1 Subwoofer...5 Using the Flexible Array...6 Adjusting the array...6 Four coverage patterns...6 Applications...7 Setting Up the System Using the F1 Model 812 with the F1 Subwoofer...8 Using the F1 Model 812 on a Tripod Stand...9 Operation F1 Model 812 Control Panel...10 F1 Subwoofer Control Panel...11 Power On/Off Sequence...
... Product Description...4 Features and Benefits...4 Carton Contents...4 F1 Model 812 Flexible Array Loudspeaker...5 F1 Subwoofer...5 Using the Flexible Array...6 Adjusting the array...6 Four coverage patterns...6 Applications...7 Setting Up the System Using the F1 Model 812 with the F1 Subwoofer...8 Using the F1 Model 812 on a Tripod Stand...9 Operation F1 Model 812 Control Panel...10 F1 Subwoofer Control Panel...11 Power On/Off Sequence...

Multilingual Owners Guide
Page 6
Introduction Using the Flexible Array You can shape the coverage pattern by magnets that trigger internal sensors that adjust EQ according to array shape. Adjusting the array Pushing the array in Pulling the array out Four coverage patterns Straight pattern Pull top and bottom array out J pattern Pull top array out, push bottom array in . 6 - Push top and bottom array in . English Reverse-J pattern C pattern Push top array in place by moving the position of the top and bottom array. The array position is held in , pull bottom array out.
Introduction Using the Flexible Array You can shape the coverage pattern by magnets that trigger internal sensors that adjust EQ according to array shape. Adjusting the array Pushing the array in Pulling the array out Four coverage patterns Straight pattern Pull top and bottom array out J pattern Pull top array out, push bottom array in . 6 - Push top and bottom array in . English Reverse-J pattern C pattern Push top array in place by moving the position of the top and bottom array. The array position is held in , pull bottom array out.

Multilingual Owners Guide
Page 7
Introduction English - 7 Applications Straight pattern Use the straight pattern when the audience is standing and their heads are approximately at loudspeaker height and extends above the top of the loudspeaker. J ...pattern The J pattern works well when the loudspeaker is up on a raised stage and the audience is on the floor. C pattern Use the C pattern for an audience in an auditorium when the first row is seated below on the floor with the loudspeaker. Reverse-J pattern...
Introduction English - 7 Applications Straight pattern Use the straight pattern when the audience is standing and their heads are approximately at loudspeaker height and extends above the top of the loudspeaker. J ...pattern The J pattern works well when the loudspeaker is up on a raised stage and the audience is on the floor. C pattern Use the C pattern for an audience in an auditorium when the first row is seated below on the floor with the loudspeaker. Reverse-J pattern...
Multilingual Owners Guide
Page 8
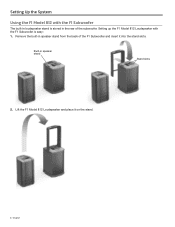
Built-in the rear of the F1 Subwoofer and insert it on the stand. 8 - Lift the F1 Model 812 Loudspeaker and place it into the stand slots. English Remove the built-in speaker stand from the back of the subwoofer. Setting up the F1 Model 812 Loudspeaker with the F1 Subwoofer The built-in loudspeaker stand is easy: 1. Setting Up the System Using the F1 Model 812 with the F1 Subwoofer is stored in speaker stand Stand slots 2.
Built-in the rear of the F1 Subwoofer and insert it on the stand. 8 - Lift the F1 Model 812 Loudspeaker and place it into the stand slots. English Remove the built-in speaker stand from the back of the subwoofer. Setting up the F1 Model 812 Loudspeaker with the F1 Subwoofer The built-in loudspeaker stand is easy: 1. Setting Up the System Using the F1 Model 812 with the F1 Subwoofer is stored in speaker stand Stand slots 2.
Multilingual Owners Guide
Page 9
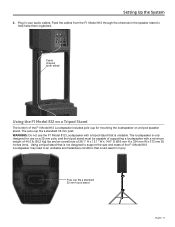
... tripod stand English - 9 The pole cup fits a standard 35 mm post. Plug in the speaker stand to help keep them organized. Cable channel (both sides) Using the F1 Model 812 on a Tripod Stand The bottom of 26.1" H x 13.1" W x 14.6" D (665 mm H x 334 mm W x 373 mm D) inches (mm). Setting Up ...the System 3. The loudspeaker is not designed to an unstable and hazardous condition that is unstable. Using a tripod stand that is only designed for use the F1 Model 812 Loudspeaker with a minimum weight of 44.5 lb (20.2 Kg) lbs and an overall size of the...
... tripod stand English - 9 The pole cup fits a standard 35 mm post. Plug in the speaker stand to help keep them organized. Cable channel (both sides) Using the F1 Model 812 on a Tripod Stand The bottom of 26.1" H x 13.1" W x 14.6" D (665 mm H x 334 mm W x 373 mm D) inches (mm). Setting Up ...the System 3. The loudspeaker is not designed to an unstable and hazardous condition that is unstable. Using a tripod stand that is only designed for use the F1 Model 812 Loudspeaker with a minimum weight of 44.5 lb (20.2 Kg) lbs and an overall size of the...
Multilingual Owners Guide
Page 10
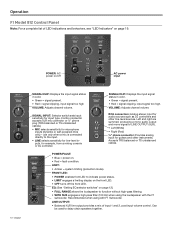
... cables. FRONT LED: • POWER enables front LED to function without high-pass filtering. • WITH SUB engages a high-pass filter (100 Hz) when using with the F1 subwoofer. LINE OUTPUT: • Balanced XLR line output provides a mix of LED indications and behaviors, see "LED Indicators" on . • Red = fault condition. English SIGNAL...
... cables. FRONT LED: • POWER enables front LED to function without high-pass filtering. • WITH SUB engages a high-pass filter (100 Hz) when using with the F1 subwoofer. LINE OUTPUT: • Balanced XLR line output provides a mix of LED indications and behaviors, see "LED Indicators" on . • Red = fault condition. English SIGNAL...
Multilingual Owners Guide
Page 11
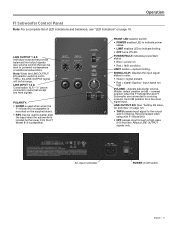
POLARITY: • NORM is used to indicate limiting. • OFF turns off switch. LIMIT: Amber = system limiting. Affects LINE OUTPUT signals only. POWER on/off LED. Operation F1 Subwoofer Control Panel Note: For a complete list of LED indications and behaviors, see "LED Indicators" on . • ...: When the LINE OUTPUT EQ selector switch is 0dB - Use 0dB position for a line-level signal input. AC input connector. English - 11 nominal position when the F1 Model 812 and F1 Subwoofer are connected to the output with F1 Model 812. • HPF passes input through a ...
POLARITY: • NORM is used to indicate limiting. • OFF turns off switch. LIMIT: Amber = system limiting. Affects LINE OUTPUT signals only. POWER on/off LED. Operation F1 Subwoofer Control Panel Note: For a complete list of LED indications and behaviors, see "LED Indicators" on . • ...: When the LINE OUTPUT EQ selector switch is 0dB - Use 0dB position for a line-level signal input. AC input connector. English - 11 nominal position when the F1 Model 812 and F1 Subwoofer are connected to the output with F1 Model 812. • HPF passes input through a ...
Multilingual Owners Guide
Page 12
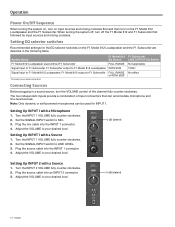
System Setup F1 Model 812 EQ Switch F1 Model 812 Loudspeaker used for the EQ selector switches on the F1 Model 812 Loudspeaker and the F1 Subwoofer. Setting Up INPUT 1 with a Source 1. Plug the mic cable into the INPUT 1 connector. 4. Plug the source cable into the... a sound source, turn the VOLUME control of input connectors that can be used without F1 Subwoofer FULL RANGE Signal input to F1 Subwoofer, F1 Subwoofer output to F1 Model 812 Loudspeaker WITH SUB Signal input to F1 Model 812 Loudspeaker, F1 Model 812 output to MIC. 3. Turn the INPUT 1 VOLUME fully counter-...
System Setup F1 Model 812 EQ Switch F1 Model 812 Loudspeaker used for the EQ selector switches on the F1 Model 812 Loudspeaker and the F1 Subwoofer. Setting Up INPUT 1 with a Source 1. Plug the mic cable into the INPUT 1 connector. 4. Plug the source cable into the... a sound source, turn the VOLUME control of input connectors that can be used without F1 Subwoofer FULL RANGE Signal input to F1 Subwoofer, F1 Subwoofer output to F1 Model 812 Loudspeaker WITH SUB Signal input to F1 Model 812 Loudspeaker, F1 Model 812 output to MIC. 3. Turn the INPUT 1 VOLUME fully counter-...
Multilingual Owners Guide
Page 13
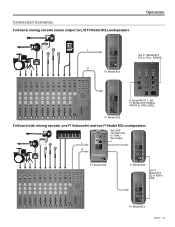
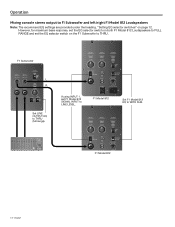
F1 Model 812 Full band with mixing console, one F1 Subwoofer and two F1 Model 812 Loudspeakers Set LINE OUTPUT EQ to FULL RANGE. Connection Scenarios Full band, mixing console stereo output to L/R F1 Model 812 Loudspeakers Operation L R F1 Model 812 Set F1 Model 812 EQ to THRU (full range). If using INPUT 1, set F1 Model 812 SIGNAL INPUT to WITH SUB. F1 Model 812 English - 13 L R F1 Subwoofer F1 Model 812 Set F1 Model 812 EQ to LINE LEVEL.
F1 Model 812 Full band with mixing console, one F1 Subwoofer and two F1 Model 812 Loudspeakers Set LINE OUTPUT EQ to FULL RANGE. Connection Scenarios Full band, mixing console stereo output to L/R F1 Model 812 Loudspeakers Operation L R F1 Model 812 Set F1 Model 812 EQ to THRU (full range). If using INPUT 1, set F1 Model 812 SIGNAL INPUT to WITH SUB. F1 Model 812 English - 13 L R F1 Subwoofer F1 Model 812 Set F1 Model 812 EQ to LINE LEVEL.
Multilingual Owners Guide
Page 14
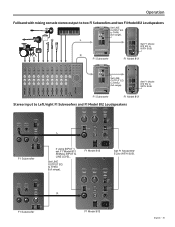
F1 Model 812 Set F1 Model 812 EQ to F1 Subwoofer and left/right F1 Model 812 Loudspeakers Note: The recommend EQ settings are provided under the heading, "Setting EQ selector switches" on page 12. F1 Model 812 14 - However, for maximum bass response, set the EQ selector switch on the F1 Subwoofer to THRU (full range). If using INPUT 1, set the EQ selector switch on both F1 Model 812 Loudspeakers to FULL RANGE and set F1 Model 812 SIGNAL INPUT to LINE LEVEL. Operation Mixing console stereo output to WITH SUB. F1 Subwoofer L R Set LINE OUTPUT EQ to THRU. English
F1 Model 812 Set F1 Model 812 EQ to F1 Subwoofer and left/right F1 Model 812 Loudspeakers Note: The recommend EQ settings are provided under the heading, "Setting EQ selector switches" on page 12. F1 Model 812 14 - However, for maximum bass response, set the EQ selector switch on the F1 Subwoofer to THRU (full range). If using INPUT 1, set the EQ selector switch on both F1 Model 812 Loudspeakers to FULL RANGE and set F1 Model 812 SIGNAL INPUT to LINE LEVEL. Operation Mixing console stereo output to WITH SUB. F1 Subwoofer L R Set LINE OUTPUT EQ to THRU. English
Multilingual Owners Guide
Page 15
.../right F1 Subwoofers and F1 Model 812 Loudspeakers L F1 Subwoofer If using INPUT 1, set F1 Model 812 SIGNAL INPUT to WITH SUB. F1 Model 812 Set F1 Model 812 EQ to LINE LEVEL. L Set F1 Model 812 EQ to THRU (full range). R F1 Subwoofer F1 Model 812 Set LINE OUTPUT EQ to WITH SUB. Set F1 Model 812 EQ to THRU (full range). R F1 Subwoofer F1 Model...
.../right F1 Subwoofers and F1 Model 812 Loudspeakers L F1 Subwoofer If using INPUT 1, set F1 Model 812 SIGNAL INPUT to WITH SUB. F1 Model 812 Set F1 Model 812 EQ to LINE LEVEL. L Set F1 Model 812 EQ to THRU (full range). R F1 Subwoofer F1 Model 812 Set LINE OUTPUT EQ to WITH SUB. Set F1 Model 812 EQ to THRU (full range). R F1 Subwoofer F1 Model...
Multilingual Owners Guide
Page 18
... • If using the F1 Model 812 Loudspeaker without the F1 Subwoofer, make sure the EQ switch is set to FULL RANGE. • If using a vocal effects processor, make sure the subwoofer is plugged into both the F1 Model 812 Loudspeaker and the AC outlet. • Make sure you have power at www.Bose.com/livesound. Microphone...
... • If using the F1 Model 812 Loudspeaker without the F1 Subwoofer, make sure the EQ switch is set to FULL RANGE. • If using a vocal effects processor, make sure the subwoofer is plugged into both the F1 Model 812 Loudspeaker and the AC outlet. • Make sure you have power at www.Bose.com/livesound. Microphone...

Multilingual Owners Guide
Page 19
Lines that are not completely connected could create noise. • If using a mixing console, external source or receiving input from the F1 Subwoofer, make sure that all signal-carrying cables away from AC power cords. • Light dimmers can cause hum in loudspeaker systems. To avoid this ...by muting channels. English - 19 If the hum goes away, replace the cable at www.Bose.com/register or call (877) 335-2673. LED Indicators The following table describes LED behavior on the F1 Model 812 Loudspeaker is set to desired level Reduce volume or source input level None Turn ...
Lines that are not completely connected could create noise. • If using a mixing console, external source or receiving input from the F1 Subwoofer, make sure that all signal-carrying cables away from AC power cords. • Light dimmers can cause hum in loudspeaker systems. To avoid this ...by muting channels. English - 19 If the hum goes away, replace the cable at www.Bose.com/register or call (877) 335-2673. LED Indicators The following table describes LED behavior on the F1 Model 812 Loudspeaker is set to desired level Reduce volume or source input level None Turn ...


