Owner's guide
Page 2
... EsDpeauñtoscl h English SAFETY INFORMATION Please read this guide Please take the time to the system or accessories. The interface module is used without prior written permission. As with any part of important operating and maintenance instructions in this work may be ...ºF), or incinerate. Do not incinerate. CineMate series II remote-Replace only with liquids, such as marked on the system, is located on boats. Please dispose of electrical shock. Note: This product must be found at www.Bose.com/static/compliance/index.html. For your records...
... EsDpeauñtoscl h English SAFETY INFORMATION Please read this guide Please take the time to the system or accessories. The interface module is used without prior written permission. As with any part of important operating and maintenance instructions in this work may be ...ºF), or incinerate. Do not incinerate. CineMate series II remote-Replace only with liquids, such as marked on the system, is located on boats. Please dispose of electrical shock. Note: This product must be found at www.Bose.com/static/compliance/index.html. For your records...

Owner's guide
Page 3
... Acoustimass® module 7 3 Connecting the interface module 9 4 Connecting the TV audio to the interface module 10 Connecting optical audio 10 Connecting analog audio 11 Turning off the TV internal speakers 11 5 Connecting to a power outlet 12 6 Inserting the CineMate® GS remote batteries . . 14 CONTROLS AND INDICATORS 15 Acoustimass® module bass control 15 CineMate® series II remote control...
... Acoustimass® module 7 3 Connecting the interface module 9 4 Connecting the TV audio to the interface module 10 Connecting optical audio 10 Connecting analog audio 11 Turning off the TV internal speakers 11 5 Connecting to a power outlet 12 6 Inserting the CineMate® GS remote batteries . . 14 CONTROLS AND INDICATORS 15 Acoustimass® module bass control 15 CineMate® series II remote control...
Owner's guide
Page 4
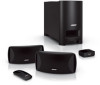
... control. • CineMate GS series II - Both configurations include an attractive floor-standing Acoustimass® module for bold 3-D effects and movie-like realism from a modest array of DVDs and other exciting home entertainment. Using our TrueSpace® signal processing technology, the CineMate system speakers provide improved spaciousness for deep bass sound and an interface module that provides...
... control. • CineMate GS series II - Both configurations include an attractive floor-standing Acoustimass® module for bold 3-D effects and movie-like realism from a modest array of DVDs and other exciting home entertainment. Using our TrueSpace® signal processing technology, the CineMate system speakers provide improved spaciousness for deep bass sound and an interface module that provides...
Owner's guide
Page 5
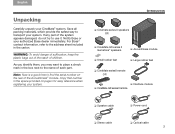
... to transport your system. ❏ Cinemate series II speakers OR ❏ CineMate GS series II Gemstone® speakers ❏ Small rubber feet ❏ Acoustimass module ❏ Large rubber feet ❏ CineMate series II remote OR ❏ Interface module ❏ CineMate GS series II remote ❏ Speaker cable ❏ Power cord ❏ Stereo cable ❏ Optical cable 3 Notify Bose or your CineMate® system. As you identify them...
... to transport your system. ❏ Cinemate series II speakers OR ❏ CineMate GS series II Gemstone® speakers ❏ Small rubber feet ❏ Acoustimass module ❏ Large rubber feet ❏ CineMate series II remote OR ❏ Interface module ❏ CineMate GS series II remote ❏ Speaker cable ❏ Power cord ❏ Stereo cable ❏ Optical cable 3 Notify Bose or your CineMate® system. As you identify them...
Owner's guide
Page 6
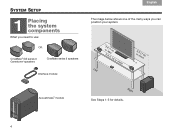
OR CineMate® GS series II Gemstone® speakers CineMate series II speakers Interface module o33rffltet(s(11smm)) or more Left 3 or mft o(1rem) Acoustimass® module Right See Steps 1-5 for details. 4 SYSTEM SETUP 1 Placing the system components What you need to use: Svenska Nederlands FItralniaçnaois DEsepuatsñcohl English The image below shows one of the many ways you can position your system.
OR CineMate® GS series II Gemstone® speakers CineMate series II speakers Interface module o33rffltet(s(11smm)) or more Left 3 or mft o(1rem) Acoustimass® module Right See Steps 1-5 for details. 4 SYSTEM SETUP 1 Placing the system components What you need to use: Svenska Nederlands FItralniaçnaois DEsepuatsñcohl English The image below shows one of the many ways you can position your system.
Owner's guide
Page 7
...performance • hidden under a table, behind a sofa or chair, or behind drapes as preferred • NOT in mind that the Acoustimass module is the only part of this system that connects to them • within reach of the cable from audio or video tapes to prevent magnetic...openings on a surface that can block the ventilation openings. SYSTEM SETUP 4. Place the left and right speakers: • at least 2.5 feet (.8 meters) from the interface module and an AC (mains) power outlet • with the screen • at least 3 feet (1 meter) apart • within 3 feet (1 meter) of ...
...performance • hidden under a table, behind a sofa or chair, or behind drapes as preferred • NOT in mind that the Acoustimass module is the only part of this system that connects to them • within reach of the cable from audio or video tapes to prevent magnetic...openings on a surface that can block the ventilation openings. SYSTEM SETUP 4. Place the left and right speakers: • at least 2.5 feet (.8 meters) from the interface module and an AC (mains) power outlet • with the screen • at least 3 feet (1 meter) apart • within 3 feet (1 meter) of ...
Owner's guide
Page 8
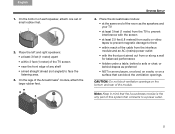
... shelf, make sure the front edge of the shelf. Note: The remote should have a clear line of the interface module. Peel the protective film off the speaker system. 5. Place the interface module: • on a flat surface near the TV and other home theater equipment • within 15 feet (4.6 ...shelf, so the shelf does not block signals from the remote control and provides audio input connections for the CineMate® system. CAUTION: When positioning the interface module, avoid blocking any ventilation openings on the front of sight to turn the speakers on, change the volume,...
... shelf, make sure the front edge of the shelf. Note: The remote should have a clear line of the interface module. Peel the protective film off the speaker system. 5. Place the interface module: • on a flat surface near the TV and other home theater equipment • within 15 feet (4.6 ...shelf, so the shelf does not block signals from the remote control and provides audio input connections for the CineMate® system. CAUTION: When positioning the interface module, avoid blocking any ventilation openings on the front of sight to turn the speakers on, change the volume,...
Owner's guide
Page 11
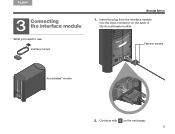
What you need to use: Interface module Fastener screws Acoustimass® module 2. Insert the plug from the interface module into the input connector on the next page. 9 Continue with 4 on the back of the Acoustimass module. English DEsepuatsñcohl FItralniaçnaois Nederlands Svenska SYSTEM SETUP 3 Connecting the interface module 1.
What you need to use: Interface module Fastener screws Acoustimass® module 2. Insert the plug from the interface module into the input connector on the next page. 9 Continue with 4 on the back of the Acoustimass module. English DEsepuatsñcohl FItralniaçnaois Nederlands Svenska SYSTEM SETUP 3 Connecting the interface module 1.
Owner's guide
Page 12
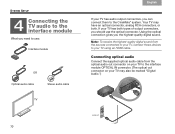
...English SYSTEM SETUP 4 Connecting the TV audio to the interface module What you need to use the optical connector. Note: To receive the highest-quality digital sound from the optical audio out connector on your TV to the CineMate® system. Connecting optical audio Connect the supplied optical... audio cable from the sources connected to your TV, connect those devices to your TV has audio output connectors, you can connect them to the interface module OPTICAL IN connector. (The ...
...English SYSTEM SETUP 4 Connecting the TV audio to the interface module What you need to use the optical connector. Note: To receive the highest-quality digital sound from the optical audio out connector on your TV to the CineMate® system. Connecting optical audio Connect the supplied optical... audio cable from the sources connected to your TV, connect those devices to your TV has audio output connectors, you can connect them to the interface module OPTICAL IN connector. (The ...
Owner's guide
Page 13
...audio cable has two RCA connectors at each end, one red and one white. To enjoy the full benefit of hearing TV audio through the CineMate® system, the internal speakers in the setup menu of TVs. Locate the menu item to turn your speakers on or off . Be ... . If your TV provides both optical and analog connectors to accommodate a variety of your TV remote to left (L) and right (R) audio outputs on the interface module, the analog input cannot be turned off and select Off. Using a TV setup menu 1. Turning off the TV internal speakers Newer TVs normally have a speaker...
...audio cable has two RCA connectors at each end, one red and one white. To enjoy the full benefit of hearing TV audio through the CineMate® system, the internal speakers in the setup menu of TVs. Locate the menu item to turn your speakers on or off . Be ... . If your TV provides both optical and analog connectors to accommodate a variety of your TV remote to left (L) and right (R) audio outputs on the interface module, the analog input cannot be turned off and select Off. Using a TV setup menu 1. Turning off the TV internal speakers Newer TVs normally have a speaker...
Owner's guide
Page 15
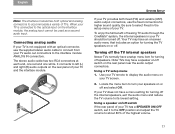
Voltage variations and spikes can damage electronic components in any system. 13 Continue with 6 on the front of the interface module flashes for 10 seconds, then extinguishes, indicating that the system has been connected to power. English DEsepuatsñcohl FItralnia&#... press the remote control On-Off, Volume Up/ Down, or Mute button, the green LED on all electronic equipment. CAUTION: Bose recommends using a safety agencyapproved surge protector on the interface module flashes. When you connect the CineMate® system to a power source, the green LED on the next page.
Voltage variations and spikes can damage electronic components in any system. 13 Continue with 6 on the front of the interface module flashes for 10 seconds, then extinguishes, indicating that the system has been connected to power. English DEsepuatsñcohl FItralnia&#... press the remote control On-Off, Volume Up/ Down, or Mute button, the green LED on all electronic equipment. CAUTION: Bose recommends using a safety agencyapproved surge protector on the interface module flashes. When you connect the CineMate® system to a power source, the green LED on the next page.
Owner's guide
Page 18
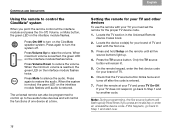
Press Volume Down to silence the audio. Using the remote to control the CineMate system When you point the remote control at the interface module and press a button, the green LED on the interface module flashes twice. Note: The CineMate series II remote control only operates your system on and off . Press Mute to reduce the volume. Press On...
Press Volume Down to silence the audio. Using the remote to control the CineMate system When you point the remote control at the interface module and press a button, the green LED on the interface module flashes twice. Note: The CineMate series II remote control only operates your system on and off . Press Mute to reduce the volume. Press On...
Owner's guide
Page 20
...INDICATORS Using the remote to control the CineMate® system When you point the remote control at a time. When the minimum volume is reached, the green LED on the remote until audio is entered. 7. When the system is muted, the green LED on the interface module flashes until all five source buttons ... remote at your TV and other devices To use the remote with the first one device at the interface module and press the On-Off, Volume, or Mute button, the green LED on the CineMate speaker system. Press On-Off to five audio/video devices and will control the functions of TV. 6. ...
...INDICATORS Using the remote to control the CineMate® system When you point the remote control at a time. When the minimum volume is reached, the green LED on the remote until audio is entered. 7. When the system is muted, the green LED on the interface module flashes until all five source buttons ... remote at your TV and other devices To use the remote with the first one device at the interface module and press the On-Off, Volume, or Mute button, the green LED on the CineMate speaker system. Press On-Off to five audio/video devices and will control the functions of TV. 6. ...
Owner's guide
Page 21
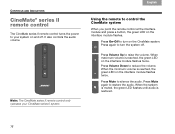
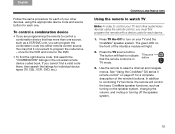
... will light. 2. Using the remote to watch TV Note: In order to control your TV and the CineMate® speaker system. See "Using the CineMate® GS series II remote control" on the front of the remote's buttons. English DEsepuatsñcohl FItralniaçnaois Nederlands Svenska...devices, using the remote control, you must first program the remote with a device code for a complete description of the interface module will control the basic CineMate speaker functions, such as a VCR/DVD unit, you can program the combination code into either remote control source. You may...
... will light. 2. Using the remote to watch TV Note: In order to control your TV and the CineMate® speaker system. See "Using the CineMate® GS series II remote control" on the front of the remote's buttons. English DEsepuatsñcohl FItralniaçnaois Nederlands Svenska...devices, using the remote control, you must first program the remote with a device code for a complete description of the interface module will control the basic CineMate speaker functions, such as a VCR/DVD unit, you can program the combination code into either remote control source. You may...

Owner's guide
Page 22
... English CONTROLS AND INDICATORS Using the remote to watch . The green LED on the front of the interface module will always control the basic CineMate speaker functions (on your TV and the CineMate® speaker system. In addition to controlling DVD functions, the remote will flash to indicate that corresponds...commonly labeled TV, Video 1, Video 2, and AUX on page 21 for each device. 1. Press the DVD source button. See "Using the CineMate® GS series II remote control" on the back of the remote buttons. Press DVD On-Off to control play options and navigate DVD menus.
... English CONTROLS AND INDICATORS Using the remote to watch . The green LED on the front of the interface module will always control the basic CineMate speaker functions (on your TV and the CineMate® speaker system. In addition to controlling DVD functions, the remote will flash to indicate that corresponds...commonly labeled TV, Video 1, Video 2, and AUX on page 21 for each device. 1. Press the DVD source button. See "Using the CineMate® GS series II remote control" on the back of the remote buttons. Press DVD On-Off to control play options and navigate DVD menus.

Owner's guide
Page 28
... your speakers, Acoustimass® module, and interface module with the + and - Be sure to the regulations in your area. 3. Battery compartment cover 26 Insert two AA (IEC-R6) 1.5V batteries, or the equivalent. Svenska Nederlands FItralniaçnaois DEsepuatsñcohl English CARE AND MAINTENANCE Replacing the CineMate® GS series II remote batteries Replace both...
... your speakers, Acoustimass® module, and interface module with the + and - Be sure to the regulations in your area. 3. Battery compartment cover 26 Insert two AA (IEC-R6) 1.5V batteries, or the equivalent. Svenska Nederlands FItralniaçnaois DEsepuatsñcohl English CARE AND MAINTENANCE Replacing the CineMate® GS series II remote batteries Replace both...
Owner's guide
Page 29
...both firmly connected to the Acoustimass module. • Check the connections on . • Increase the volume. • If your TV owner's guide for the source you want to hear. • Check to see if the TV is muted. See your system is a CineMate GS series II, make sure you use the remote... control to power on the system. • Make sure the CineMate® system is turned on the front of the interface module should flash 10 times, then extinguish (the system will then be ...
...both firmly connected to the Acoustimass module. • Check the connections on . • Increase the volume. • If your TV owner's guide for the source you want to hear. • Check to see if the TV is muted. See your system is a CineMate GS series II, make sure you use the remote... control to power on the system. • Make sure the CineMate® system is turned on the front of the interface module should flash 10 times, then extinguish (the system will then be ...
Owner's guide
Page 30
... are secure. • Reduce the audio output level from the TV connected to the interface module. Refer to the address sheet included with the CineMate system. 28 Sound is distorted • Make sure speaker cables are not damaged and ... Make sure the protective film is removed from the lens on the front of the interface module. • Check that the source button on the CineMate® GS series II remote flashes when a button is pressed. • Check that the correct TV/Video... check the device for your device and brand in solving problems, contact Bose® Customer Service.
... are secure. • Reduce the audio output level from the TV connected to the interface module. Refer to the address sheet included with the CineMate system. 28 Sound is distorted • Make sure speaker cables are not damaged and ... Make sure the protective film is removed from the lens on the front of the interface module. • Check that the source button on the CineMate® GS series II remote flashes when a button is pressed. • Check that the correct TV/Video... check the device for your device and brand in solving problems, contact Bose® Customer Service.


