
Owner's guide
Page 5
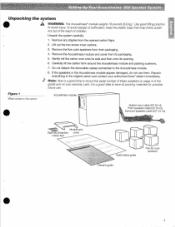
...cube speakers from the opened carton flaps. 2. Remove the Acoustimass module end cover from around the Acoustimass module and packing cushions. 7. Repack wr everything in the carton Acoustimass module System input cable (20' [6 ml) Front speakers cable (20' [6 mD Surround speakers cable (50' [15 mj) -lam sseozs- It is ...idea to the Acoustimass module. 8. Figure 1 What comes in the original carton and contact your warranty card. ers out of the reach of suffocation, keep the plastic bags that wrap these speakers on page 3 of this guide and on your authorized Bose° dealer ...
...cube speakers from the opened carton flaps. 2. Remove the Acoustimass module end cover from around the Acoustimass module and packing cushions. 7. Repack wr everything in the carton Acoustimass module System input cable (20' [6 ml) Front speakers cable (20' [6 mD Surround speakers cable (50' [15 mj) -lam sseozs- It is ...idea to the Acoustimass module. 8. Figure 1 What comes in the original carton and contact your warranty card. ers out of the reach of suffocation, keep the plastic bags that wrap these speakers on page 3 of this guide and on your authorized Bose° dealer ...
Owner's guide
Page 6
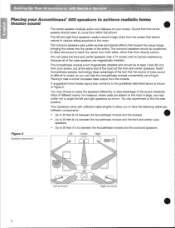
...Bose Acoustimass speaker technology takes advantage of the fact that conforms to the guidelines described above is not magnetically shielded and should be positioned to allow you to have the following distances between components: • • Up to 20 feet (6 m) between the Acoustimass...(15 m) between the Acoustimass module and the surround speakers. Setting Up Your Acoustimass 600Speaker System Placing your Acoustimass® 600 speakers to achieve realistic home...of sight. Placing it near a TV screen with sufficient cable lengths to allow the sound to take advantage of the...
...Bose Acoustimass speaker technology takes advantage of the fact that conforms to the guidelines described above is not magnetically shielded and should be positioned to allow you to have the following distances between components: • • Up to 20 feet (6 m) between the Acoustimass...(15 m) between the Acoustimass module and the surround speakers. Setting Up Your Acoustimass 600Speaker System Placing your Acoustimass® 600 speakers to achieve realistic home...of sight. Placing it near a TV screen with sufficient cable lengths to allow the sound to take advantage of the...

Owner's guide
Page 7
...stands can cause the cube speakers to your N, at least 6 feet (2 m), or as much as you are marked UR (Figure 3). Optional Bose° extension cable, add-on the back of a center or surround cube speaker Center cube speaker Select one speaker with a gray terminal marked C/S as possible, for... (see listings on -screen imaging. • Keep it as close to come from within the picture. There are several ways to your Acoustimass° 600 system provide a great deal of flexibility in line with the horizontal center of the screen for the best sound balance (position 1). Adjust them...
...stands can cause the cube speakers to your N, at least 6 feet (2 m), or as much as you are marked UR (Figure 3). Optional Bose° extension cable, add-on the back of a center or surround cube speaker Center cube speaker Select one speaker with a gray terminal marked C/S as possible, for... (see listings on -screen imaging. • Keep it as close to come from within the picture. There are several ways to your Acoustimass° 600 system provide a great deal of flexibility in line with the horizontal center of the screen for the best sound balance (position 1). Adjust them...
Owner's guide
Page 8
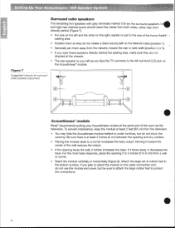
... interference, keep the module at the same end of the room as you face the N connects to stand the module on the cable connection end, do not use the module end cover, but do not create a direct sound path to 8 cm) from directly behind... • Stand the module vertically or horizontally (Figure 8). Figure 7 Suggested choices for surround H (rear) speaker placement 0 0 0 • Acoustimass• module Bose• recommends putting your left and the other on the Acoustimasse module. seating area. • Position them away from the television. • You may hide the...
... interference, keep the module at the same end of the room as you face the N connects to stand the module on the cable connection end, do not use the module end cover, but do not create a direct sound path to 8 cm) from directly behind... • Stand the module vertically or horizontally (Figure 8). Figure 7 Suggested choices for surround H (rear) speaker placement 0 0 0 • Acoustimass• module Bose• recommends putting your left and the other on the Acoustimasse module. seating area. • Position them away from the television. • You may hide the...
Owner's guide
Page 9
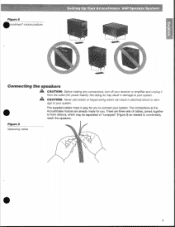
The connections at the Acoustimass module are three sets of cables, joined together to form ribbons, which can result in damage to connect your system. age to your system. • The supplied cables make it from the outlet (AC power mains). Not doing so may be... CAUTION: Never use broken or frayed wiring which may result in electricalshock or dam- Figure 9 Separating cables //' Figure 8 •oustimasc module positions Setting Up Your Acoustimass 600 Speaker System Connecting the speakers CAUTION: Before making any connections, turn off your receiver or amplifier and ...
The connections at the Acoustimass module are three sets of cables, joined together to form ribbons, which can result in damage to connect your system. age to your system. • The supplied cables make it from the outlet (AC power mains). Not doing so may be... CAUTION: Never use broken or frayed wiring which may result in electricalshock or dam- Figure 9 Separating cables //' Figure 8 •oustimasc module positions Setting Up Your Acoustimass 600 Speaker System Connecting the speakers CAUTION: Before making any connections, turn off your receiver or amplifier and ...

Owner's guide
Page 10
... wires to connect the Acoustimass module to the left and right surround cube speakers. • Use the 20 foot (6 m) system input cable with five pairs of cable joined, making them easier to reach the connectors. A 8 e V a4 SURROUND MERCERS po*R con • I System input cable RS LS Surround speakers cable • 10 Bose Customer Service telephone numbers...
... wires to connect the Acoustimass module to the left and right surround cube speakers. • Use the 20 foot (6 m) system input cable with five pairs of cable joined, making them easier to reach the connectors. A 8 e V a4 SURROUND MERCERS po*R con • I System input cable RS LS Surround speakers cable • 10 Bose Customer Service telephone numbers...
Owner's guide
Page 11
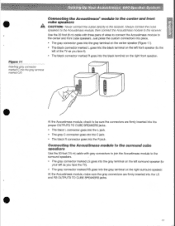
... LS goes into the gray terminal on the left surround speaker (to your left of wires to connect the Acoustimass module to the surround cube speakers Use the 50 foot (15 m) cable with three pairs of the TV as you face it). • The black connector marked R goes into ...the C jack. • The black R connector goes into the LS and RS OUTPUTS TO CUBE SPEAKERS jacks. 11 Setting Up Your Acoustimass 600 Speaker System • Connecting the Acoustimass® module to the center and front cube speakers A CAUTION: Never connect the cubes directly to the receiver. Always connect the cube...
... LS goes into the gray terminal on the left surround speaker (to your left of wires to connect the Acoustimass module to the surround cube speakers Use the 50 foot (15 m) cable with three pairs of the TV as you face it). • The black connector marked R goes into ...the C jack. • The black R connector goes into the LS and RS OUTPUTS TO CUBE SPEAKERS jacks. 11 Setting Up Your Acoustimass 600 Speaker System • Connecting the Acoustimass® module to the center and front cube speakers A CAUTION: Never connect the cubes directly to the receiver. Always connect the cube...
Owner's guide
Page 12
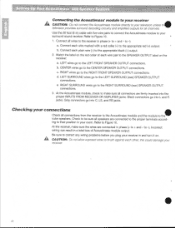
... LEFT SURROUND (rear) SPEAKER OUTPUT connections. RIGHT SURROUND wires go to the RIGHT SURROUND (rear) SPEAKER OUTPUT connections. 3. At the Acoustimass module, check to make sure the wires are firmly inserted into the proper INPUTS FROM RECEIVER OR AMPLIFIER jacks. Checking your connections Check ... • 12 RIGHT wires go into C, LS, and RS jacks. Black connectors go to your surround sound receiver. Use the 20 foot (6 m) cable with a red collar (+) to the SPEAKER OUTPUT label on . CENTER wires go into L and R jacks. to the CENTER SPEAKER OUTPUT connections. Incorrect...
... LEFT SURROUND (rear) SPEAKER OUTPUT connections. RIGHT SURROUND wires go to the RIGHT SURROUND (rear) SPEAKER OUTPUT connections. 3. At the Acoustimass module, check to make sure the wires are firmly inserted into the proper INPUTS FROM RECEIVER OR AMPLIFIER jacks. Checking your connections Check ... • 12 RIGHT wires go into C, LS, and RS jacks. Black connectors go to your surround sound receiver. Use the 20 foot (6 m) cable with a red collar (+) to the SPEAKER OUTPUT label on . CENTER wires go into L and R jacks. to the CENTER SPEAKER OUTPUT connections. Incorrect...
Owner's guide
Page 13
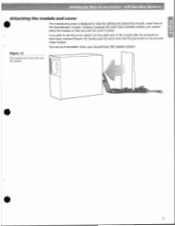
... system. Figure 12 The module end cover fits over the cables 13 Setting Up Your Acoustimass 600 Speaker System • Attaching the module end cover The module end cover is complete. Gently push the end cover into the grommets on that end ... cannot stand the module on the Acousti- However, because the cover has a beveled surface, you plan to use the cover, attach it to hide the cabling and extend the smooth, clean lines of the module after all connections have been checked (Figure 12). Your set up is designed to the...
... system. Figure 12 The module end cover fits over the cables 13 Setting Up Your Acoustimass 600 Speaker System • Attaching the module end cover The module end cover is complete. Gently push the end cover into the grommets on that end ... cannot stand the module on the Acousti- However, because the cover has a beveled surface, you plan to use the cover, attach it to hide the cabling and extend the smooth, clean lines of the module after all connections have been checked (Figure 12). Your set up is designed to the...
Owner's guide
Page 16
...) by an RCA stereo cable. if the receiver is plugged into the Acoustimass° module or the speaker grilles. Do not use solvents or chemicals. You may vacuum the grilles carefully; the drivers are connected to the N using a damp cloth. Troubleshooting If you still have a problem with your Acoustimass 600 speaker system, turn off...
...) by an RCA stereo cable. if the receiver is plugged into the Acoustimass° module or the speaker grilles. Do not use solvents or chemicals. You may vacuum the grilles carefully; the drivers are connected to the N using a damp cloth. Troubleshooting If you still have a problem with your Acoustimass 600 speaker system, turn off...
Owner's guide
Page 17
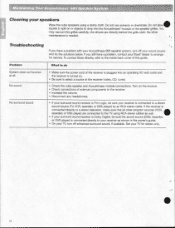
... inside back cover for offices and phone numbers. • • 17 Not enough or too much bass • Move the Acoustimass° module closer to a wall or corner to + and - Warranty period The Bose° Acoustimass 600 speaker system is Dolby Digital. Customer Service • For help in ordering accessories or solving problems, contact... provided on that came with your speakers. 'Lir• YA-.Ag Problem What to do •ound is distorted No bass • Make sure speaker cable is not damaged. • Reduce the volume of the coverage are correct (4-
... inside back cover for offices and phone numbers. • • 17 Not enough or too much bass • Move the Acoustimass° module closer to a wall or corner to + and - Warranty period The Bose° Acoustimass 600 speaker system is Dolby Digital. Customer Service • For help in ordering accessories or solving problems, contact... provided on that came with your speakers. 'Lir• YA-.Ag Problem What to do •ound is distorted No bass • Make sure speaker cable is not damaged. • Reduce the volume of the coverage are correct (4-
Owner's guide
Page 18
... use with speaker wire git • AC-1 adapter (stripped wire to male RCA connector) (Figure 14) • Extension cable: PN187092-1 (black) or PN187092-2 (white); 2V (6 m) ribbon cable with a floor stand or bracket, the cable will run up rather than down before attaching a stand or a bracket, it into the attached to change the orientation... (white) • Wall brackets: UB-20B (black), UB-20W (white) Figure 15 --- - 4P Note: Both UFS-20 floor stands and UB-20 wall brackets fit Acoustimass 600 cube speakers. 24' (' C.
... use with speaker wire git • AC-1 adapter (stripped wire to male RCA connector) (Figure 14) • Extension cable: PN187092-1 (black) or PN187092-2 (white); 2V (6 m) ribbon cable with a floor stand or bracket, the cable will run up rather than down before attaching a stand or a bracket, it into the attached to change the orientation... (white) • Wall brackets: UB-20B (black), UB-20W (white) Figure 15 --- - 4P Note: Both UFS-20 floor stands and UB-20 wall brackets fit Acoustimass 600 cube speakers. 24' (' C.

