Owner's guide
Page 3
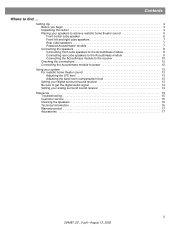
... left and right cube speakers 7 Rear cube speakers 7 Powered Acoustimass® module 7 Connecting the speakers 8 Connecting front cube speakers to the Acoustimass module 8 Connecting rear cube speakers to the Acoustimass module 9 Connecting the Acoustimass module to the receiver 10 Checking the connections 12 Connecting the Acoustimass module to power 12 Using your system 13 For realistic...
... left and right cube speakers 7 Rear cube speakers 7 Powered Acoustimass® module 7 Connecting the speakers 8 Connecting front cube speakers to the Acoustimass module 8 Connecting rear cube speakers to the Acoustimass module 9 Connecting the Acoustimass module to the receiver 10 Checking the connections 12 Connecting the Acoustimass module to power 12 Using your system 13 For realistic...
Owner's guide
Page 4
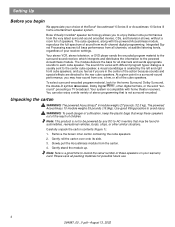
...is usually sent to the center cube speaker, a visual soundstage is not to be found in the center of the Bose® Acoustimass® 6 Series III or Acoustimass 10 Series III home entertainment speaker system. Integrated Signal Processing assures full bass performance from one, a few, or all channels, at audible... encoded movies, CDs, and television shows, without a room full of suffocation, keep the plastic bags that is compatible with home theater receivers. The module delivers the bass for possible future use. 4 264887_00 _V.pdf • August 13, 2002 WARNING: To avoid danger ...
...is usually sent to the center cube speaker, a visual soundstage is not to be found in the center of the Bose® Acoustimass® 6 Series III or Acoustimass 10 Series III home entertainment speaker system. Integrated Signal Processing assures full bass performance from one, a few, or all channels, at audible... encoded movies, CDs, and television shows, without a room full of suffocation, keep the plastic bags that is compatible with home theater receivers. The module delivers the bass for possible future use. 4 264887_00 _V.pdf • August 13, 2002 WARNING: To avoid danger ...
Owner's guide
Page 8
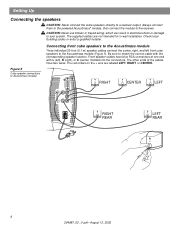
...R (right), or C (center) molded into the connectors. Setting Up Connecting the speakers CAUTION: Never connect the cube speakers directly to Acoustimass module RIGHT CENTER LEFT Audio Input Left Center Right Front Front Front Right Rear Audio Output Left Rear RIGHT REAR LEFT REAR 8 264887_00 _V... two wires. The red collars on the + wire are not intended for in electrical shock or damage to the receiver. Figure 5 Cube speaker connections to a receiver output. The supplied cables are labeled LEFT, RIGHT, or CENTER. CAUTION: Never use broken or frayed wiring, which...
...R (right), or C (center) molded into the connectors. Setting Up Connecting the speakers CAUTION: Never connect the cube speakers directly to Acoustimass module RIGHT CENTER LEFT Audio Input Left Center Right Front Front Front Right Rear Audio Output Left Rear RIGHT REAR LEFT REAR 8 264887_00 _V... two wires. The red collars on the + wire are not intended for in electrical shock or damage to the receiver. Figure 5 Cube speaker connections to a receiver output. The supplied cables are labeled LEFT, RIGHT, or CENTER. CAUTION: Never use broken or frayed wiring, which...
Owner's guide
Page 10
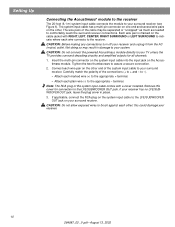
...connector on one end and several wire pairs on the Acoustimass module. The wire pairs of the connections (+ to + and - Not doing so may be separated or "unzipped" as much as needed to comfortably reach the surround receiver connections. Insert the multi-pin connector on the system ...the other. Tighten the two thumbscrews to the appropriate - terminal. Each wire pair is marked on your surround receiver. CAUTION: Do not connect the powered Acoustimass module directly to your receiver and unplug it from the AC (mains) outlet. Carefully match the polarity of the cable may result in ...
...connector on one end and several wire pairs on the Acoustimass module. The wire pairs of the connections (+ to + and - Not doing so may be separated or "unzipped" as much as needed to comfortably reach the surround receiver connections. Insert the multi-pin connector on the system ...the other. Tighten the two thumbscrews to the appropriate - terminal. Each wire pair is marked on your surround receiver. CAUTION: Do not connect the powered Acoustimass module directly to your receiver and unplug it from the AC (mains) outlet. Carefully match the polarity of the cable may result in ...
Owner's guide
Page 11
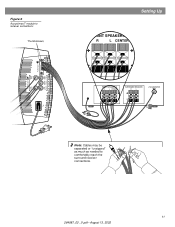
Figure 6 Acoustimass® module to receiver connections Thumbscrews Audio Output Left Rear Right Rear Audio Input Left Center Right Front Front Front Setting Up FRONT SPEAKERS A R L CENTER FRONT SPEAKERS A R L CENTER SURROUND SPEAKERS R L LFE/SUBWOOFER OUT Note: Cables may be separated or "unzipped" as much as needed to comfortably reach the surround receiver connections. 11 264887_00 _V.pdf • August 13, 2002
Figure 6 Acoustimass® module to receiver connections Thumbscrews Audio Output Left Rear Right Rear Audio Input Left Center Right Front Front Front Setting Up FRONT SPEAKERS A R L CENTER FRONT SPEAKERS A R L CENTER SURROUND SPEAKERS R L LFE/SUBWOOFER OUT Note: Cables may be separated or "unzipped" as much as needed to comfortably reach the surround receiver connections. 11 264887_00 _V.pdf • August 13, 2002
Owner's guide
Page 12
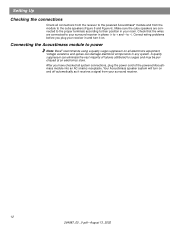
...system connections, plug the power cord of failures attributed to surges and may be purchased at an electronics store. Your Acoustimass speaker system will turn it receives a signal from the module to the cube speakers (Figure 5 and Figure 6). After you plug your room. ....pdf • August 13, 2002 Connecting the Acoustimass module to + and - Correct wiring problems before you have checked all electronics equipment. Make sure the cube speakers are connected to your surround receiver in phase (+ to power Note: Bose® recommends using a quality surge suppressor on ...
...system connections, plug the power cord of failures attributed to surges and may be purchased at an electronics store. Your Acoustimass speaker system will turn it receives a signal from the module to the cube speakers (Figure 5 and Figure 6). After you plug your room. ....pdf • August 13, 2002 Connecting the Acoustimass module to + and - Correct wiring problems before you have checked all electronics equipment. Make sure the cube speakers are connected to your surround receiver in phase (+ to power Note: Bose® recommends using a quality surge suppressor on ...
Owner's guide
Page 13
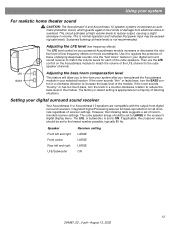
... menu. Using your system For realistic home theater sound CAUTION: The Acoustimass® 6 and Acoustimass 10 speaker systems incorporate an automatic protection circuit, which guards against most kinds of the LFE channel to LARGE in your digital surround sound receiver Your Acoustimass 6 or Acoustimass 10 speakers are compatible with the output from electrical stress or...
... menu. Using your system For realistic home theater sound CAUTION: The Acoustimass® 6 and Acoustimass 10 speaker systems incorporate an automatic protection circuit, which guards against most kinds of the LFE channel to LARGE in your digital surround sound receiver Your Acoustimass 6 or Acoustimass 10 speakers are compatible with the output from electrical stress or...
Owner's guide
Page 14
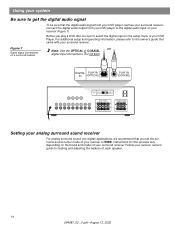
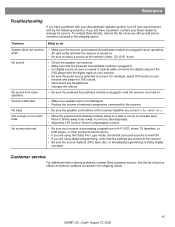
...For additional setup and operating information, please refer to the owner's guide that the digital audio signal from your DVD player reaches your surround receiver, connect the digital audio output from your DVD player to WIDE. DIGITAL PLAY IN IN (OPTICAL) PLAY IN (COAXIAL) DIGITAL PLAY IN ...on the brand and model of each speaker. 14 264887_00 _V.pdf • August 13, 2002 Follow your receiver owner's guide for this process vary, depending on a surround receiver Note: Use the OPTICAL or COAXIAL OR digital input connections, but not both. Instructions for testing and adjusting the...
...For additional setup and operating information, please refer to the owner's guide that the digital audio signal from your DVD player reaches your surround receiver, connect the digital audio output from your DVD player to WIDE. DIGITAL PLAY IN IN (OPTICAL) PLAY IN (COAXIAL) DIGITAL PLAY IN ...on the brand and model of each speaker. 14 264887_00 _V.pdf • August 13, 2002 Follow your receiver owner's guide for this process vary, depending on a surround receiver Note: Use the OPTICAL or COAXIAL OR digital input connections, but not both. Instructions for testing and adjusting the...
Owner's guide
Page 15
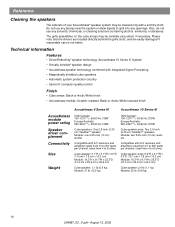
...phone numbers enclosed in the shipping carton. For example, select DVD audio on your Bose® dealer to do System does not function • Make sure the receiver and powered Acoustimass module are plugged into an operating at all AC wall outlet and that the settings... the speaker connections. • Make sure that the powered Acoustimass module is plugged in solving problems, contact Bose customer service. Sound is distorted • Make sure speaker wire is turned on . If you have a problem, contact your receiver. • Be sure the audio source selected is turned ...
...phone numbers enclosed in the shipping carton. For example, select DVD audio on your Bose® dealer to do System does not function • Make sure the receiver and powered Acoustimass module are plugged into an operating at all AC wall outlet and that the settings... the speaker connections. • Make sure that the powered Acoustimass module is plugged in solving problems, contact Bose customer service. Sound is distorted • Make sure speaker wire is turned on . If you have a problem, contact your receiver. • Be sure the audio source selected is turned ...
Owner's guide
Page 16
... Black or Arctic White finish • Acoustimass module: Scratch-resistant Black or Arctic White textured finish Acoustimass 6 Series III Acoustimass 10 Series III Acoustimass module power rating Speaker driver complement Connectivity Size Weight ...USA/Canada: 100-127V 50/60 Hz 135W Europe/Australia: 220-240V 50/60 Hz 135W Cube speakers: One 2.5-inch (6.35 cm) TwiddlerTM speaker Module: one 5.25-inch (13 cm) woofer Compatible with A/V receivers...
... Black or Arctic White finish • Acoustimass module: Scratch-resistant Black or Arctic White textured finish Acoustimass 6 Series III Acoustimass 10 Series III Acoustimass module power rating Speaker driver complement Connectivity Size Weight ...USA/Canada: 100-127V 50/60 Hz 135W Europe/Australia: 220-240V 50/60 Hz 135W Cube speakers: One 2.5-inch (6.35 cm) TwiddlerTM speaker Module: one 5.25-inch (13 cm) woofer Compatible with A/V receivers...


