
Owner's guide
Page 1
The Bose® Acoustimass® 6 Series II Speaker System Owner's Guide October 29, 2001 AM252172_02_V.pdf
The Bose® Acoustimass® 6 Series II Speaker System Owner's Guide October 29, 2001 AM252172_02_V.pdf
Owner's guide
Page 2
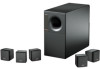
... carefully. It will help you 'll surround yourself with EMC Directive 89/336/EEC and Article 10(1) of its features. Your system features next generation Acoustimass cube speakers, a product of the Bose® Acoustimass® 6 home theater speaker system. These cube speakers deliver more lifelike sound and better overall performance than their predecessors.
... carefully. It will help you 'll surround yourself with EMC Directive 89/336/EEC and Article 10(1) of its features. Your system features next generation Acoustimass cube speakers, a product of the Bose® Acoustimass® 6 home theater speaker system. These cube speakers deliver more lifelike sound and better overall performance than their predecessors.
Owner's guide
Page 3
... Pro-Logic receiver 14 Using your Dolby Digital (AC-3) receiver 15 Maintaining Your Acoustimass 6 Speaker System 16 Cleaning your speakers ...16 Troubleshooting ...16 Warranty period ...17 Customer Service ...17 Product Information ...18 Technical Information ...18 Accessories ...18 Bose® Corporation Inside back cover Español Français Italiano For your...
... Pro-Logic receiver 14 Using your Dolby Digital (AC-3) receiver 15 Maintaining Your Acoustimass 6 Speaker System 16 Cleaning your speakers ...16 Troubleshooting ...16 Warranty period ...17 Customer Service ...17 Product Information ...18 Technical Information ...18 Accessories ...18 Bose® Corporation Inside back cover Español Français Italiano For your...
Owner's guide
Page 4
... for all or just a few of the speakers, but the overall experience puts you to the left or right front speakers. Your Acoustimass 6 home theater speakers are also compatible with Dolby Digital (AC-3)* receivers and program material. (Instructions on using your surround or digital receiver ...from the left or right side of the picture go to enjoy lifelike home performances from all channels. Setting Up Your Acoustimass® 6 Speaker System Before you begin Bose® Virtually Invisible® speaker technology allows you in a surround sound performance, you may hear sound from the very...
... for all or just a few of the speakers, but the overall experience puts you to the left or right front speakers. Your Acoustimass 6 home theater speakers are also compatible with Dolby Digital (AC-3)* receivers and program material. (Instructions on using your surround or digital receiver ...from the left or right side of the picture go to enjoy lifelike home performances from all channels. Setting Up Your Acoustimass® 6 Speaker System Before you begin Bose® Virtually Invisible® speaker technology allows you in a surround sound performance, you may hear sound from the very...
Owner's guide
Page 5
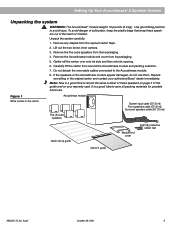
... out of the reach of this guide and on your authorized Bose® dealer immediately. Gently roll the carton over onto its side and then onto its packaging. 5. If the speakers or the Acoustimass module appear damaged, do not use . Do not detach the...1 What comes in the original carton and contact your warranty card. Use good lifting practice to the Acoustimass module. 8. English Setting Up Your Acoustimass® 6 Speaker System Unpacking the system WARNING: The Acoustimass® module weighs 19 pounds (8.6 kg). Unpack the system carefully: 1. Lift out the two brown...
... out of the reach of this guide and on your authorized Bose® dealer immediately. Gently roll the carton over onto its side and then onto its packaging. 5. If the speakers or the Acoustimass module appear damaged, do not use . Do not detach the...1 What comes in the original carton and contact your warranty card. Use good lifting practice to the Acoustimass module. 8. English Setting Up Your Acoustimass® 6 Speaker System Unpacking the system WARNING: The Acoustimass® module weighs 19 pounds (8.6 kg). Unpack the system carefully: 1. Lift out the two brown...
Owner's guide
Page 6
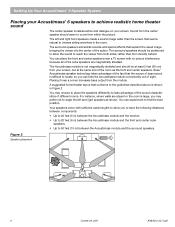
... 2001 AM25212_02_V.pdf Sound from directly behind. A suggested home theater layout that seems natural to 50 feet (15 m) between the Acoustimass module and the front and center cube speakers. • Up to viewers sitting anywhere in Figure 2. The surround speakers should be... speakers are magnetically shielded. You can hide the Acoustimass module conveniently out of the action. Setting Up Your Acoustimass® 6 Speaker System Placing your Acoustimass® 6 speakers to find the best position. Bose® Acoustimass speaker technology takes advantage of the fact that expand...
... 2001 AM25212_02_V.pdf Sound from directly behind. A suggested home theater layout that seems natural to 50 feet (15 m) between the Acoustimass module and the front and center cube speakers. • Up to viewers sitting anywhere in Figure 2. The surround speakers should be... speakers are magnetically shielded. You can hide the Acoustimass module conveniently out of the action. Setting Up Your Acoustimass® 6 Speaker System Placing your Acoustimass® 6 speakers to find the best position. Bose® Acoustimass speaker technology takes advantage of the fact that expand...
Owner's guide
Page 7
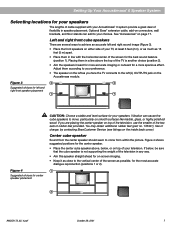
Optional Bose® extension cable, add-on connectors, wall brackets, and floor stands can cause the cube speakers to achieve an accurate left (L) OUTPUTS jack on the Acoustimass module. Figure 3 2 2 Suggested choices for left as close to your choices. Figure 4 shows suggested positions for the ...smooth surfaces like marble, glass, or highly polished wood. See "Accessories" on the inside back cover). English Setting Up Your Acoustimass® 6 Speaker System Selecting locations for your speakers The lengths of cable supplied with the horizontal center of the screen for ...
Optional Bose® extension cable, add-on connectors, wall brackets, and floor stands can cause the cube speakers to achieve an accurate left (L) OUTPUTS jack on the Acoustimass module. Figure 3 2 2 Suggested choices for left as close to your choices. Figure 4 shows suggested positions for the ...smooth surfaces like marble, glass, or highly polished wood. See "Accessories" on the inside back cover). English Setting Up Your Acoustimass® 6 Speaker System Selecting locations for your speakers The lengths of cable supplied with the horizontal center of the screen for ...
Owner's guide
Page 8
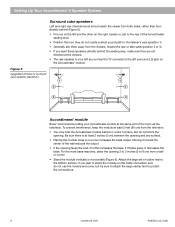
... face the TV connects to the left surround (LS) jack on the Acoustimass® module. Setting Up Your Acoustimass® 6 Speaker System Surround cube speakers Left and right rear channel sound...keep the module at least 2 feet (60 cm) from the television. • You may hide the Acoustimass module behind the seating area, make sure they do not create a direct sound path to the listener's...; Generally aim them so they are not directed at the viewers. • The rear speaker to your Acoustimass module at least 2 inches (5 cm) between the opening and any surface. • Placing the module...
... face the TV connects to the left surround (LS) jack on the Acoustimass® module. Setting Up Your Acoustimass® 6 Speaker System Surround cube speakers Left and right rear channel sound...keep the module at least 2 feet (60 cm) from the television. • You may hide the Acoustimass module behind the seating area, make sure they do not create a direct sound path to the listener's...; Generally aim them so they are not directed at the viewers. • The rear speaker to your Acoustimass module at least 2 inches (5 cm) between the opening and any surface. • Placing the module...
Owner's guide
Page 9
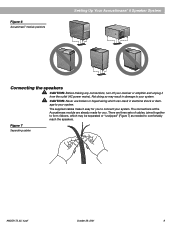
... broken or frayed wiring which may result in electrical shock or damage to comfortably reach the speakers. English Figure 6 Acoustimass® module positions Setting Up Your Acoustimass® 6 Speaker System Connecting the speakers CAUTION: Before making any connections, turn off your system. There are already... made for you . The connections at the Acoustimass module are three sets of cables, joined together to form ribbons, which can result in damage to connect your receiver or ...
... broken or frayed wiring which may result in electrical shock or damage to comfortably reach the speakers. English Figure 6 Acoustimass® module positions Setting Up Your Acoustimass® 6 Speaker System Connecting the speakers CAUTION: Before making any connections, turn off your system. There are already... made for you . The connections at the Acoustimass module are three sets of cables, joined together to form ribbons, which can result in damage to connect your receiver or ...
Owner's guide
Page 10
...System input cable 10 October 29, 2001 AM25212_02_V.pdf Separate these accessories. You may want to keep unextended lengths of wires to connect the Acoustimass module to the outputs on the receiver. Note: If you have already installed cable behind walls or under floors, or believe you lay ...out the cable lengths. Bose Customer Service telephone numbers are listed on the inside back cover. Refer to page 17 for an overview of the completed connections. • ...
...System input cable 10 October 29, 2001 AM25212_02_V.pdf Separate these accessories. You may want to keep unextended lengths of wires to connect the Acoustimass module to the outputs on the receiver. Note: If you have already installed cable behind walls or under floors, or believe you lay ...out the cable lengths. Bose Customer Service telephone numbers are listed on the inside back cover. Refer to page 17 for an overview of the completed connections. • ...
Owner's guide
Page 11
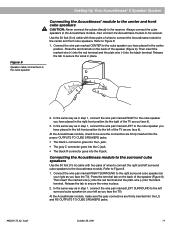
... face the TV). Refer to the left front position (to Figure 8. 1. English Setting Up Your Acoustimass® 6 Speaker System Figure 9 Speaker cable connections to the cube speaker Connecting the Acoustimass® module to the center and front cube speakers CAUTION: Never connect the cubes directly to the ...TO CUBE SPEAKERS jacks. Then insert the marked wire (+) into the red terminal and the plain wire (-) into the black terminal. Connecting the Acoustimass module to the surround cube speakers Use the 50 foot (15 m) cable with three pairs of the speaker (Figure 9). October 29, 2001 ...
... face the TV). Refer to the left front position (to Figure 8. 1. English Setting Up Your Acoustimass® 6 Speaker System Figure 9 Speaker cable connections to the cube speaker Connecting the Acoustimass® module to the center and front cube speakers CAUTION: Never connect the cubes directly to the ...TO CUBE SPEAKERS jacks. Then insert the marked wire (+) into the red terminal and the plain wire (-) into the black terminal. Connecting the Acoustimass module to the surround cube speakers Use the 50 foot (15 m) cable with three pairs of the speaker (Figure 9). October 29, 2001 ...

Owner's guide
Page 12
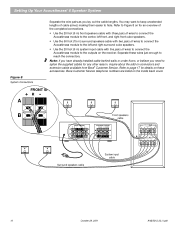
... OUTPUT connections. to -). Checking your room. to -). Connect each wire pair to the SPEAKER OUTPUT label on the red collar of Acoustimass module output. CENTER wires go to the LEFT FRONT SPEAKER OUTPUT connections. Connect all speakers are firmly inserted into the proper INPUTS FROM ...the CENTER SPEAKER OUTPUT connections. CAUTION: Do not allow exposed wires to brush against each wire marked with five wire pairs to connect the Acoustimass module to your receiver in a total loss of each plain wire (-) to the appropriate black (-) output. 2. d. Check to be sure...
... OUTPUT connections. to -). Checking your room. to -). Connect each wire pair to the SPEAKER OUTPUT label on the red collar of Acoustimass module output. CENTER wires go to the LEFT FRONT SPEAKER OUTPUT connections. Connect all speakers are firmly inserted into the proper INPUTS FROM ...the CENTER SPEAKER OUTPUT connections. CAUTION: Do not allow exposed wires to brush against each wire marked with five wire pairs to connect the Acoustimass module to your receiver in a total loss of each plain wire (-) to the appropriate black (-) output. 2. d. Check to be sure...
Owner's guide
Page 13
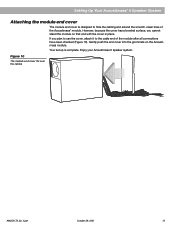
... and extend the smooth, clean lines of the module after all connections have been checked (Figure 10). If you cannot stand the module on the Acoustimass module. Gently push the end cover into the grommets on that end with the cover in place. Your set up is designed to the cable... end of the Acoustimass® module. English Setting Up Your Acoustimass® 6 Speaker System Attaching the module end cover The module end cover is complete. Figure 10 The module end cover fits over...
... and extend the smooth, clean lines of the module after all connections have been checked (Figure 10). If you cannot stand the module on the Acoustimass module. Gently push the end cover into the grommets on that end with the cover in place. Your set up is designed to the cable... end of the Acoustimass® module. English Setting Up Your Acoustimass® 6 Speaker System Attaching the module end cover The module end cover is complete. Figure 10 The module end cover fits over...
Owner's guide
Page 14
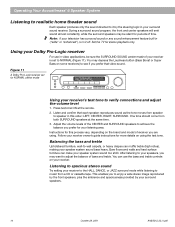
... your receiver's test tone to verify connections and adjust the volume level 1. This enables you prefer for your speaker system sound too shrill. Operating Your Acoustimass® 6 Speaker System Listening to realistic home theater sound Each speaker produces only the sound directed to it by your receiver owner's guide instructions for...
... your receiver's test tone to verify connections and adjust the volume level 1. This enables you prefer for your speaker system sound too shrill. Operating Your Acoustimass® 6 Speaker System Listening to realistic home theater sound Each speaker produces only the sound directed to it by your receiver owner's guide instructions for...
Owner's guide
Page 15
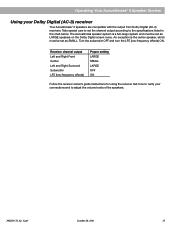
... be set as LARGE speakers on the Dolby Digital screen menu. English Operating Your Acoustimass® 6 Speaker System Using your connections and to adjust the volume levels of the speakers. The Acoustimass speaker system is the center speaker, which must be set as SMALL. Turn the... LFE (low-frequency effects) ON. Take special care to set the channel output according to verify your Dolby Digital (AC-3) receiver Your Acoustimass® 6 speakers are compatible with the output from Dolby Digital (AC-3) receivers. Receiver channel output Left and Right Front Center Left and...
... be set as LARGE speakers on the Dolby Digital screen menu. English Operating Your Acoustimass® 6 Speaker System Using your connections and to adjust the volume levels of the speakers. The Acoustimass speaker system is the center speaker, which must be set as SMALL. Turn the... LFE (low-frequency effects) ON. Take special care to set the channel output according to verify your Dolby Digital (AC-3) receiver Your Acoustimass® 6 speakers are compatible with the output from Dolby Digital (AC-3) receivers. Receiver channel output Left and Right Front Center Left and...
Owner's guide
Page 16
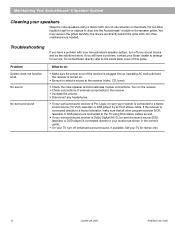
... to the TV using a damp cloth. To contact Bose directly, refer to a stereo television, make sure that all . Problem System does not function at the receiver (video, CD, tuner). • Check the cube speaker and Acoustimass module connections. No sound No surround sound What to arrange...16 October 29, 2001 AM25212_02_V.pdf Troubleshooting If you still have a problem with your Acoustimass 6 speaker system, turn off your sound source and try the solutions below. If you have a problem, contact your Bose® dealer to do • Make sure the power cord of the receiver ...
... to the TV using a damp cloth. To contact Bose directly, refer to a stereo television, make sure that all . Problem System does not function at the receiver (video, CD, tuner). • Check the cube speaker and Acoustimass module connections. No sound No surround sound What to arrange...16 October 29, 2001 AM25212_02_V.pdf Troubleshooting If you still have a problem with your Acoustimass 6 speaker system, turn off your sound source and try the solutions below. If you have a problem, contact your Bose® dealer to do • Make sure the power cord of the receiver ...
Owner's guide
Page 17
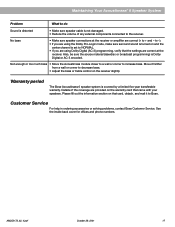
...correct (+ to + and - See the inside back cover for offices and phone numbers. AM252172_02_V.pdf October 29, 2001 17 Warranty period The Bose Acoustimass 6 speaker system is set to NORMAL. • If you are using Dolby Digital (AC-3) programming, verify that the settings are correct at... by a limited five-year transferable warranty. Not enough or too much bass • Move the Acoustimass module closer to a wall or corner to increase bass. English Maintaining Your Acoustimass® 6 Speaker System Problem What to do Sound is distorted • Make sure speaker cable ...
...correct (+ to + and - See the inside back cover for offices and phone numbers. AM252172_02_V.pdf October 29, 2001 17 Warranty period The Bose Acoustimass 6 speaker system is set to NORMAL. • If you are using Dolby Digital (AC-3) programming, verify that the settings are correct at... by a limited five-year transferable warranty. Not enough or too much bass • Move the Acoustimass module closer to a wall or corner to increase bass. English Maintaining Your Acoustimass® 6 Speaker System Problem What to do Sound is distorted • Make sure speaker cable ...
Owner's guide
Page 18
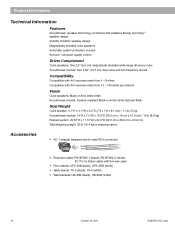
... circuitry Syncom® computer quality control Driver Complement Cube speakers: One 2.5" (6.4 cm) magnetically shielded wide-range driver per cube Acoustimass module: Two 5.25" (13.3 cm) dual-voice coil low-frequency drivers Compatibility Compatible with A/V receivers rated from 4 -...rated from 10 - 100 watts per channel Finish Cube speakers: Black or Artic white finish Acoustimass module: Scratch-resistant Black or Arctic white textured finish Size/Weight Cube speaker: 3.1"H x 3.1"W x 3.2"D (7.9 x 7.9 x 8.1 cm) / 1.1 lb (.5 kg) Acoustimass module: 14"H x 7.5"W x 16.5"D (35.5 cm x 19 cm x 41.9...
... circuitry Syncom® computer quality control Driver Complement Cube speakers: One 2.5" (6.4 cm) magnetically shielded wide-range driver per cube Acoustimass module: Two 5.25" (13.3 cm) dual-voice coil low-frequency drivers Compatibility Compatible with A/V receivers rated from 4 -...rated from 10 - 100 watts per channel Finish Cube speakers: Black or Artic white finish Acoustimass module: Scratch-resistant Black or Arctic white textured finish Size/Weight Cube speaker: 3.1"H x 3.1"W x 3.2"D (7.9 x 7.9 x 8.1 cm) / 1.1 lb (.5 kg) Acoustimass module: 14"H x 7.5"W x 16.5"D (35.5 cm x 19 cm x 41.9...

Owner's guide
Page 22
... FAX 06172-710419 France Bose S.A., 6, rue Saint Vincent 78100 Saint Germain en Laye TEL 01-30616363 FAX 01-30614105 India Bose Corporation India Private Limited W-16, Greater Kailash-II New Delhi 110 048 TEL (011) 648 4462 FAX (011) 648 4463 Ireland Bose Corporation Carrickmacross, Co Monaghan... TEL 042-9661988 FAX 042-9661998 Italia Bose S.p.A., Via della Magliana 876 00148 Roma...
... FAX 06172-710419 France Bose S.A., 6, rue Saint Vincent 78100 Saint Germain en Laye TEL 01-30616363 FAX 01-30614105 India Bose Corporation India Private Limited W-16, Greater Kailash-II New Delhi 110 048 TEL (011) 648 4462 FAX (011) 648 4463 Ireland Bose Corporation Carrickmacross, Co Monaghan... TEL 042-9661988 FAX 042-9661998 Italia Bose S.p.A., Via della Magliana 876 00148 Roma...

Owner's guide
Page 23
© 1999 Bose Corporation The Mountain, Framingham, MA 01701-9168 USA 252172 AM Rev.02 JN99820
© 1999 Bose Corporation The Mountain, Framingham, MA 01701-9168 USA 252172 AM Rev.02 JN99820