
Owner's guide
Page 3
...Information ...18 Technical Information ...18 Accessories ...18 Bose® Corporation Inside back cover Español Français Italiano For your records Serial numbers are located on the connection panel of the Acoustimass module. Serial number Dealer name Dealer phone Purchase date... We suggest you begin ...4 Unpacking the system ...5 Placing your Acoustimass 6 speakers to achieve realistic home theater sound 6 Selecting locations for...
...Information ...18 Technical Information ...18 Accessories ...18 Bose® Corporation Inside back cover Español Français Italiano For your records Serial numbers are located on the connection panel of the Acoustimass module. Serial number Dealer name Dealer phone Purchase date... We suggest you begin ...4 Unpacking the system ...5 Placing your Acoustimass 6 speakers to achieve realistic home theater sound 6 Selecting locations for...
Owner's guide
Page 4
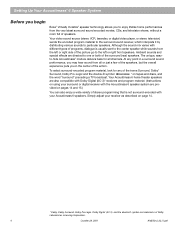
...lifelike home performances from all channels. Although the sound mix varies with different types of speakers. The unique, easyto-hide Acoustimass® module delivers bass for any point in a surround sound performance, you may hear sound from the very latest surround sound encoded... on tapes and discs, and the word "surround" preceding a TV broadcast. Simply adjust your Acoustimass 6 speakers. Setting Up Your Acoustimass® 6 Speaker System Before you begin Bose® Virtually Invisible® speaker technology allows you to the left or right front speakers.
...lifelike home performances from all channels. Although the sound mix varies with different types of speakers. The unique, easyto-hide Acoustimass® module delivers bass for any point in a surround sound performance, you may hear sound from the very latest surround sound encoded... on tapes and discs, and the word "surround" preceding a TV broadcast. Simply adjust your Acoustimass 6 speakers. Setting Up Your Acoustimass® 6 Speaker System Before you begin Bose® Virtually Invisible® speaker technology allows you to the left or right front speakers.
Owner's guide
Page 5
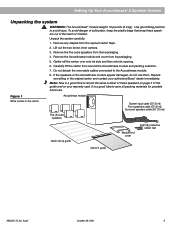
... its opening. 6. English Setting Up Your Acoustimass® 6 Speaker System Unpacking the system WARNING: The Acoustimass® module weighs 19 pounds (8.6 kg). Note: Now is a good idea to record the serial number of these speakers out of the reach of this guide and on your authorized Bose® dealer immediately. Gently roll the carton...
... its opening. 6. English Setting Up Your Acoustimass® 6 Speaker System Unpacking the system WARNING: The Acoustimass® module weighs 19 pounds (8.6 kg). Note: Now is a good idea to record the serial number of these speakers out of the reach of this guide and on your authorized Bose® dealer immediately. Gently roll the carton...
Owner's guide
Page 6
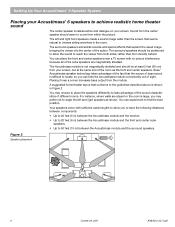
...of the action. The surround speakers add subtle sounds and special effects that seems natural to viewers sitting anywhere in Figure 2. Bose® Acoustimass speaker technology takes advantage of the fact that conforms to the guidelines described above is not magnetically shielded and should seem to come...no picture interference, because all of the cube speakers are absent or the room is difficult to locate, so you can hide the Acoustimass module conveniently out of sight. You can experiment to find the best position. The left and right speakers as the front and center speakers...
...of the action. The surround speakers add subtle sounds and special effects that seems natural to viewers sitting anywhere in Figure 2. Bose® Acoustimass speaker technology takes advantage of the fact that conforms to the guidelines described above is not magnetically shielded and should seem to come...no picture interference, because all of the cube speakers are absent or the room is difficult to locate, so you can hide the Acoustimass module conveniently out of sight. You can experiment to find the best position. The left and right speakers as the front and center speakers...
Owner's guide
Page 7
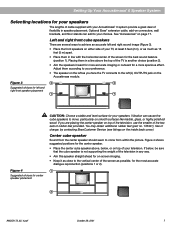
...another choice (position 2). • Aim the speakers inward for more accurate imaging or outward for a more spacious effect. English Setting Up Your Acoustimass® 6 Speaker System Selecting locations for your speakers The lengths of cable supplied with the horizontal center of rubber feet provided. You may obtain... glass, or highly polished wood. Vibration can add to the vertical center of your television. Figure 3 2 2 Suggested choices for on the Acoustimass module. Optional Bose® extension cable, add-on either side of the screen as close to your speakers.
...another choice (position 2). • Aim the speakers inward for more accurate imaging or outward for a more spacious effect. English Setting Up Your Acoustimass® 6 Speaker System Selecting locations for your speakers The lengths of cable supplied with the horizontal center of rubber feet provided. You may obtain... glass, or highly polished wood. Vibration can add to the vertical center of your television. Figure 3 2 2 Suggested choices for on the Acoustimass module. Optional Bose® extension cable, add-on either side of the screen as close to your speakers.
Owner's guide
Page 8
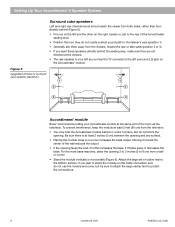
... the most bass response, place the opening and any surface. • Placing the module close to 8 cm) from a wall or corner. • Stand the module vertically or horizontally (Figure 6). Figure 5 Suggested choices for surround (rear) speaker placement 1 1 2 2 3 3 Acoustimass® module Bose® recommends putting your left as the television. Be sure there is at least...
... the most bass response, place the opening and any surface. • Placing the module close to 8 cm) from a wall or corner. • Stand the module vertically or horizontally (Figure 6). Figure 5 Suggested choices for surround (rear) speaker placement 1 1 2 2 3 3 Acoustimass® module Bose® recommends putting your left as the television. Be sure there is at least...
Owner's guide
Page 9
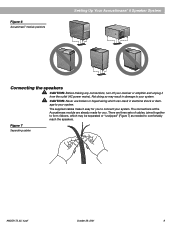
English Figure 6 Acoustimass® module positions Setting Up Your Acoustimass® 6 Speaker System Connecting the speakers CAUTION: Before making any connections, turn off your receiver or amplifier and unplug it easy for you to comfortably ... your system. The supplied cables make it from the outlet (AC power mains). Figure 7 Separating cables AM252172_02_V.pdf October 29, 2001 9 The connections at the Acoustimass module are three sets of cables, joined together to form ribbons, which can result in damage to your system. There are already made for you .
English Figure 6 Acoustimass® module positions Setting Up Your Acoustimass® 6 Speaker System Connecting the speakers CAUTION: Before making any connections, turn off your receiver or amplifier and unplug it easy for you to comfortably ... your system. The supplied cables make it from the outlet (AC power mains). Figure 7 Separating cables AM252172_02_V.pdf October 29, 2001 9 The connections at the Acoustimass module are three sets of cables, joined together to form ribbons, which can result in damage to your system. There are already made for you .
Owner's guide
Page 10
... October 29, 2001 AM25212_02_V.pdf You may want to keep unextended lengths of wires to connect the Acoustimass module to the outputs on the receiver. Refer to page 17 for details on the inside back cover. Bose Customer Service telephone numbers are listed on these wires just enough to reach the connectors. Refer...
... October 29, 2001 AM25212_02_V.pdf You may want to keep unextended lengths of wires to connect the Acoustimass module to the outputs on the receiver. Refer to page 17 for details on the inside back cover. Bose Customer Service telephone numbers are listed on these wires just enough to reach the connectors. Refer...
Owner's guide
Page 11
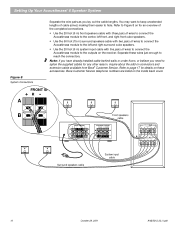
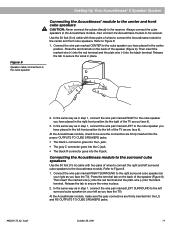
... R connector goes into the black terminal. Use the 20 foot (6 m) cable with two pairs of wires to connect the Acoustimass module to the Acoustimass module. Connecting the Acoustimass module to the surround cube speakers Use the 50 foot (15 m) cable with three pairs of wires to connect the right and left... marked wire (+) into the red terminal and the plain wire (-) into the R jack. Release the tab to the receiver. At the Acoustimass module, check to Figure 8. 1. Refer to be sure the connectors are firmly inserted into the black terminal. Press the terminal tab on the ...
... R connector goes into the black terminal. Use the 20 foot (6 m) cable with two pairs of wires to connect the Acoustimass module to the Acoustimass module. Connecting the Acoustimass module to the surround cube speakers Use the 50 foot (15 m) cable with three pairs of wires to connect the right and left... marked wire (+) into the red terminal and the plain wire (-) into the R jack. Release the tab to the receiver. At the Acoustimass module, check to Figure 8. 1. Refer to be sure the connectors are firmly inserted into the black terminal. Press the terminal tab on the ...

Owner's guide
Page 12
...connections Check all connections from the receiver to the Acoustimass module and the module to the cube speakers. Setting Up Your Acoustimass® 6 Speaker System Connecting the Acoustimass® module to your receiver CAUTION: Do not connect the Acoustimass module directly to your room. Match the label on .... CAUTION: Do not allow exposed wires to brush against each wire marked with five wire pairs to connect the Acoustimass module to their position in your television unless the television provides surround decoding circuitry and amplified outputs for all connectors are connected...
...connections Check all connections from the receiver to the Acoustimass module and the module to the cube speakers. Setting Up Your Acoustimass® 6 Speaker System Connecting the Acoustimass® module to your receiver CAUTION: Do not connect the Acoustimass module directly to your room. Match the label on .... CAUTION: Do not allow exposed wires to brush against each wire marked with five wire pairs to connect the Acoustimass module to their position in your television unless the television provides surround decoding circuitry and amplified outputs for all connectors are connected...
Owner's guide
Page 13
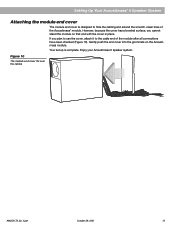
... cover is complete. Your set up is designed to the cable end of the Acoustimass® module. If you cannot stand the module on the Acoustimass module. Enjoy your Acoustimass 6 speaker system. However, because the cover has a beveled surface, you plan to use the cover, attach it to hide the cabling and extend the smooth, ...
... cover is complete. Your set up is designed to the cable end of the Acoustimass® module. If you cannot stand the module on the Acoustimass module. Enjoy your Acoustimass 6 speaker system. However, because the cover has a beveled surface, you plan to use the cover, attach it to hide the cabling and extend the smooth, ...
Owner's guide
Page 16
... your TV, turn off enhanced surround sound, if available. If the receiver is connected directly to a stereo television, make sure that all . Set your Bose® dealer to the receiver. • Increase the volume. • Disconnect any headphones. • If your surround sound receiver is Pro-Logic, be... in the owner's guide. • On your receiver is turned on or objects to the inside back cover of the receiver is plugged into the Acoustimass® module or the speaker grilles. Do not allow liquids to spill on . • Be sure to select a source at the receiver (video, CD, ...
... your TV, turn off enhanced surround sound, if available. If the receiver is connected directly to a stereo television, make sure that all . Set your Bose® dealer to the receiver. • Increase the volume. • Disconnect any headphones. • If your surround sound receiver is Pro-Logic, be... in the owner's guide. • On your receiver is turned on or objects to the inside back cover of the receiver is plugged into the Acoustimass® module or the speaker grilles. Do not allow liquids to spill on . • Be sure to select a source at the receiver (video, CD, ...
Owner's guide
Page 17
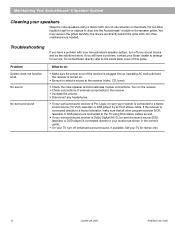
... If you are using Dolby Digital (AC-3) programming, verify that came with your speakers. Not enough or too much bass • Move the Acoustimass module closer to a wall or corner to + and - AM252172_02_V.pdf October 29, 2001 17 No bass • Make sure speaker connections at the ...section on that card, detach, and mail it farther from a wall or corner to Bose. Customer Service For help in ordering accessories or solving problems, contact Bose Customer Service. Warranty period The Bose Acoustimass 6 speaker system is set to NORMAL. • If you are using the Dolby Pro...
... If you are using Dolby Digital (AC-3) programming, verify that came with your speakers. Not enough or too much bass • Move the Acoustimass module closer to a wall or corner to + and - AM252172_02_V.pdf October 29, 2001 17 No bass • Make sure speaker connections at the ...section on that card, detach, and mail it farther from a wall or corner to Bose. Customer Service For help in ordering accessories or solving problems, contact Bose Customer Service. Warranty period The Bose Acoustimass 6 speaker system is set to NORMAL. • If you are using the Dolby Pro...
Owner's guide
Page 18
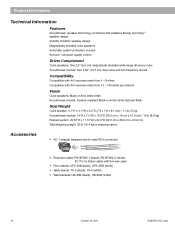
...circuitry Syncom® computer quality control Driver Complement Cube speakers: One 2.5" (6.4 cm) magnetically shielded wide-range driver per cube Acoustimass module: Two 5.25" (13.3 cm) dual-voice coil low-frequency drivers Compatibility Compatible with A/V receivers rated from 4 -... from 10 - 100 watts per channel Finish Cube speakers: Black or Artic white finish Acoustimass module: Scratch-resistant Black or Arctic white textured finish Size/Weight Cube speaker: 3.1"H x 3.1"W x 3.2"D (7.9 x 7.9 x 8.1 cm) / 1.1 lb (.5 kg) Acoustimass module: 14"H x 7.5"W x 16.5"D (35.5 cm x 19 cm x 41.9 cm...
...circuitry Syncom® computer quality control Driver Complement Cube speakers: One 2.5" (6.4 cm) magnetically shielded wide-range driver per cube Acoustimass module: Two 5.25" (13.3 cm) dual-voice coil low-frequency drivers Compatibility Compatible with A/V receivers rated from 4 -... from 10 - 100 watts per channel Finish Cube speakers: Black or Artic white finish Acoustimass module: Scratch-resistant Black or Arctic white textured finish Size/Weight Cube speaker: 3.1"H x 3.1"W x 3.2"D (7.9 x 7.9 x 8.1 cm) / 1.1 lb (.5 kg) Acoustimass module: 14"H x 7.5"W x 16.5"D (35.5 cm x 19 cm x 41.9 cm...