Owner's guide
Page 5
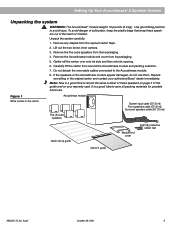
... authorized Bose® dealer immediately. It is a good time to save all packing materials for possible future use them. Do not detach the removable cables connected to avoid injury. Carefully lift the carton from its opening. 6. English Setting Up Your Acoustimass®... roll the carton over onto its side and then onto its packaging. 5. Repack everything in the carton Acoustimass module System input cable (20' [6 m]) Front speakers cable (20' [6 m]) Surround speakers cable (50' [15 m]) Five (5) cube speakers Quick set up guide Module end cover Eight (8) protective ...
... authorized Bose® dealer immediately. It is a good time to save all packing materials for possible future use them. Do not detach the removable cables connected to avoid injury. Carefully lift the carton from its opening. 6. English Setting Up Your Acoustimass®... roll the carton over onto its side and then onto its packaging. 5. Repack everything in the carton Acoustimass module System input cable (20' [6 m]) Front speakers cable (20' [6 m]) Surround speakers cable (50' [15 m]) Five (5) cube speakers Quick set up guide Module end cover Eight (8) protective ...
Owner's guide
Page 10
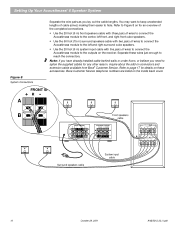
... LEFT CENTER RIGHT LEFT RIGHT SURROUND SURROUND INPUTS FROM RECEIVER OR AMPLIFIER L C R LS RS Surround speakers cable System input cable 10 October 29, 2001 AM25212_02_V.pdf You may want to keep unextended lengths of wires to connect the Acoustimass module to the outputs on the receiver....accessories. Setting Up Your Acoustimass® 6 Speaker System Figure 8 System Connections Separate the wire pairs as you need to splice the supplied cables for any other reason, inquire about the add-on connectors and extension cable available from Bose® Customer Service. ...
... LEFT CENTER RIGHT LEFT RIGHT SURROUND SURROUND INPUTS FROM RECEIVER OR AMPLIFIER L C R LS RS Surround speakers cable System input cable 10 October 29, 2001 AM25212_02_V.pdf You may want to keep unextended lengths of wires to connect the Acoustimass module to the outputs on the receiver....accessories. Setting Up Your Acoustimass® 6 Speaker System Figure 8 System Connections Separate the wire pairs as you need to splice the supplied cables for any other reason, inquire about the add-on connectors and extension cable available from Bose® Customer Service. ...

Owner's guide
Page 12
Use the 20 foot (6 m) cable with a red collar (+) to + and - Refer to the appropriate black (-) output. 2. a. b. Connect each other; Match the label on the red collar of Acoustimass module output. LEFT wires go to the CENTER SPEAKER OUTPUT connections. c. Checking your connections Check all channels. ...SPEAKER OUTPUT label on . b. RIGHT wires go into C, LS, and RS jacks. d. At the Acoustimass module, check to make sure the wires are firmly inserted into the proper INPUTS FROM RECEIVER OR AMPLIFIER jacks. Gray connectors go into L and R jacks. At the receiver, make ...
Use the 20 foot (6 m) cable with a red collar (+) to + and - Refer to the appropriate black (-) output. 2. a. b. Connect each other; Match the label on the red collar of Acoustimass module output. LEFT wires go to the CENTER SPEAKER OUTPUT connections. c. Checking your connections Check all channels. ...SPEAKER OUTPUT label on . b. RIGHT wires go into C, LS, and RS jacks. d. At the Acoustimass module, check to make sure the wires are firmly inserted into the proper INPUTS FROM RECEIVER OR AMPLIFIER jacks. Gray connectors go into L and R jacks. At the receiver, make ...


