Owner's guide
Page 2
... to the presence of this owner's guide. ©2006 Bose Corporation. Please save your sales receipt and warranty card together with your speaker system. The exclamation point within an equilateral triangle, as lighted candles, should be placed on the rear of the Acoustimass module: The lightning flash with arrowhead symbol within the system...
... to the presence of this owner's guide. ©2006 Bose Corporation. Please save your sales receipt and warranty card together with your speaker system. The exclamation point within an equilateral triangle, as lighted candles, should be placed on the rear of the Acoustimass module: The lightning flash with arrowhead symbol within the system...
Owner's guide
Page 3
...çais CONTENTS SETTING UP 4 Unpacking the carton 4 Choosing locations for your speakers 5 Placing the center front speaker 6 Placing your left and right front speakers 6 Placing your rear speakers 6 Placing your Acoustimass® module 7 Making the connections 7 Connecting speakers to the Acoustimass module 7 Connecting the Acoustimass® module to the receiver 9 Checking and finalizing connections 10 Optional upgrade...
...çais CONTENTS SETTING UP 4 Unpacking the carton 4 Choosing locations for your speakers 5 Placing the center front speaker 6 Placing your left and right front speakers 6 Placing your rear speakers 6 Placing your Acoustimass® module 7 Making the connections 7 Connecting speakers to the Acoustimass module 7 Connecting the Acoustimass® module to the receiver 9 Checking and finalizing connections 10 Optional upgrade...
Owner's guide
Page 4
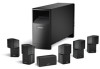
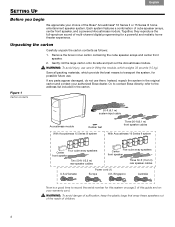
... this system on your authorized Bose dealer. entertainment speaker system. Figure 1 Carton contents 20-ft (6.1 m) system input cable Acoustimass module Rubber feet With Acoustimass 15 Series IIl system Three 20-ft (6.1 m) front speaker cables With Acoustimass 16 Series II system Four cube array speakers Center front speaker Two 50-ft (15.2 m) rear speaker cables Five cube array speakers Center front speaker Three 50-ft (15...
... this system on your authorized Bose dealer. entertainment speaker system. Figure 1 Carton contents 20-ft (6.1 m) system input cable Acoustimass module Rubber feet With Acoustimass 15 Series IIl system Three 20-ft (6.1 m) front speaker cables With Acoustimass 16 Series II system Four cube array speakers Center front speaker Two 50-ft (15.2 m) rear speaker cables Five cube array speakers Center front speaker Three 50-ft (15...
Owner's guide
Page 5
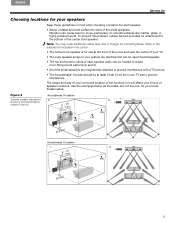
...speaker: • Select a stable and level surface for use at least 2 feet (.6 m) from your TV set to the bottom of the center front speaker. Refer to create ! Figure 2 Acoustimass 16 system Sample speaker... placement a. Vibration can be used interchangeably. • The top and bottom cubes of each of the small speakers...sound patterns (b and d). • All of the small speakers. ! b. (a and c) and performance results (b and d) Acoustimass 15 system c. To prevent this problem, rubber feet are magnetically ...
...speaker: • Select a stable and level surface for use at least 2 feet (.6 m) from your TV set to the bottom of the center front speaker. Refer to create ! Figure 2 Acoustimass 16 system Sample speaker... placement a. Vibration can be used interchangeably. • The top and bottom cubes of each of the small speakers...sound patterns (b and d). • All of the small speakers. ! b. (a and c) and performance results (b and d) Acoustimass 15 system c. To prevent this problem, rubber feet are magnetically ...

Owner's guide
Page 6
... Français Español English Bose® wall brackets and floor or table stands expand the options for placement of your rear speakers While the rear (surround) speakers may deliver some dialogue, they can deliver sound on both the front ! Note: The Acoustimass® 15 Series III system is wider than from within...
... Français Español English Bose® wall brackets and floor or table stands expand the options for placement of your rear speakers While the rear (surround) speakers may deliver some dialogue, they can deliver sound on both the front ! Note: The Acoustimass® 15 Series III system is wider than from within...
Owner's guide
Page 7
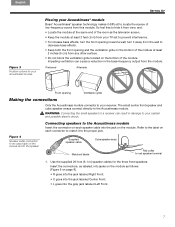
... a receiver can cause a reduction in damage to your system and possible electric shock. Use the supplied 20-foot (6.1 m) speaker cables for your Acoustimass module Placing your Acoustimass® module Bose® Acoustimass® speaker technology makes it from view, and: • Locate the module at least ! 2 inches (5 cm) from any other surface. • Do not block...
... a receiver can cause a reduction in damage to your system and possible electric shock. Use the supplied 20-foot (6.1 m) speaker cables for your Acoustimass module Placing your Acoustimass® module Bose® Acoustimass® speaker technology makes it from view, and: • Locate the module at least ! 2 inches (5 cm) from any other surface. • Do not block...
Owner's guide
Page 8
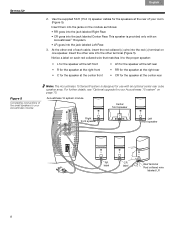
...Left Rear. 3. Acoustimass 16 system module Center front speaker Right front speaker Left front speaker RR label CR label Red terminal Red collared wire labeled LR 8 At the other terminal (Figure 5). Notice a label on page 10. This speaker is designed for use with an Acoustimass® 16 system. •... for the speaker at the center front • LR for the speaker at the left rear • RR for the speaker at the right rear • CR for the speakers at the center rear Figure 5 Completing connections of your Acoustimass module Note: The Acoustimass 15 Series III system ...
...Left Rear. 3. Acoustimass 16 system module Center front speaker Right front speaker Left front speaker RR label CR label Red terminal Red collared wire labeled LR 8 At the other terminal (Figure 5). Notice a label on page 10. This speaker is designed for use with an Acoustimass® 16 system. •... for the speaker at the center front • LR for the speaker at the left rear • RR for the speaker at the right rear • CR for the speakers at the center rear Figure 5 Completing connections of your Acoustimass module Note: The Acoustimass 15 Series III system ...
Owner's guide
Page 9
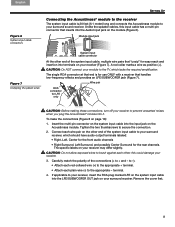
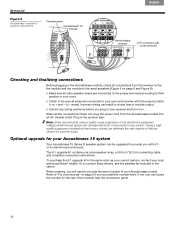
...(+ to + and - Insert the multi-pin connector on the system input cable into the input jack on page 10): 1. Unlike the speaker cables, this could damage your surround sound receiver. Wire pair RCA connector for LFE only CAUTION: Before making these connections, turn off your ... OUT jack on your surround receiver, which lacks the required amplification. connector that end is 20 feet (6.1 meter) long and connects the Acoustimass module to the appropriate - Module input jack Figure 7 Unzipping the paired wires System input cable connector At the other ; The single RCA...
...(+ to + and - Insert the multi-pin connector on the system input cable into the input jack on page 10): 1. Unlike the speaker cables, this could damage your surround sound receiver. Wire pair RCA connector for LFE only CAUTION: Before making these connections, turn off your ... OUT jack on your surround receiver, which lacks the required amplification. connector that end is 20 feet (6.1 meter) long and connects the Acoustimass module to the appropriate - Module input jack Figure 7 Unzipping the paired wires System input cable connector At the other ; The single RCA...
Owner's guide
Page 10
...your Acoustimass 15 system Your Acoustimass 15 Series III speaker system can be sure all wires are connected to your records" on page 2 if you can result in a total loss of module output. • Correct any system. Or to contact Bose ...speakers (Figure 5 on . SETTING UP Figure 8 Acoustimass® module to receiver connections Thumbscrews Acoustimass® 16 module Français Español English Home theater receiver LFE connector with cover removed Checking and finalizing connections Before plugging in the Acoustimass module, check all connections from the Acoustimass...
...your Acoustimass 15 system Your Acoustimass 15 Series III speaker system can be sure all wires are connected to your records" on page 2 if you can result in a total loss of module output. • Correct any system. Or to contact Bose ...speakers (Figure 5 on . SETTING UP Figure 8 Acoustimass® module to receiver connections Thumbscrews Acoustimass® 16 module Français Español English Home theater receiver LFE connector with cover removed Checking and finalizing connections Before plugging in the Acoustimass module, check all connections from the Acoustimass...
Owner's guide
Page 11
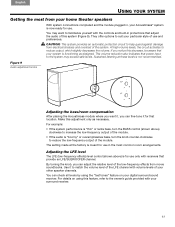
Figure 9 Audio adjustment knobs Adjusting the bass/room compensation After placing the Acoustimass module where you notice this adjustment only as designed. The setting made at these levels is now ready for that ! You can check all levels ... soundtracks. This volume reduction also indicates that your system is meant for use in the most from your home theater speakers With system connections completed and the module plugged in, your Acoustimass® system is not recommended. to the owner's guide provided with volume levels of your particular style of the system...
Figure 9 Audio adjustment knobs Adjusting the bass/room compensation After placing the Acoustimass module where you notice this adjustment only as designed. The setting made at these levels is now ready for that ! You can check all levels ... soundtracks. This volume reduction also indicates that your system is meant for use in the most from your home theater speakers With system connections completed and the module plugged in, your Acoustimass® system is not recommended. to the owner's guide provided with volume levels of your particular style of the system...
Owner's guide
Page 12
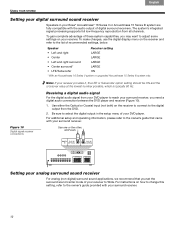
... the other, NOT both ) on how to change this setting, refer to select the digital output in your Bose® Acoustimass® 16 Series II or Acoustimass 15 Series III system are fully compatible with the audio output of your surround receiver, you may want to Wide. For... your receiver to adjust some! Speaker Receiver setting • Left and right LARGE • Center LARGE • Left and right surround LARGE • Center surround* LARGE • LFE/Subwoofer ON * With an Acoustimass 16 Series II system or upgraded Acoustimass 15 Series IlI system only. To make ...
... the other, NOT both ) on how to change this setting, refer to select the digital output in your Bose® Acoustimass® 16 Series II or Acoustimass 15 Series III system are fully compatible with the audio output of your surround receiver, you may want to Wide. For... your receiver to adjust some! Speaker Receiver setting • Left and right LARGE • Center LARGE • Left and right surround LARGE • Center surround* LARGE • LFE/Subwoofer ON * With an Acoustimass 16 Series II system or upgraded Acoustimass 15 Series IlI system only. To make ...
Owner's guide
Page 13
... DVD audio on your receiver to your area. Customer service For additional help in solving problems, contact the Bose Customer Service office appropriate to hear the DVD sound. Cleaning the speakers The cabinets of your Acoustimass speaker system may be carefully vacuumed, if necessary. reasonable care is processing a signal from a Hi-Fi VCR, stereo...
... DVD audio on your receiver to your area. Customer service For additional help in solving problems, contact the Bose Customer Service office appropriate to hear the DVD sound. Cleaning the speakers The cabinets of your Acoustimass speaker system may be carefully vacuumed, if necessary. reasonable care is processing a signal from a Hi-Fi VCR, stereo...
Owner's guide
Page 14
... the card and mail it to 8 ohms Speaker weight/size Each cube speaker array and center front speaker: 2.4 lb (1.1 kg)! 6.2"H x 3.1"W x 4.0"D ! (15.7 cm x 7.8 cm x 10.2 cm) Acoustimass module: 45 lb (20.3 kg)! 16.3"H x 8.1"W x 29.1"D ! (41.4 cm x 20.6 cm x 73.9 cm) Packed system weight Acoustimass 16 Series II system: 72.5 lb (32.6 kg)! Powered Acoustimass module: Three 5.25" (13 cm) woofers System...
... the card and mail it to 8 ohms Speaker weight/size Each cube speaker array and center front speaker: 2.4 lb (1.1 kg)! 6.2"H x 3.1"W x 4.0"D ! (15.7 cm x 7.8 cm x 10.2 cm) Acoustimass module: 45 lb (20.3 kg)! 16.3"H x 8.1"W x 29.1"D ! (41.4 cm x 20.6 cm x 73.9 cm) Packed system weight Acoustimass 16 Series II system: 72.5 lb (32.6 kg)! Powered Acoustimass module: Three 5.25" (13 cm) woofers System...
Quick setup guide
Page 1
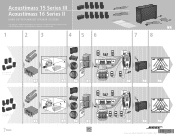
Acoustimass® 15 Series III Acoustimass 16 Series II HOME ENTERTAINMENT SPEAKER SYSTEMS Quick setup guide • Hurtig opstillingsvejledning • Kurzanleitung • Guía rápida de instalación • Noticede montage Guida di installazione rapida • Snelle opstellingsgids • Vägledning för snabb montering 1 2 3 4 5 6 �� � � � �� Acoustimass 15 Series III system � 4 � �...
Acoustimass® 15 Series III Acoustimass 16 Series II HOME ENTERTAINMENT SPEAKER SYSTEMS Quick setup guide • Hurtig opstillingsvejledning • Kurzanleitung • Guía rápida de instalación • Noticede montage Guida di installazione rapida • Snelle opstellingsgids • Vägledning för snabb montering 1 2 3 4 5 6 �� � � � �� Acoustimass 15 Series III system � 4 � �...

