
Owner's guide
Page 3
... front cube speaker arrays to the Acoustimass module 8 Connecting rear cube speaker arrays to the Acoustimass module 9 Connecting the Acoustimass module to the receiver 10 Checking the connections 12 Connecting the Acoustimass module to power 12 Upgrading your Acoustimass 15 Series II speaker system 12 Using your system 13... Where to get the digital audio signal 14 Setting your analog surround sound receiver 14 Reference 15 Troubleshooting 15 Customer service 15 Cleaning the speakers 16 Technical information 16 Warranty period 17 Accessories 17 3 AM264924_00 _V.pdf • August ...
... front cube speaker arrays to the Acoustimass module 8 Connecting rear cube speaker arrays to the Acoustimass module 9 Connecting the Acoustimass module to the receiver 10 Checking the connections 12 Connecting the Acoustimass module to power 12 Upgrading your Acoustimass 15 Series II speaker system 12 Using your system 13... Where to get the digital audio signal 14 Setting your analog surround sound receiver 14 Reference 15 Troubleshooting 15 Customer service 15 Cleaning the speakers 16 Technical information 16 Warranty period 17 Accessories 17 3 AM264924_00 _V.pdf • August ...
Owner's guide
Page 5
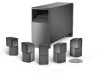
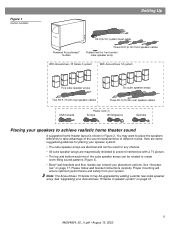
...Acoustimass 15 Series II system With Acoustimass 16 system Five cube speaker arrays Six cube speaker arrays Two 50-ft (15.2m) rear speaker cables Three 50-ft (15.2m) rear speaker cables USA/Canada Power cord (1) Europe UK/Singapore Australia Placing your speakers to create room-filling sound patterns (Figure 3). • Bose...® wall brackets and floor stands can extend your placement options. You may be upgraded by adding a center rear cube speaker array. Figure 1 Carton contents Setting Up 20-ft (6.1m) system input cable Powered Acoustimass®...
...Acoustimass 15 Series II system With Acoustimass 16 system Five cube speaker arrays Six cube speaker arrays Two 50-ft (15.2m) rear speaker cables Three 50-ft (15.2m) rear speaker cables USA/Canada Power cord (1) Europe UK/Singapore Australia Placing your speakers to create room-filling sound patterns (Figure 3). • Bose...® wall brackets and floor stands can extend your placement options. You may be upgraded by adding a center rear cube speaker array. Figure 1 Carton contents Setting Up 20-ft (6.1m) system input cable Powered Acoustimass®...
Owner's guide
Page 7
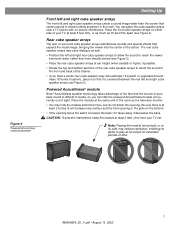
...do not block the opening faces the wall it increases the bass; You can hide the powered Acoustimass module conveniently out of your TV set. Powered Acoustimass® module Bose® Acoustimass speaker technology takes advantage of the fact that the source of the action. if it faces away... arrays add discrete sounds and special effects that seems natural to locate, so you have a center rear cube speaker array (Acoustimass 16 system or upgraded Acoustimass 15 Series II system), place it so that it decreases the bass. Be sure there is difficult to viewers sitting anywhere in ...
...do not block the opening faces the wall it increases the bass; You can hide the powered Acoustimass module conveniently out of your TV set. Powered Acoustimass® module Bose® Acoustimass speaker technology takes advantage of the fact that the source of the action. if it faces away... arrays add discrete sounds and special effects that seems natural to locate, so you have a center rear cube speaker array (Acoustimass 16 system or upgraded Acoustimass 15 Series II system), place it so that it decreases the bass. Be sure there is difficult to viewers sitting anywhere in ...
Owner's guide
Page 8
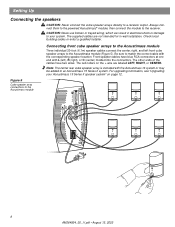
... with the Acoustimass 16 system or may be added to your Acoustimass 15 Series II speaker system" on the + wire are not intended for in electrical shock or damage to an Acoustimass 15 Series II system. The red collars on page 12. For upgrading information, see "Upgrading your system.... Always connect them to the powered Acoustimass® module, then connect the module to a receiver output. CAUTION...
... with the Acoustimass 16 system or may be added to your Acoustimass 15 Series II speaker system" on the + wire are not intended for in electrical shock or damage to an Acoustimass 15 Series II system. The red collars on page 12. For upgrading information, see "Upgrading your system.... Always connect them to the powered Acoustimass® module, then connect the module to a receiver output. CAUTION...
Owner's guide
Page 9
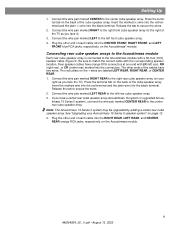
... REAR to match the correct cable with the corresponding speaker location. Release the tab to secure the wires. 2. Note: The Acoustimass 15 Series II system may be upgraded by adding a center rear cube speaker array. See "Upgrading your right as you face it). 3. Release the tab to secure the wires. 2. Connect the wire pair marked LEFT...
... REAR to match the correct cable with the corresponding speaker location. Release the tab to secure the wires. 2. Note: The Acoustimass 15 Series II system may be upgraded by adding a center rear cube speaker array. See "Upgrading your right as you face it). 3. Release the tab to secure the wires. 2. Connect the wire pair marked LEFT...
Owner's guide
Page 12
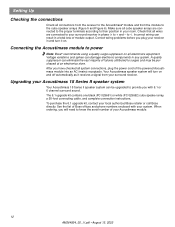
... system. Voltage variations and spikes can result in your room. Your Acoustimass speaker system will need to power Note: Bose® recommends using a quality surge suppressor on all electronics equipment. Correct wiring problems before you with your system. Upgrading your Acoustimass 15 Series II speaker system Your Acoustimass 15 Series II speaker system can eliminate the vast majority of the powered...
... system. Voltage variations and spikes can result in your room. Your Acoustimass speaker system will need to power Note: Bose® recommends using a quality surge suppressor on all electronics equipment. Correct wiring problems before you with your system. Upgrading your Acoustimass 15 Series II speaker system Your Acoustimass 15 Series II speaker system can eliminate the vast majority of the powered...
Owner's guide
Page 13
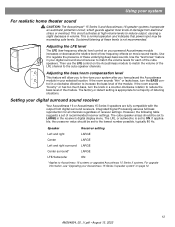
...level of the LFE channel to ON. Then use the LFE control on the Acoustimass module to Acoustimass 16 systems or upgraded Acoustimass 15 Series II systems. For upgrade information, see "Upgrading your Acoustimass 15 Series II speaker system" on movie sound tracks. Speaker Receiver setting Left and right LARGE ... and indicates that power input may be set to fine-tune your digital surround sound receiver Your Acoustimass 16 or Acoustimass 15 Series II speakers are fully compatible with the output from electrical stress or overload. The cube speaker arrays should be...
...level of the LFE channel to ON. Then use the LFE control on the Acoustimass module to Acoustimass 16 systems or upgraded Acoustimass 15 Series II systems. For upgrade information, see "Upgrading your Acoustimass 15 Series II speaker system" on movie sound tracks. Speaker Receiver setting Left and right LARGE ... and indicates that power input may be set to fine-tune your digital surround sound receiver Your Acoustimass 16 or Acoustimass 15 Series II speakers are fully compatible with the output from electrical stress or overload. The cube speaker arrays should be...