Owner's guide
Page 2
...Important Safety Instructions page enclosed with your records The system serial number is located on the rear of the Acoustimass module: The lightning flash with this owner's guide. ©2006 Bose Corporation. No part of important operating and maintenance instructions in this owner's guide. Confidential Unpublished Works. &#...read this owner's guide Please take the time to the Low Voltage Directive 73/23/EEC. It will help you set up and operate your safety WARNING: To reduce the risk of the Acoustimass module. These CAUTION marks are trademarks of the AC (mains) receptacle.
...Important Safety Instructions page enclosed with your records The system serial number is located on the rear of the Acoustimass module: The lightning flash with this owner's guide. ©2006 Bose Corporation. No part of important operating and maintenance instructions in this owner's guide. Confidential Unpublished Works. &#...read this owner's guide Please take the time to the Low Voltage Directive 73/23/EEC. It will help you set up and operate your safety WARNING: To reduce the risk of the Acoustimass module. These CAUTION marks are trademarks of the AC (mains) receptacle.
Owner's guide
Page 3
...; module 7 Making the connections 7 Connecting speakers to the Acoustimass module 7 Connecting the Acoustimass module to the receiver 9 Checking the connections 10 USING YOUR SYSTEM 11 Getting the most from your home theater speakers 11 Adjusting the bass/room compensation 11 Adjusting the LFE level 11 Setting your digital surround sound receiver 12 Receiving a digital...
...; module 7 Making the connections 7 Connecting speakers to the Acoustimass module 7 Connecting the Acoustimass module to the receiver 9 Checking the connections 10 USING YOUR SYSTEM 11 Getting the most from your home theater speakers 11 Adjusting the bass/room compensation 11 Adjusting the LFE level 11 Setting your digital surround sound receiver 12 Receiving a digital...
Owner's guide
Page 4
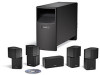
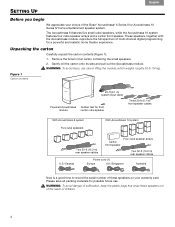
...the carton contents (Figure 1): 1. WARNING: To avoid injury, use . Français Español English SETTING UP Before you begin We appreciate your warranty card. Remove the brown inner carton containing the small speakers. 2. ...theater experience. The Acoustimass 6 features five small cube speakers, while the Acoustimass 10 system features four cube speaker arrays and a center front speaker. These speakers, together with the Acoustimass module, reproduce the full spectrum of the Bose® Acoustimass® 6 Series III or Acoustimass 10 Series IV home entertainment speaker ...
...the carton contents (Figure 1): 1. WARNING: To avoid injury, use . Français Español English SETTING UP Before you begin We appreciate your warranty card. Remove the brown inner carton containing the small speakers. 2. ...theater experience. The Acoustimass 6 features five small cube speakers, while the Acoustimass 10 system features four cube speaker arrays and a center front speaker. These speakers, together with the Acoustimass module, reproduce the full spectrum of the Bose® Acoustimass® 6 Series III or Acoustimass 10 Series IV home entertainment speaker ...
Owner's guide
Page 5
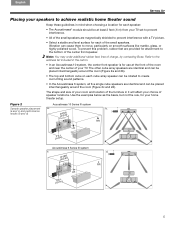
... of the furniture in it will affect your TV. d. 5 Note: You may order additional rubber feet, free of charge, by contacting Bose. Use the examples below as the basis, but not the rule, for attachment to the bottom of the center front speaker. English Espa&#...241;ol Français SETTING UP Placing your speakers to achieve realistic home theater sound Keep these guidelines in mind when choosing a location for each of the small speakers. Figure 2 Acoustimass 10 Series IV system Sample speaker placement a. The other cube array speakers are...
... of the furniture in it will affect your TV. d. 5 Note: You may order additional rubber feet, free of charge, by contacting Bose. Use the examples below as the basis, but not the rule, for attachment to the bottom of the center front speaker. English Espa&#...241;ol Français SETTING UP Placing your speakers to achieve realistic home theater sound Keep these guidelines in mind when choosing a location for each of the small speakers. Figure 2 Acoustimass 10 Series IV system Sample speaker placement a. The other cube array speakers are...
Owner's guide
Page 6
.... • Keep the speaker in line with the vertical center of the screen, if possible, for these speakers at the rear outer edges on page 5). SETTING UP Français Español English Front left and right rear speakers so they serve primarily to ! Place the other two feet at... the same height as the ears of a seated viewer or higher. • For the Acoustimass® 10 system, rotate the top and bottom sections of the rear cube speaker arrays to direct the sound to the front and back of the listener...
.... • Keep the speaker in line with the vertical center of the screen, if possible, for these speakers at the rear outer edges on page 5). SETTING UP Français Español English Front left and right rear speakers so they serve primarily to ! Place the other two feet at... the same height as the ears of a seated viewer or higher. • For the Acoustimass® 10 system, rotate the top and bottom sections of the rear cube speaker arrays to direct the sound to the front and back of the listener...
Owner's guide
Page 7
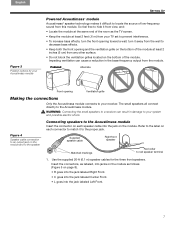
... jack. Supplied speaker cable Right front speaker Matched markings Red collar to the Acoustimass module. So feel free to hide it from view, and: • Locate the module at least 2 feet (.6 m) from your Acoustimass module SETTING UP Powered Acoustimass® module Acoustimass® speaker technology makes it difficult to your system and possible electric shock...
... jack. Supplied speaker cable Right front speaker Matched markings Red collar to the Acoustimass module. So feel free to hide it from view, and: • Locate the module at least 2 feet (.6 m) from your Acoustimass module SETTING UP Powered Acoustimass® module Acoustimass® speaker technology makes it difficult to your system and possible electric shock...
Owner's guide
Page 8
...cables for the speaker at the rear of the small speakers to the proper speaker: Figure 5 Completing connections of your Acoustimass® module • L for the speaker at the left front • R for the speaker at the right... front • C for the speaker at the center front Acoustimass® 10 system module • LR for the speaker at the left rear • RR for the speakers at the...room (Figure 5). Français Español English SETTING UP 2. Insert them into the jacks on one speaker. At the other terminal (Figure 5).
...cables for the speaker at the rear of the small speakers to the proper speaker: Figure 5 Completing connections of your Acoustimass® module • L for the speaker at the left front • R for the speaker at the right... front • C for the speaker at the center front Acoustimass® 10 system module • LR for the speaker at the left rear • RR for the speakers at the...room (Figure 5). Français Español English SETTING UP 2. Insert them into the jacks on one speaker. At the other terminal (Figure 5).
Owner's guide
Page 9
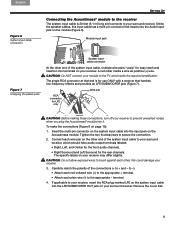
...input cable into the input jack on the module (Figure 6). The specific labels on page 10): 1. English Español Français SETTING UP Figure 6 System input cable connection Connecting the Acoustimass® module to the receiver The system input cable is for easy reach and insertion ... wire pairs "unzip" for use ONLY with a receiver that inserts into the LFE/SUBWOOFER OUT jack on your receiver may differ slightly. Acoustimass module. Module input jack Figure 7 Unzipping the paired wires System input cable connector At the other end of the system input cable to ...
...input cable into the input jack on the module (Figure 6). The specific labels on page 10): 1. English Español Français SETTING UP Figure 6 System input cable connection Connecting the Acoustimass® module to the receiver The system input cable is for easy reach and insertion ... wire pairs "unzip" for use ONLY with a receiver that inserts into the LFE/SUBWOOFER OUT jack on your receiver may differ slightly. Acoustimass module. Module input jack Figure 7 Unzipping the paired wires System input cable connector At the other end of the system input cable to ...
Owner's guide
Page 10
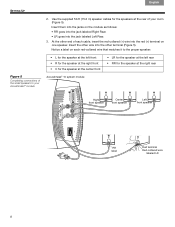
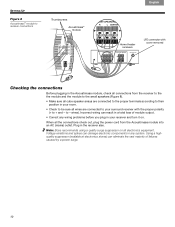
...10 When all electronics equipment. Using a highquality suppressor (available at electronics stores) can damage electronic components in your surround receiver with cover removed Checking the connections Before plugging in the Acoustimass module, check all connections from the Acoustimass...; Correct any wiring problems before you plug in any system. SETTING UP Figure 8 Acoustimass® module to receiver connections Thumbscrews Acoustimass® module Français Español English Home theater... to - Note: Bose recommends using a quality surge suppressor on .
...10 When all electronics equipment. Using a highquality suppressor (available at electronics stores) can damage electronic components in your surround receiver with cover removed Checking the connections Before plugging in the Acoustimass module, check all connections from the Acoustimass...; Correct any wiring problems before you plug in any system. SETTING UP Figure 8 Acoustimass® module to receiver connections Thumbscrews Acoustimass® module Français Español English Home theater... to - Note: Bose recommends using a quality surge suppressor on .

Owner's guide
Page 11
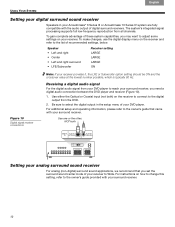
... power input to reduce output, which slightly decreases the volume. Figure 9 Audio adjustment knobs Adjusting the bass/room compensation After placing the Acoustimass module where you want to familiarize yourself with your ! Make this decrease, be aware that provide an LFE/SUBWOOFER channel. to match...protection circuit to increase the low-frequency output of the LFE channel with receivers that your system is functioning as necessary. The setting made at these levels is for use only with volume levels of the low-frequency effects from movie soundtracks. surround receiver. 11...
... power input to reduce output, which slightly decreases the volume. Figure 9 Audio adjustment knobs Adjusting the bass/room compensation After placing the Acoustimass module where you want to familiarize yourself with your ! Make this decrease, be aware that provide an LFE/SUBWOOFER channel. to match...protection circuit to increase the low-frequency output of the LFE channel with receivers that your system is functioning as necessary. The setting made at these levels is for use only with volume levels of the low-frequency effects from movie soundtracks. surround receiver. 11...
Owner's guide
Page 12
... the digital output in your receiver to Wide. Français Español English USING YOUR SYSTEM Setting your digital surround sound receiver Speakers in the setup menu of your Acoustimass® 6 Series III or Acoustimass 10 Series IV system are fully ! The system's integrated signal processing supports full low-frequency reproduction from the DVD. 2. surround...
... the digital output in your receiver to Wide. Français Español English USING YOUR SYSTEM Setting your digital surround sound receiver Speakers in the setup menu of your Acoustimass® 6 Series III or Acoustimass 10 Series IV system are fully ! The system's integrated signal processing supports full low-frequency reproduction from the DVD. 2. surround...
Owner's guide
Page 13
...are using digital programming, verify that the settings are plugged into an operating at the receiver. To contact Bose directly, refer to increase bass. Problem What to do System does not function • Make sure the receiver and powered Acoustimass module are correct at all AC outlet and... that both the powered Acoustimass module and the receiver are in...
...are using digital programming, verify that the settings are plugged into an operating at the receiver. To contact Bose directly, refer to increase bass. Problem What to do System does not function • Make sure the receiver and powered Acoustimass module are correct at all AC outlet and... that both the powered Acoustimass module and the receiver are in...


