Quick setup guide
Page 1
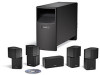
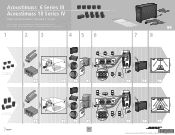
Acoustimass® 6 Series III Acoustimass 10 Series IV HOME ENTERTAINMENT SPEAKER SYSTEMS Quick setup guide • Hurtig opstillingsvejledning • Kurzanleitung • Guía rápida de instalación • Noticede montage • Guida di installazione rapida • Snelle opstellingsgids • Vägledning för snabb montering 1 2 3 4 5 6 �� � � � �� Acoustimass 6 Series III system � �� � �...
Acoustimass® 6 Series III Acoustimass 10 Series IV HOME ENTERTAINMENT SPEAKER SYSTEMS Quick setup guide • Hurtig opstillingsvejledning • Kurzanleitung • Guía rápida de instalación • Noticede montage • Guida di installazione rapida • Snelle opstellingsgids • Vägledning för snabb montering 1 2 3 4 5 6 �� � � � �� Acoustimass 6 Series III system � �� � �...
Owner's guide
Page 3
... 4 Unpacking the carton 4 Placing your speakers to achieve realistic home theater sound 5 Front left and right speakers 6 Center speaker 6 Rear speakers 6 Powered Acoustimass® module 7 Making the connections 7 Connecting speakers to the Acoustimass module 7 Connecting the Acoustimass module to the receiver 9 Checking the connections 10 USING YOUR SYSTEM 11 Getting the most from your home theater speakers 11 Adjusting the bass/room...
... 4 Unpacking the carton 4 Placing your speakers to achieve realistic home theater sound 5 Front left and right speakers 6 Center speaker 6 Rear speakers 6 Powered Acoustimass® module 7 Making the connections 7 Connecting speakers to the Acoustimass module 7 Connecting the Acoustimass module to the receiver 9 Checking the connections 10 USING YOUR SYSTEM 11 Getting the most from your home theater speakers 11 Adjusting the bass/room...
Owner's guide
Page 4
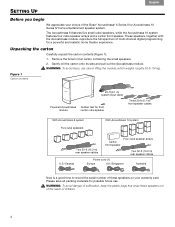
... contents (Figure 1): 1. Remove the brown inner carton containing the small speakers. 2. Gently roll the carton onto its side and pull out the Acoustimass module. WARNING: To avoid injury, use . These speakers, together with the Acoustimass module, reproduce the full spectrum of these speakers out of the reach of the Bose® Acoustimass® 6 Series III or Acoustimass 10 Series IV home entertainment speaker system.
... contents (Figure 1): 1. Remove the brown inner carton containing the small speakers. 2. Gently roll the carton onto its side and pull out the Acoustimass module. WARNING: To avoid injury, use . These speakers, together with the Acoustimass module, reproduce the full spectrum of these speakers out of the reach of the Bose® Acoustimass® 6 Series III or Acoustimass 10 Series IV home entertainment speaker system.
Owner's guide
Page 5
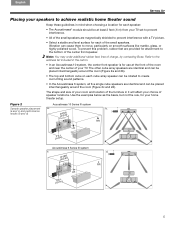
.... • Select a stable and level surface for your home theater setup. b. (a and c) and performance results (b and d) Acoustimass 6 Series III system c. Figure 2 Acoustimass 10 Series IV system Sample speaker placement a. The shape and size of your room and location of the furniture in it will affect your choice of charge, by contacting Bose. d. 5 Refer to the address list included in...
.... • Select a stable and level surface for your home theater setup. b. (a and c) and performance results (b and d) Acoustimass 6 Series III system c. Figure 2 Acoustimass 10 Series IV system Sample speaker placement a. The shape and size of your room and location of the furniture in it will affect your choice of charge, by contacting Bose. d. 5 Refer to the address list included in...
Owner's guide
Page 10
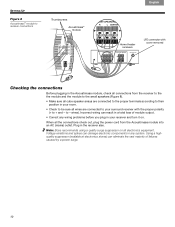
... the connections Before plugging in a total loss of failures caused by a power surge. 10 Incorrect wiring can eliminate the vast majority of module output. • Correct any system. Note: Bose recommends using a quality surge suppressor on . Plug in your room. • Check...module to the small speakers (Figure 8). • Make sure all connections from the Acoustimass module into an AC (mains) outlet. wires). SETTING UP Figure 8 Acoustimass® module to receiver connections Thumbscrews Acoustimass® module Français Español English Home theater receivers LFE ...
... the connections Before plugging in a total loss of failures caused by a power surge. 10 Incorrect wiring can eliminate the vast majority of module output. • Correct any system. Note: Bose recommends using a quality surge suppressor on . Plug in your room. • Check...module to the small speakers (Figure 8). • Make sure all connections from the Acoustimass module into an AC (mains) outlet. wires). SETTING UP Figure 8 Acoustimass® module to receiver connections Thumbscrews Acoustimass® module Français Español English Home theater receivers LFE ...

Owner's guide
Page 11
... the volume. Use it for use only with the controls and built-in the most from your home theater speakers With system connections completed and the module plugged in, your Acoustimass® system is functioning as necessary. For details on your digital surround sound receiver. preferences. This... provide an LFE/SUBWOOFER channel. the audio of the module. Figure 9 Audio adjustment knobs Adjusting the bass/room compensation After placing the Acoustimass module where you can check all levels by using the "test tones" feature on using this system (Figure 9). location. to match ...
... the volume. Use it for use only with the controls and built-in the most from your home theater speakers With system connections completed and the module plugged in, your Acoustimass® system is functioning as necessary. For details on your digital surround sound receiver. preferences. This... provide an LFE/SUBWOOFER channel. the audio of the module. Figure 9 Audio adjustment knobs Adjusting the bass/room compensation After placing the Acoustimass module where you can check all levels by using the "test tones" feature on using this system (Figure 9). location. to match ...


