Owner's guide
Page 2
... distributed or otherwise used without prior written permission. These CAUTION marks may be placed on the bottom of the Acoustimass module. No part of this owner's guide. ©2002 Bose Corporation. Confidential Unpublished Works. ©1992-1997 Dolby Laboratories. NO USER-SERVICABLE PARTS INSIDE. Please ...ELECTRICAL SHOCK DO NOT OPEN CAUTION: TO REDUCE THE RISK OF ELECTRIC SHOCK, DO NOT REMOVE COVER (OR BACK). It will help you set up and operate your owner's guide for future reference. Safety Information WARNING: To reduce the risk of fire or electric shock, ...
... distributed or otherwise used without prior written permission. These CAUTION marks may be placed on the bottom of the Acoustimass module. No part of this owner's guide. ©2002 Bose Corporation. Confidential Unpublished Works. ©1992-1997 Dolby Laboratories. NO USER-SERVICABLE PARTS INSIDE. Please ...ELECTRICAL SHOCK DO NOT OPEN CAUTION: TO REDUCE THE RISK OF ELECTRIC SHOCK, DO NOT REMOVE COVER (OR BACK). It will help you set up and operate your owner's guide for future reference. Safety Information WARNING: To reduce the risk of fire or electric shock, ...
Owner's guide
Page 3
... rear cube speakers to the Acoustimass module 9 Connecting the Acoustimass module to the receiver 10 Checking the connections 12 Connecting the Acoustimass module to power 12 Using your system 13 For realistic home theater sound 13 Adjusting the LFE level 13 Adjusting the bass/room compensation level 13 Setting your analog surround sound receiver 14...
... rear cube speakers to the Acoustimass module 9 Connecting the Acoustimass module to the receiver 10 Checking the connections 12 Connecting the Acoustimass module to power 12 Using your system 13 For realistic home theater sound 13 Adjusting the LFE level 13 Adjusting the bass/room compensation level 13 Setting your analog surround sound receiver 14...
Owner's guide
Page 4
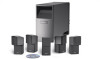
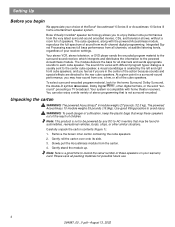
...card. Unpacking the carton WARNING: The powered Acoustimass® 6 module weighs 27 pounds (12.3 kg). Gently roll the carton over onto its side. 3. Setting Up Before you begin We appreciate your receiver settings. Your system is created by any DC-...-channel digital programming. You can also enjoy a wide variety of the Bose® Acoustimass® 6 Series III or Acoustimass 10 Series III home entertainment speaker system. Use good lifting practice to the powered Acoustimass module. Bose Virtually Invisible® speaker technology allows you are in automobiles, recreational vehicles...
...card. Unpacking the carton WARNING: The powered Acoustimass® 6 module weighs 27 pounds (12.3 kg). Gently roll the carton over onto its side. 3. Setting Up Before you begin We appreciate your receiver settings. Your system is created by any DC-...-channel digital programming. You can also enjoy a wide variety of the Bose® Acoustimass® 6 Series III or Acoustimass 10 Series III home entertainment speaker system. Use good lifting practice to the powered Acoustimass module. Bose Virtually Invisible® speaker technology allows you are in automobiles, recreational vehicles...
Owner's guide
Page 5
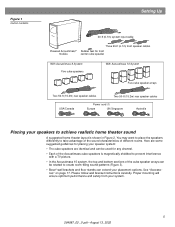
... 1 Carton contents Setting Up 20-ft (6.1m) system input cable Powered Acoustimass® module Three 20-ft (6.1m) front speaker cables Rubber feet for front center cube speaker With Acoustimass 6 System Five cube speakers With Acoustimass 10 System Five cube speaker... arrays Two 50-ft (15.2m) rear speaker cables Two 50-ft (15.2m) rear speaker cables USA/Canada Power cord (1) Europe UK/Singapore Australia Placing your speakers to create room-filling sound patterns (Figure 3). • Bose...
... 1 Carton contents Setting Up 20-ft (6.1m) system input cable Powered Acoustimass® module Three 20-ft (6.1m) front speaker cables Rubber feet for front center cube speaker With Acoustimass 6 System Five cube speakers With Acoustimass 10 System Five cube speaker... arrays Two 50-ft (15.2m) rear speaker cables Two 50-ft (15.2m) rear speaker cables USA/Canada Power cord (1) Europe UK/Singapore Australia Placing your speakers to create room-filling sound patterns (Figure 3). • Bose...
Owner's guide
Page 6
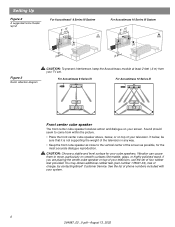
... cause them to come from your TV set of phone numbers included with your television. You may obtain additional rubber feet (part number 178321-04), free of the screen as close to the vertical center of charge, by contacting Bose® Customer Service. For Acoustimass 6 Series III For Acoustimass 10 Series III Front center cube speaker The front center...
... cause them to come from your TV set of phone numbers included with your television. You may obtain additional rubber feet (part number 178321-04), free of the screen as close to the vertical center of charge, by contacting Bose® Customer Service. For Acoustimass 6 Series III For Acoustimass 10 Series III Front center cube speaker The front center...
Owner's guide
Page 7
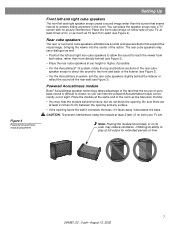
... it decreases the bass. CAUTION: To prevent interference, keep the module at ear height or higher, if possible. • For the Acoustimass® 10 system, rotate the top and bottom sections of the rear cube speaker arrays to direct the sound to the front and back of the... same end of the action. if it faces away it increases the bass; You can hide the powered Acoustimass module conveniently out of your TV set. Powered Acoustimass module Bose® Acoustimass speaker technology takes advantage of the fact that seems natural to viewers sitting anywhere in the room. Be sure...
... it decreases the bass. CAUTION: To prevent interference, keep the module at ear height or higher, if possible. • For the Acoustimass® 10 system, rotate the top and bottom sections of the rear cube speaker arrays to direct the sound to the front and back of the... same end of the action. if it faces away it increases the bass; You can hide the powered Acoustimass module conveniently out of your TV set. Powered Acoustimass module Bose® Acoustimass speaker technology takes advantage of the fact that seems natural to viewers sitting anywhere in the room. Be sure...
Owner's guide
Page 8
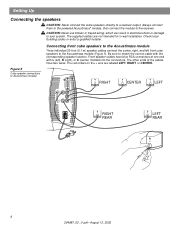
... cables are labeled LEFT, RIGHT, or CENTER. The red collars on the + wire are not intended for in electrical shock or damage to the Acoustimass module (Figure 5). Setting Up Connecting the speakers CAUTION: Never connect the cube speakers directly to match the correct cable with L (left front cube speakers to your system...
... cables are labeled LEFT, RIGHT, or CENTER. The red collars on the + wire are not intended for in electrical shock or damage to the Acoustimass module (Figure 5). Setting Up Connecting the speakers CAUTION: Never connect the cube speakers directly to match the correct cable with L (left front cube speakers to your system...
Owner's guide
Page 9
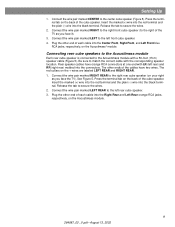
...cable with the corresponding speaker location. Plug the other end of the cube speaker. The red collars on the Acoustimass® module. Plug the other ends of the TV as you face it). 3. Insert the marked (+) wire...marked RIGHT to the right front cube speaker (to secure the wires. 2. Connecting rear cube speakers to the Acoustimass module Each rear cube speaker is connected to the left rear) and RR (right rear) molded into the ... the plain (-) wire into the black terminal. Rear speaker cables have two wires. Setting Up 1. The other end of the cube speaker.
...cable with the corresponding speaker location. Plug the other end of the cube speaker. The red collars on the Acoustimass® module. Plug the other ends of the TV as you face it). 3. Insert the marked (+) wire...marked RIGHT to the right front cube speaker (to secure the wires. 2. Connecting rear cube speakers to the Acoustimass module Each rear cube speaker is connected to the left rear) and RR (right rear) molded into the ... the plain (-) wire into the black terminal. Rear speaker cables have two wires. Setting Up 1. The other end of the cube speaker.
Owner's guide
Page 10
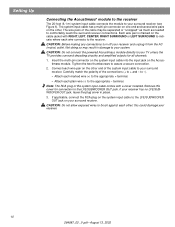
Setting Up Connecting the Acoustimass® module to the receiver The 20-foot (6.1 m) system input cable connects the module to your system. The wire pairs of the system input cable to your receiver. 10 264887_00 _V.pdf • August 13, 2002 Insert the multi-pin connector on the ...LFE/SUBWOOFER OUT jack, leave the plug cover in damage to comfortably reach the surround receiver connections. CAUTION: Do not connect the powered Acoustimass module directly to the LFE/SUBWOOFER OUT jack on the cable jacket with a cover installed. terminal. Carefully match the polarity of the...
Setting Up Connecting the Acoustimass® module to the receiver The 20-foot (6.1 m) system input cable connects the module to your system. The wire pairs of the system input cable to your receiver. 10 264887_00 _V.pdf • August 13, 2002 Insert the multi-pin connector on the ...LFE/SUBWOOFER OUT jack, leave the plug cover in damage to comfortably reach the surround receiver connections. CAUTION: Do not connect the powered Acoustimass module directly to the LFE/SUBWOOFER OUT jack on the cable jacket with a cover installed. terminal. Carefully match the polarity of the...
Owner's guide
Page 11
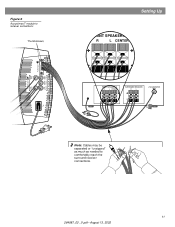
Figure 6 Acoustimass® module to receiver connections Thumbscrews Audio Output Left Rear Right Rear Audio Input Left Center Right Front Front Front Setting Up FRONT SPEAKERS A R L CENTER FRONT SPEAKERS A R L CENTER SURROUND SPEAKERS R L LFE/SUBWOOFER OUT Note: Cables may be separated or "unzipped" as much as needed to comfortably reach the surround receiver connections. 11 264887_00 _V.pdf • August 13, 2002
Figure 6 Acoustimass® module to receiver connections Thumbscrews Audio Output Left Rear Right Rear Audio Input Left Center Right Front Front Front Setting Up FRONT SPEAKERS A R L CENTER FRONT SPEAKERS A R L CENTER SURROUND SPEAKERS R L LFE/SUBWOOFER OUT Note: Cables may be separated or "unzipped" as much as needed to comfortably reach the surround receiver connections. 11 264887_00 _V.pdf • August 13, 2002
Owner's guide
Page 12
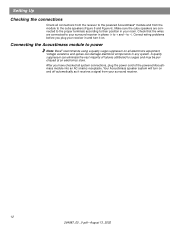
...Setting Up Checking the connections Check all electronics equipment. to + and - Connecting the Acoustimass module to power Note: Bose® recommends using a quality surge suppressor on . After you plug your surround receiver. 12 264887_00 _V.pdf • August 13, 2002 Voltage variations and spikes can eliminate the vast majority of the powered Acoustimass...problems before you have checked all system connections, plug the power cord of failures attributed to the powered Acoustimass® module and from your receiver in phase (+ to -). Make sure the cube speakers are connected ...
...Setting Up Checking the connections Check all electronics equipment. to + and - Connecting the Acoustimass module to power Note: Bose® recommends using a quality surge suppressor on . After you plug your surround receiver. 12 264887_00 _V.pdf • August 13, 2002 Voltage variations and spikes can eliminate the vast majority of the powered Acoustimass...problems before you have checked all system connections, plug the power cord of failures attributed to the powered Acoustimass® module and from your receiver in phase (+ to -). Make sure the cube speakers are connected ...
Owner's guide
Page 13
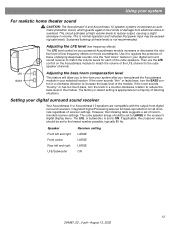
... activates at these underlying deep bass sounds. However, the following table suggests a set to ON. Adjusting the LFE level (low frequency effects) The LFE level control on your system For realistic home theater sound CAUTION: The Acoustimass® 6 and Acoustimass 10 speaker systems incorporate an automatic protection circuit, which guards against most kinds of...
... activates at these underlying deep bass sounds. However, the following table suggests a set to ON. Adjusting the LFE level (low frequency effects) The LFE level control on your system For realistic home theater sound CAUTION: The Acoustimass® 6 and Acoustimass 10 speaker systems incorporate an automatic protection circuit, which guards against most kinds of...
Owner's guide
Page 14
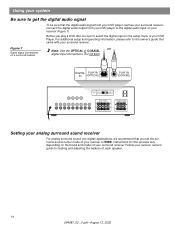
...; August 13, 2002 DIGITAL PLAY IN IN (OPTICAL) PLAY IN (COAXIAL) DIGITAL PLAY IN IN (OPTICAL) PLAY IN (COAXIAL) FRONT SPEAKERS R L SURROUND SPEAKERS R REAR L CENTER Setting your analog surround sound receiver For analog surround sound (not digital) applications, we recommend that the digital audio signal from your DVD player reaches your..., please refer to select the digital ouput in the setup menu of your receiver to WIDE. Before you play a DVD disc, be sure that you set the surround-sound center mode of your surround receiver.
...; August 13, 2002 DIGITAL PLAY IN IN (OPTICAL) PLAY IN (COAXIAL) DIGITAL PLAY IN IN (OPTICAL) PLAY IN (COAXIAL) FRONT SPEAKERS R L SURROUND SPEAKERS R REAR L CENTER Setting your analog surround sound receiver For analog surround sound (not digital) applications, we recommend that the digital audio signal from your DVD player reaches your..., please refer to select the digital ouput in the setup menu of your receiver to WIDE. Before you play a DVD disc, be sure that you set the surround-sound center mode of your surround receiver.
Owner's guide
Page 15
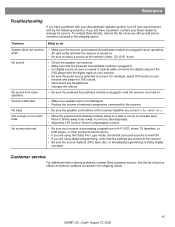
... phone numbers enclosed in the shipping carton. Move it farther away from cube speakers • Be sure the powered Acoustimass module is plugged in solving problems, contact Bose customer service. See the list of service of external components connected to the list of service of the DVD player...using the Dolby Pro-Logic mode, check that surround-sound is turned ON. • If you are using digital programming, verify that the settings are correct at the receiver/amplifier are plugged into an operating at the receiver (video, CD, DVD, tuner). Reference Troubleshooting If...
... phone numbers enclosed in the shipping carton. Move it farther away from cube speakers • Be sure the powered Acoustimass module is plugged in solving problems, contact Bose customer service. See the list of service of external components connected to the list of service of the DVD player...using the Dolby Pro-Logic mode, check that surround-sound is turned ON. • If you are using digital programming, verify that the settings are correct at the receiver/amplifier are plugged into an operating at the receiver (video, CD, DVD, tuner). Reference Troubleshooting If...


