Owner's guide
Page 3
... cube speaker 6 Front left and right cube speakers 7 Rear cube speakers 7 Powered Acoustimass® module 7 Connecting the speakers 8 Connecting front cube speakers to the Acoustimass module 8 Connecting rear cube speakers to the Acoustimass module 9 Connecting the Acoustimass module to the receiver 10 Checking the connections 12 Connecting the Acoustimass module to power 12 Using your system 13 For realistic home theater sound...
... cube speaker 6 Front left and right cube speakers 7 Rear cube speakers 7 Powered Acoustimass® module 7 Connecting the speakers 8 Connecting front cube speakers to the Acoustimass module 8 Connecting rear cube speakers to the Acoustimass module 9 Connecting the Acoustimass module to the receiver 10 Checking the connections 12 Connecting the Acoustimass module to power 12 Using your system 13 For realistic home theater sound...
Owner's guide
Page 8
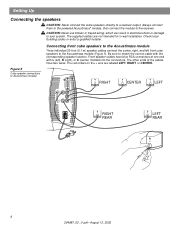
... cables are labeled LEFT, RIGHT, or CENTER. Setting Up Connecting the speakers CAUTION: Never connect the cube speakers directly to match the correct cable with L (left front cube speakers to your system. Connecting front cube speakers to the Acoustimass module Three individual 20-foot (6.1 m) speaker cables connect the center, right, and left ), R (right), or C (center...
... cables are labeled LEFT, RIGHT, or CENTER. Setting Up Connecting the speakers CAUTION: Never connect the cube speakers directly to match the correct cable with L (left front cube speakers to your system. Connecting front cube speakers to the Acoustimass module Three individual 20-foot (6.1 m) speaker cables connect the center, right, and left ), R (right), or C (center...
Owner's guide
Page 9
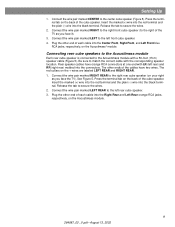
...Plug the other end of the TV as you face it). 3. Connecting rear cube speakers to the Acoustimass module Each rear cube speaker is connected to secure the wires. 2. Connect the wire pair marked LEFT REAR to the center cube speaker (Figure 5). Connect the wire pair marked CENTER to the left rear) and RR ... of the cube speaker. Release the tab to the right rear cube speaker (on the Acoustimass module. 9 264887_00 _V.pdf • August 13, 2002 Rear speaker cables have two wires. Setting Up 1. Connect the wire pair marked RIGHT to the right front cube speaker (to the right of each...
...Plug the other end of the TV as you face it). 3. Connecting rear cube speakers to the Acoustimass module Each rear cube speaker is connected to secure the wires. 2. Connect the wire pair marked LEFT REAR to the center cube speaker (Figure 5). Connect the wire pair marked CENTER to the left rear) and RR ... of the cube speaker. Release the tab to the right rear cube speaker (on the Acoustimass module. 9 264887_00 _V.pdf • August 13, 2002 Rear speaker cables have two wires. Setting Up 1. Connect the wire pair marked RIGHT to the right front cube speaker (to the right of each...
Owner's guide
Page 10
... several wire pairs on the other ; CAUTION: Before making any connections turn off your surround receiver. Insert the multi-pin connector on the system input cable into the input jack on your receiver. 10 264887_00 _V.pdf • August 13, 2002 Remove this could ...; Attach each marked wire (+) to the appropriate + terminal. • Attach each wire connects to the receiver. Setting Up Connecting the Acoustimass® module to the receiver The 20-foot (6.1 m) system input cable connects the module to your TV unless the TV provides surround decoding circuitry and amplified ...
... several wire pairs on the other ; CAUTION: Before making any connections turn off your surround receiver. Insert the multi-pin connector on the system input cable into the input jack on your receiver. 10 264887_00 _V.pdf • August 13, 2002 Remove this could ...; Attach each marked wire (+) to the appropriate + terminal. • Attach each wire connects to the receiver. Setting Up Connecting the Acoustimass® module to the receiver The 20-foot (6.1 m) system input cable connects the module to your TV unless the TV provides surround decoding circuitry and amplified ...
Owner's guide
Page 11
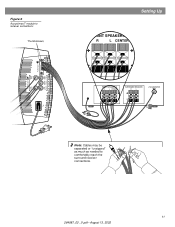
Figure 6 Acoustimass® module to receiver connections Thumbscrews Audio Output Left Rear Right Rear Audio Input Left Center Right Front Front Front Setting Up FRONT SPEAKERS A R L CENTER FRONT SPEAKERS A R L CENTER SURROUND SPEAKERS R L LFE/SUBWOOFER OUT Note: Cables may be separated or "unzipped" as much as needed to comfortably reach the surround receiver connections. 11 264887_00 _V.pdf • August 13, 2002
Figure 6 Acoustimass® module to receiver connections Thumbscrews Audio Output Left Rear Right Rear Audio Input Left Center Right Front Front Front Setting Up FRONT SPEAKERS A R L CENTER FRONT SPEAKERS A R L CENTER SURROUND SPEAKERS R L LFE/SUBWOOFER OUT Note: Cables may be separated or "unzipped" as much as needed to comfortably reach the surround receiver connections. 11 264887_00 _V.pdf • August 13, 2002
Owner's guide
Page 12
... before you have checked all electronics equipment. Connecting the Acoustimass module to power Note: Bose® recommends using a quality surge suppressor on . Voltage variations and spikes can eliminate the vast majority of the powered Acoustimass module into an AC (mains) receptacle. Make sure the cube speakers are connected to your room. A quality suppressor can damage...
... before you have checked all electronics equipment. Connecting the Acoustimass module to power Note: Bose® recommends using a quality surge suppressor on . Voltage variations and spikes can eliminate the vast majority of the powered Acoustimass module into an AC (mains) receptacle. Make sure the cube speakers are connected to your room. A quality suppressor can damage...
Owner's guide
Page 14
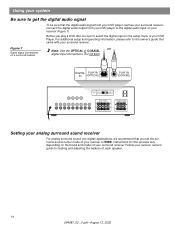
...the owner's guide that you play a DVD disc, be sure that the digital audio signal from your DVD player reaches your surround receiver, connect the digital audio output from your DVD player to the digital audio input on a surround receiver Note: Use the OPTICAL or COAXIAL OR digital... input connections, but not both. Figure 7 Digital signal connections on your receiver (Figure 7). Before you set the surround-sound center mode of your receiver to WIDE. Using your system...
...the owner's guide that you play a DVD disc, be sure that the digital audio signal from your DVD player reaches your surround receiver, connect the digital audio output from your DVD player to the digital audio input on a surround receiver Note: Use the OPTICAL or COAXIAL OR digital... input connections, but not both. Figure 7 Digital signal connections on your receiver (Figure 7). Before you set the surround-sound center mode of your receiver to WIDE. Using your system...
Owner's guide
Page 15
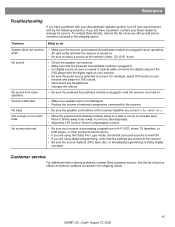
... a coaxial or optical cable connects the digital output of the DVD player with your Acoustimass® speaker system, turn off your sound source and try the following solutions. To contact Bose directly, refer to the list of service of external components connected to the receiver. to increase... bass. Problem What to do System does not function • Make sure the receiver and powered Acoustimass module are plugged into an operating...
... a coaxial or optical cable connects the digital output of the DVD player with your Acoustimass® speaker system, turn off your sound source and try the following solutions. To contact Bose directly, refer to the list of service of external components connected to the receiver. to increase... bass. Problem What to do System does not function • Make sure the receiver and powered Acoustimass module are plugged into an operating...
Owner's guide
Page 16
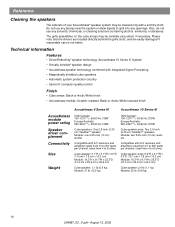
... • Syncom® computer quality control Finish • Cube arrays: Black or Arctic White finish • Acoustimass module: Scratch-resistant Black or Arctic White textured finish Acoustimass 6 Series III Acoustimass 10 Series III Acoustimass module power rating Speaker driver complement Connectivity Size Weight USA/Canada: 100-127V 50/60 Hz 135W Europe/Australia: 220-240V 50/60 Hz...
... • Syncom® computer quality control Finish • Cube arrays: Black or Arctic White finish • Acoustimass module: Scratch-resistant Black or Arctic White textured finish Acoustimass 6 Series III Acoustimass 10 Series III Acoustimass module power rating Speaker driver complement Connectivity Size Weight USA/Canada: 100-127V 50/60 Hz 135W Europe/Australia: 220-240V 50/60 Hz...


