Owner's guide
Page 1
The Bose® Acoustimass® 10 Series II Home Theater Speaker System Owner's Guide October 22, 2001 AM194646_02 _V.pdf
The Bose® Acoustimass® 10 Series II Home Theater Speaker System Owner's Guide October 22, 2001 AM194646_02 _V.pdf
Owner's guide
Page 2
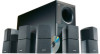
... Acoustimass 10 Series II speaker system is in compliance with realistic sound, without a lot of equipment. Please take the time to read this owner's guide carefully. These cube speakers deliver more lifelike sound and better overall performance, yet are smaller than their predecessors. Your system features new third generation Acoustimass cube speaker arrays, a product of the Bose® Acoustimass® 10 Series II...
... Acoustimass 10 Series II speaker system is in compliance with realistic sound, without a lot of equipment. Please take the time to read this owner's guide carefully. These cube speakers deliver more lifelike sound and better overall performance, yet are smaller than their predecessors. Your system features new third generation Acoustimass cube speaker arrays, a product of the Bose® Acoustimass® 10 Series II...
Owner's guide
Page 5
... realistic home theater sound 5 Selecting the locations for your speakers 6 Connecting the speakers 9 Using Your Acoustimass 10 Series II speaker system For realistic home theater sound 13 Maintaining Your Acoustimass 10 Series II speaker system Troubleshooting ...14 Customer service ...14 Cleaning the speakers 15 Warranty period ...15 Accessories ...15 Product Information Technical information 16 Bose® Corporation inside back cover For your records The...
... realistic home theater sound 5 Selecting the locations for your speakers 6 Connecting the speakers 9 Using Your Acoustimass 10 Series II speaker system For realistic home theater sound 13 Maintaining Your Acoustimass 10 Series II speaker system Troubleshooting ...14 Customer service ...14 Cleaning the speakers 15 Warranty period ...15 Accessories ...15 Product Information Technical information 16 Bose® Corporation inside back cover For your records The...
Owner's guide
Page 6
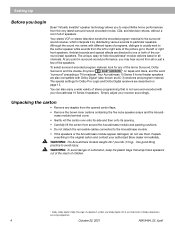
... point in the original carton and contact your receiver accordingly. WARNING: The Acoustimass module weighs 28.7 pounds (13 kg). The special settings for any of speakers. Ambient sounds and special effects are also compatible with your Acoustimass 10 Series II speakers. Simply adjust your authorized Bose dealer immediately. At any staples from the opened carton flaps. • Remove...
... point in the original carton and contact your receiver accordingly. WARNING: The Acoustimass module weighs 28.7 pounds (13 kg). The special settings for any of speakers. Ambient sounds and special effects are also compatible with your Acoustimass 10 Series II speakers. Simply adjust your authorized Bose dealer immediately. At any staples from the opened carton flaps. • Remove...
Owner's guide
Page 7
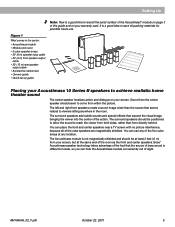
... and center speakers. You can use . AM194646_02_V.pdf October 22, 2001 5 The left and right front speakers create a sound image wider than from directly behind. Bose® Acoustimass speaker technology takes advantage of sight. You can hide the Acoustimass module conveniently ...8226; Owner's guide • Quick set up guide Placing your Acoustimass 10 Series II speakers to achieve realistic home theater sound The center speaker localizes action and dialogue on your warranty card. The surround speakers add subtle sounds and special effects that expand the visual image,...
... and center speakers. You can use . AM194646_02_V.pdf October 22, 2001 5 The left and right front speakers create a sound image wider than from directly behind. Bose® Acoustimass speaker technology takes advantage of sight. You can hide the Acoustimass module conveniently ...8226; Owner's guide • Quick set up guide Placing your Acoustimass 10 Series II speakers to achieve realistic home theater sound The center speaker localizes action and dialogue on your warranty card. The surround speakers add subtle sounds and special effects that expand the visual image,...
Owner's guide
Page 8
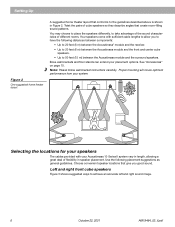
Bose wall brackets and floor stands can extend your system. Selecting the locations for your Acoustimass 10 Series II system vary in Figure 2. Use the following distances between components: • Up to 20 feet (6 m) between the Acoustimass® module and the receiver. • Up to 20 feet (6 m) between the Acoustimass module and the front and center cube speakers. •...
Bose wall brackets and floor stands can extend your system. Selecting the locations for your Acoustimass 10 Series II system vary in Figure 2. Use the following distances between components: • Up to 20 feet (6 m) between the Acoustimass® module and the receiver. • Up to 20 feet (6 m) between the Acoustimass module and the front and center cube speakers. •...

Owner's guide
Page 9
... the top of the TV is connected to the LEFT FRONT output jack on the Acoustimass® module. 3 23 1 1 2 Figure 4 Suggested choices for center speaker placement Center cube speaker Sound from the center speaker should seem to come from within the picture. Ask for the best sound balance ...(position 1). Additional rubber feet are placing the center speaker on surfaces such as marble or glass. English Setting Up Figure 3 Suggested choices for left as you are available, free, by calling the Bose® customer service numbers inside the back cover of this manual...
... the top of the TV is connected to the LEFT FRONT output jack on the Acoustimass® module. 3 23 1 1 2 Figure 4 Suggested choices for center speaker placement Center cube speaker Sound from the center speaker should seem to come from within the picture. Ask for the best sound balance ...(position 1). Additional rubber feet are placing the center speaker on surfaces such as marble or glass. English Setting Up Figure 3 Suggested choices for left as you are available, free, by calling the Bose® customer service numbers inside the back cover of this manual...
Owner's guide
Page 10
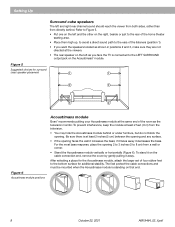
... m) from the television. • You may hide the Acoustimass module behind . After selecting a place for the Acoustimass module, attach the larger set of the listeners (position 1). • If you want the speakers located as shown in positions 2 and 3, make sure they...opening 2 to 3 inches (5 to the bottom surface for surround (rear) speaker placement 1 1 2 2 3 3 Figure 6 Acoustimass module positions Acoustimass module Bose® recommends putting your Acoustimass module at the viewers. • The rear speaker on the left and the other on the left as the television monitor....
... m) from the television. • You may hide the Acoustimass module behind . After selecting a place for the Acoustimass module, attach the larger set of the listeners (position 1). • If you want the speakers located as shown in positions 2 and 3, make sure they...opening 2 to 3 inches (5 to the bottom surface for surround (rear) speaker placement 1 1 2 2 3 3 Figure 6 Acoustimass module positions Acoustimass module Bose® recommends putting your Acoustimass module at the viewers. • The rear speaker on the left and the other on the left as the television monitor....
Owner's guide
Page 11
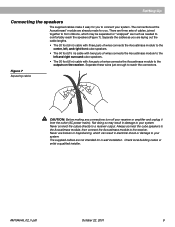
...foot (6 m) cable with three pairs of wires connects the Acoustimass module to the center, left, and right front cube speakers. • The 50 foot (15 m) cable with two pairs of wires connects the Acoustimass module to the left and right surround cube speakers. • The 20 foot (6 m) cable with five... you are three sets of wires connects the Acoustimass module to your system. Not doing so may be separated or "unzipped" as much as you . Check local building codes or enlist a qualified installer. English Setting Up Connecting the speakers The supplied cables make it from the outlet ...
...foot (6 m) cable with three pairs of wires connects the Acoustimass module to the center, left, and right front cube speakers. • The 50 foot (15 m) cable with two pairs of wires connects the Acoustimass module to the left and right surround cube speakers. • The 20 foot (6 m) cable with five... you are three sets of wires connects the Acoustimass module to your system. Not doing so may be separated or "unzipped" as much as you . Check local building codes or enlist a qualified installer. English Setting Up Connecting the speakers The supplied cables make it from the outlet ...

Owner's guide
Page 12
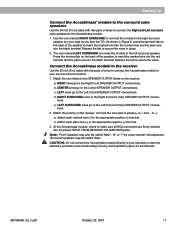
... the supplied cables, call Bose® customer service. English Setting Up Figure 8 Making cube speaker connections Note: If you want to use any cube array in any position. 1. See page 15 for descriptions of each speaker. The customer service numbers can use other speaker cable or need to secure...wire to the left front position (to red terminal 10 October 22, 2001 AM19464_02_V.pdf Connect the Acoustimass® module to the center and front cube speakers Use the 20 foot (6 m) cable with three pairs of wires to connect the Acoustimass module to the right of the TV as you ...
... the supplied cables, call Bose® customer service. English Setting Up Figure 8 Making cube speaker connections Note: If you want to use any cube array in any position. 1. See page 15 for descriptions of each speaker. The customer service numbers can use other speaker cable or need to secure...wire to the left front position (to red terminal 10 October 22, 2001 AM19464_02_V.pdf Connect the Acoustimass® module to the center and front cube speakers Use the 20 foot (6 m) cable with three pairs of wires to connect the Acoustimass module to the right of the TV as you ...
Owner's guide
Page 13
... two pairs of wires to connect the Right and Left surround cube speakers to the Acoustimass module. 1. RIGHT SURROUND wires to secure the wires. Note: "Front" speakers may be called "Rear". "Surround" speakers may also be called "Main", "A", or "1" by some receiver .... 2. a. The wire marked LEFT SURROUND connects the module to the Right Front SPEAKER OUTPUT connections. to the Center SPEAKER OUTPUT connections. d. CAUTION: Do not connect the Acoustimass module directly to your television unless the television provides surround decoding circuitry and amplified outputs...
... two pairs of wires to connect the Right and Left surround cube speakers to the Acoustimass module. 1. RIGHT SURROUND wires to secure the wires. Note: "Front" speakers may be called "Rear". "Surround" speakers may also be called "Main", "A", or "1" by some receiver .... 2. a. The wire marked LEFT SURROUND connects the module to the Right Front SPEAKER OUTPUT connections. to the Center SPEAKER OUTPUT connections. d. CAUTION: Do not connect the Acoustimass module directly to your television unless the television provides surround decoding circuitry and amplified outputs...
Owner's guide
Page 14
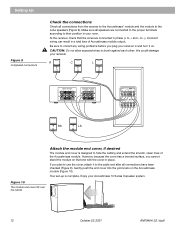
At the receiver, check that end with the cover in and turn it to the cable end after all speakers are connected in a total loss of the Acoustimass module. If you plan to use the cover, attach it on. Enjoy your receiver. CAUTION: Do not allow exposed wires to +... 9). Your set-up is designed to correct any wiring problems before you cannot stand the module on the Acoustimass module (Figure 10). this could damage your Acoustimass 10 Series II speaker system. 12 October 22, 2001 AM19464_02_V.pdf Gently push the end cover into the grommets on that the wires are ...
At the receiver, check that end with the cover in and turn it to the cable end after all speakers are connected in a total loss of the Acoustimass module. If you plan to use the cover, attach it on. Enjoy your receiver. CAUTION: Do not allow exposed wires to +... 9). Your set-up is designed to correct any wiring problems before you cannot stand the module on the Acoustimass module (Figure 10). this could damage your Acoustimass 10 Series II speaker system. 12 October 22, 2001 AM19464_02_V.pdf Gently push the end cover into the grommets on that the wires are ...
Owner's guide
Page 15
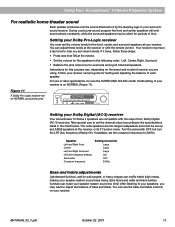
...and adjusting the balance of your Dolby Digital (AC-3) receiver Your Acoustimass 10 Series II speakers are compatible with the remote control. Turn the subwoofer OFF, but turn the LFE (low frequency effects) ON. Speaker Left and Right Front Center Left and Right Surround LFE (low frequency... Crossover frequency Setting at the remote. • Set the volume for the speakers in the chart below. English Using Your Acoustimass® 10 Series II Speaker System For realistic home theater sound Each speaker produces only the sound directed to it does, follow these levels at your ...
...and adjusting the balance of your Dolby Digital (AC-3) receiver Your Acoustimass 10 Series II speakers are compatible with the remote control. Turn the subwoofer OFF, but turn the LFE (low frequency effects) ON. Speaker Left and Right Front Center Left and Right Surround LFE (low frequency... Crossover frequency Setting at the remote. • Set the volume for the speakers in the chart below. English Using Your Acoustimass® 10 Series II Speaker System For realistic home theater sound Each speaker produces only the sound directed to it does, follow these levels at your ...
Owner's guide
Page 16
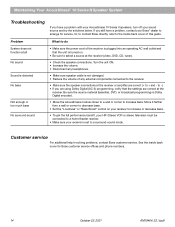
... amplifier are correct at the receiver (video, DVD, CD, tuner). • Check the speaker connections. If you still have a problem with your Acoustimass 10 Series II speakers, turn off your Bose® dealer to select a source at the receiver. English Maintaining Your Acoustimass® 10 Series II Speaker System Troubleshooting If you have a problem, contact your sound source and try the solutions...
... amplifier are correct at the receiver (video, DVD, CD, tuner). • Check the speaker connections. If you still have a problem with your Acoustimass 10 Series II speakers, turn off your Bose® dealer to select a source at the receiver. English Maintaining Your Acoustimass® 10 Series II Speaker System Troubleshooting If you have a problem, contact your sound source and try the solutions...
Owner's guide
Page 17
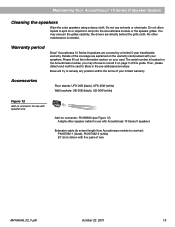
...) Figure 12 Add-on connector for use solvents or chemicals. English Maintaining Your Acoustimass® 10 Series II Speaker System Cleaning the speakers Wipe the cube speakers using a damp cloth. Bose will try to Bose in the pre-addressed envelope. the drivers are covered by a limited 5-year ...page 3 of wire AM194646_02_V.pdf October 22, 2001 15 Warranty period Bose® Acoustimass 10 Series II speakers are directly behind the grille cloth. you may vacuum the grilles carefully; No other speaker cable for use with your limited warranty. The serial number is needed...
...) Figure 12 Add-on connector for use solvents or chemicals. English Maintaining Your Acoustimass® 10 Series II Speaker System Cleaning the speakers Wipe the cube speakers using a damp cloth. Bose will try to Bose in the pre-addressed envelope. the drivers are covered by a limited 5-year ...page 3 of wire AM194646_02_V.pdf October 22, 2001 15 Warranty period Bose® Acoustimass 10 Series II speakers are directly behind the grille cloth. you may vacuum the grilles carefully; No other speaker cable for use with your limited warranty. The serial number is needed...
Owner's guide
Page 18
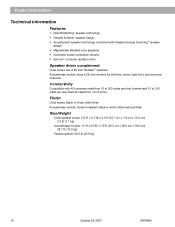
... 8 ohms Finish Cube arrays: Black or Arctic white finish Acoustimass module: Scratch-resistant black or Arctic white textured finish Size/Weight Cube speaker arrays: 6.2"H x 3.1"W x 4.0"D (15.7 cm x 7.8 cm x 10.2 cm) 2.4 lb (1.1 kg) Acoustimass module: 14"H x 23"W x 7.5"D (35.5 cm x 58.5 cm x 19.0 cm) 28.7 lb (13.0 kg) Packed system: 50.5 lb (22.9 kg) 16 October 22...
... 8 ohms Finish Cube arrays: Black or Arctic white finish Acoustimass module: Scratch-resistant black or Arctic white textured finish Size/Weight Cube speaker arrays: 6.2"H x 3.1"W x 4.0"D (15.7 cm x 7.8 cm x 10.2 cm) 2.4 lb (1.1 kg) Acoustimass module: 14"H x 23"W x 7.5"D (35.5 cm x 58.5 cm x 19.0 cm) 28.7 lb (13.0 kg) Packed system: 50.5 lb (22.9 kg) 16 October 22...


